Lessons Learned
Have any questions? Reach out to Nick, programmernick@pm.me and I can see what I can do to help you get setup!
Team 95 has had an Nvidia Jetson TX1 for several years now. At first I think we wanted to use it as a vision coprocessor but in the end we just used a RPi. So it was laying around collecting dust! Towards the end of the 2022 season I spoke with Team 88 about their implementation of LiDAR on their robot. Come to find out they had their robot entirely running on ROS (Robot Operating System) using LiDAR units and a Jetson.
Well this (2023) pre-season and hopefully into 2023 season I wanted to get some sort of LiDAR and SLAM (Simultaneous Localization and Mapping) up and running on the robot. It brings several benefits, the biggest one being able to get a better guess on where you are on the field.
This is what I have learned thus far using the Jetson TX1 as we haven't been able to get our hands on a new unit yet. There were several time in which I bricked the TX1 and needed to redo the following steps. If at all possible try and get a newer unit (Nano, TX2, etc...)
To start out, you will need:
- External Monitor
- USB Hub
- Keyboard
- Mouse
- Micro USB to USB A
- LiDAR Unit (RPLidar is great, you can get a cheap A1 unit to test with. It also comes with ROS Packages to make like easier)
It also saves a LOT of headache if you have a separate linux machine to use. Not required, I didn't and I will show you how I got around some of the issues!
Below I will detail the process without a VM.
- Setup an Ubuntu 18.04 VM
- Install Nvidia Jetpack (You will need an Nvidia Developer Account): https://docs.nvidia.com/jetson/jetpack/install-jetpack/index.html
- Put your Jetson into recovery mode (Power on, Hold down REC, Press RST, Keep holding down REC for two seconds)
- Connect your Jetson to the VM. This was the headache part!
I was using HyperV and HyperV has no built in support for USB passthrough. So instead I opted to use USB over IP. To do this I used usbipd-win as my server and then the built in usbip for my VM. Once you have the usbipd-win server up and running and you have bound the Jetson. You can jump over to your VM and use usbip.
First install all the required dependencies, then run modprobe vhci-hcd and sudo usbip attach -r <REMOTE> -b <BUSID> make sure to run the attach command as sudo or you might have issues!
Now we have the Jetson connected to the VM over IP.
- Run Nvidia Jetpack, sign in
- Make sure the Jetson is detected and follow on screen prompts.
One thing to note! Because we are running in a VM when Jetpack starts to flash the Jetson firmware (it will tell you) you have to do the following!
- Open up a terminal
- Have this in your clipboard:
sudo usbip attach -r <REMOTE> -b <BUSID> - When you hear the disconnect/reconnect sound from your windows OS paste and run
sudo usbip attach -r <REMOTE> -b <BUSID> - Spam the above until it stops disconnecting.
The above is a really bootleg solution to the problem but this was the only way I was able to get it to work! If you are not using a VM then you don't have to worry about the above steps
The TX1 has very limited space and to do anything you will need to get an SD card setup. You can follow this video on how to do that: https://www.youtube.com/watch?v=kVwG-Blz0zQ
This is where the Jetson TX1 starts to lose. Jetpack install only supports up to Ubuntu 18.04 right now. There are ways to upgrade but it can be a pain and make the system unstable. Because we are limited to Ubuntu 18.04 we can only use ROS Melodic. In any real application on a robot we would want to use newer versions of ROS.
You can follow the steps here: http://wiki.ros.org/melodic/Installation
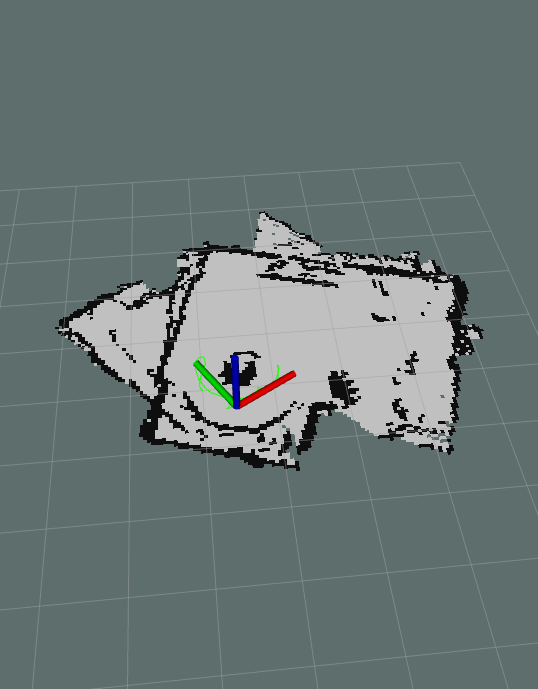
Now that everything is setup, we can get started with a simple LiDAR mapping ROS package to test everything out! This video: https://www.youtube.com/watch?v=Qrtz0a7HaQ4 is simple to follow, short, and easy to understand.
Following the above you can get a really cool project that outputs a map of the area around the LiDAR:
You can also use ROS on WSL2 as well! A few things to follow:
- Make sure to install Ubuntu 20.04 not Ubuntu 22
- Use the same USBIPD and USBIP to send the LiDAR unit to WSL