Runt Rover
- Overview
- Components
-
Wiring
3.1. Motor Drivers
3.2. Arduino
3.3. Power - Future Development
- Setup Instructions
The Runt Rover is the name for the club's mini-rover that is used by the Software Team to test out new features. It has six wheels and can be driven with a joystick. Code to run the Runt Rover lives inside the ROS-Rover Repository

The Runt Rover will use the following components:

| Image Num. | Name | Use | Information |
|---|---|---|---|
| 1 | Raspberry Pi 3 Model B | Run Rover Scheduler | |
| 2 | Arduino Nano | Control Motor Drivers | |
| 3 | 6 x Motor Driver | Control wheel motors | (BD65496MUV Single Brushed DC Motor Driver Carrier) |
| 4 | Voltage Regulator | Reduce Dewalt battery voltage | (20W Adjustable DC-DC Buck Converter with Digital Display) DFR0379 |
| 5 | 12V Dewalt Drill Battery | Power wheel motors | |
| - | USB Power Bank | Power Arduino | |
| - | Webcam | Test video streaming | |
| - | Mini-rover arm | Test Schedulers |
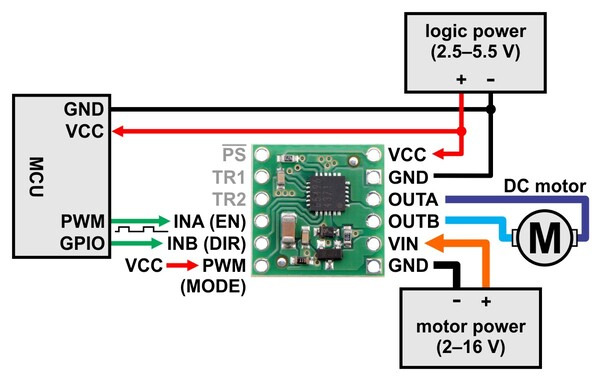
Information on wiring the motor drivers is found on the BD65496MUV motor driver page. The motor drivers use the PWM (MODE) pin to select one of the two possible control interface modes (IN/IN or EN/IN).
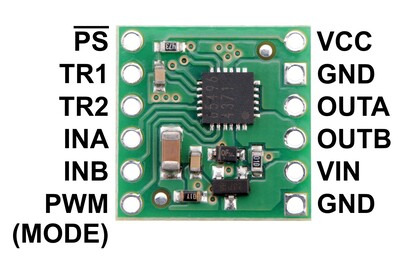
For our setup, we drive the PWM (MODE) pin high to select EN/IN mode. This allows the us to control the motor driver with a single PWM signal for speed and a single digital signal for direction.
| Wheel | Direction Pin | PWM Pin |
|---|---|---|
| Left rear | 2 | 3 |
| Left middle | 4 | 5 |
| Left front | 7 | 6 |
| Right rear | 8 | 9 |
| Right middle | 12 | 10 |
| Right front | 13 | 11 |
The Dewalt battery will power the motors for each wheel. The USB Power bank will power the Arduino Nano.
Currently, the Runt Rover receives its commands over USB from a laptop. The next steps in development are:
- Put Raspberry Pi on the rover and set up the Pi to receive commands over WiFi from a laptop
- Integrate the JXD S192 Controller to interface with the rover
- Attach the camera onto the onboard Rasberry Pi to have access to camera feed
- Attach on an imu
The Runt Rover's components are taped down to the body, except the Dewalt battery which has its own 3D-printed case. The Mechanical Team is working on designing and printing cases for each component that will attach to the body.

Currently, the instructions to run the runt rover is inside the ROS-runt-rover repository