Installation
- Get the latest version of the code.
In a command-line window, cd to the directory where you want to download the source code, and run git clone:
git clone https://github.com/ManskeLab/3DSlicer_Erosion_Analysis.gitTo update this 3D Slicer extension, cd to the directory named “3DSlicer_Erosion_Analysis” that contains all the source code you downloaded, and run git pull:
git pull-
Install 3D Slicer.
-
Open 3D Slicer and go to Edit > Application Settings > Modules.
-
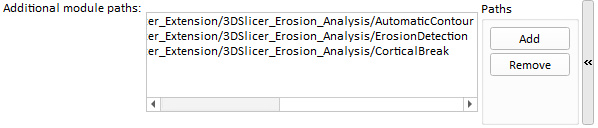
Expand the box "Additional module paths:" by clicking the arrow on the right side. This shows the “Add” and “Remove” buttons.
-
Click “Add” and navigate to the directory where you downloaded the erosion analysis source code. Add the file path of each module separately (i.e. the folders named "AutomaticContour","ErosionDetection" and "CorticalBreak").
-
After adding all the file paths, click OK. Slicer wants to be restarted.
-
After restarting Slicer, the toolkits should be listed in the “Bone” category under the "Modules:" list. An alternative way to access the toolkits is to click the magnifying glass beside the “Modules:” list and search for “Automatic Contour”, “Erosion Detection” or "Cortical Break".
