Flask Web Development 02
p.27
初始化
所有 flask 的應用, 必須有 application instance, server 會傳遞所有來自 client 的請求給該物件進行處理, 這個協定為 WSGI
from flask import Flask
app = Flask(__name__)
__name__ 被用於識別是否為應用的根路徑 root path
routing
當請求送至 server 處理時, application instance 需要判斷該 url request 應該交由哪個 function 來處理, 這樣的關聯稱為 routing
在 flask 中, 定義 route 最簡潔的方式是使用 app.route decorator, decorator 會註冊 function 作為 route
decorator 在 python 中常見的使用模式為, 將 function 註冊為 event handler
@app.route('/')
def index():
    return '<h1>Hello World!</h1>'
上例中, index() 為 root URL 的 handler, 通常會對應該應用程式所佈署 server 的 domain name, 以上例為例, 當請求來自 http://www.example.com 時, application 會將請求交由 index() 處理, client-server 間互動的方式為 request-response.
view function
index() 稱作 view function, 可回傳 HTML 內容或進行更複雜的運算
另外, 觀察一些服務的 URL 時, 會發現 URL 中會夾帶 variable, 如 http://www.facebook.com/<your-name>, flask 也提供了特殊的語法來支援這種動態路由, 如下:
@app.route('/user/<name>')
def user(name):
    return '<h1>Hello, %s!</h1>' % name
預設這類動態變數 為 string 格式, 但 flask 也提供其他 type 的支援, 如 int, float, 和 path
/user/<int:id>
上例中, id 的型態為 int
Server startup
在應用程式的實例中, run() 會運行一個開發用的 server, 以 loop 的方式 listen to the request
if __name__ == '__main__':
    app.run(debug=True)
run() 可傳遞不同的參數運行不同的 mode
完整的應用
$ git checkout 2a- hello.py
from flask import Flask
app = Flask(__name__)


@app.route('/')
def index():
    return '<h1>Hello World!</h1>'


if __name__ == '__main__':
    app.run(debug=True)
運行應用
$ python hello.py
 * Running on http://127.0.0.1:5000/ (Press CTRL+C to quit)
 * Restarting with stat
 * Debugger is active!
 * Debugger pin code: 117-818-855
動態參數的應用
$ git checkout 2bfrom flask import Flask
app = Flask(__name__)
@app.route('/')
def index():
return '<h1>Hello World!</h1>'
@app.route('/user/<name>')
def user(name):
return '<h1>Hello, %s!</h1>' % name
if __name__ == '__main__':
app.run(debug=True)$ python hello.py
* Running on http://127.0.0.1:5000/ (Press CTRL+C to quit)
* Restarting with stat
* Debugger is active!
* Debugger pin code: 117-818-855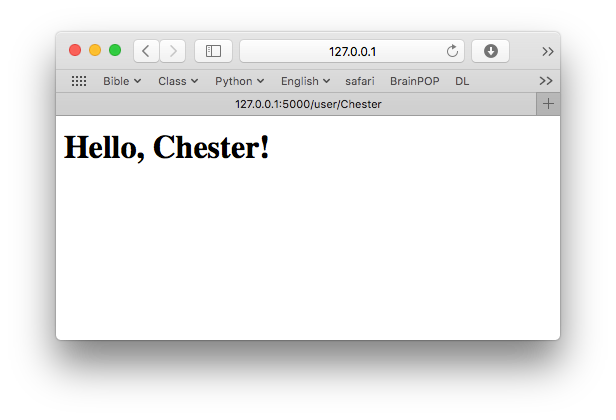
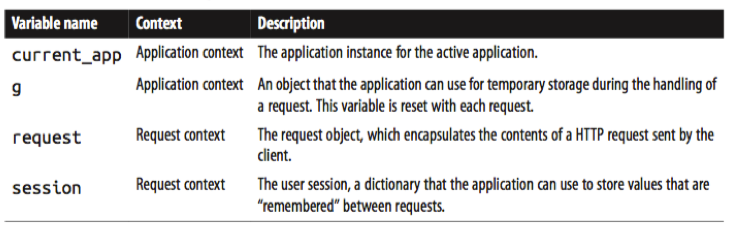
當 server 收到來自 client 的請求時, 有時要能夠傳遞一些 objects, 讓 view function 能夠處理, 舉例來說, 像是 request object, 需要封裝 HTTP protocol, 為了傳遞 object, handler 需要更多的參數, 為了避免參數混亂, flask 提供 contexts 的方式, 讓 object 能夠暫時全域化而被存取.
from flask import request

@app.route('/')
def index():
    user_agent = request.headers.get('User-Agent')
    return '<p>Your browser is %s</p>' % user_agent
Application and Request Contexts
在 flask 中有兩種 context:
- the application context
- the request context
$ python
Python 2.7.11 (default, Dec  5 2015, 14:44:53)
[GCC 4.2.1 Compatible Apple LLVM 7.0.0 (clang-700.1.76)] on darwin
Type "help", "copyright", "credits" or "license" for more information.
>>> from hello import app
>>> from flask import current_app
>>> current_app.name
Traceback (most recent call last):
  File "<stdin>", line 1, in <module>
  File "/Users/user/.virtualenvs/flask_web/lib/python2.7/site-packages/werkzeug/local.py", line 343, in __getattr__
    return getattr(self._get_current_object(), name)
  File "/Users/user/.virtualenvs/flask_web/lib/python2.7/site-packages/werkzeug/local.py", line 302, in _get_current_object
    return self.__local()
  File "/Users/user/.virtualenvs/flask_web/lib/python2.7/site-packages/flask/globals.py", line 34, in _find_app
    raise RuntimeError('working outside of application context')
RuntimeError: working outside of application context
>>> app_ctx = app.app_context()
>>> app_ctx.push()
>>> current_app.name
'hello'
>>> app_ctx.pop()
>>> type(app_ctx)
<class 'flask.ctx.AppContext'>
>>>
application context 在 push() 後可用, 在 pop() 後就失效, 同理 request context 也是如此
Request Dispatching
在 flask 中, 會維護一個 application’s URL map 來對應 url 與 view function, 一種方式是使用 app.route decorators, 另一種 nondecorator 的方式為 app.add_url_rule()
下例中, 可以看到在 hello application 中, app 所維護的 url map
$ python
Python 2.7.11 (default, Dec  5 2015, 14:44:53)
[GCC 4.2.1 Compatible Apple LLVM 7.0.0 (clang-700.1.76)] on darwin
Type "help", "copyright", "credits" or "license" for more information.
>>> from hello import app
>>> app.url_map
Map([<Rule '/' (HEAD, OPTIONS, GET) -> index>,
 <Rule '/static/<filename>' (HEAD, OPTIONS, GET) -> static>,
 <Rule '/user/<name>' (HEAD, OPTIONS, GET) -> user>])
>>>
Request Hooks
Request hooks 是以 decorator 實作, flask 支持四種不同 hook:
-
before_first_request: Register a function to run before the first request is handled. -
before_request: Register a function to run before each request. -
after_request: Register a function to run after each request, if no unhandled exceptions occurred. -
teardown_request: Register a function to run after each request, even if unhandled exceptions occurred.
在 request hook functions 和 view functions 間的資料分享, 可使用 g context global
Responses
在 view function 處理請間之後, response 期待回覆 value 或 string, 此外, HTTP protocol 需要回應額外的 stats code 來辨識回應的結果.
在 flask 中, return response text, numeric code, a dictionary of header 可以這樣的形式返回值
@app.route('/')
def index():
    return '<h1>Bad Request</h1>', 400
除了以 tuple 的方式回傳值, flask 提供 response object 來封裝回傳值
from flask import make_response
@app.route('/')
def index():
    response = make_response('<h1>This document carries a cookie!</h1>')
    response.set_cookie('answer', '42')
    return response
redirect, 一種常見的情況, 當 request 的 url 被重新導向到新的 url, 可以使用 three-value return, 也可使用 Response object, 但因為是很常見的功能, flask 提供 redirect 的方式來處理這種請求
from flask import redirect

@app.route('/')
def index():
    return redirect('http://www.example.com')
另一種特殊的 response 是 abort function, 用來處理 error handling
from flask import abort

@app.route('/user/<id>')
def get_user(id):
    user = load_user(id)
    if not user:
        abort(404)
    return '<h1>Hello, %s</h1>' % user.name
flask 提供參數設定來設置 server, 但必須通過 app.run() 來進行配置, 為了能使用像 command line 的方式來進行配置, 以下安裝 flask-script 套件來擴充該功能
$ pip install flask-script$ git checkout 2c使用 flask.ext 強化 hello.py
from flask import Flask
from flask.ext.script import Manager

app = Flask(__name__)

manager = Manager(app)


@app.route('/')
def index():
    return '<h1>Hello World!</h1>'


@app.route('/user/<name>')
def user(name):
    return '<h1>Hello, %s!</h1>' % name


if __name__ == '__main__':
    manager.run()
執行 hello.py 後, 可以看到多增加了功能選項
$ python hello.py
usage: hello.py [-?] {shell,runserver} ...

positional arguments:
  {shell,runserver}
    shell            Runs a Python shell inside Flask application context.
    runserver        Runs the Flask development server i.e. app.run()

optional arguments:
  -?, --help         show this help message and exit
現在 python hello.py runserver 啟動 server 擁有更多種選項
$ python hello.py runserver --help
usage: hello.py runserver [-?] [-h HOST] [-p PORT] [--threaded]
                          [--processes PROCESSES] [--passthrough-errors] [-d]
                          [-D] [-r] [-R]

Runs the Flask development server i.e. app.run()

optional arguments:
  -?, --help            show this help message and exit
  -h HOST, --host HOST
  -p PORT, --port PORT
  --threaded
  --processes PROCESSES
  --passthrough-errors
  -d, --debug           enable the Werkzeug debugger (DO NOT use in production
                        code)
  -D, --no-debug        disable the Werkzeug debugger
  -r, --reload          monitor Python files for changes (not 100{'const':
                        True, 'help': 'monitor Python files for changes (not
                        100% safe for production use)', 'option_strings':
                        ['-r', '--reload'], 'dest': 'use_reloader',
                        'required': False, 'nargs': 0, 'choices': None,
                        'default': None, 'prog': 'hello.py runserver',
                        'container': <argparse._ArgumentGroup object at
                        0x102f2be10>, 'type': None, 'metavar': None}afe for
                        production use)
  -R, --no-reload       do not monitor Python files for changes
例如可以運行下列指令, --host 可以指定 listen 的 network interface, 由於設定為 0.0.0.0, http://0.0.0.0:5000/, 故外部連線可透過 server 的外部 ip 連進 server, 而非只運行於 localhost
$ python hello.py runserver --host 0.0.0.0