AngularJS
AngularJS application: « Protractor is an end-to-end test framework for Angular and AngularJS applications.
« Since a large AngularJS application has many components it's best to structure it in a directory hierarchy.
organizing our codebase in a way that makes it easy (both for us and other developers on our team) to navigate through the code and quickly locate the pieces that are relevant to a specific feature or section of the application.
.
├── app
│   ├── app.js « This file should contain route definitions, configuration and/or manual bootstrap (if required).
│   ├── controllers
│   │   ├── home
│   │   │   ├── FirstCtrl.js
│   │   │   └── SecondCtrl.js
│   │   └── about
│   │       └── ThirdCtrl.js
│   ├── directives
│   │   ├── home
│   │   |   └── confirmPassword.js
│   │   |   └── passwordStrength.js
│   │   └── about
│   │   │   └── directive1.js
│   │   │   └── user-profile.directive.js
│   ├── filters
│   │   ├── pagination.js
│   │   └── wordCount.js
│   ├── services
│   |   ├── CommonService.js
│   |   └── accountDetailsService.js
│   └── views
│       ├── user-profile.html
│       └── login.html
└─── lib
Bootstrap AngularJS application:
- Integrating the AngularJS using
<script src="angular.js"></script>element while HTML loading.
- Choose:
angular-[version].jsfor a human-readable file, suitable for development and debugging. - Choose:
angular-[version].min.jsfor a compressed and obfuscated file, suitable for use in production.
- Place ng-app to the root of your application, typically on the tag if you want AngularJS to auto-bootstrap your application.
Note: Wrap Angular components in an Immediately Invoked Function Expression (IIFE).
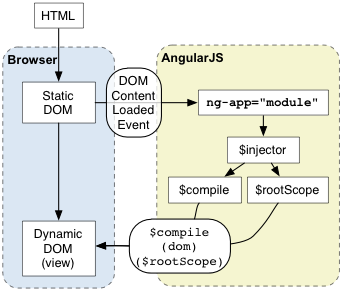
AngularJS initializes automatically upon
- DOMContentLoaded event or
- when the angular.js script is evaluated if at that time
document.readyStateis set to 'complete'.
At this point AngularJS looks for the ngApp directive which designates your application root. If the ngApp directive is found then AngularJS will:
- load the module associated with the directive.
- create the application injector
- compile the DOM treating the ngApp directive as the root of the compilation. This allows you to tell it to treat only a portion of the DOM as an AngularJS application.
As a best practice, consider adding an ng-strict-di directive on the same element as ng-app:
<!doctype html>
<html ng-app="loginModule" ng-strict-di>
  <body>
    I can add: {{ 1+2 }}.
    <div ng-controller="MyController">
       Hello {{greetMe}}!
    </div>
    <script src="angular.js"></script>
  </body>
</html>
/* You can make the dependency of the "user directives like ['ngRoute', 'confirmPassword.js']" to the page Model. */
(function (angular) {
var loginRouteProvider = angular.module('loginModule', ['ngRoute']); // Module Loading & Dependencies
loginRouteProvider.constant('USERCONSTANTS', (function() {
return {
FIRSTNAME: 'Yashwanth',
LASTNAME: 'M'
}
})());
loginRouteProvider.config( function($routeProvider) {
$routeProvider
.when('/login', {
templateUrl : '/login.html', //to load the template from the specified URL, asynchronously.
controller : 'loginController'
})
.when('/forgotPassword', {
templateUrl : '/forgotPassword.html',
controller : 'forgotPasswordController'
})
.otherwise({ redirectTo: '/login' });
});
loginRouteProvider.controller('MyController', ['$scope', function ($scope) {
$scope.greetMe = 'World';
}])
})(window.angular);Creation versus Retrieval
Beware that using angular.module('myModule', []) will create the module myModule and overwrite any existing module named myModule.
Use angular.module('myModule') to retrieve an existing module.
var myModule = angular.module('myModule', []);

// add some directives and services
myModule.service('myService', ...);
myModule.directive('myDirective', ...);

// overwrites both myService and myDirective by creating a new module
var myModule = angular.module('myModule', []);

// we are accessing an already created module
var myModule = angular.module('myModule');

// throws an error because myOtherModule has yet to be defined
var myModule = angular.module('myOtherModule');
we can pass|inject the required parameters in 2 ways var loginModule = angular.module('loginModule');
- loginModule.controller('loginController', ['$scope','$window', loginControllerFun]);
- Predefined Object « loginController.$inject - ['$scope', '$window'];
Directives « One of the most common use cases for directives is to create reusable components.
At a high level, directives are markers on a DOM element (such as an attribute, element name, comment or CSS class) that tell AngularJS's HTML compiler ($compile) to attach a specified behavior to that DOM element (e.g. via event listeners|handler), or even to transform the DOM element and its children.
Compiler « Compiler is an AngularJS service which traverses the DOM looking for attributes. The compilation process happens in two phases.
- Compile: traverse the DOM and collect all of the directives. The result is a linking function. How directives are compiled and its life-cycle.
-
Link: Directives often have a link function. A link function allows the directive to register listeners to the specific cloned DOM element instance as well as to copy content into the DOM from the scope.
function link(scope, iElement, iAttrs, controller, transcludeFn) { ... }

// combine the directives with a scope and produce a live view
link: function($scope, $element, $attrs, ngModelCtrl) {

    $element.on('blur change keydown', function( evt ) {
        $scope.$evalAsync(function($scope) {
            // Any user interactions with the view are reflected in the scope model
            // update the $scope.elementModel with the element's value
            var pwd = $scope.elementModel = $element.val();

            // Any changes in the scope model are reflected in the view
            ngModelCtrl.$setValidity('myController', pwd.length > 8);
        });
    });
}
The solution is to break the compilation process into two phases:
the compile phase where all of the directives are identified and sorted by priority, and a linking phase where any work which "links" a specific instance of the scope and the specific instance of an is performed.
Note: Link means setting up listeners on the DOM and setting up $watch on the Scope to keep the two in sync.
Register a new directive with the compiler.
directive(directiveName, directiveFactoryFunction);AngularJS normalizes an element's tag and attribute name to determine which elements match which directives. We typically refer to directives by their case-sensitive camelCase normalized name (e.g. ngModel). However, since HTML is case-insensitive, we refer to directives in the DOM by lower-case forms, typically using dash-delimited attributes on DOM elements (e.g. ng-model).
NOTE: The most commonly used directive for manipulating the DOM is ngRepeatDirective The
ngRepeatdirective instantiates a template once per item from a collection. Each template instance gets its own scope, where the given loop variable is set to the current collection item, and$indexis set to the item index or key. ng-repeat clone DOM elements once for each item in a collection. Having a compile and link phase improves performance since the cloned template only needs to be compiled once, and then linked once for each clone instance.
A Custom Directive: Create custom directives to separate the logic into a reusable directive. which can be used over different model's by adding the functionality to that model.
- First of all register a directive, you use the module.directive API. module.directive takes the normalized directive name followed by a factory function. This factory function should return an object with the different options to tell $compile how the directive should behave when matched. The factory function is invoked only once when the compiler matches the directive for the first time. You can perform any initialization work here. The function is invoked using $injector.invoke which makes it injectable just like a controller.
angular.module('docsSimpleDirective', [])
.controller('Controller', ['$scope', function($scope) {
  $scope.customer = {
    name: 'Naomi',
    address: '1600 Amphitheatre'
  };
}])
.directive('myCustomer', function() {
  return {
    restrict: 'A',
    require: 'ngModel',
    scope: {
        data: "=myCustomer"
    },
    template: 'Name: {{customer.name}} Address: {{customer.address}}'
    // templateUrl: 'my-customer.html'
  };
});
NOTE: These =attr attributes in the scope option of directives are normalized just like directive names. To bind to the attribute in <div bind-to-this="thing">, you'd specify a binding of =bindToThis.
<div ng-controller="Controller">
  <div data-my-customer="BindValue" ></div>
</div>
The restrict option: String of subset of EACM which restricts the directive to a specific directive declaration style. If omitted, the defaults (elements and attributes) are used.
- E - Element name (default):
<my-directive></my-directive> - A - Attribute (default):
<div my-directive="exp"></div> - C - Class:
<div class="my-directive: exp;"></div> - M - Comment:
<!-- directive: my-directive exp -->
These restrictions can all be combined as needed:
- 'AEC' - matches either attribute or element or class name
Best Practice: Prefer using directives via tag name and attributes over comment and class names. Doing so generally makes it easier to determine what directives a given element matches.
Examples: Create a Directive that Manipulates the DOM by updating the current time, scope: { 'close': '&onClose' } use &attr in the scope option when you want your directive to expose an API for binding to behaviors. dragHTMLElementEventListener directive that reacts to events on its elements.
« Digging more into angular controller as Syntax
// we declare as usual, just using the `this` Object instead of `$scope`
app.controller('MainCtrl', function () {
  this.title = 'Some title';
  // $scope.title = 'Some title';
});
<!-- Nested scopes -->
<div ng-controller="MainCtrl as main">
{{ main.title }}
<div ng-controller="AnotherCtrl as another">
{{ another.title }}
<div ng-controller="YetAnotherCtrl as yet">
{{ yet.title }}
Parent title [AnotherCtrl]: {{ $parent.title }}
Parent title [AnotherCtrl]: {{ another.title }}
Parent parent title: {{ $parent.$parent.title }}
</div>
</div>
</div>