DataSpec Examples
Learn how to use DataSpec by following our step-by-step examples.
Example 1: Simple Door Codes (click to expand instructions)
Let's walk through a basic example: creating a rule to ensure consistent door numbers. In Revit, this often means targeting the 'Mark' parameter for all elements of the 'Door' category. Our theoretical company states that all door codes must either begin with 'ID' for internal doors, or 'ED' for external doors. This is followed by a full-stop, and then 3 numbers, for instance 'ID.001' or 'ED.101'.
- To create a rule, first launch the Rule Manager and click on the New Rule button. This will launch the Rule Editor window.

- Create a descriptive name for your rule, by entering a value in the textbox (1).
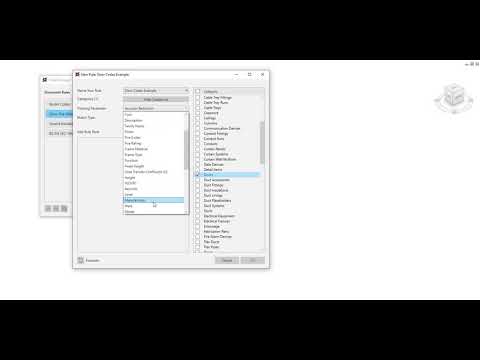
- You need to select which category (or categories) of elements this rule should be applied to. In our case, door codes only need to apply to doors. Click the Show Categories button (2)
- The categories panel should now be expanded. Select the 'Doors' category (3)
- You can now specify which parameter needs to be validated by this rule. For this example, select the 'Mark' parameter from the tracking parameter dropdown (4)
- In our case, we're only accepting values which are a perfect match for our door numbering standard, so set Match Type to 'Exact Match' (5)
- We now need to start defining what format the data needs to take. The first part of our door code needs to be either 'ID' or 'ED'. We can define an Option Set containing these two values, by selecting Option Set from the rule-part dropdown (6) and adding it to the rule with the + button (7).
- The Option Set has now been added to our rule, but it needs some values. Click the Edit button inside the rule part body (8).
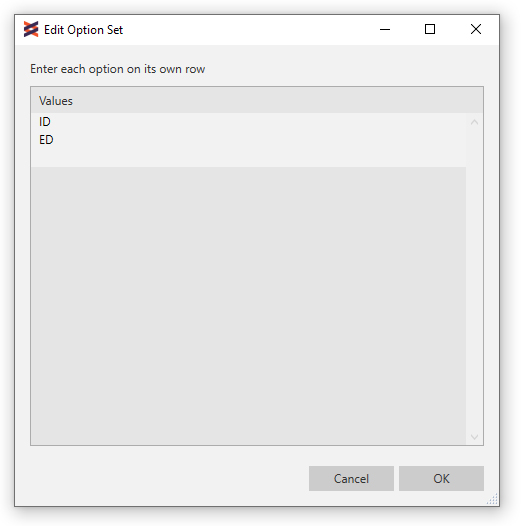
- This launches the Option Set Editor. Add new options by typing values in new rows of the editor. In this instance, type 'ID' on a single line, and 'ED' on another line. You can now close the Option Set Editor, and the rule-part will have updated to show your newly-added options. We can also set whether a rule part is case-sensitive, or might appear optionally inside the rule part body.
- The next part of our code requires a full stop character. This is pre-built into DataSpec, so simply select Full Stop from the rule part dropdown (6) and press the + button.
- The final part of our code will be any 3 digits. We'll need add in the 'Any Number' rule part 3 times to complete the rule specification.
- Finally, to check whether your rule is specified correctly, click the 'Refresh Example' button (9) a few times to generate values that are compliant with the rule you've built.
- If you need to reorder rule parts, you can select them and use the arrow buttons (10). If you want to delete a rule part, simply click the X button in the rule part body.
- Once you're done, click OK to close the Rule Editor. This rule is now saved as part of your Revit model.
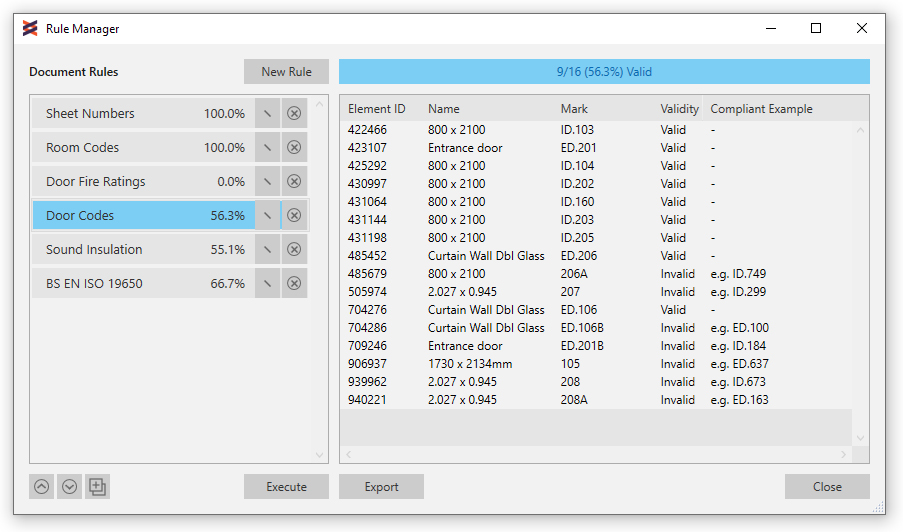
That's it! The rule now meets our company standards. We can execute the rule from the Rule Manager to validate all our doors numbers. To execute the rule, simply select it and click the Execute button. The Rule Manager will expand to create a new report.

Finally, to export this validation report for use in other software, click the Export button. This will create a .csv file with the report's contents.
Or click the image to watch on Youtube:
Example 2: Sound Insulation (click to expand instructions)
According to UK construction codes (Approved Document E), certain dividing elements are required to demonstrate a minimum acoustic insulation value. This is commonly expressed as Weighted Sound Reduction using the format 'Rw 99 dB', where the numeric value signifies weighted decibel reduction. In this example, we will describe a rule to ensure our data meets this format.
- To create a rule, first launch the Rule Manager and click on the New Rule button. This will launch the Rule Editor window.

- Create a descriptive name for your rule, by entering a value in the textbox (1). Ours is called 'Sound Insulation'.
- You need to select which category (or categories) of elements this rule should be applied to. In our case, we've created a special Project Parameter called 'Acoustic Reduction' and applied it to Doors, Walls and Windows. Therefore, we'll want to select these categories. Click the Show Categories button (2)
- The categories panel should now be expanded. Select the 'Doors', 'Walls' and 'Windows' categories (3)
- You can now specify which parameter needs to be validated by this rule. In this case, we've already created the 'Acoustic Reduction' parameter, so we can select this from the tracking parameter dropdown (4)
- In this instance, we're only accepting values which are a perfect match for our rule, so we can set Match Type to 'Exact Match' (5)
- We now need to start defining what format the data needs to take. The first part of our acoustic reduction code is always 'Rw'. We can define specific custom values using the Custom Text rule part by selecting Custom Text from the rule-part dropdown (6) and adding it to the rule with the + button (7).
- The Custom Text rule part has now been added to our rule, but it needs a value. Click the Edit button inside the rule part body (8) and type 'Rw ' (note the space, which is something we want in this instance).
- The next part of our code requires two consecutive digits. We can add in the 'Any Number' rule part 2 times to describe this.
- The last part of our rule is always 'dB' to signify decibels. Again, we can add a Custom Text rule part with its value set to ' dB' (again, note the space).
- Finally, to check whether this rule is specified correctly, click the 'Refresh Example' button (9) a few times to generate values that are compliant with the rule you've built.
- If you need to reorder rule parts, you can select them and use the arrow buttons (10). If you want to delete a rule part, simply click the X button in the rule part body.
- Once you're done, click OK to close the Rule Editor. This rule is now saved as part of your Revit model.
The rule is now specified! We can execute the rule from the Rule Manager to validate all our doors, walls and windows against this format. To execute the rule, simply select it and click the Execute button. The Rule Manager will expand to create a new report.
Finally, to export this validation report for use in other software, click the Export button. This will create a .csv file with the report's contents.
Example 3: BS EN 19650 Sheet Numbering (click to expand instructions)
ISO 19650 is a recognised international standard for information management, with BS EN ISO 19650 being its national interpretation used within the UK. Among its many features, it contains guidance on a commonly-used drawing numbering standard, which we will try and recreate in this example. This guidance assumes you are now familiar with DataSpec, so will exclude some of the more obvious UI prompts.
- We'll create a new rule from the Rule Manager and name it something descriptive, such as 'BS EN ISO 19650'.
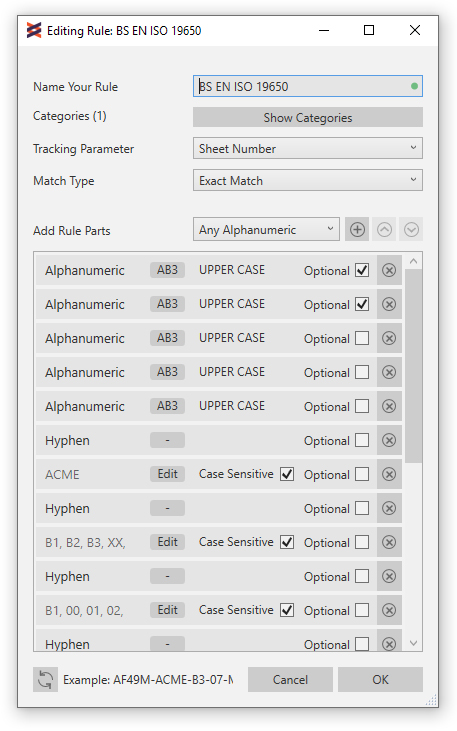
- This rule applies to all elements of the 'Sheets' category in Revit, and tracks their Sheet Number parameter.
- The first part of the standard always relates to the 'Project Number'. To be as flexible as possible, we will accept between 3 and 5 alphanumeric characters here. Add the Any Alphanumeric rule part in 5 times, and set 2 of these to be 'Optional'. We still want to ensure any letters are upper case only, so we can leave the case-sensitivity to its default value of 'UPPER CASE'.
- Each separate part of the standard is hyphen separated, so be sure to add in the ready-made 'Hyphen' rule part between others.
- Next comes the 'Originator' which is a short code for the company producing this information. Our hypothetical company is called 'ACME', so add a Custom Text rule part with its value set to 'ACME'.
- Following this, comes the 'Volume' value, previously known as 'Zone'. This is always two alphanumeric characters. In our case, this can take multiple values for the multiple volumes in our scheme, such as Building 1 (B1), Building 2 (B2) etc. 'XX' and 'ZZ' are also specified to mean 'No Volume' or 'All Volumes' respectively. We can create an Option Set and add all of these possible values.
- The next part of the code concerns codes for the 'Level' the information is assigned to. We've added in another Option Set with some values used in our scheme: 'B1', '00', '01' up to 'RF'.
- For the 'Type' value, the standard sets out several hard-coded values, such as 'DR' for drawing'. We've just copied these into another Option Set, since any of these values could technically be considered valid.
- The standard now comes to 'Role', which is another set of hard-coded values. In our case, our company is only acting as Architect on the job, so the 'A' value is required here. We can add in a Custom Text rule part and hard-code this to 'A'.
- The last mandatory part of this code is normally a consecutive 5-digit number. This is achieved by adding the 'Any Number' rule part 5 times.
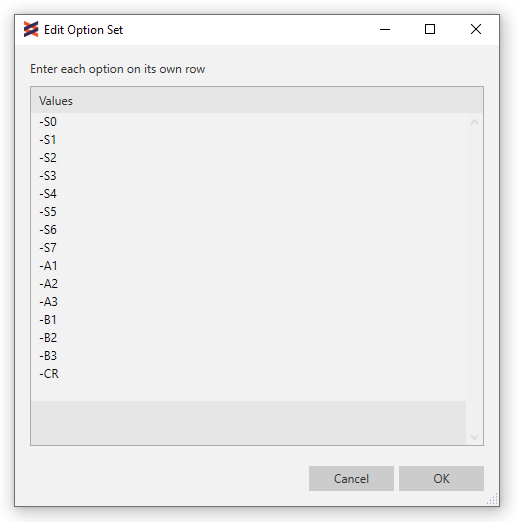
- Finally, the code specified an optional 'Suitability Code', which is a set of hard-coded values which may or may not appear as part of the sheet number. We've used an Option Set here, with the 'Optional' checkbox checked, meaning the sheet number is valid regardless of whether these values appear or not. Note that since the standard is hyphen-separated, we've prefixed each option in this option set with a hyphen. This looks like:
The code specification is now complete and our sheet numbers may now be tested against BS EN ISO 19650.
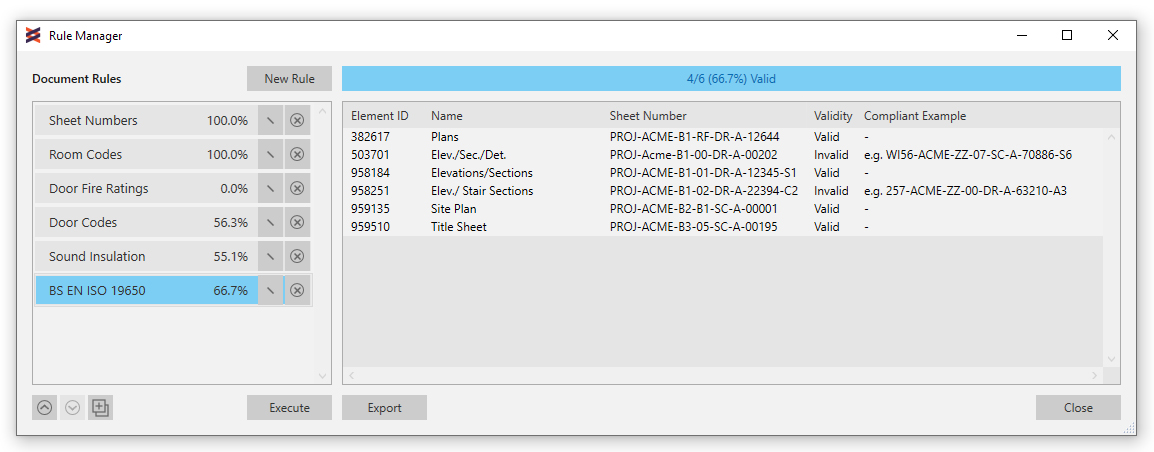
Finally, to export this validation report for use in other software, click the Export button. This will create a .csv file with the report's contents.