


- Auth Alpaca
- Before to start to run the applications
- 1. Start up the database and environment variables:
- 2. Start up the auth-alpaca (Backend):
- 3. Start up the auth-alpaca-ui (Frontend):
- Are you curious about the Development Process?
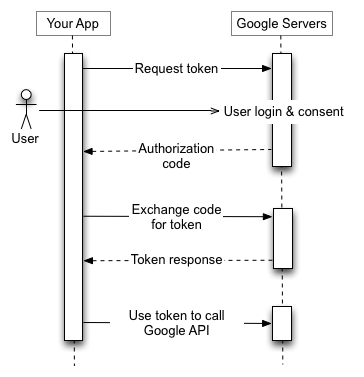
- Are you curious about OAuth2 Process?
Spring Boot Application that focuses on implementing multiple authentication methods using OAuhth2 and JWT.
The repository contains a Springboot application for users to login and register using email and password or using OAuth2 (Google). The backend app is meant to be run together with the frontend Angular application.
- Backend:
- Java 21
- Spring Boot 3.4
- PostgreSQL
- JJWT 0.12.6
- Frontend:
- Angular 18
- JWT-Decode
Details
- First, The user visits our Frontend application and logs in with "Google" and is redirected to our Backend application where he is then redirected to the Google consent page with our OAuth2 API information for Google
- Second, If he accepts the consent, he is redirected to our Backend application with the authorization code, where it is resolved, where he will first be redirected to our Backend application, but at the end to our Frontend application.
- Third, The received authorization code is processed and resolved in our Backend application, then the received authorization code is exchanged for a Token.
- Fourth, The Token response is received by our Backend application and converted to a Token response with our JWT configuration, then he is redirected to our Frontend application with the new Token.
- Fifth, The user can access our Backend application to use any of our services.

- Note: Use a terminal with bash to run the scripts.
- Run the following script to create the security variables:
bash backend/generate_keys.sh-
Create your credentials for using oauth2 in the google cloud console or follow the steps detailed here.
-
Run Postgresql docker container with the following command (replace {PASSWORD} with your own password):
docker run --name auth-alpaca-app-postgres -e POSTGRES_USER=postgres -e POSTGRES_PASSWORD={PASSWORD} -e POSTGRES_DB=auth-alpaca -d -p 127.0.0.1:5432:5432 postgres-
Don't change the port configuration when running in a local environment. The syntax of the mapping is for extra security, so that the database is not accessible from outside the container.
-
If you change the password to the postgresql database, make sure to update the password in the application.properties file of the auth-alpaca-api project.
-
If you need to connect to the postgresql database container, run the following command:
docker exec -it auth-alpaca-app-postgres bash- Connect to postgresql database, once inside the container:
psql -U postgres- Note: Currently, dotenv-java is used to load environment variables. Please note that this library should not be used in a production environment.
- Make sure to create a .env file in the root of the project, and list all the required properties there as key-value pairs (don't forget to exclude this file from version control):
 SPRING_DATASOURCE_USERNAME=postgres
 SPRING_DATASOURCE_PASSWORD=K29r8Dhc79n2gPG86CRhoVt9NBxTa0Gk
 ......
- Run the following command from the root directory of the project or just press the start button in your IDE:
./mvnw spring-boot:run-
Default port for the auth-alpaca-api is 8080. If you want to change the port, set the "server.port" property in the application.properties file. If you change the port, make sure to update the port in the auth-alpaca-ui project as well (constants.ts file, "API_BASE_URL" parameter).
-
As this project uses OAuth2, make sure to update the redirect-uri in the application.properties file and in configurations at OAuth2 providers (Google, GitHub, Twitter, etc.) too.
-
If you checked out from main branch, you will see that application.properties contains references to environment variables.
- Run the following command from the root directory of the project:
npm install- Run the following command from the root directory of the project:
npm run start- Default port for the auth-alpaca-ui is 4200. If you want to change the port, update the port in the angular.json file. On the following path: auth-alpaca-ui -> architect -> serve add this:
"options": {
  "port": [desired-port]
}
- Make sure to update authorized redirect uri usage places in the auth-alpaca-api too.
The Use of OAuth2 has been implemented according to the following repository, if you find this project useful, please visit the following repository and follow the step-by-step creation articles here. You can find the corresponding repository here.
Visit the documentation and explanation of Google OAuth2 here.