This is a guide to building the linux kernel from source and tweaking it and testing it using QEMU with root file system using buildroot.
This is an alternative to the traditional VM method if you have lost all hopes (or are a nerd).
Here I list the commands for Ubuntu based distros. You might want to find their equivalents for your particular distribution.
sudo apt install git
sudo apt install libncurses5-dev libssl-dev ccache flex bison libelf-dev
sudo apt install build-essential fakeroot
sudo apt install qemu qemu-system
I have listed all necessary packages to the best of my knowledge, in case something is missing (or extra) use your own discretion to make amends.
Download the latest kernel from kernel.org into your desired directory and extract it.
As far as I know it is not necessary to move the files to /usr/src however if need be you can always do that using mv command with root privileges.
For the sake of the tutorial, I assume the kernel is in ~/Downloads/linux-5.8.10/ directory.
Unless otherwise specified, execute all the following commands as non-root user. Some commands might fail if you are executing them as root or with root privileges. To verify you are not root you can check whoami which should return the username.
Change the working directory to the path to kernel source
cd ~/Downloads/linux-5.8.10/
Making the config file. We also make the kvm config file just to be safe.
    sudo make defconfig
    sudo make kvm_guest.config
Making the kernel image
sudo make -j$(nproc)
Check to see all the commands have executed perfectly, especially the last one.
Cloning the buildroot project
    cd ~
    git clone git://git.buildroot.net/buildroot
    cd ~/buildroot
Making the config file
make menuconfig
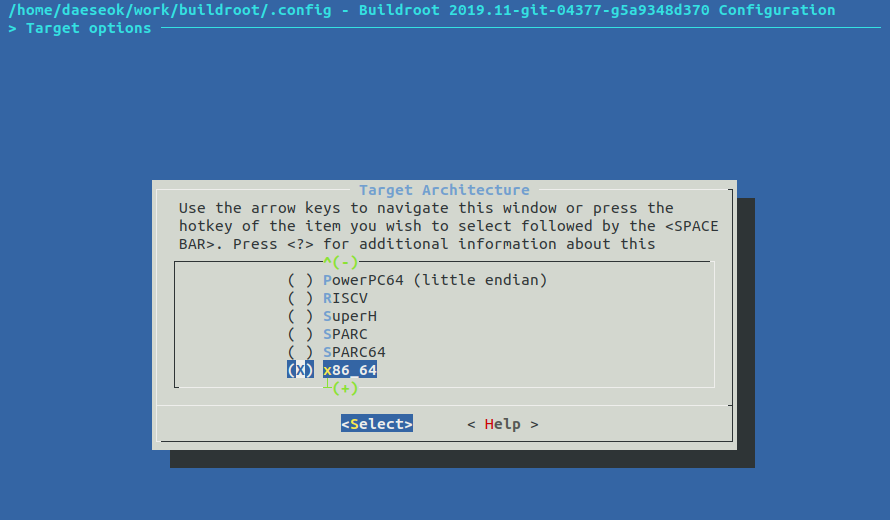
Select “Target Options” to run it on x86_64 virtualized system with qemu.
Target Options -> Target Architecture →
Filesystem images → ext2/3/4 root file system
Choose ext4 file system to be mounted as default file system for the system.

After selecting the required above-mentioned settings, Save and Exit from the dialog. You should return to your terminal screen with a message confirming that the config has been saved
Build ‘buildroot’ project with ‘make' and take a nap as the building process is said to take a long time.(How much, idk because I took a nap myself). Just wait for 15 mins to check that no error occurred though. Also remember to keep your laptop charging as this might take a long time and you don't want to terminate compilation early on. Internet connectivity during compilation is also necessary.
make
Do not use the -j flag here as the documentation says it hasn't been implemented yet!
Hopefully the compilation ends successfully.
The rootfs.ext4 has been created, so you can use the generated image could be used as root file system in qemu. Check the output file in ~/buildroot/output/images/ directory. This image file will be used in qemu execution.
Hopefully if your kernel compiled perfectly and the rootfs.ext4 was generated, you can proceed to actually test your system.
The kernel image should be in ~/Downloads/linux-5.8.10/arch/x86/boot with file name bzImage
The rootfs.ext4 should be in ~/buildroot/output/images/ with name rootfs.ext4
If not, verify your commands ran correctly, or double check the locations of these files. There is no harm with these files being in different directories but you might need to modify the below command appropriately.
I recommend saving this below command as a bash alias/executable script (Google how.)
qemu-system-x86_64 -kernel ~/Downloads/linux-5.8.10/arch/x86/boot/bzImage -boot c -m 2049M -hda ~/buildroot/output/images/rootfs.ext4 -append "root=/dev/sda rw console=ttyS0,115200 acpi=off nokaslr" -serial stdio -display none
Buildroot has ‘root’ as default login user without password. Just put root after buildroot login: then you will get the shell. Only the very basic commands shall work in this shell.
Since you are currently logged in as root, you might want to create a non-root user. You could change username and home directory test to whatever you want. However I will assume it to be test for the tutorial.
mkdir /home
mkdir /home/test
adduser test -h /home/test
Set password and then,
exit
and log in with the new credentials.
Play around if you want to. Note that there is no package manager since this is a barebones system but hopefully there would not be a need to download anything.
Use Ctrl + C to exit qemu and return to local host terminal.
I recommend you save the following commands as bash scripts. These are used to mount the above made rootfs.ext4 on your local system so you can easily make any changes like creating/deleting files with your favorite text editor.
sudo mount -t ext4 -o rw,loop ~/buildroot/output/images/rootfs.ext4 /mnt
If you are unable to mount on /mnt you can make a new directory anywhere and substitute it.
Change directory to the home directory of the user we created.
cd /mnt/home/test
Make a test C file helloworld.c
sudo touch helloworld.c
sudo nano helloworld.c
...and write the test code as you please.
Where is the compiler you ask? Is it not simply gcc?
Well yes, but actually no. Since we are compiling for the target system, we need to use a cross compiler. It should be in ~/buildroot/output/host/bin/
You can run this to check if gcc works
~/buildroot/output/host/bin/x86_64-buildroot-linux-uclibc-gcc --version
Use this to compile your above made C file.
sudo ~/buildroot/output/host/bin/x86_64-buildroot-linux-uclibc-gcc helloworld.c
You would see a a.out file in /mnt/home/test
Now you can again start the kernel using qemu command we used above (which you hopefully aliased) and login with the test user. But first unmount the mounted rootfs from /mnt using
sudo umount /mnt
And then run the above mentioned qemu command.
You can run the a.out file in the home directory
Similarly whenever you make changes to the kernel and recompile it on your host system, you can write and compile driver codes to test that the changes you made work
My BTC Address is ... nah kidding.
https://medium.com/@daeseok.youn/prepare-the-environment-for-developing-linux-kernel-with-qemu-c55e37ba8ade Consider this to be the better guide than mine. Please let me know if I made any silly mistake in this guide. Some parts of this guide have directly been pasted here since there was no better explanation, so special thanks to the author.
Nachiket Agrawal, 2018A7PS0235G
Please let me know if I made a mistake somewhere.