Configuration
The first time you run indistarter you are presented to this screen:
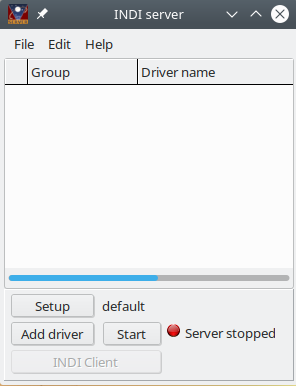
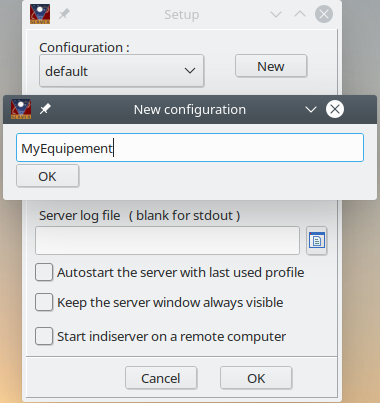
Click the Setup button or the Edit/Setup menu to make a new profile for your equipment.
All the options and the driver list are associate to the profile. So it is recommended you make as many profile as necessary to handle all your different configuration without having to fiddle with the setup every time you change a piece of equipment.
You can fill other options for the indiserver:
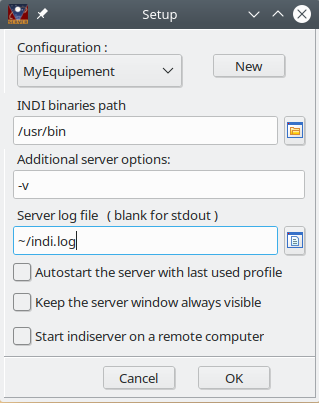
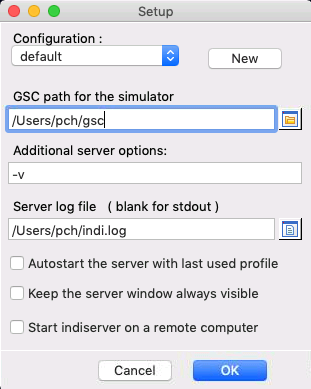
- If the INDI software is not in your default PATH you can indicate here where to find indiserver and the drivers.
- For the additional command line options never use -f as it is used internally by indistarter, and do not include any driver.
- You can indicate a file that will log the indiserver messages. If empty the message are to stdout. Beware this file can be very big if you use the verbose option with a camera!
- Select if you want to start the server with this profile when indistarter is started. This is useful to setup everything automatically on a headless system.
- Select if you want to keep indistarter window on top of any other. This help to check if the driver are running in case of instabilities.
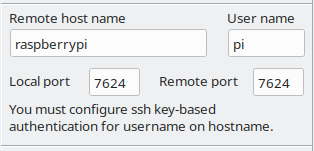
- You can start indiserver on another computer than the one running indistarter. In this case a ssh tunnel is established on port 7624 so you can use this tunnel to connect the applications to the driver.
The MacOS version include it's own INDI server and drivers so there is no need to set the software PATH. Instead you can set the path for the GSC data used by the camera simulator. Download the data from https://sourceforge.net/projects/indistarter/files/GSC/ , extract in you Document folder and set the path here.
Then click the Add driver button to select the drivers you need.
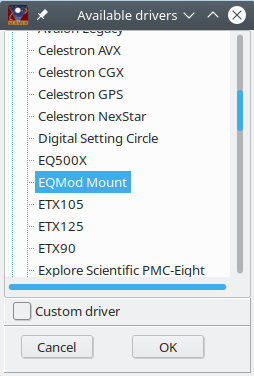
The list include all the drivers installed on the local system running indistarter.
Select one at a time and click OK.
Click Custom driver if you need to include a driver not present in the list.
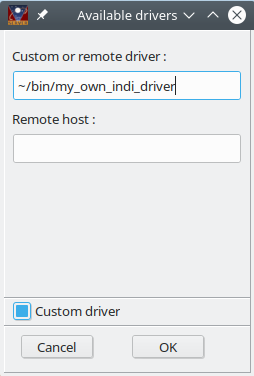
- Enter the driver binary path
- If you enter a remote host name here this create a link to another indiserver on the remote host that run this driver. This not start the driver on the remote host, it must already be running. More informations
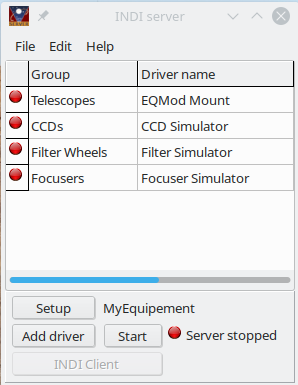
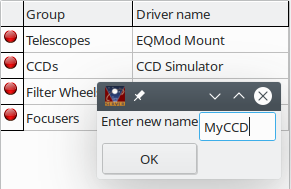
A right click menu give you the option to rename a driver. This is useful to distinguish two same equipment connected to the same computer, or to use a different configuration. Note that after renaming it start with the default driver configuration.
The same right click menu also let you remove a driver from the profile.
When done you are ready to start the server.
The configuration is saved automatically when you quit the program.
The files are saved in ~/.config/indistarter/
Some drivers change their name after connection to the device to include model, serial number or other informations. The program automatically change the driver name in the list after the first connection.
If you have more than one camera that use the same driver, you must process as follow the first time you create the configuration to allow the name to be changed for the right device:
- connect only one camera to the computer
- add the driver in indistarter
- click Start in indistarter to get the modified name
- click Stop
- connect the second camera to the computer
- add the second driver instance
- click Start
Once every camera name include it's model/serial number and this is saved in the configuration you can start normally with all the camera connected.