In this tutorial we will setup three containers:
- api-service
- data-collector
- frontend-simple
The following container architecture is what we will implement:

- Have Docker installed
- Cloned this repository to your local machine with a terminal up and running
- Check that your Docker is running with the following command
docker run hello-world
Install Docker Desktop
- To make sure we can run multiple container go to Docker>Preferences>Resources and in "Memory" make sure you have selected > 4GB
Follow the instructions for your operating system.
If you already have a preferred text editor, skip this step.
- Run
docker container ls - Stop any container that is running
- Run
docker system prune - Run
docker image ls
-
Create a root project folder
mushroom-app -
Organize containers into sub folders, create the following folders inside the project folder:
api-servicedata-collectorfrontend-simple
-
Create a folder called
persistent-folderinside the root project folder -
Create a folder called
secretsinside the root project folder -
Add a
.gitignorefile at the root project folder.
.gitignore
/persistent-folder
/secrets
We will create a simple frontend app that uses basic HTML & Javascript.
- Open a terminal and go to the location where
mushroom-app/frontend-simple
Start with a base docker container with and add the following:
- Use a base image slim version fo Debian with node installed
- Ensure we have an up to date baseline, install dependencies
- Install
http-server - Create a user so we don't run the app as root, add a user called
app - Create a directory
app, where we will place all our code - Set the owner of the directory as the newly created user
- Expose port
8080from the container to the outside for the web server - Switch the user to
appand set the the working directory toapp - Set the entrypoint of the container to
bash
Dockerfile
FROM node:14.9.0-buster-slim

# Update baseline and ensure we don't run the app as root.
RUN set -ex; \
    apt-get update && \
    apt-get upgrade -y && \
    apt-get install -y --no-install-recommends openssl && \
    npm install -g http-server && \
    useradd -ms /bin/bash app -d /home/app -G sudo -u 2000 -p "$(openssl passwd -1 Passw0rd)" && \
    mkdir -p /app && \
    chown app:app /app

EXPOSE 8080

# Switch to the new user
USER app
WORKDIR /app

ENTRYPOINT ["/bin/bash"]
Based on your OS, create a startup script to make building & running the container easy
docker-shell.sh
#!/bin/bash

# exit immediately if a command exits with a non-zero status
set -e

# Define some environment variables
# Automatic export to the environment of subsequently executed commands
# source: the command 'help export' run in Terminal
export IMAGE_NAME="mushroom-app-frontend-simple"
export BASE_DIR=$(pwd)

# Build the image based on the Dockerfile
docker build -t $IMAGE_NAME -f Dockerfile .

# Run the container
# --mount: Attach a filesystem mount to the container
# -p: Publish a container's port(s) to the host (host_port: container_port) (source: https://dockerlabs.collabnix.com/intermediate/networking/ExposingContainerPort.html)
docker run --rm --name $IMAGE_NAME -ti \
--mount type=bind,source="$BASE_DIR",target=/app \
-p 8080:8080 $IMAGE_NAME
docker-shell.bat
REM Define some environment variables
SET IMAGE_NAME=frontend-app
SET BASE_DIR=%cd%

REM Build the image based on the Dockerfile
docker build -t %IMAGE_NAME% -f Dockerfile .

REM Run the container
REM --mount: Attach a filesystem mount to the container
REM -p: Publish a container's port(s) to the host (host_port: container_port) (source: https://dockerlabs.collabnix.com/intermediate/networking/ExposingContainerPort.html)
docker run  --rm --name %IMAGE_NAME% -ti --mount type=bind,source="%cd%",target=/app -p 8080:8080 %IMAGE_NAME%
index.html
<!DOCTYPE html>
<html>
    <head>
        <title>🍄 Mushroom Identifier</title>
    </head>
    <body>
        🍄 Welcome to the mushroom identification App!
    </body>
</html>
- Run
sh docker-shell.shordocker-shell.batfor windows
- To run development web server run
http-serverfrom the docker shell - Test the web app by going to
http://localhost:8080/
We will create a basic backend container to run our REST API. The FastAPI framework will be used for this.
- Open a terminal and go to the location where
mushroom-app/api-service
Start with a base docker container with and add the following:
- Use a base image slim version fo Debian with python 3.8 installed
- Ensure we have an up to date baseline, install dependencies
- Upgrade
pip& Installpipenv - Create a user so we don't run the app as root, add a user called
app - Create a directory
app, where we will place all our code - Set the owner of the directory as the newly created user
- Expose port
9000from the container to the outside for the api server - Switch the user to
appand set the the working directory toapp - Install python packages using the
Pipfile&Pipfile.lock - Execute
pipenv syncto ensure we have the updated python environment - Set the entrypoint of the docker container to
bashand call the scriptdocker-entrypoint.sh
Dockerfile
# Use the official Debian-hosted Python image
FROM python:3.8-slim-buster

ARG DEBIAN_PACKAGES="build-essential git"

# Prevent apt from showing prompts
ENV DEBIAN_FRONTEND=noninteractive

# Python wants UTF-8 locale
ENV LANG=C.UTF-8

# Tell pipenv where the shell is. This allows us to use "pipenv shell" as a
# container entry point.
ENV PYENV_SHELL=/bin/bash

# Tell Python to disable buffering so we don't lose any logs.
ENV PYTHONUNBUFFERED=1

# Ensure we have an up to date baseline, install dependencies and
# create a user so we don't run the app as root
RUN set -ex; \
    for i in $(seq 1 8); do mkdir -p "/usr/share/man/man${i}"; done && \
    apt-get update && \
    apt-get upgrade -y && \
    apt-get install -y --no-install-recommends $DEBIAN_PACKAGES && \
    apt-get clean && \
    rm -rf /var/lib/apt/lists/* && \
    pip install --no-cache-dir --upgrade pip && \
    pip install pipenv && \
    useradd -ms /bin/bash app -d /home/app -u 1000 -p "$(openssl passwd -1 Passw0rd)" && \
    mkdir -p /app && \
    chown app:app /app

# Expose port
EXPOSE 9000

# Switch to the new user
USER app
WORKDIR /app

# Install python packages
ADD --chown=app:app Pipfile Pipfile.lock /app/

RUN pipenv sync

# Add the rest of the source code. This is done last so we don't invalidate all
# layers when we change a line of code.
ADD --chown=app:app . /app

# Entry point
ENTRYPOINT ["/bin/bash","./docker-entrypoint.sh"]
Based on your OS, create a startup script to make building & running the container easy
docker-shell.sh
#!/bin/bash

# exit immediately if a command exits with a non-zero status
set -e

# Define some environment variables
# Automatic export to the environment of subsequently executed commands
# source: the command 'help export' run in Terminal
export IMAGE_NAME="mushroom-app-api-service"
export BASE_DIR=$(pwd)
export PERSISTENT_DIR=$(pwd)/../persistent-folder/
export SECRETS_DIR=$(pwd)/../secrets/

# Build the image based on the Dockerfile
docker build -t $IMAGE_NAME -f Dockerfile .

# Run the container
# --mount: Attach a filesystem mount to the container
# -p: Publish a container's port(s) to the host (host_port: container_port) (source: https://dockerlabs.collabnix.com/intermediate/networking/ExposingContainerPort.html)
docker run --rm --name $IMAGE_NAME -ti \
--mount type=bind,source="$BASE_DIR",target=/app \
--mount type=bind,source="$PERSISTENT_DIR",target=/persistent \
--mount type=bind,source="$SECRETS_DIR",target=/secrets \
-p 9000:9000 \
-e DEV=1 $IMAGE_NAME
docker-shell.bat
REM Define some environment variables
SET IMAGE_NAME="mushroom-app-api-server"

REM Build the image based on the Dockerfile
docker build -t %IMAGE_NAME% -f Dockerfile .

REM Run the container
cd ..
docker run  --rm --name %IMAGE_NAME% -ti ^
            --mount type=bind,source="%cd%\api-service",target=/app ^
            --mount type=bind,source="%cd%\persistent-folder",target=/persistent ^
            --mount type=bind,source="%cd%\secrets",target=/secrets ^
            -p 9000:9000 -e DEV=1 %IMAGE_NAME%
- The entrypoint file is used to abstract out startup related code outside the
Dockerfile - The entrypoint file can have logic on running code in dev vs production model
- Here we will create two functions
uvicorn_serveranduvicorn_server_productionwhich defines how we want to run the API Server, in Dev or production mode
docker-entrypoint.sh
#!/bin/bash

echo "Container is running!!!"

# this will run the api/service.py file with the instantiated app FastAPI
uvicorn_server() {
    uvicorn api.service:app --host 0.0.0.0 --port 9000 --log-level debug --reload --reload-dir api/ "$@"
}

uvicorn_server_production() {
    pipenv run uvicorn api.service:app --host 0.0.0.0 --port 9000 --lifespan on
}

export -f uvicorn_server
export -f uvicorn_server_production

echo -en "\033[92m
The following commands are available:
    uvicorn_server
        Run the Uvicorn Server
\033[0m
"

if [ "${DEV}" = 1 ]; then
  pipenv shell
else
  uvicorn_server_production
fi
- The
service.pywill be used to initialize our FastAPI server and define routes
api/service.py
from fastapi import FastAPI
from starlette.middleware.cors import CORSMiddleware

# Setup FastAPI app
app = FastAPI(
    title="API Server",
    description="API Server",
    version="v1"
)

# Enable CORSMiddleware
app.add_middleware(
    CORSMiddleware,
    allow_credentials=False,
    allow_origins=["*"],
    allow_methods=["*"],
    allow_headers=["*"],
)

# Routes
@app.get("/")
async def get_index():
    return {
        "message": "Welcome to the API Service"
    }
- Since we will start with a similar Python environment as last class
- Copy over Pipfile
- Copy over Pipfile.lock
- Run
sh docker-shell.shordocker-shell.batfor windows
- To run development API service run
uvicorn_serverfrom the docker shell - Test the API service by going to
http://localhost:9000/
We will create a python container that can run scripts from the CLI. This can be used to run scripts to download images from Google
- Open a terminal and go to the location where
mushroom-app/data-collector
- We will start with a similar container as we did previously
- Copy over Dockerfile
- Copy over docker-entrypoint.sh
- Copy over Pipfile
- Copy over Pipfile.lock
- Copy over cli.py
- Copy over downloader.py
Based on your OS, create a startup script to make building & running the container easy
docker-shell.sh
#!/bin/bash

# exit immediately if a command exits with a non-zero status
set -e

# Define some environment variables
# Automatic export to the environment of subsequently executed commands
# source: the command 'help export' run in Terminal
export IMAGE_NAME="mushroom-app-data-collector"
export BASE_DIR=$(pwd)
export PERSISTENT_DIR=$(pwd)/../persistent-folder/
export SECRETS_DIR=$(pwd)/../secrets/

# Build the image based on the Dockerfile
docker build -t $IMAGE_NAME -f Dockerfile .

# Run the container
# --mount: Attach a filesystem mount to the container
docker run --rm --name $IMAGE_NAME -ti \
--mount type=bind,source="$BASE_DIR",target=/app \
--mount type=bind,source="$PERSISTENT_DIR",target=/persistent \
--mount type=bind,source="$SECRETS_DIR",target=/secrets $IMAGE_NAME
docker-shell.bat
REM Define some environment variables
SET IMAGE_NAME="mushroom-app-data-collector"

REM Build the image based on the Dockerfile
docker build -t %IMAGE_NAME% -f Dockerfile .

REM Run the container
cd ..
docker run  --rm --name %IMAGE_NAME% -ti ^
            --mount type=bind,source="%cd%\data-collector",target=/app ^
            --mount type=bind,source="%cd%\persistent-folder",target=/persistent ^
            --mount type=bind,source="%cd%\secrets",target=/secrets %IMAGE_NAME%
- Run
sh docker-shell.shordocker-shell.batfor windows
-
Test the container is up and running, run
python --versionin the docker shell to verify the version is3.7.11 -
To test image download you can run the example command
python -m cli --nums 10 --search "oyster mushrooms" "crimini mushrooms" "amanita mushrooms" --opp "search"
Next step is to enable data-collector and api-service container to have access to GCP. We want these two container to take to GCP as show:

- This step has already been done since we want to connect the "common" model store you all published to in the Mushroom Classification competition. (The credentials file will be provided to you before this exercise)
- THE FOLLOWING STEPS ARE FYI (NOT REQUIRED FOR THIS EXERCISE)
- Here are the step to create an account just for reference:
- To setup a service account you will need to go to GCP Console, search for "Service accounts" from the top search box. or go to: "IAM & Admins" > "Service accounts" from the top-left menu and create a new service account called "bucket-reader". For "Service account permissions" select "Cloud Storage" > "Storage Bucket Reader". Then click done.
- This will create a service account
- On the right "Actions" column click the vertical ... and select "Create key". A prompt for Create private key for "bucket-reader" will appear select "JSON" and click create. This will download a Private key json file to your computer. Copy this json file into the secrets folder.
- To setup GCP Credentials in a container we need to set the environment variable
GOOGLE_APPLICATION_CREDENTIALSinside the container to the path of the secrets file from the previous step - Update
docker-shell.shordocker-shell.batin bothdata-collectorandapi-serviceto add the new environment variable
docker-shell.sh
export GCP_PROJECT="ai5-project"
export GCP_ZONE="us-central1-a"
export GOOGLE_APPLICATION_CREDENTIALS=/secrets/bucket-reader.json

-e GOOGLE_APPLICATION_CREDENTIALS=$GOOGLE_APPLICATION_CREDENTIALS \
-e GCP_PROJECT=$GCP_PROJECT \
-e GCP_ZONE=$GCP_ZONE \
docker-shell.bat
SET GCP_PROJECT="ai5-project"
SET GCP_ZONE="us-central1-a"
SET GOOGLE_APPLICATION_CREDENTIALS=/secrets/bucket-reader.json

-e GOOGLE_APPLICATION_CREDENTIALS="%GOOGLE_APPLICATION_CREDENTIALS%" ^
-e GCP_PROJECT="%GCP_PROJECT%" ^
-e GCP_ZONE="%GCP_ZONE%" ^
- Restart both
data-collectorandapi-serviceso that the new environment variables we added should take effect - Install
google-auth&google-cloud-storagepython packages - Run this in the
data-collectordocker shell
pipenv install google-auth google-cloud-storage
- Run this in
api-servicedocker shell
pipenv install google-auth google-cloud-storage
- In the
data-collectorcreate a python file calledtest_bucket_access.pyand add the following code to it
test_bucket_access.py
import os
from google.cloud import storage


gcp_project = os.environ["GCP_PROJECT"]
bucket_name = "ai5-mushroom-app-models"
persistent_folder = "/persistent"


def download_blob(bucket_name, source_blob_name, destination_file_name):
    """Downloads a blob from the bucket."""

    storage_client = storage.Client(project=gcp_project)

    bucket = storage_client.bucket(bucket_name)
    blob = bucket.blob(source_blob_name)
    blob.download_to_filename(destination_file_name)


print(gcp_project)

# Test access
download_file = "test-bucket-access.txt"
download_blob(bucket_name, download_file,
              os.path.join(persistent_folder, download_file))
- Run the following
python test_bucket_access.py
If you followed all the steps above you should see a file called test-bucket-access.txt inside your persistent-folder. This file was copied from the GCP bucket over to your local folder. This ensures us we have read access to the GCP bucket.
Next step have the api-service monitor the GCP bucket for any new models and pull download the best model. We ill also keep track of a leaderboard.
-
Install
tensorflow -
Run this in
api-servicedocker shell
pipenv install tensorflow
-
Add a python file api/tracker.py
-
Update
service.pyto initiateTrackerServiceand call it on startup -
Add the following new imports
import asyncio
from api.tracker import TrackerService
- Add code to initialize the tracker, this can be right before "Setup FastAPI app"
# Initialize Tracker Service
tracker_service = TrackerService()
- Add startup and shutdown events, add this after "Enable CORSMiddleware"
@app.on_event("startup")
async def startup():
    # Startup tasks
    # Start the tracker service
    asyncio.create_task(tracker_service.track())


@app.on_event("shutdown")
async def shutdown():
    # Shutdown tasks
    ...
- Run
uvicorn_serverand wait for 60 seconds
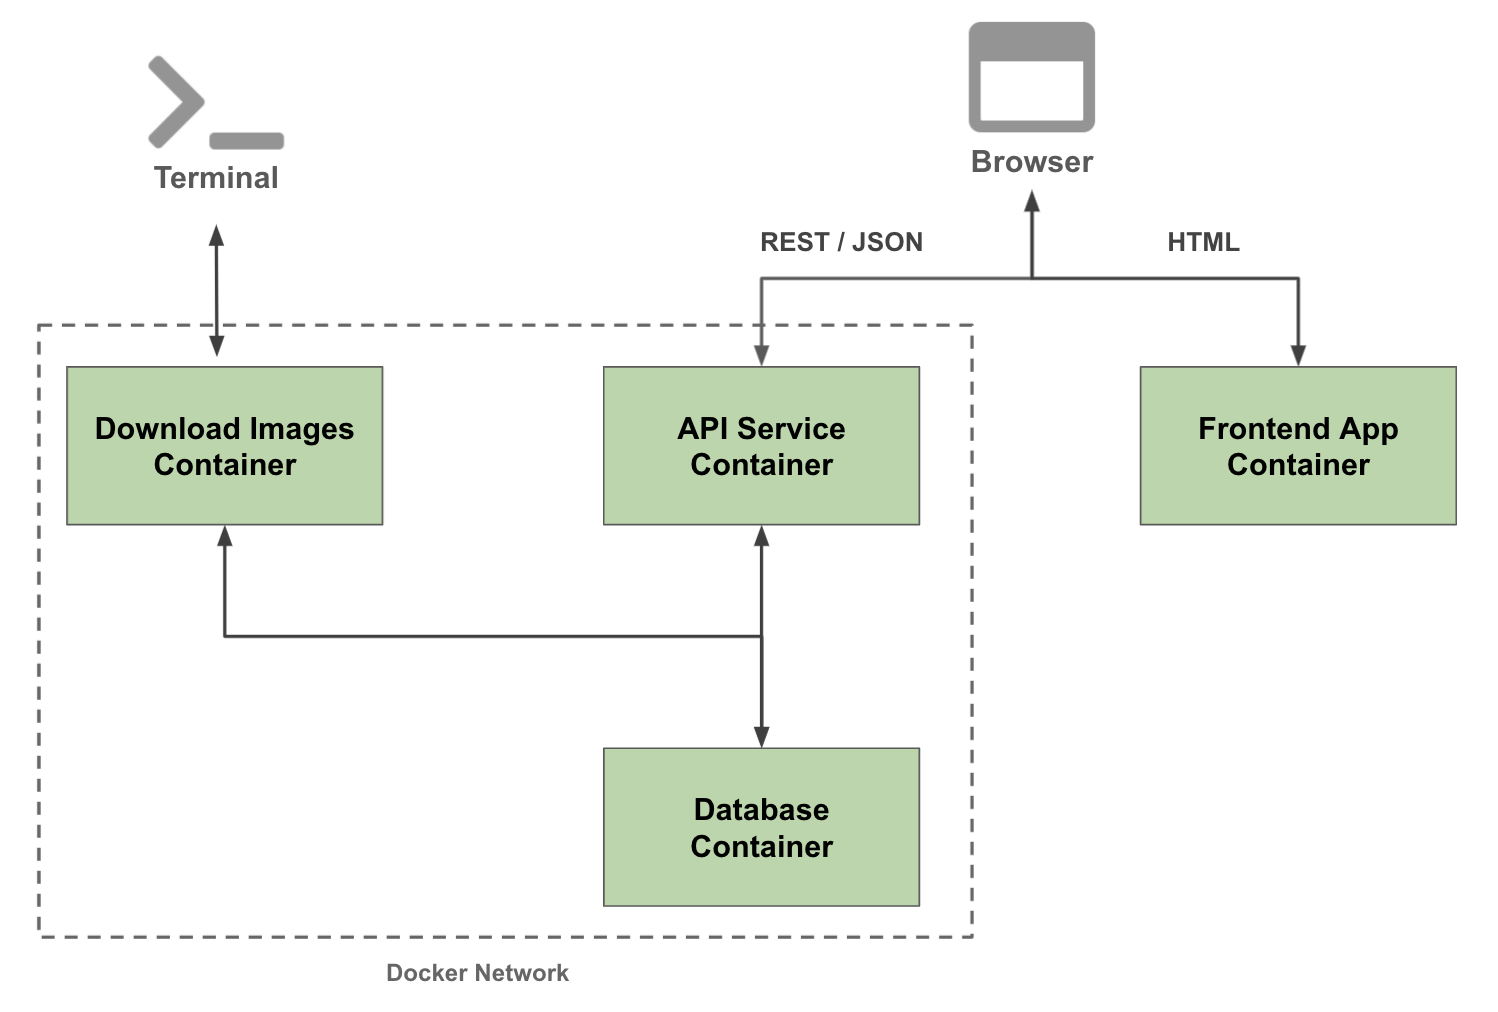
In the this section we will be setting up containers so that they talk to each other. The following architecture shows what we are going to do today:
Here we will setup a database server and a database client. We will use PostgreSQL as our database server and dbmate as our database client and migration tool.
- Create a folder
database-server - For this container we will use a docker compose file
- Create a file
docker-compose.ymlinside the folderdatabase-server - Add the following code
docker-compose.yml
version: "3.8"
services:
    # we have two services here, mushroomappdb-client and mushroomappdb-server
    # this client depends on the server
    mushroomappdb-client:
        # source: https://github.com/amacneil/dbmate#postgresql
        # Dbmate is a database migration tool, to keep your database schema in sync across multiple developers and your production servers
        # keeps track of migrations, and runs it in an order; the power of dbmate is to manage migrations of the script; Shivas uses DataGrip to manage; “dbmate rollback” removes stuff; “dbmate up” creates the table; When we run this “sh ./docker-shell.sh”, I can get the same database setup as Shivas on his end
        image: amacneil/dbmate
        container_name: mushroomappdb-client
        entrypoint: /bin/sh
        depends_on:
            - mushroomappdb-server
        # source: https://docs.docker.com/storage/volumes/
        # Volumes are the preferred mechanism for persisting data generated by and used by Docker containers. While bind mounts are dependent on the directory structure and OS of the host machine, volumes are completely managed by Docker
        volumes:
            - ./db:/db
        environment:
            DATABASE_URL: "postgres://mushroomapp:awesome@mushroomappdb-server:5432/mushroomappdb?sslmode=disable"
    mushroomappdb-server:
        # The database is for the metadata (e.g. when a model predicts, keep track of the prediction results)
        image: postgres
        container_name: mushroomappdb-server
        volumes:
            - ./docker-volumes/postgres:/var/lib/postgresql/data
        ports:
            - 5432:5432
        environment:
            POSTGRES_USER: mushroomapp
            POSTGRES_PASSWORD: awesome
            POSTGRES_DB: mushroomappdb
        command: -p 5432
networks:
    default:
        name: mushroomappnetwork
- Create a file
docker-shell.shordocker-shell.batinside inside the folderdatabase-server
docker-shell.sh
#!/bin/bash

# sources: https://www.gnu.org/savannah-checkouts/gnu/bash/manual/bash.html#index-set; https://unix.stackexchange.com/questions/255581/what-does-set-command-without-arguments-do/255588; the command 'help set' run in Terminal
# `set -e` will exit immediately if a command exits with a non-zero status
set -e

# Create the network if we don't have it yet
# sources: https://dockerlabs.collabnix.com/networking/A1-network-basics.html#docker_network; in terminal, run "docker network inspect"
# The docker network command is the main command for configuring and managing container networks.
# what this is saying here is to inspect the network (Display detailed information on one or more networks) if the network exists; if it does not exist, then create the network
docker network inspect mushroomappnetwork >/dev/null 2>&1 || docker network create mushroomappnetwork

# Run Postgres DB and DBMate
# sources: https://dockerlabs.collabnix.com/intermediate/workshop/; in Terminal, run "docker-compose run"; https://dockerlabs.collabnix.com/intermediate/workshop/DockerCompose/Difference_between_dockerfile_and_docker_compose.html
# Docker compose is a tool built by docker to ease the task of creating and configuring multiple containers in a development environment; the counter-part of docker-compose for production environments is docker-swarm. Docker compose takes as input a YAML configuration file (docker-compose.yml) and creates the resources (containers, networks, volumes etc.) by communicating with the docker daemon through docker api.
# A Dockerfile is a text document that contains all the commands/Instruction a user could call on the command line to assemble an image. On the other hand, Docker Compose is a tool for defining and running multi-container Docker applications. With Compose, you use a YAML file to configure your application’s services. Then, with a single command, you create and start all the services from your configuration. By default, docker-compose expects the name of the Compose file as docker-compose.yml or docker-compose.yaml. If the compose file have different name we can specify it with -f flag.

# "docker-compose run" means to Run a one-off command on a service
# "--rm" means to Remove container after run. Ignored in detached mode.
# "--service-ports" means to Run command with the service's ports enabled and mapped to the host
docker-compose run --rm --service-ports mushroomappdb-client
docker-shell.bat
# Create the network if we don't have it yet
# sources: https://dockerlabs.collabnix.com/networking/A1-network-basics.html#docker_network; in terminal, run "docker network inspect"
# The docker network command is the main command for configuring and managing container networks.
# what this is saying here is to inspect the network (Display detailed information on one or more networks) if the network exists; if it does not exist, then create the network
docker network inspect mushroomappnetwork >NUL || docker network create mushroomappnetwork

# Run Postgres DB and DBMate
# sources: https://dockerlabs.collabnix.com/intermediate/workshop/; in Terminal, run "docker-compose run"; https://dockerlabs.collabnix.com/intermediate/workshop/DockerCompose/Difference_between_dockerfile_and_docker_compose.html
# Docker compose is a tool built by docker to ease the task of creating and configuring multiple containers in a development environment; the counter-part of docker-compose for production environments is docker-swarm. Docker compose takes as input a YAML configuration file (docker-compose.yml) and creates the resources (containers, networks, volumes etc.) by communicating with the docker daemon through docker api.
# A Dockerfile is a text document that contains all the commands/Instruction a user could call on the command line to assemble an image. On the other hand, Docker Compose is a tool for defining and running multi-container Docker applications. With Compose, you use a YAML file to configure your application’s services. Then, with a single command, you create and start all the services from your configuration. By default, docker-compose expects the name of the Compose file as docker-compose.yml or docker-compose.yaml. If the compose file have different name we can specify it with -f flag.

# "docker-compose run" means to Run a one-off command on a service
# "--rm" means to Remove container after run. Ignored in detached mode.
# "--service-ports" means to Run command with the service's ports enabled and mapped to the host
docker-compose run --rm --service-ports --name database-client mushroomappdb-client
Type the command
cd database-server- Run
sh docker-shell.shordocker-shell.batfor windows - Can exit the docker shell without shutting down by typing
ctrl+d - Can reconnect to docker shell by typing...
- Check migration status:
dbmate status - To shut down docker container, type
ctrl+c
-
Run
psql postgres://mushroomapp:awesome@mushroomappdb-server:5432/mushroomappdbin the docker shell -
Format to connect to postgres: postgres://:@i:/
-
Since we do not have any tables created we can check on some system tables, Run this select query
select table_catalog,table_schema,table_name,table_type from information_schema.tables limit 10; -
Next let us create a table in the database
-
Exit from the DB prompt so we are back in the dbmate prompt
-
Run
dbmate new leaderboard, this will create a migration file
dbmate --help    # print usage help
dbmate new       # generate a new migration file
dbmate up        # create the database (if it does not already exist) and run any pending migrations
dbmate create    # create the database
dbmate drop      # drop the database
dbmate migrate   # run any pending migrations
dbmate rollback  # roll back the most recent migration
dbmate down      # alias for rollback
dbmate status    # show the status of all migrations (supports --exit-code and --quiet)
dbmate dump      # write the database schema.sql file
dbmate wait # wait for the database server to become available- In the migration file we just created added the following table creation scripts:
CREATE TABLE leaderboard (
    id BIGSERIAL PRIMARY KEY,
    trainable_parameters NUMERIC,
    execution_time NUMERIC,
    loss NUMERIC,
    accuracy NUMERIC,
    model_size NUMERIC,
    learning_rate NUMERIC,
    batch_size NUMERIC,
    epochs NUMERIC,
    optimizer TEXT,
    email TEXT,
    experiment TEXT,
    model_name TEXT
);

DROP TABLE IF EXISTS leaderboard;
- Run the DB migration so we create the table in the database. Run
dbmate up(see db/migrations for what tables are created). - Run
psql postgres://mushroomapp:awesome@mushroomappdb-server:5432/mushroomappdbin the docker shell and run the queryselect * from leaderboard;The table should exist but no data. - Exit from the DB prompt so we are back in the dbmate prompt
- Run
dbmate rollbackto test our removing tables from the database - Run
dbmate upagain so we have the new table for storing image meta data in our database
- In
data-collector&api-servicemodifydocker-shell.shordocker-shell.bat
# Create the network if we don't have it yet
docker network inspect mushroomappnetwork >/dev/null 2>&1 || docker network create mushroomappnetwork
REM Create the network if we don't have it yet
docker network inspect mushroomappnetwork >NUL || docker network create mushroomappnetwork
- Modify the docker run command to attach the container to the network
mushroomappnetwork
Add this additional argument
-e DATABASE_URL=postgres://mushroomapp:awesome@mushroomappdb-server:5432/mushroomappdb
--network mushroomappnetwork
Your docker run command should look something like this:
docker run --rm --name $IMAGE_NAME -ti \
--mount type=bind,source="$BASE_DIR",target=/app \
--mount type=bind,source="$PERSISTENT_DIR",target=/persistent \
--mount type=bind,source="$SECRETS_DIR",target=/secrets \
-p 9000:9000 \
-e DEV=1 \
-e GOOGLE_APPLICATION_CREDENTIALS=$GOOGLE_APPLICATION_CREDENTIALS \
-e GCP_PROJECT=$GCP_PROJECT \
-e GCP_ZONE=$GCP_ZONE \
-e DATABASE_URL=postgres://mushroomapp:awesome@mushroomappdb-server:5432/mushroomappdb \
--network mushroomappnetwork $IMAGE_NAME
-
Exit from docker shell and run
docker-shellto get back in -
Add a python file dataaccess/session.py
-
Update
service.pyconnect to database on startup -
Add the following new imports
import dataaccess.session as database_session
- Add startup and shutdown events, add this after "Enable CORSMiddleware"
@app.on_event("startup")
async def startup():
    # Startup tasks
    # Connect to database
    await database_session.connect()
    # Start the tracker service
    asyncio.create_task(tracker_service.track())

@app.on_event("shutdown")
async def shutdown():
    # Shutdown tasks
    # Disconnect from database
    await database_session.disconnect()
- Run
uvicorn_serverand ensure no errors in the terminal
- Update
tracker.py - Add an import so we can connect to DB
from dataaccess.session import database
- Add this method:
async def save_leaderboard_db():
    # read leaderboard
    df = pd.read_csv(local_experiments_path+"/leaderboard.csv")
    print("Shape:", df.shape)
    print(df.head())

    # Delete current data in table
    query = "delete from leaderboard;"
    print("query:", query)
    await database.execute(query)

    # Insert rows
    query = f"""
        INSERT INTO leaderboard (
                trainable_parameters ,
                execution_time ,
                loss ,
                accuracy ,
                model_size ,
                learning_rate ,
                batch_size ,
                epochs ,
                optimizer ,
                email ,
                experiment ,
                model_name
            ) VALUES (
                :trainable_parameters ,
                :execution_time ,
                :loss ,
                :accuracy ,
                :model_size ,
                :learning_rate ,
                :batch_size ,
                :epochs ,
                :optimizer ,
                :email ,
                :experiment ,
                :model_name
            );
       """
    for index, row in df.iterrows():
        await database.execute(query, {
            "trainable_parameters": row["trainable_parameters"],
            "execution_time": row["execution_time"],
            "loss": row["loss"],
            "accuracy": row["accuracy"],
            "model_size": row["model_size"],
            "learning_rate": row["learning_rate"],
            "batch_size": row["batch_size"],
            "epochs": row["epochs"],
            "optimizer": row["optimizer"],
            "email": row["user"],
            "experiment": row["experiment"],
            "model_name": row["model_name"]
        })
- Call the above method in the loop:
# Compute Leaderboard and find best model
compute_leaderboard()

# Saving leaderboard
await save_leaderboard_db()