
This is the repository for running the the infrastructure for the ARENA program. These scripts are used to set up cloud machines with GPUS with all necessary dependencies pre-installed for the participants to use and connect to.
We use Runpod for the ARENA 6.0 infrastructure, as they are relatively affordable and have a good API for setting up machines, but if you want to do things manually or only have a few machines, you can use another service like Vast.ai or whetever else.
The runpod template is available here: https://link.nicky.pro/runpod-arena-env, but the actual images are available on docker hub as nickypro/arena-env.
The template is set to automatically clone the latest version of the ARENA_3.0 repository and install the dependencies with conda and cuda.
If you have not yet set up the repo, see the section below. Here is a summary for any organisers using the repo. To create some new machines, run one of the two options (either adding to existing pods, or requesting a total number of pods):
python3 ./arena-infra/management/create_new_pods.py -a [number_of_new_pods]
python3 ./arena-infra/management/create_new_pods.py -n [total_number_of_pods]
By default it will use 1x A4000 16GB. You can also use multiple gpus by adding --gpu-count 2 for 2 gpus per machine, or --gpu-type [GPU_NAME] (eg: NVIDIA A100 80GB PCIe or NVIDIA GeForce RTX 3090 or NVIDIA A40, see runpod gpu type list)
Then, you can see the machine information using:
python3 ./arena-infra/management/list_pods.py
It may take a short while before the machine is up and running, you will need to wait until it shows an IP Address and Port in order to connect.
(proxy option) if using the proxy setup, you can update the config by running:
bash ./arena-infra/proxy/update.sh
(manual option) if not using the proxy, you can generate a new ssh config using this command:
python3 ./arena-infra/management/ssh_config_manual.py
Then once done, you should probably test that the machines are all good. Try connecting using:
bash ./arena-infra/management/test_em.sh
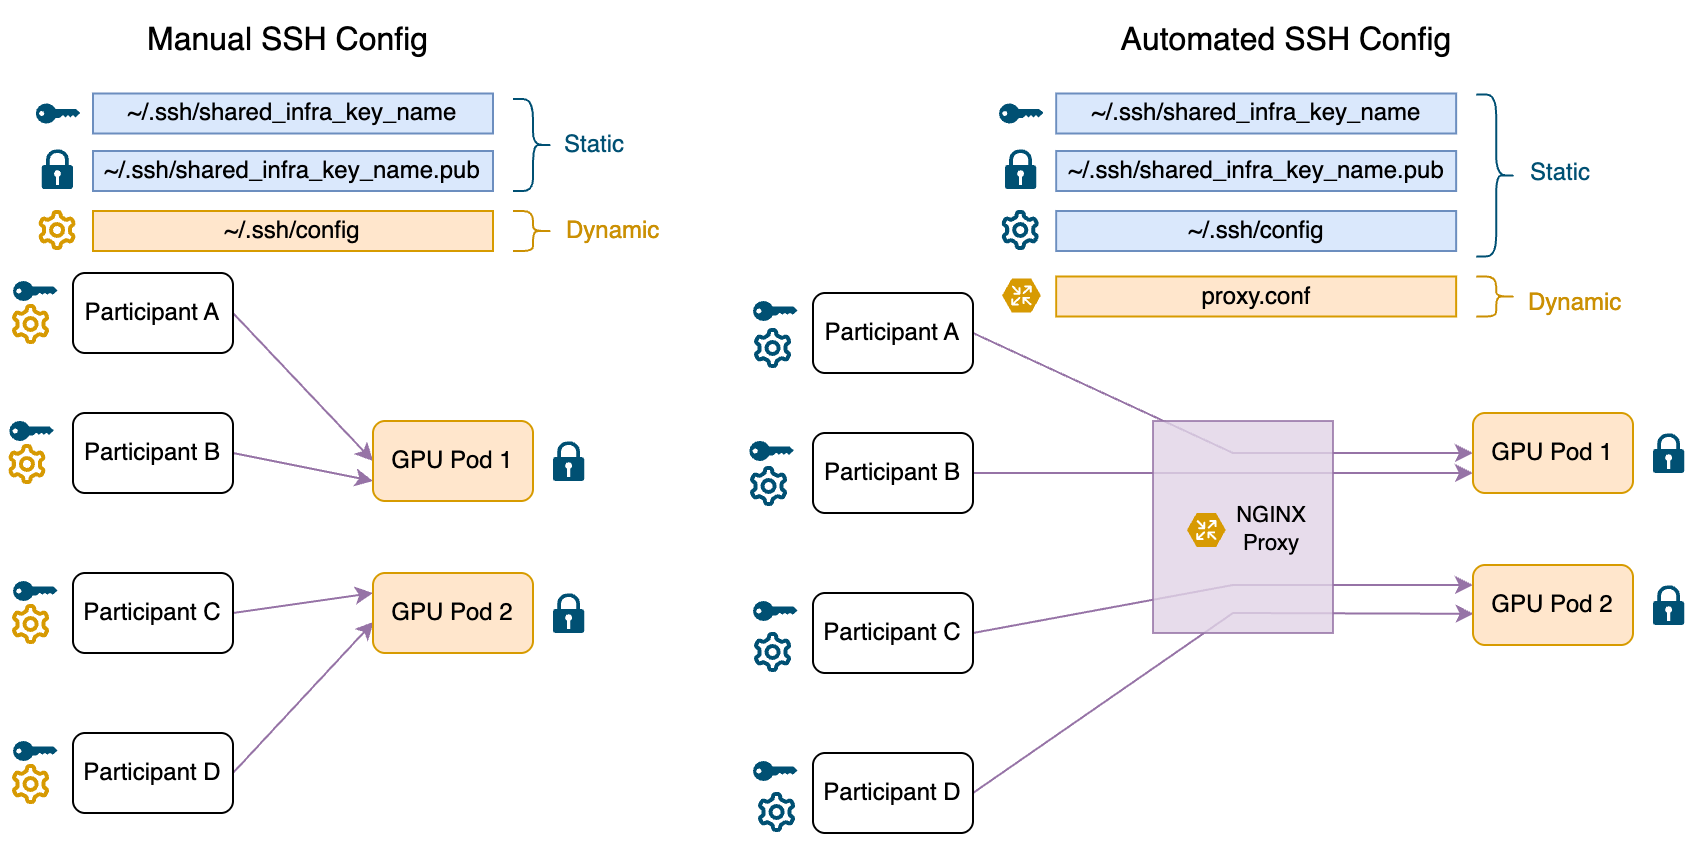
- If you have a lot of participants, or a long program, setting up a proxy upfront and only needing to get participants set up once saves a lot of headaches.
- You can, however, choose to setup a proxy at a later point in time.
If you decide to go the proxy route, do step 6 (setting up a proxy) first, and instead of running any commands on the local machine, instead run them on the proxy machine. This makes it easier for other organisers to also manage the machines.
- You will need git and python installed on your local machine.
- Clone this github repo on your local machine:
git clone https://github.com/nickypro/arena-infra.git - install runpod python api library on your local machine:
pip install runpod
- get api key from runpod
- create a shared ssh key (optionally replace
shared_infra_key_namewith something meaningful for your program):ssh-keygen -t ed25519 -N "" -C "shared_infra_key_name" -f ~/.ssh/shared_infra_key_name
What do these do?
-
RUNPOD_API_KEY: The api key for runpod. This is optional, and you can use a different service if you prefer, but our scripts are set up to use runpod. Look below for "manual" setup if you don't want to use runpod. -
SHARED_SSH_KEY_PATH: This is a special key that allows anyone with it to access the machines. You should generate a new key for each program, and give it to all the participants. This has two components:- The private key, which you should save in
~/.ssh/shared_infra_key_name. This is the key that is used to access the machines. - The public key, saved at
~/.ssh/shared_infra_key_name.pub. This is put on the pods, so that if the users have the private key, they can ssh into the machines.
- The private key, which you should save in
Why is a single key shared between all participants? Can I make a more secure setup?
As we don't keep sensitive data on the machines, and we mostly trust our participants, the flexibility and ease of being able to move machines if there are issues and not needing cusomised workflows for assigning people to pairs outweighs the slightly less secure setup and potential ability for participants to "abuse" the setup.
It would be possible and more secure to have a different key for each participant, but this would increase the complexity of the setup and make it more difficult to manage. If this is usecase that you need, feel free to contact Nicky, I can see what I can do for you.
- open
config.envand add the details for: RUNPOD_API_KEY, the api key for runpod. (it would be better to add this specific one to your~/.zshrcor~/.bashrcfile instead of the config.env file so that you can save this config file to github without exposing your api key, but if you don't feel comfortable with that, you can leave it in the config.env file.)SHARED_SSH_KEY_PATH, the path to the ssh key you created in step 2.- (optional)
MACHINE_NAME_PREFIX, the prefix for the machine names for your program (e.g:arena). - (optional) modify any settings like
RUNPOD_GPU_TYPEandRUNPOD_CLOUD_TYPEas desired for different GPUs, orRUNPOD_NUM_GPUSto change the number of GPUs per machine. - (optional) modify
ARENA_REPO_OWNERto the owner of the arena repo you want to use. You can use the default values for this, but if you want to be easily able to sync and save changes, you can change these to your own github fork of this repo. - (optional) if you are planning to use many machines (>50), you will need to add more name options to the
MACHINE_NAME_LISTvariable in the config.
i. Creating the machines
-
To create however many runpod pods as you need, run
./management/create_new_pods.py. It will ask for confirmation before creating the machines, and will only create the difference if you have already created some machines already.python3 ./management/create_new_pods.py -n <total_number_of_pods> -
You can also create a specific number of new machines by running:
python3 ./management/create_new_pods.py --add <additional_number_of_pods>
I don't want to use runpod, or I don't want to run a script to set up the machines. Can I do it manually?
Yes, you can do it manually.
-
a. Set them up manually (if only a few machines):
- Go to runpod and click on "Create Instance".
- Use our template https://link.nicky.pro/runpod-arena-env, or create your own template by going My Templates > New Template, and create one called something like
arena-envthat uses the docker imagenickypro/arena-env:6.0, and increase the volume size to 100GB. - Create a pod with the template for each pair of participants.
-
b. VAST.ai
- Go to VAST.ai and create an instance.
- Use the
nickypro/arena-env:6.0image. - Create an instance with desired GPU and reccomended ~100GB of storage.
- You can then ssh into the machine using command given by VAST.
ii. Connecting to the machines
Now we can try connecting to the machines to make sure they are working correctly.
- (manual option) run
python3 ./management/ssh_config_manual.pyto print out the ssh config for the machines you have created. (this should give~/.ssh/configfor the machines you have created). Save this file to your local machine. You can automatically append it to your existing config with:python3 ./management/ssh_config_manual.py >> ~/.ssh/config - You can see all the machines you have created and their current status with
python3 ./management/list_pods.py. - test one of the machines by trying to ssh into them with
ssh arena-<machine_name>. - Test all of the machines by running
test_em.sh:bash ~/management/test_em.sh - try that you can connect to the machine using
Remote-SSH: Connect to Host...in VSCode.
How do I get the `~/.ssh/config` if I am not using runpod?
You will need to manually add the following to your ~/.ssh/config file, formatted like this. You will need to:
- replace
arena-with$MACHINE_NAME_PREFIX-if you changed it - replace
shared_infra_key_namewith the name of the key you created in step 2
and for each machine you created:
- replace
<machine_name>with the name of the machine you created - replace
<machine_ip>with the ip address of the machine you created - replace
<port>with the port of the machine you created
Host arena-*
    User root
    IdentityFile ~/.ssh/shared_infra_key_name
    UserKnownHostsFile=/dev/null
    StrictHostKeyChecking=no

Host arena-<machine_name>
    HostName <machine_ip>
    Port <port>
Host arena-<machine_name>
    HostName <machine_ip>
    Port <port>
- give the participants the ssh private key
cat ~/.ssh/shared_infra_key_name, get them to save it in~/.ssh/shared_infra_key_name. (If they are on MacOS/Linux, they will additionally need runchmod 600 ~/.ssh/shared_infra_key_nameto make sure the key is not world readable.) - give the participants the ssh config file
cat ~/.ssh/configfrom step 4. They should add the lines to their own~/.ssh/configfile.
-
One issue is that if you ever want to turn off a machine, or you want to change out one of the machines, you need to manually update the ssh config by giving this to each participant. This is a pain.
-
set up an ubuntu proxy machine with many ports available. I use hetzner. You can create whatever Virtual Private Server (VPS) or similar you want. For ease of setup I will assume hetzner + ubuntu VPU by default, if you have different requirements you can follow them as needed.
-
First, use a different ssh key than the one that is shared with the participants. (you can use an existing key you have for yourself, or create a new one with
ssh-keygen -t ed25519 -N "" -C "proxy_key_name" -f ~/.ssh/proxy_key_name, and use the public keycat ~/.ssh/proxy_key_name.pubfor the proxy machine.) -
add this proxy machine to your ~/.ssh/config
-
If you don't have any preferences, then:
- Create an account on hetzner
- Create a new project, name it whatever you want (eg: "arena-infra-proxy")
- Create a resource > create a server
- Choose any location (whatever is closest to you)
- Choose an image (eg: Ubuntu 24.04)
- Choose a type: Shared vCPU > Arm64 (Ampere) > CAX11
- Add your ssh key (eg: run
cat ~.ssh/proxy_key_name.puband copy the output) - Create & Buy Now
-
Now you can add an ssh config to your local machine in order to connect to the proxy:
Host myproxy
    User root
    HostName <hetzner_machine_ip>
    IdentityFile ~/.ssh/proxy_key_name
    UserKnownHostsFile=/dev/null
    StrictHostKeyChecking=no
-
clone this repo on the proxy machine:
git clone https://github.com/nickypro/arena-infra.git && cd arena-infra -
setup python on the machine, I find it annoying on ubuntu and the easiest way is to run:
bash ~/arena-infra/proxy/install_python_venv.sh -
(if you previously set up locally first) copy the config.env file to the proxy machine. On local machine run:
scp config.env myproxy:~/arena-infra/config.env -
Update the config.env,
SSH_PROXY_HOSTshould be the ip address or domain name of the proxy machine. (optionally updateSSH_PROXY_NGINX_CONFIG_PATHandSSH_PROXY_STARTING_PORTif you want to run multiple instances of the proxy on the same machine.) -
setup nginx on the proxy machine:
sudo bash ./proxy/setup_nginx.sh. -
on the proxy machine, run
python3 ./proxy/nginx_pods.py -vto print out the nginx proxy config for the machines you have created, as well as a more readable table showing the status. -
This should give
~/proxy.conffor the machines you have created. Add this to~/proxy.confon the proxy machine. You can do this automatically with:python3 ./proxy/nginx_pods.py > ~/proxy.conf && systemctl restart nginx -
Note if you are manually editing
proxy.conf, you will also need to then restart nginx:sudo systemctl restart nginx. Note that if there is an error in your config (eg: missing semicolon), nginx will not start.nginx_pods.pyshould directly give a working config, but if things fail, the best way to debug this is to runjournalctl -fu nginxto see the error. -
On your local machine again now, you can generate the new ssh config file with
python3 ./management/ssh_config_proxy.py. Now whenever you want to restart or change one of the machines, you only need to update the proxy config file and restart nginx on the proxy machine, no need to update the ssh config for all the participants.
How do I get the `~/proxy.conf` if I am not using runpod?
You will need to manually add the following to your ~/proxy.conf file, formatted like this, for each machine you created. You will need to:
- replace
<machine_name>with the name of the machine you created - replace
<machine_ip>with the ip address of the machine you created - replace
<machine_port>with the port of the machine you created (generated randomly by runpod/vastai/etc...) - replace
<proxy_port>with the port of the proxy machine you created (should be consistent, eg: 12000, 12001, etc...)
upstream <machine_name> { server <machine_ip>:<machine_port>; }
server { listen <proxy_port>; proxy_pass <machine_name>; }
for example, if you created a machine called apple, you would add the following to your ~/proxy.conf file:
upstream apple { server 1.2.3.4:2222; }
server { listen 12000; proxy_pass apple; }
- you can make it so that the users can push to a branch of the arena repo, by automatically deploying the branch to the machine when it is pushed to.
- To do this, you will need to have your own fork of the arena repo on your account, and to add the public key (
~/.ssh/shared_infra_key_name.pub) as a deploy key on the repo. - You will then need to change the
ARENA_REPO_OWNERin the config.env file to your github username. Make sure to set it so that themainbranch has read-only access. - You can then copy the ssh key to the machines, and automatically set the repo to be your account's repo with the script
python3 ./management/setup_em.py. - You can also automatically push all changes, by running
python3 ./management/sync_git.sh
- If you are doing evals week3, you will need to copy the API keys to the machines.
- You will need to manually make an api key on OpenAI and Anthropic, and make two CSV files of the format, saved to
./keys/openai_api_keys.csvand./keys/anthropic_api_keys.csv:
arena-<machine_name>,sk-...
arena-apple,sk-...
arena-autumn,sk-...
arena-bloom,sk-...
- You can then copy the keys to the machines with
python3 ./management/copy_api_keys.py.
- If you want to retain the data, make sure to use the script from step 7.
- You can stop the machines with
./management/stop_pods.py. Note that be default this will delete all the data on machines, so make sure you have saved all the data you need. (it is potentially possible to save the data by using volumes, but I have found that often one is left with the volume is connected to a machine with no gpus available when you want to start it again, so in practice this is not useful) - To stop the machines, you can run:
python3 ./management/stop_pods.py
It will ask for confirmation, and then it will stop the machines. You can use the --include <machine_name> flag to stop a specific machine, or --exclude <machine_name> to stop all the machines except for a specific one.
- To finally delete the machines, you can run:
python3 ./management/delete_pods.py
It will ask for confirmation, and then it will delete the machines.
- If you want to know the current status of the machines, you can run
python3 ./management/list_pods.py. - If you want to update the machines, you will need to update either the
~/.ssh/configfor all users (4.ii) if you choose to use the manual ssh config, or the~/proxy.conf(6.) if you choose to use the proxy.
-
create_new_pods.py: Creates new runpod pods.- command options:
python3 ./management/create_new_pods.py --help: Shows the help message.python3 ./management/create_new_pods.py -n <total_number_of_pods>: Creates up to a specified number of pods. If there are already sum number of pods, it will only make the difference.python3 ./management/create_new_pods.py -a <additional_number_of_pods>: Creates additional in addition to the existing number of pods.python3 ./management/create_new_pods.py <machine_name_1> <machine_name_2> ...: Creates a pod with the specified machine names.python3 ./management/create_new_pods.py -a 1 --gpu-type "NVIDIA A40" --num-gpus 4 --cloud-type SECURE --docker-image nickypro/arena-env:6.0 --disk-space-in-gb 500: Creates 1 pod with the specified gpu type, number of gpus per machine, cloud type, docker image, and disk space.
-
ssh_config_manual.py: Prints out the ssh config for the machines you have created. -
ssh_config_proxy.py: Prints out the ssh config for the machines you have created using the proxy. -
list_pods.py: Lists all of your runpod pods and their current status. -
test_em.sh: Tests the machines by sshing into them and running a few commands. -
setup_em.py: Sets up the machines to use your github fork of the arena repo. -
sync_git.sh: Automatically pushes all changes to the machines. -
copy_api_keys.py: Copies the API keys to the machines. -
stop_pods.py: Stops the machines (if you want to retain the data, make sure to use sync_git.sh first). -
delete_pods.py: Deletes all stopped pods.
setup_nginx.sh: Sets up nginx on the proxy machine.nginx_pods.py: Prints out the nginx proxy config for the machines you have created.- This should be added to the
~/proxy.conffile on the proxy machine.
- This should be added to the
update.sh: Restarts nginx on the proxy machine.journalctl -fu nginx: Shows the nginx logs, useful for debugging issues with nginx.