
A beautiful real-time terminal monitoring tool for Claude AI token usage. Track your token consumption, burn rate, and get predictions about when you'll run out of tokens.
- ✨ Key Features
- 🚀 Installation
- 📖 Usage
- 🙏 Please Help Test This Release!
- ✨ Features & How It Works
- 🚀 Usage Examples
- 🔧 Development Installation
- Troubleshooting
- 📞 Contact
- 📚 Additional Documentation
- 📝 License
- 🤝 Contributors
- 🙏 Acknowledgments
- 🔄 Real-time monitoring - Updates every 3 seconds with smooth refresh
- 📊 Visual progress bars - Beautiful color-coded token and time progress bars
- 🔮 Smart predictions - Calculates when tokens will run out based on current burn rate
- 🤖 Auto-detection - Automatically switches to custom max when Pro limit is exceeded
- 📋 Multiple plan support - Works with Pro, Max5, Max20, and auto-detect plans
⚠️ Warning system - Alerts when tokens exceed limits or will deplete before session reset- 💼 Professional UI - Clean, colorful terminal interface with emojis
- 🎨 Smart Theming - Automatic light/dark theme detection with manual override options
- ⏰ Customizable scheduling - Set your own reset times and timezones
Why uv is the best choice:
- ✅ Creates isolated environments automatically (no system conflicts)
- ✅ No Python version issues
- ✅ No "externally-managed-environment" errors
- ✅ Easy updates and uninstallation
- ✅ Works on all platforms
The fastest and easiest way to install and use the monitor:
# Install directly from PyPI with uv (easiest)
uv tool install claude-usage-monitor

# Run from anywhere
claude-usage-monitor# Clone and install from source
git clone https://github.com/Maciek-roboblog/Claude-Code-Usage-Monitor.git
cd Claude-Code-Usage-Monitor
uv tool install .
# Run from anywhere
claude-monitorIf you don't have uv installed yet, get it with one command:
# On Linux/macOS:
curl -LsSf https://astral.sh/uv/install.sh | sh

# On Windows:
powershell -ExecutionPolicy ByPass -c "irm https://astral.sh/uv/install.ps1 | iex"

# After installation, restart your terminal# Install from PyPI
pip install claude-usage-monitor
# If claude-monitor command is not found, add ~/.local/bin to PATH:
echo 'export PATH="$HOME/.local/bin:$PATH"' >> ~/.bashrc
source ~/.bashrc # or restart your terminal
# Run from anywhere (dependencies auto-install on first run)
claude-usage-monitor
⚠️ PATH Setup: If you seeWARNING: The script claude-monitor is installed in '/home/username/.local/bin' which is not on PATH, follow the export PATH command above.
⚠️ Important: On modern Linux distributions (Ubuntu 23.04+, Debian 12+, Fedora 38+), you may encounter an "externally-managed-environment" error. Instead of using--break-system-packages, we strongly recommend:
- Use uv instead (see above) - it's safer and easier
- Use a virtual environment -
python3 -m venv myenv && source myenv/bin/activate- Use pipx -
pipx install claude-usage-monitorSee the Troubleshooting section for detailed solutions.
# Install with pipx
pipx install claude-usage-monitor

# Run from anywhere (dependencies auto-install on first run)
claude-usage-monitor# Install with pip in conda environment
pip install claude-usage-monitor
# Run from anywhere (dependencies auto-install on first run)
claude-usage-monitor# Default (Pro plan - 7,000 tokens)
claude-usage-monitor
# Exit the monitor
# Press Ctrl+C to gracefully exitIf running from source, use ./claude_monitor.py instead of claude-usage-monitor.
# Pro plan (~7,000 tokens) - Default
claude-monitor --plan pro

# Max5 plan (~35,000 tokens)
claude-monitor --plan max5

# Max20 plan (~140,000 tokens)
claude-monitor --plan max20

# Auto-detect from highest previous session
claude-monitor --plan custom_max# Reset at 3 AM
claude-monitor --reset-hour 3
# Reset at 10 PM
claude-monitor --reset-hour 22The default timezone is Europe/Warsaw. Change it to any valid timezone:
# Use US Eastern Time
claude-monitor --timezone US/Eastern

# Use Tokyo time
claude-monitor --timezone Asia/Tokyo

# Use UTC
claude-monitor --timezone UTC

# Use London time
claude-monitor --timezone Europe/LondonThe monitor automatically detects your terminal theme (light/dark) and adapts colors accordingly:
# Auto-detect theme (default)
claude-monitor

# Force light theme
claude-monitor --theme light

# Force dark theme
claude-monitor --theme dark

# Auto-detect with explicit setting
claude-monitor --theme auto

# Debug theme detection
claude-monitor --theme-debug| Plan | Token Limit | Best For |
|---|---|---|
| pro | ~7,000 | Light usage, testing (default) |
| max5 | ~35,000 | Regular development |
| max20 | ~140,000 | Heavy usage, large projects |
| custom_max | Auto-detect | Uses highest from previous sessions |
We need your help! This is a new release and we want to ensure it works perfectly on all systems.
If something doesn't work:
- Switch to the develop branch for the latest fixes:
git clone -b develop https://github.com/Maciek-roboblog/Claude-Code-Usage-Monitor.git cd Claude-Code-Usage-Monitor python3 -m venv venv source venv/bin/activate # On Windows: venv\Scripts\activate pip install -e . claude-monitor- Create an issue with title format: [MAIN-PROBLEM]: Your specific problem
- Example:
[MAIN-PROBLEM]: Command not found after pip install on Ubuntu 24.04- Include your OS, Python version, and installation method
- Create Issue Here
Thank you for helping make this tool better! 🚀
LATEST STABLE VERSION FOR USE IS ON PYPI THIS VERSION IS LITTLE BIT TRICKY AND I WILL FIX IT 24.06.2025
- Updates every 3 seconds with smooth refresh
- No screen flicker - intelligent display updates
- Live token consumption tracking across multiple sessions
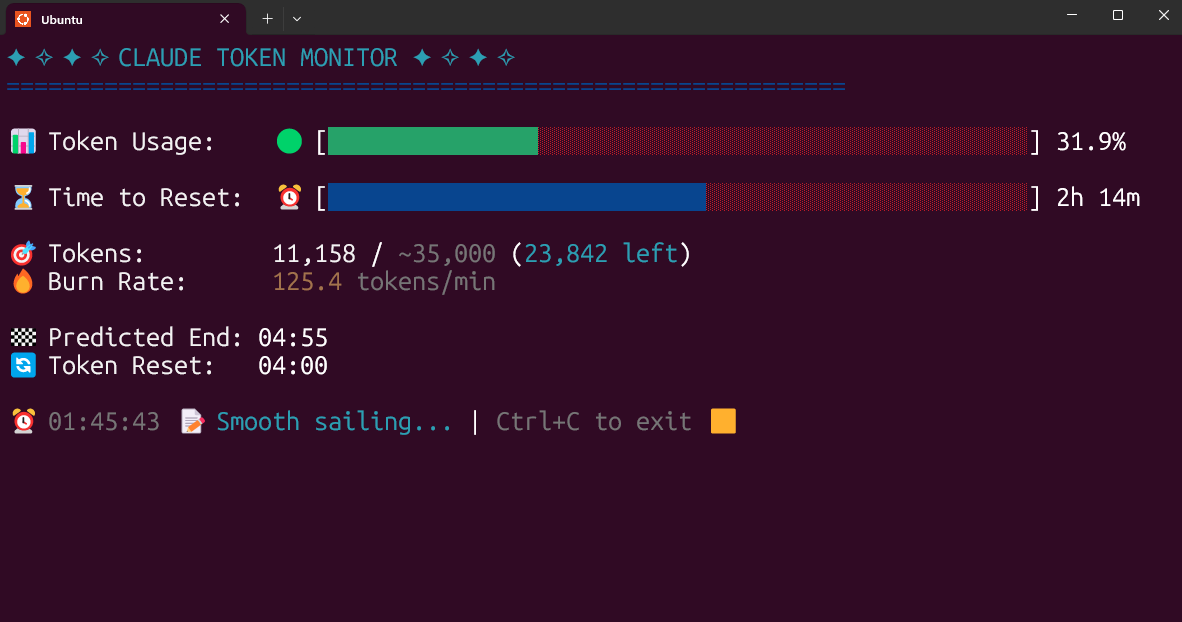
- Token Progress: Color-coded bars showing current usage vs limits
- 🟢 Green (0-49%): Safe usage level
- 🟡 Yellow (50-89%): Warning - approaching limit
- 🔴 Red (90-100%): Critical - near or at limit
- Time Progress: Visual countdown to next session reset with blue progress indicator
- Burn Rate Indicator: Real-time consumption velocity with emoji indicators (🐌➡️🚀⚡)
- Calculates when tokens will run out based on current burn rate
- Warns if tokens will deplete before next session reset
- Analyzes usage patterns from the last hour
- Smart Plan Switching: Automatically switches from Pro to custom_max when limits exceeded
- Limit Discovery: Scans previous sessions to find your actual token limits
- Intelligent Notifications: Shows when automatic switches occur
Claude Code operates on a 5-hour rolling session window system:
- Session Start: Begins with your first message to Claude
- Session Duration: Lasts exactly 5 hours from that first message
- Token Limits: Apply within each 5-hour session window
- Multiple Sessions: Can have several active sessions simultaneously
- Rolling Windows: New sessions can start while others are still active
Default reference times (in your configured timezone):
04:00,09:00,14:00,18:00,23:00
⚠️ Important: These are reference times for planning. Your actual token refresh happens exactly 5 hours after YOUR first message in each session.
Example Session Timeline:
10:30 AM - First message (Session A starts)
03:30 PM - Session A expires (5 hours later)

12:15 PM - First message (Session B starts)
05:15 PM - Session B expires (5 hours later)
The monitor calculates burn rate using sophisticated analysis:
- Data Collection: Gathers token usage from all sessions in the last hour
- Pattern Analysis: Identifies consumption trends across overlapping sessions
- Velocity Tracking: Calculates tokens consumed per minute
- Prediction Engine: Estimates when current session tokens will deplete
- Real-time Updates: Adjusts predictions as usage patterns change
| Plan | Approximate Limit | Typical Usage |
|---|---|---|
| Claude Pro | ~7,000 tokens | Light coding, testing, learning |
| Claude Max5 | ~35,000 tokens | Regular development work |
| Claude Max20 | ~140,000 tokens | Heavy usage, large projects |
| Plan | How It Works | Best For |
|---|---|---|
| custom_max | Scans all previous sessions, uses highest token count found | Users with variable/unknown limits |
When using the default Pro plan:
- Detection: Monitor notices token usage exceeding 7,000
- Analysis: Scans previous sessions for actual limits
- Switch: Automatically changes to custom_max mode
- Notification: Displays clear message about the change
- Continuation: Keeps monitoring with new, higher limit
The auto-detection system:
- Scans History: Examines all available session blocks
- Finds Peaks: Identifies highest token usage achieved
- Validates Data: Ensures data quality and recency
- Sets Limits: Uses discovered maximum as new limit
- Learns Patterns: Adapts to your actual usage capabilities
Scenario: You start work at 9 AM and want tokens to reset aligned with your schedule.
# Set custom reset time to 9 AM
./claude_monitor.py --reset-hour 9

# With your timezone
./claude_monitor.py --reset-hour 9 --timezone US/EasternBenefits:
- Reset times align with your work schedule
- Better planning for daily token allocation
- Predictable session windows
Scenario: You often work past midnight and need flexible reset scheduling.
# Reset at midnight for clean daily boundaries
./claude_monitor.py --reset-hour 0

# Late evening reset (11 PM)
./claude_monitor.py --reset-hour 23Strategy:
- Plan heavy coding sessions around reset times
- Use late resets to span midnight work sessions
- Monitor burn rate during peak hours
Scenario: Your token limits seem to change, and you're not sure of your exact plan.
# Auto-detect your highest previous usage
claude-monitor --plan custom_max

# Monitor with custom scheduling
claude-monitor --plan custom_max --reset-hour 6Approach:
- Let auto-detection find your real limits
- Monitor for a week to understand patterns
- Note when limits change or reset
Scenario: You're working across different timezones or traveling.
# US East Coast
claude-monitor --timezone America/New_York

# Europe
claude-monitor --timezone Europe/London

# Asia Pacific
claude-monitor --timezone Asia/Singapore

# UTC for international team coordination
claude-monitor --timezone UTC --reset-hour 12Scenario: You just want to see current status without configuration.
# Just run it with defaults
claude-monitor

# Press Ctrl+C after checking statusStart with Default (Recommended for New Users)
# Pro plan detection with auto-switching
claude-monitor- Monitor will detect if you exceed Pro limits
- Automatically switches to custom_max if needed
- Shows notification when switching occurs
Known Subscription Users
# If you know you have Max5
claude-monitor --plan max5

# If you know you have Max20
claude-monitor --plan max20
Unknown Limits
# Auto-detect from previous usage
claude-monitor --plan custom_max-
Start Early in Sessions
# Begin monitoring when starting Claude work (uv installation)
claude-monitor

# Or development mode
./claude_monitor.py
- Gives accurate session tracking from the start
- Better burn rate calculations
- Early warning for limit approaches
-
Use Modern Installation (Recommended)
# Easy installation and updates with uv uv tool install claude-monitor claude-monitor --plan max5- Clean system installation
- Easy updates and maintenance
- Available from anywhere
-
Custom Shell Alias (Legacy Setup)
# Add to ~/.bashrc or ~/.zshrc (only for development setup)
alias claude-monitor='cd ~/Claude-Code-Usage-Monitor && source venv/bin/activate && ./claude_monitor.py'
-
Monitor Burn Rate Velocity
- Watch for sudden spikes in token consumption
- Adjust coding intensity based on remaining time
- Plan big refactors around session resets
-
Strategic Session Planning
# Plan heavy usage around reset times claude-monitor --reset-hour 9- Schedule large tasks after resets
- Use lighter tasks when approaching limits
- Leverage multiple overlapping sessions
-
Timezone Awareness
# Always use your actual timezone claude-monitor --timezone Europe/Warsaw- Accurate reset time predictions
- Better planning for work schedules
- Correct session expiration estimates
-
Terminal Setup
- Use terminals with at least 80 character width
- Enable color support for better visual feedback (check
COLORTERMenvironment variable) - Consider dedicated terminal window for monitoring
- Use terminals with truecolor support for best theme experience
-
Workflow Integration
# Start monitoring with your development session (uv installation)
tmux new-session -d -s claude-monitor 'claude-monitor'

# Or development mode
tmux new-session -d -s claude-monitor './claude_monitor.py'

# Check status anytime
tmux attach -t claude-monitor
-
Multi-Session Strategy
- Remember sessions last exactly 5 hours
- You can have multiple overlapping sessions
- Plan work across session boundaries
Large Project Development
# Setup for sustained development
claude-monitor --plan max20 --reset-hour 8 --timezone America/New_York
Daily Routine:
- 8:00 AM: Fresh tokens, start major features
- 10:00 AM: Check burn rate, adjust intensity
- 12:00 PM: Monitor for afternoon session planning
- 2:00 PM: New session window, tackle complex problems
- 4:00 PM: Light tasks, prepare for evening session
Learning & Experimentation
# Flexible setup for learning
claude-monitor --plan pro
Sprint Development
# High-intensity development setup
claude-monitor --plan max20 --reset-hour 6For contributors and developers who want to work with the source code:
For immediate testing or development:
# Install Python dependency
pip install pytz
pip install rich>=13.0.0

git clone https://github.com/Maciek-roboblog/Claude-Code-Usage-Monitor.git
cd Claude-Code-Usage-Monitor
python claude_monitor.py- Python 3.7+ installed on your system
Using a virtual environment is strongly recommended because:
- 🛡️ Isolation: Keeps your system Python clean and prevents dependency conflicts
- 📦 Portability: Easy to replicate the exact environment on different machines
- 🔄 Version Control: Lock specific versions of dependencies for stability
- 🧹 Clean Uninstall: Simply delete the virtual environment folder to remove everything
- 👥 Team Collaboration: Everyone uses the same Python and package versions
If you don't have venv module available:
# Ubuntu/Debian
sudo apt-get update
sudo apt-get install python3-venv

# Fedora/RHEL/CentOS
sudo dnf install python3-venv

# macOS (usually comes with Python)
# If not available, install Python via Homebrew:
brew install python3

# Windows (usually comes with Python)
# If not available, reinstall Python from python.org
# Make sure to check "Add Python to PATH" during installation
Alternatively, use the virtualenv package:
# Install virtualenv via pip
pip install virtualenv

# Then create virtual environment with:
virtualenv venv
# instead of: python3 -m venv venv# 1. Clone the repository
git clone https://github.com/Maciek-roboblog/Claude-Code-Usage-Monitor.git
cd Claude-Code-Usage-Monitor
# 2. Create virtual environment
python3 -m venv venv
# Or if using virtualenv package:
# virtualenv venv
# 3. Activate virtual environment
# On Linux/Mac:
source venv/bin/activate
# On Windows:
# venv\Scripts\activate
# 4. Install Python dependencies
pip install pytz
pip install rich>=13.0.0
# 5. Make script executable (Linux/Mac only)
chmod +x claude_monitor.py
# 6. Run the monitor
python claude_monitor.pyAfter initial setup, you only need:
# Navigate to project directory
cd Claude-Code-Usage-Monitor

# Activate virtual environment
source venv/bin/activate  # Linux/Mac
# venv\Scripts\activate   # Windows

# Run monitor
./claude_monitor.py  # Linux/Mac
# python claude_monitor.py  # Windows

# When done, deactivate
deactivateCreate an alias for quick access:
# Add to ~/.bashrc or ~/.zshrc
alias claude-monitor='cd ~/Claude-Code-Usage-Monitor && source venv/bin/activate && ./claude_monitor.py'

# Then just run:
claude-monitorOn modern Linux distributions (Ubuntu 23.04+, Debian 12+, Fedora 38+), you may encounter:
error: externally-managed-environment
× This environment is externally managed
Solutions (in order of preference):
-
Use uv (Recommended)
# Install uv first
curl -LsSf https://astral.sh/uv/install.sh | sh

# Then install with uv
uv tool install claude-monitor
-
Use pipx (Isolated Environment)
# Install pipx
sudo apt install pipx  # Ubuntu/Debian
# or
python3 -m pip install --user pipx

# Install claude-monitor
pipx install claude-monitor
-
Use virtual environment
python3 -m venv myenv source myenv/bin/activate pip install claude-monitor -
Force installation (Not Recommended)
pip install --user claude-monitor --break-system-packages
⚠️ Warning: This bypasses system protection and may cause conflicts. We strongly recommend using a virtual environment instead.
If claude-monitor command is not found after pip installation:
-
Check if it's a PATH issue
# Look for the warning message during pip install:
# WARNING: The script claude-monitor is installed in '/home/username/.local/bin' which is not on PATH
-
Add to PATH
# Add this to ~/.bashrc or ~/.zshrc
echo 'export PATH="$HOME/.local/bin:$PATH"' >> ~/.bashrc

# Reload shell
source ~/.bashrc  # or source ~/.zshrc
-
Verify installation location
# Find where pip installed the script
pip show -f claude-monitor | grep claude-monitor
-
Run directly with Python
python3 -m claude_monitor
If you have multiple Python versions:
-
Check Python version
python3 --version
pip3 --version
-
Use specific Python version
python3.11 -m pip install claude-monitor
python3.11 -m claude_monitor
-
Use uv (handles Python versions automatically)
uv tool install claude-monitor
If you encounter the error No active session found, please follow these steps:
-
Initial Test: Launch Claude Code and send at least two messages. In some cases, the session may not initialize correctly on the first attempt, but it resolves after a few interactions.
-
Configuration Path: If the issue persists, consider specifying a custom configuration path. By default, Claude Code uses
~/.config/claude. You may need to adjust this path depending on your environment.
CLAUDE_CONFIG_DIR=~/.config/claude ./claude_monitor.pyHave questions, suggestions, or want to collaborate? Feel free to reach out!
📧 Email: maciek@roboblog.eu
Whether you need help with setup, have feature requests, found a bug, or want to discuss potential improvements, don't hesitate to get in touch. I'm always happy to help and hear from users of the Claude Code Usage Monitor!
- Development Roadmap - ML features, PyPI package, Docker plans
- Contributing Guide - How to contribute, development guidelines
- Troubleshooting - Common issues and solutions
MIT License - feel free to use and modify as needed.
Want to contribute? Check out our Contributing Guide!
⭐ Star this repo if you find it useful! ⭐