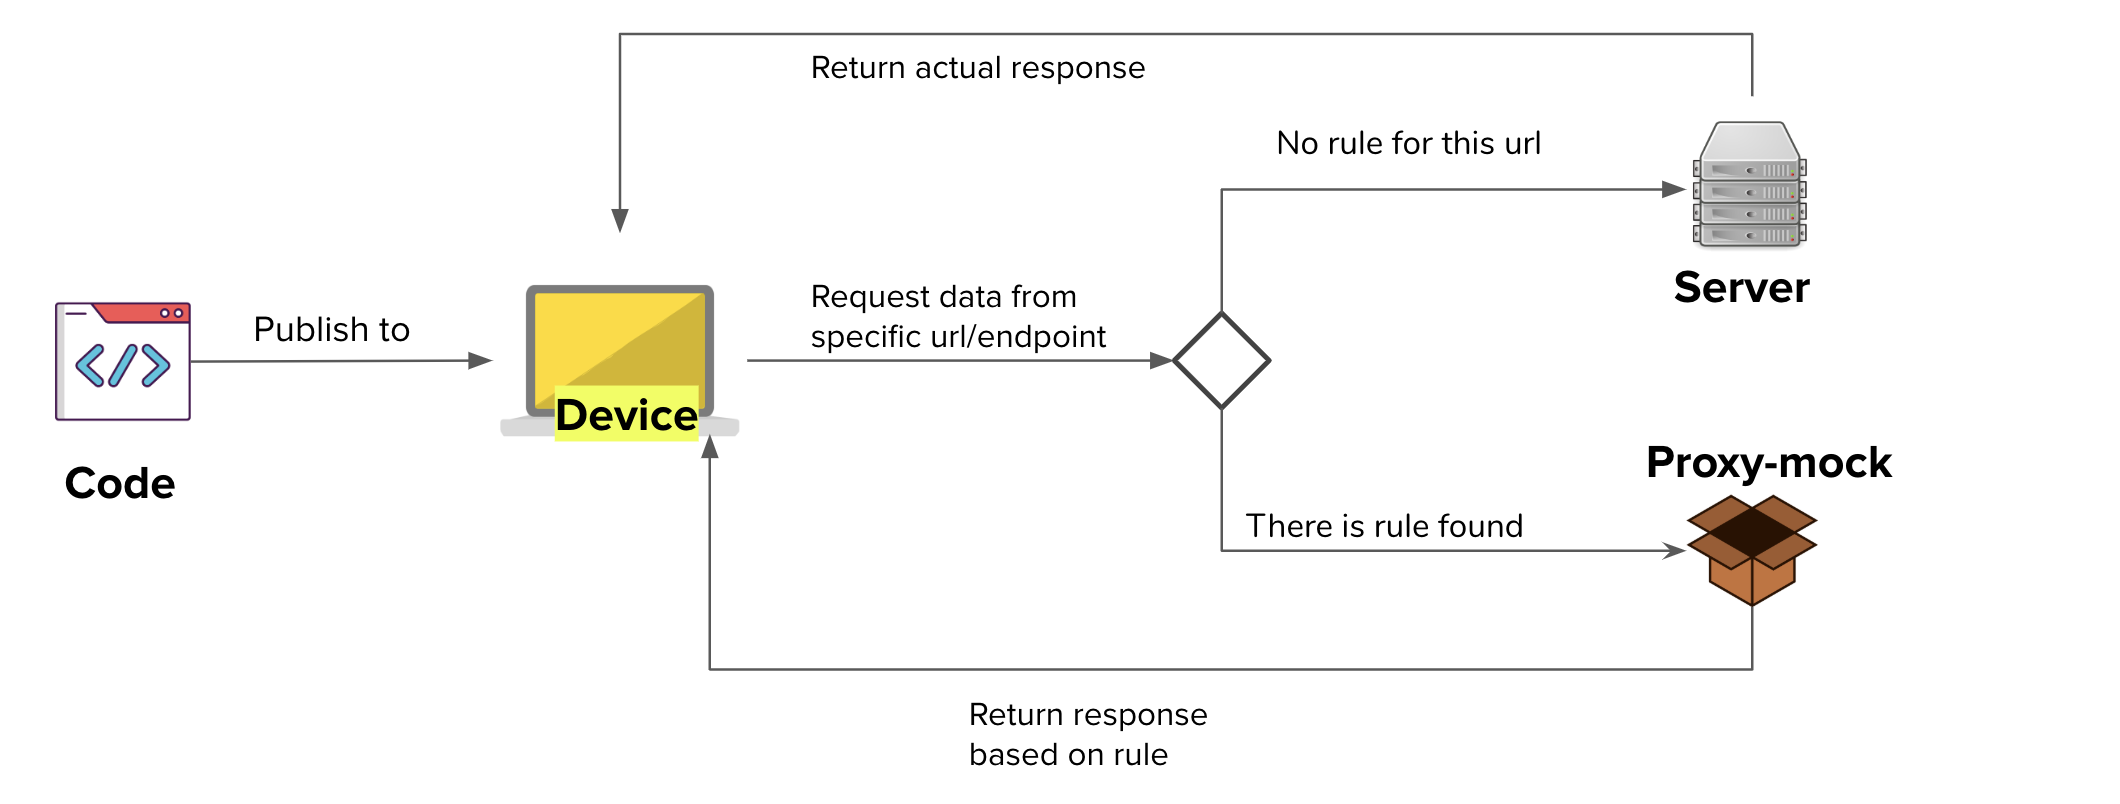
This package's goal is simply to mock API response. By using proxy, you can intercept and return mock data from any request to specific URL. This project is using Anyproxy rule based config to intercept request. You can mock API response based on API contract you have agreed with your team. So that, you can start developing immediately without waiting for API implementation.
This project is node based app. You can install node js here
$  git clone --depth 1 git@github.com:linkors/proxy-mock.git
& cd <repo_name>$ npm installYou can run proxy-mock with entering this in project root folder
$ node proxy-mock [options]or
By globally install the package. You can run this in the root folder
$ npm install -g
$ proxy-mock [options]
These are the list of arguments you can pass:
| Option | Description | Default |
|---|---|---|
-p, --port [value] |
Port for proxy | 8001 |
-w, --web [value] |
Web GUI port | 8002 |
--path [rule file path] |
Source location. Relative to where you run the command | mocks/source.json |
-s, --setglobalproxy |
Will automatically set global proxy on start | - |
-i, --ignorerule |
Use this if you just want to check request response. It will ignore defined rule. | - |
There are 2 ways to set source rule, use json or javascript(js) file. The file will contain list of rules of url to be intercepted . You can see sample config on mocks/source.json or mocks/source.js.
Config properties consists of:
| Property | Type | Description | Required | Default Value | Example |
|---|---|---|---|---|---|
url |
string | regex | Endpoint URL that contains this value will be intercepted. Regex can be used in js config file. |
Yes | - | /v2/api/getUser |
statusCode |
number | Htpp response status | - | 200 | - |
headers |
object | Http response header | - | {"content-type": "application/json", "Access-Control-Allow-Origin": "*"} |
- |
responseFile |
string | Read response from file (must be a json or js file) |
Yes, if responseBody is not used. It is relative to the source file |
- | test.json |
responseBody |
string | number | object | Will automatically set global proxy on start | - | - | {"data":"baloon"} |
dataToKeep |
array | Use this if you want to bring any data from request to response | - | - | ["nonce", "context"] |
Of course you can modify the implementation of how this proxy handle config rule. File app/rule.js is what you are looking for.
After you setup the rule, now you cen setup the mock response. Just like the config source, you can use json or js file.
I'll explain you by example. Let we want to return this data as response
{
    "data": "such data"
}
For json version you can just put the mock response directly to the file.
For js version, there is more that you can do. The response must use following template (sample can be seen at mocks/response.js)
module.exports = function (requestDetail) {
    // Data is inside `responseBody`
    return {
        responseBody: {
            "data": "such data"
        },
        statusCode: 200, // optional
        headers: { // optional
          'test': 'ini header test'
        }
    }
}
As you can see, you may also override statusCode and headers from config source here.
Other than that, you also receive requestDetail as parameter. Use this to provide dynamic reponse based on request you send.
| Property | Type | Description | Value |
|---|---|---|---|
| protocol | string | request protocol | http or https |
| requestOptions | object | the options of the request-to-go, a param of require('http').request . ref: https://nodejs.org/api/http.html#http_http_request_options_callback | - |
| requestData | object | request body | - |
| url | string | request url | - |
| _req | object | the native node.js request object | - |
For proxy ing any https requests, you need to add Anyproxy certificate as trusted source.
Use this command to generate CA certificate
$ node_modules/.bin/anyproxy-caThen you need to trust the generated certificate to your browser/device. You can see how to set up it Anyrpoxy Config Certification.
Warning: please keep your root CA safe since it may influence your system security. Note: you only need to do this once.
Feel free to fork to modify it to your own need. Or create pull request to contribute.