Currently working on migrating to Python!
Run
builder.m
on matlab, no parameter required.
There are 2 script files:
builder.m: Calls image2points and plots the resultimage2points.m: script that does the actual reconstruction
And input files:
habitat-img/*: Habitat output depth image files, generated using examples.py from Habitat Sim (only 50 entries)parsedOutput.csv: Contains (x, y, z, qa, qb, qc, qd) data from habitat output (only 50 entries)
Data files not used in code, but is uploaded to repo:
testOutput.txt: Contains habitat output

Samples from habitat are obtained as images: (row j, col i, depth)
For any pixel in image, we can get coordinates
Where x: right, y: up, z: towards screen and camera located at (0, 0, 0).
Code:
% Sampling pixel (i, j) from image im
% 1 <= i <= w, 1 <= j <= h, 0 <= im(j, i) <= 1.0
x_n(count) = (i - w/2) / w;
y_n(count) = ((-1)*j + h/2)/h;
z_n(count) = im(j, i);For fast computation the images are downsampled:
% Downsampling using stepSize parameter
count = 0;
x_n = [];
y_n = [];
z_n = [];
for i=1:stepSize:w
	for j=1:stepSize:h
		if (im(j, i) < 0.15 || im(j, i) > 0.85), continue; end
		count = count + 1;
		x_n(count) = (i - w/2)/w;
		y_n(count) = ((-1)*j + h/2)/h;
		z_n(count) = im(j, i);
	end
end
NDC = [x_n; y_n; z_n];
Near: 0.01, Far: 1000.0
- Near, Far: float
- CameraSensor Class doc
- Hard coded in
src/esp/sensor/VisualSensor.h: here- near: 0.01, far: 1000.0
hfov: 90 (degrees)
- hfov: degree
- from
settings.py
- from
width, height: 640, 480
- from settings.py
screen x-length :
screen y-length:

width = 640; height = 480;
near = 0.01; far = 1000.0; hfov = 90*(2*PI/180);
s_x = 2 * near * tan(hfov/2);
s_y = s_x * width/height;top: sy/2, bottom: -sy/2, right: sx/2, left: -sx/2
Code:
near = 0.01; far = 1000.0;
[h, w] = size(im);
hfov = 90*(2*pi/360);
s_x = 2 * near * tan(hfov/2);
s_y = s_x * h/w;
r = s_x/2;
t = s_y/2;Code to parse habitat output log to csv: [Parse output to csv]('Parse output to csv.md')
(nothing special with this code, just reading habitat output and parsing into csv file)
Outputs 3 values for location and 4 values for rotation quaternion.
Our code:
- x: right, y: up, z: towards screen
Habitat output:
- x: towards screen, y: up, z: right

Hence
modifiedCameraPos = [extrinsics(i,3); extrinsics(i,2); extrinsics(i,1)]';
modifiedQuaternion = [extrinsics(i,4); (-1)*extrinsics(i,7); extrinsics(i,6); (-1)*extrinsics(i,5)]';near, far, top, right samples
- x: right, y: up, z: towards screen, camera placed at (0,0,0)
x, y, z in camera coord.
- x: Camera right, y: Camera up, z: Camera front direction, camera placed at (0,0,0)
Define coordinates in Camera and NDC:
Here Camera is located at the origin for both coordinates, z_c > 0.
For NDC,
Let's define a homogeneous coord version of NDC:
where
As a step for constructing ProjMat Let's define Proj on near plane: homog coord equivalent to NDC where z_p is equal to n (z_p = n > 0).
By drawing triangles

we get the relation
(Note that z_c varies for each points)
Since we chose

we get the relation
Substituting (1) for (2), we get
We need a way to divide x_n and y_n by z_c, so we decide to use homogeneous coordinates and set the w_n' term equal to z_c. The resulting projection matrix would be:
z_n' term: We know that z_n' doesn't depend on x_c or y_c, so we can set the corresponding elements in the matrix to 0.
Solving for A and B: By projection matrix,
As we decide to map
Gives us the result
So we can complete the projection matrix
Since our goal is to obtain the camera coordinates from NDC, we have to go the opposite direction.
However
is impossible from the first step because we don't know w_n'. In order to get z_c we need w_n', but we need z_c to get w_n'.
This can be solved by using the relationship
and bringing z_c to LHS gives
which the RHS is fully known.
Using
Calculate in order:
Code:
% A and B components used in Projection Matrix
A_comp = (far)/(far-near);
B_comp = near*far/(far-near)*(-1);

% NDC mapped to frustum - near plane
w_n_prime = z_n + A_comp;
w_n_prime = 1./w_n_prime;
w_n_prime = w_n_prime * B_comp;

% 2. Plane coordinates
planeProj = [x_n.*w_n_prime; y_n.*w_n_prime; z_n.*w_n_prime; w_n_prime];

% Inverse projection
projMat = [(near/r), 0,0,0; ...
	0, (near/t), 0,0; ...
	0,0, A_comp, B_comp; ...
	0,0,1,0];

cameraSpaceCoords = projMat\planeProj;Rotation matrix can be obtained by matlab's built in rotmat function Code:
% Revert rotation
% building rotation matrix
quatVector = quatnormalize(quat);
imquat = quaternion(quatVector);
rotationMat = rotmat(imquat, 'point'); % 3x3
rotationMat = [rotationMat, zeros(3,1); zeros(1,3), 1]; % 4x4

% get coord before rotation
beforeRotCoords = rotationMat\cameraSpaceCoords;Code:
% Revert translation
moveMat = eye(4);
moveMat(1, 4) = cameraPos(1);
moveMat(2, 4) = cameraPos(2);
moveMat(3, 4) = cameraPos(3);

% get coord before translation
beforeMove = moveMat\beforeRotCoords;
And finally converting homogeneous coord to cartesian coord
result = hom2cart(beforeMove')';We can complete the image -> points function.
Combing all resulting points into 1 array:
<loop>
	results = % Call image2points function

	% Concatenate results into 1 big 3*n array
	all_points = [all_points points];
Plotting coords in World coord: Matlab uses y direction up:
scatter3(all_points(1,:), all_points(3,:), all_points(2,:), '.b');
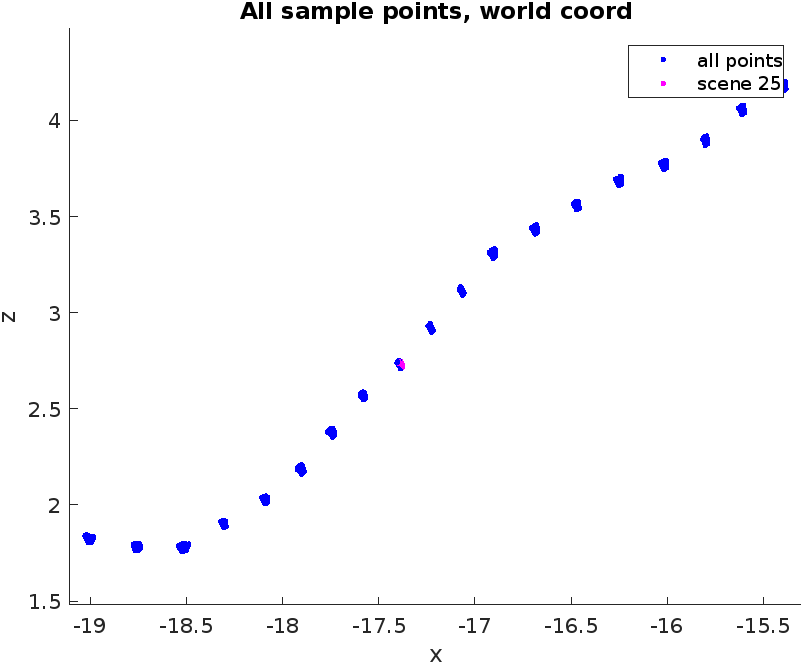
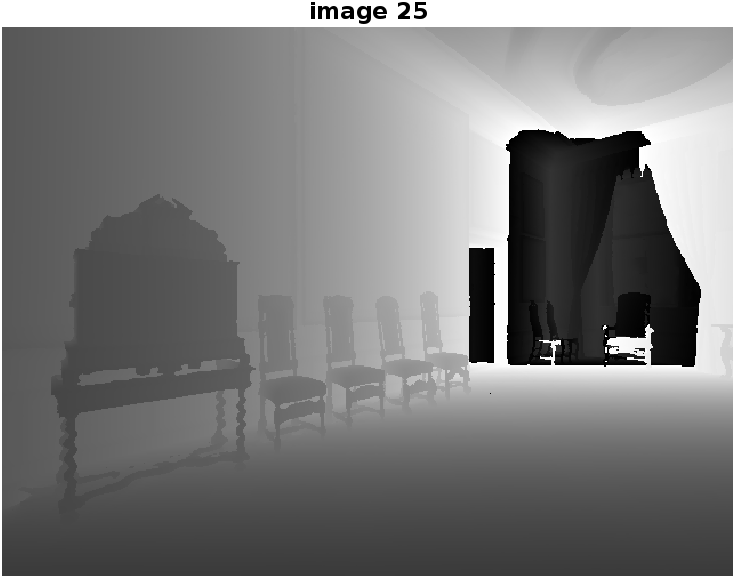
xlabel('x'); ylabel('z'); zlabel('y');In builder.m, we produce 4 plots
- Plot 1) All sample points
- Plot 2) Depth image of choice
- Plot 3) Corresponding samples in world coord
- Plot 4) Corresponding samples in camera coord
We expect that:
- Plot 1 will be point cloud of samples in world coord, reconstructing the whole sample scene.
- Plot 3 will be the reconstruction of Plot 2
- Plot 4 will be the reconstruction of Plot 2, but in camera space.
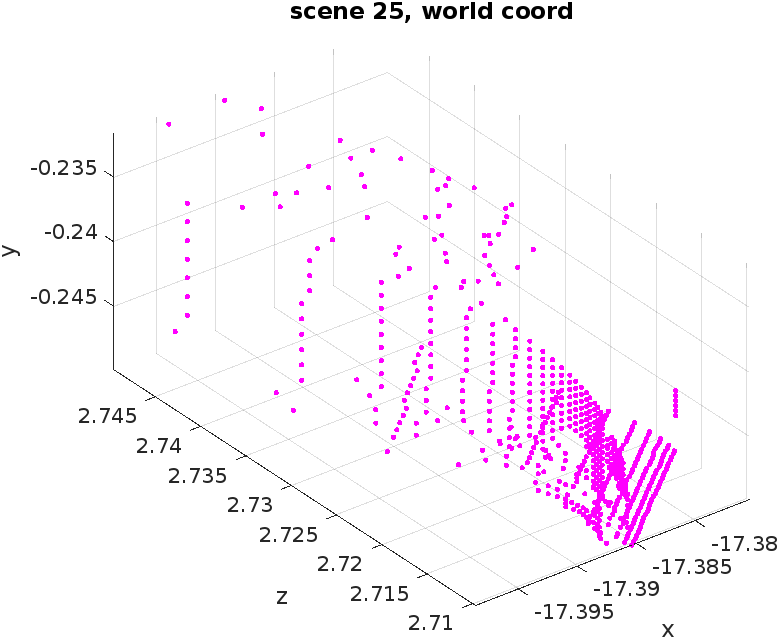
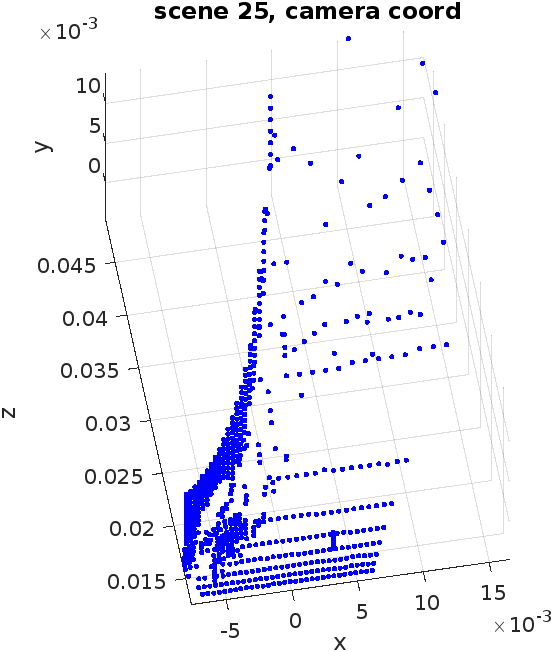
???
Where did it go wrong?
-
The depth value is scaled here
https://github.com/facebookresearch/habitat-sim/blob/main/examples/demo_runner.py#L73
Maybe I need some extra steps?
-
Projection matrix may be wrong?