# One-liner install (installs + runs quick test)
curl -sSL https://raw.githubusercontent.com/greynewell/mcpbr/main/install.sh | bash

# Or install and run manually
pip install mcpbr && mcpbr run -n 1
Benchmark your MCP server against real GitHub issues. One command, hard numbers.
![]()
Model Context Protocol Benchmark Runner
![]()


Stop guessing if your MCP server actually helps. Get hard numbers comparing tool-assisted vs. baseline agent performance on real GitHub issues.
Real metrics showing whether your MCP server improves agent performance on SWE-bench tasks. No vibes, just data.
MCP servers promise to make LLMs better at coding tasks. But how do you prove it?
mcpbr runs controlled experiments: same model, same tasks, same environment - the only variable is your MCP server. You get:
- Apples-to-apples comparison against a baseline agent
- Real GitHub issues from SWE-bench (not toy examples)
- Reproducible results via Docker containers with pinned dependencies
mcpbr supports multiple software engineering benchmarks through a flexible abstraction layer:
Real GitHub issues requiring bug fixes and patches. The agent generates unified diffs evaluated by running pytest test suites.
- Dataset: SWE-bench/SWE-bench_Lite
- Task: Generate patches to fix bugs
- Evaluation: Test suite pass/fail
- Pre-built images: Available for most tasks
Security vulnerabilities requiring Proof-of-Concept (PoC) exploits. The agent generates exploits that trigger crashes in vulnerable code.
- Dataset: sunblaze-ucb/cybergym
- Task: Generate PoC exploits
- Evaluation: PoC crashes pre-patch, doesn't crash post-patch
- Difficulty levels: 0-3 (controls context given to agent)
- Learn more: CyberGym Project
Large-scale MCP tool use evaluation across 45+ categories. Tests agent capabilities in tool discovery, selection, invocation, and result interpretation.
- Dataset: MCPToolBench/MCPToolBenchPP
- Task: Complete tasks using appropriate MCP tools
- Evaluation: Tool selection accuracy, parameter correctness, sequence matching
- Categories: Browser, Finance, Code Analysis, and 40+ more
- Learn more: MCPToolBench++ Paper | GitHub
# Run SWE-bench (default)
mcpbr run -c config.yaml

# Run CyberGym at level 2
mcpbr run -c config.yaml --benchmark cybergym --level 2

# Run MCPToolBench++
mcpbr run -c config.yaml --benchmark mcptoolbench

# List available benchmarks
mcpbr benchmarks
See the benchmarks guide for details on each benchmark and how to configure them.
This harness runs two parallel evaluations for each task:
- MCP Agent: LLM with access to tools from your MCP server
- Baseline Agent: LLM without tools (single-shot generation)
By comparing these, you can measure the effectiveness of your MCP server for different software engineering tasks. See the MCP integration guide for tips on testing your server.
mcpbr includes built-in regression detection to catch performance degradations between MCP server versions:
- Automatic Detection: Compare current results against a baseline to identify regressions
- Detailed Reports: See exactly which tasks regressed and which improved
- Threshold-Based Exit Codes: Fail CI/CD pipelines when regression rate exceeds acceptable limits
- Multi-Channel Alerts: Send notifications via Slack, Discord, or email
A regression is detected when a task that passed in the baseline now fails in the current run. This helps you catch issues before deploying new versions of your MCP server.
# First, run a baseline evaluation and save results
mcpbr run -c config.yaml -o baseline.json

# Later, compare a new version against the baseline
mcpbr run -c config.yaml --baseline-results baseline.json --regression-threshold 0.1

# With notifications
mcpbr run -c config.yaml --baseline-results baseline.json \
  --regression-threshold 0.1 \
--slack-webhook https://hooks.slack.com/services/YOUR/WEBHOOK/URL- CI/CD Integration: Automatically detect regressions in pull requests
- Version Comparison: Compare different versions of your MCP server
- Performance Monitoring: Track MCP server performance over time
- Team Notifications: Alert your team when regressions are detected
======================================================================
REGRESSION DETECTION REPORT
======================================================================

Total tasks compared: 25
Regressions detected: 2
Improvements detected: 5
Regression rate: 8.0%

REGRESSIONS (previously passed, now failed):
----------------------------------------------------------------------
  - django__django-11099
    Error: Timeout
  - sympy__sympy-18087
    Error: Test suite failed

IMPROVEMENTS (previously failed, now passed):
----------------------------------------------------------------------
  - astropy__astropy-12907
  - pytest-dev__pytest-7373
  - scikit-learn__scikit-learn-25570
  - matplotlib__matplotlib-23913
  - requests__requests-3362

======================================================================
For CI/CD integration, use --regression-threshold to fail the build when regressions exceed an acceptable rate:
# .github/workflows/test-mcp.yml
- name: Run mcpbr with regression detection
  run: |
    mcpbr run -c config.yaml \
      --baseline-results baseline.json \
      --regression-threshold 0.1 \
      -o current.json
This will exit with code 1 if the regression rate exceeds 10%, failing the CI job.
Full installation guide with detailed setup instructions.
Prerequisites
- Python 3.11+
- Docker (running)
ANTHROPIC_API_KEYenvironment variable- Claude Code CLI (
claude) installed - Network access (for pulling Docker images and API calls)
Supported Models (aliases or full names):
- Claude Opus 4.5:
opusorclaude-opus-4-5-20251101 - Claude Sonnet 4.5:
sonnetorclaude-sonnet-4-5-20250929 - Claude Haiku 4.5:
haikuorclaude-haiku-4-5-20251001
Run mcpbr models to see the full list.
# Run with npx (no installation)
npx mcpbr-cli run -c config.yaml

# Or install globally
npm install -g mcpbr-cli
mcpbr run -c config.yamlNote: The npm package requires Python 3.11+ and the mcpbr Python package (
pip install mcpbr)
# Install from PyPI
pip install mcpbr

# Or install from source
git clone https://github.com/greynewell/mcpbr.git
cd mcpbr
pip install -e .

# Or with uv
uv pip install -e .
Note for Apple Silicon users: The harness automatically uses x86_64 Docker images via emulation. This may be slower than native ARM64 images but ensures compatibility with all SWE-bench tasks.
Get started in seconds with our example configurations:
# Set your API key
export ANTHROPIC_API_KEY="your-api-key"

# Run your first evaluation using an example config
mcpbr run -c examples/quick-start/getting-started.yaml -v
This runs 5 SWE-bench tasks with the filesystem server. Expected runtime: 15-30 minutes, cost: $2-5.
Explore 25+ example configurations in the examples/ directory:
- Quick Start: Getting started, testing servers, comparing models
- Benchmarks: SWE-bench Lite/Full, CyberGym basic/advanced
- MCP Servers: Filesystem, GitHub, Brave Search, databases, custom servers
- Scenarios: Cost-optimized, performance-optimized, CI/CD, regression detection
See the Examples README for the complete guide.
- Set your API key:
export ANTHROPIC_API_KEY="your-api-key"- Run mcpbr (config auto-created if missing):
# Config is auto-created on first run
mcpbr run -n 1

# Or explicitly generate a config file first
mcpbr init- Edit the configuration to point to your MCP server:
mcp_server:
  command: "npx"
  args:
    - "-y"
    - "@modelcontextprotocol/server-filesystem"
    - "{workdir}"
  env: {}

provider: "anthropic"
agent_harness: "claude-code"

model: "sonnet"  # or full name: "claude-sonnet-4-5-20250929"
dataset: "SWE-bench/SWE-bench_Lite"
sample_size: 10
timeout_seconds: 300
max_concurrent: 4

# Optional: disable default logging (logs are saved to output_dir/logs/ by default)
# disable_logs: true- Run the evaluation:
mcpbr run --config config.yamlmcpbr includes a built-in Claude Code plugin that makes Claude an expert at running benchmarks correctly. The plugin provides specialized skills and knowledge about mcpbr configuration, execution, and troubleshooting.
You have three ways to enable the mcpbr plugin in Claude Code:
When you clone this repository, Claude Code automatically detects and loads the plugin:
git clone https://github.com/greynewell/mcpbr.git
cd mcpbr

# Plugin is now active - try asking Claude:
# "Run the SWE-bench Lite eval with 5 tasks"
Best for: Contributors, developers testing changes, or users who want the latest unreleased features.
Install the plugin globally via npm for use across any project:
# Planned for v0.4.0 (not yet released)
npm install -g @mcpbr/claude-code-pluginNote: The npm package is not yet published. This installation method will be available in a future release. Track progress in issue #265.
Best for: Users who want plugin features available in any directory.
Install via Claude Code's built-in plugin manager:
- Open Claude Code settings
- Navigate to Plugins > Browse
- Search for "mcpbr"
- Click Install
Note: Plugin manager installation is not yet available. This installation method will be available after plugin marketplace submission. Track progress in issue #267.
Best for: Users who prefer a GUI and want automatic updates.
| Method | Availability | Auto-updates | Works Anywhere | Latest Features |
|---|---|---|---|---|
| Clone Repository | Available now | Manual (git pull) | No (repo only) | Yes (unreleased) |
| npm Global Install | Planned (not yet released) | Via npm | Yes | Yes (published) |
| Plugin Manager | Planned (not yet released) | Automatic | Yes | Yes (published) |
The plugin includes three specialized skills that enhance Claude's ability to work with mcpbr:
Expert at running evaluations with proper validation and error handling.
Capabilities:
- Validates prerequisites (Docker running, API keys set, config files exist)
- Constructs correct
mcpbr runcommands with appropriate flags - Handles errors gracefully with actionable troubleshooting steps
- Monitors progress and provides meaningful status updates
Example interactions:
- "Run the SWE-bench Lite benchmark with 10 tasks"
- "Evaluate my MCP server using CyberGym level 2"
- "Test my config with a single task"
Generates valid mcpbr configuration files with benchmark-specific templates.
Capabilities:
- Ensures required
{workdir}placeholder is included in MCP server args - Validates MCP server command syntax
- Provides templates for different benchmarks (SWE-bench, CyberGym, MCPToolBench++)
- Suggests appropriate timeouts and concurrency settings
Example interactions:
- "Generate a config for the filesystem MCP server"
- "Create a config for testing my custom MCP server"
- "Set up a CyberGym evaluation config"
Quick-start command for running SWE-bench Lite evaluations.
Capabilities:
- Pre-configured for 5-task evaluation (fast testing)
- Includes sensible defaults for output files and logging
- Perfect for demonstrations and initial testing
- Automatically sets up verbose output for debugging
Example interactions:
- "Run a quick SWE-bench Lite test"
- "Show me how mcpbr works"
- "Test the filesystem server"
When using Claude Code with the mcpbr plugin active, Claude will automatically:
- Verify Docker is running before starting evaluations
- Check for required API keys (
ANTHROPIC_API_KEY) - Generate valid configurations with proper
{workdir}placeholders - Use correct CLI flags and avoid deprecated options
- Provide contextual troubleshooting when issues occur
- Follow mcpbr best practices for optimal results
Plugin not detected in cloned repository:
- Ensure you're in the repository root directory
- Verify the
claude-code.jsonfile exists in the repo - Try restarting Claude Code
Skills not appearing:
- Check Claude Code version (requires v2.0+)
- Verify plugin is listed in Settings > Plugins
- Try running
/reload-pluginsin Claude Code
Commands failing:
- Ensure mcpbr is installed:
pip install mcpbr - Verify Docker is running:
docker info - Check API key is set:
echo $ANTHROPIC_API_KEY
For more help, see the troubleshooting guide or open an issue.
Full configuration reference with all options and examples.
The mcp_server section defines how to start your MCP server:
| Field | Description |
|---|---|
command |
Executable to run (e.g., npx, uvx, python) |
args |
Command arguments. Use {workdir} as placeholder for the task repository path |
env |
Additional environment variables |
Anthropic Filesystem Server:
mcp_server:
  command: "npx"
  args: ["-y", "@modelcontextprotocol/server-filesystem", "{workdir}"]
Custom Python MCP Server:
mcp_server:
  command: "python"
  args: ["-m", "my_mcp_server", "--workspace", "{workdir}"]
  env:
    LOG_LEVEL: "debug"
Supermodel Codebase Analysis Server:
mcp_server:
  command: "npx"
  args: ["-y", "@supermodeltools/mcp-server"]
  env:
SUPERMODEL_API_KEY: "${SUPERMODEL_API_KEY}"mcpbr supports configurable timeouts for MCP server operations to handle different server types and workloads.
| Field | Description | Default |
|---|---|---|
startup_timeout_ms |
Timeout in milliseconds for MCP server startup | 60000 (60s) |
tool_timeout_ms |
Timeout in milliseconds for MCP tool execution | 900000 (15 min) |
These fields map to the MCP_TIMEOUT and MCP_TOOL_TIMEOUT environment variables used by Claude Code. See the Claude Code settings documentation for more details.
mcp_server:
  command: "npx"
  args: ["-y", "@modelcontextprotocol/server-filesystem", "{workdir}"]
  startup_timeout_ms: 60000      # 60 seconds for server to start
tool_timeout_ms: 900000 # 15 minutes for long-running toolsDifferent server types require different timeout settings based on their operational characteristics:
| Server Type | startup_timeout_ms | tool_timeout_ms | Notes |
|---|---|---|---|
| Fast (filesystem, git) | 10000 (10s) | 30000 (30s) | Local operations with minimal overhead |
| Medium (web search, APIs) | 30000 (30s) | 120000 (2m) | Network I/O with moderate latency |
| Slow (code analysis, databases) | 60000 (60s) | 900000 (15m) | Complex processing or large datasets |
When to adjust timeouts:
- Increase
startup_timeout_msif your server takes longer to initialize (e.g., loading large models, establishing database connections) - Increase
tool_timeout_msif your tools perform long-running operations (e.g., codebase analysis, file processing, AI inference) - Decrease timeouts for fast servers to fail quickly on connection issues
You can customize the prompt sent to the agent using the agent_prompt field:
agent_prompt: |
  Fix the following bug in this repository:

  {problem_statement}

  Make the minimal changes necessary to fix the issue.
  Focus on the root cause, not symptoms.
Use {problem_statement} as a placeholder for the SWE-bench issue text. You can also override the prompt via CLI with --prompt.
| Parameter | Default | Description |
|---|---|---|
provider |
anthropic |
LLM provider |
agent_harness |
claude-code |
Agent backend |
benchmark |
swe-bench |
Benchmark to run (swe-bench, cybergym, or mcptoolbench) |
agent_prompt |
null |
Custom prompt template (use {problem_statement} placeholder) |
model |
sonnet |
Model alias or full ID |
dataset |
null |
HuggingFace dataset (optional, benchmark provides default) |
cybergym_level |
1 |
CyberGym difficulty level (0-3, only for CyberGym benchmark) |
sample_size |
null |
Number of tasks (null = full dataset) |
timeout_seconds |
300 |
Timeout per task |
max_concurrent |
4 |
Parallel task limit |
max_iterations |
10 |
Max agent iterations per task |
Full CLI documentation with all commands and options.
Get help for any command with --help or -h:
mcpbr --help
mcpbr run --help
mcpbr init --help| Command | Description |
|---|---|
mcpbr run |
Run benchmark evaluation with configured MCP server |
mcpbr init |
Generate an example configuration file |
mcpbr models |
List supported models for evaluation |
mcpbr providers |
List available model providers |
mcpbr harnesses |
List available agent harnesses |
mcpbr benchmarks |
List available benchmarks (SWE-bench, CyberGym, MCPToolBench++) |
mcpbr cleanup |
Remove orphaned mcpbr Docker containers |
Run SWE-bench evaluation with the configured MCP server.
All options
| Option | Short | Description |
|---|---|---|
--config PATH |
-c |
Path to YAML configuration file (default: mcpbr.yaml, auto-created if missing) |
--model TEXT |
-m |
Override model from config |
--benchmark TEXT |
-b |
Override benchmark from config (swe-bench, cybergym, or mcptoolbench) |
--level INTEGER |
Override CyberGym difficulty level (0-3) | |
--sample INTEGER |
-n |
Override sample size from config |
--mcp-only |
-M |
Run only MCP evaluation (skip baseline) |
--baseline-only |
-B |
Run only baseline evaluation (skip MCP) |
--no-prebuilt |
Disable pre-built SWE-bench images (build from scratch) | |
--output PATH |
-o |
Path to save JSON results |
--report PATH |
-r |
Path to save Markdown report |
--output-junit PATH |
Path to save JUnit XML report (for CI/CD integration) | |
--verbose |
-v |
Verbose output (-v summary, -vv detailed) |
--log-file PATH |
-l |
Path to write raw JSON log output (single file) |
--log-dir PATH |
Directory to write per-instance JSON log files (default: output_dir/logs/) |
|
--disable-logs |
Disable detailed execution logs (overrides default and config) | |
--task TEXT |
-t |
Run specific task(s) by instance_id (repeatable) |
--prompt TEXT |
Override agent prompt (use {problem_statement} placeholder) |
|
--baseline-results PATH |
Path to baseline results JSON for regression detection | |
--regression-threshold FLOAT |
Maximum acceptable regression rate (0-1). Exit with code 1 if exceeded. | |
--slack-webhook URL |
Slack webhook URL for regression notifications | |
--discord-webhook URL |
Discord webhook URL for regression notifications | |
--email-to EMAIL |
Email address for regression notifications | |
--email-from EMAIL |
Sender email address for notifications | |
--smtp-host HOST |
SMTP server hostname for email notifications | |
--smtp-port PORT |
SMTP server port (default: 587) | |
--smtp-user USER |
SMTP username for authentication | |
--smtp-password PASS |
SMTP password for authentication | |
--help |
-h |
Show help message |
Examples
# Full evaluation (MCP + baseline)
mcpbr run -c config.yaml

# Run only MCP evaluation
mcpbr run -c config.yaml -M

# Run only baseline evaluation
mcpbr run -c config.yaml -B

# Override model
mcpbr run -c config.yaml -m claude-3-5-sonnet-20241022

# Override sample size
mcpbr run -c config.yaml -n 50

# Save results and report
mcpbr run -c config.yaml -o results.json -r report.md

# Save JUnit XML for CI/CD
mcpbr run -c config.yaml --output-junit junit.xml

# Run specific tasks
mcpbr run -c config.yaml -t astropy__astropy-12907 -t django__django-11099

# Verbose output with per-instance logs
mcpbr run -c config.yaml -v --log-dir logs/

# Very verbose output
mcpbr run -c config.yaml -vv

# Run CyberGym benchmark
mcpbr run -c config.yaml --benchmark cybergym --level 2

# Run CyberGym with specific tasks
mcpbr run -c config.yaml --benchmark cybergym --level 3 -n 5

# Regression detection - compare against baseline
mcpbr run -c config.yaml --baseline-results baseline.json

# Regression detection with threshold (exit 1 if exceeded)
mcpbr run -c config.yaml --baseline-results baseline.json --regression-threshold 0.1

# Regression detection with Slack notifications
mcpbr run -c config.yaml --baseline-results baseline.json --slack-webhook https://hooks.slack.com/...

# Regression detection with Discord notifications
mcpbr run -c config.yaml --baseline-results baseline.json --discord-webhook https://discord.com/api/webhooks/...

# Regression detection with email notifications
mcpbr run -c config.yaml --baseline-results baseline.json \
  --email-to team@example.com --email-from mcpbr@example.com \
  --smtp-host smtp.gmail.com --smtp-port 587 \
--smtp-user user@gmail.com --smtp-password "app-password"Generate an example configuration file.
Options and examples
| Option | Short | Description |
|---|---|---|
--output PATH |
-o |
Path to write example config (default: mcpbr.yaml) |
--help |
-h |
Show help message |
mcpbr init
mcpbr init -o my-config.yamlList supported Anthropic models for evaluation.
Remove orphaned mcpbr Docker containers that were not properly cleaned up.
Options and examples
| Option | Short | Description |
|---|---|---|
--dry-run |
Show containers that would be removed without removing them | |
--force |
-f |
Skip confirmation prompt |
--help |
-h |
Show help message |
# Preview containers to remove
mcpbr cleanup --dry-run

# Remove containers with confirmation
mcpbr cleanup

# Remove containers without confirmation
mcpbr cleanup -fHere's what a typical evaluation looks like:
$ mcpbr run -c config.yaml -v -o results.json --log-dir my-logs

mcpbr Evaluation
  Config: config.yaml
  Provider: anthropic
  Model: sonnet
  Agent Harness: claude-code
  Dataset: SWE-bench/SWE-bench_Lite
  Sample size: 10
  Run MCP: True, Run Baseline: True
  Pre-built images: True
  Log dir: my-logs

Loading dataset: SWE-bench/SWE-bench_Lite
Evaluating 10 tasks
Provider: anthropic, Harness: claude-code
14:23:15 [MCP] Starting mcp run for astropy-12907:mcp
14:23:22 astropy-12907:mcp    > TodoWrite
14:23:22 astropy-12907:mcp    < Todos have been modified successfully...
14:23:26 astropy-12907:mcp    > Glob
14:23:26 astropy-12907:mcp    > Grep
14:23:27 astropy-12907:mcp    < $WORKDIR/astropy/modeling/separable.py
14:23:27 astropy-12907:mcp    < Found 5 files: astropy/modeling/tests/test_separable.py...
...
14:27:43 astropy-12907:mcp    * done turns=31 tokens=115/6,542
14:28:30 [BASELINE] Starting baseline run for astropy-12907:baseline
...Understanding evaluation results - detailed guide to interpreting output.
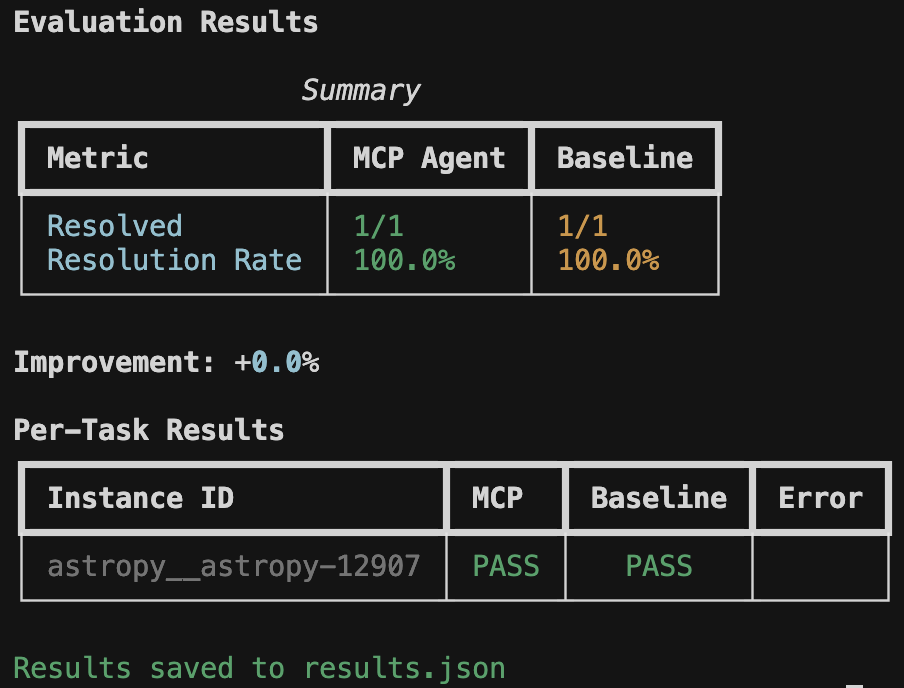
The harness displays real-time progress with verbose mode (-v) and a final summary table:
Evaluation Results

                 Summary
+-----------------+-----------+----------+
| Metric          | MCP Agent | Baseline |
+-----------------+-----------+----------+
| Resolved        | 8/25      | 5/25     |
| Resolution Rate | 32.0%     | 20.0%    |
+-----------------+-----------+----------+

Improvement: +60.0%

Per-Task Results
+------------------------+------+----------+-------+
| Instance ID            | MCP  | Baseline | Error |
+------------------------+------+----------+-------+
| astropy__astropy-12907 | PASS |   PASS   |       |
| django__django-11099   | PASS |   FAIL   |       |
| sympy__sympy-18087     | FAIL |   FAIL   |       |
+------------------------+------+----------+-------+

Results saved to results.json
{
  "metadata": {
    "timestamp": "2026-01-17T07:23:39.871437+00:00",
    "config": {
      "model": "sonnet",
      "provider": "anthropic",
      "agent_harness": "claude-code",
      "dataset": "SWE-bench/SWE-bench_Lite",
      "sample_size": 25,
      "timeout_seconds": 600,
      "max_iterations": 30
    },
    "mcp_server": {
      "command": "npx",
      "args": ["-y", "@modelcontextprotocol/server-filesystem", "{workdir}"]
    }
  },
  "summary": {
    "mcp": {"resolved": 8, "total": 25, "rate": 0.32},
    "baseline": {"resolved": 5, "total": 25, "rate": 0.20},
    "improvement": "+60.0%"
  },
  "tasks": [
    {
      "instance_id": "astropy__astropy-12907",
      "mcp": {
        "patch_generated": true,
        "tokens": {"input": 115, "output": 6542},
        "iterations": 30,
        "tool_calls": 72,
        "tool_usage": {
          "TodoWrite": 4, "Task": 1, "Glob": 4,
          "Grep": 11, "Bash": 27, "Read": 22,
          "Write": 2, "Edit": 1
        },
        "resolved": true,
        "patch_applied": true,
        "fail_to_pass": {"passed": 2, "total": 2},
        "pass_to_pass": {"passed": 10, "total": 10}
      },
      "baseline": {
        "patch_generated": true,
        "tokens": {"input": 63, "output": 7615},
        "iterations": 30,
        "tool_calls": 57,
        "tool_usage": {
          "TodoWrite": 4, "Glob": 3, "Grep": 4,
          "Read": 14, "Bash": 26, "Write": 4, "Edit": 1
        },
        "resolved": true,
        "patch_applied": true
      }
    }
  ]
}By default, mcpbr consolidates all outputs into a single timestamped directory:
.mcpbr_run_20260126_133000/
├── config.yaml                # Copy of configuration used
├── evaluation_state.json      # Task results and state
├── logs/                      # Detailed MCP server logs
│   ├── task_1_mcp.log
│   ├── task_2_mcp.log
│   └── ...
└── README.txt                 # Auto-generated explanation
This makes it easy to:
- Archive results:
tar -czf results.tar.gz .mcpbr_run_* - Clean up:
rm -rf .mcpbr_run_* - Share: Just zip one directory
You can customize the output directory:
# Custom output directory
mcpbr run -c config.yaml --output-dir ./my-results

# Or in config.yaml
output_dir: "./my-results"
Note: The --output-dir CLI flag takes precedence over the output_dir config setting. This ensures that the README.txt file in the output directory reflects the final effective configuration values after all CLI overrides are applied.
Generates a human-readable report with:
- Summary statistics
- Per-task results table
- Analysis of which tasks each agent solved
Logging is enabled by default to prevent data loss. Detailed execution traces are automatically saved to output_dir/logs/ unless disabled.
To disable logging:
# Via CLI flag
mcpbr run -c config.yaml --disable-logs

# Or in config file
disable_logs: true
Creates a directory with detailed JSON log files for each task run. Filenames include timestamps to prevent overwrites:
my-logs/
  astropy__astropy-12907_mcp_20260117_143052.json
  astropy__astropy-12907_baseline_20260117_143156.json
  django__django-11099_mcp_20260117_144023.json
  django__django-11099_baseline_20260117_144512.json
Each log file contains the full stream of events from the agent CLI:
{
  "instance_id": "astropy__astropy-12907",
  "run_type": "mcp",
  "events": [
    {
      "type": "system",
      "subtype": "init",
      "cwd": "/workspace",
      "tools": ["Task", "Bash", "Glob", "Grep", "Read", "Edit", "Write", "TodoWrite"],
      "model": "claude-sonnet-4-5-20250929",
      "claude_code_version": "2.1.12"
    },
    {
      "type": "assistant",
      "message": {
        "content": [{"type": "text", "text": "I'll help you fix this bug..."}]
      }
    },
    {
      "type": "assistant",
      "message": {
        "content": [{"type": "tool_use", "name": "Grep", "input": {"pattern": "separability"}}]
      }
    },
    {
      "type": "result",
      "num_turns": 31,
      "usage": {"input_tokens": 115, "output_tokens": 6542}
    }
  ]
}
This is useful for debugging failed runs or analyzing agent behavior in detail.
The harness can generate JUnit XML reports for integration with CI/CD systems like GitHub Actions, GitLab CI, and Jenkins. Each task is represented as a test case, with resolved/unresolved tasks mapped to pass/fail states.
mcpbr run -c config.yaml --output-junit junit.xmlThe JUnit XML report includes:
- Test Suites: Separate suites for MCP and baseline evaluations
- Test Cases: Each task is a test case with timing information
- Failures: Unresolved tasks with detailed error messages
- Properties: Metadata about model, provider, benchmark configuration
- System Output: Token usage, tool calls, and test results per task
GitHub Actions:
name: MCP Benchmark

on: [push, pull_request]

jobs:
  benchmark:
    runs-on: ubuntu-latest
    steps:
      - uses: actions/checkout@v3

      - name: Set up Python
        uses: actions/setup-python@v4
        with:
          python-version: '3.11'

      - name: Install mcpbr
        run: pip install mcpbr

      - name: Run benchmark
        env:
          ANTHROPIC_API_KEY: ${{ secrets.ANTHROPIC_API_KEY }}
        run: |
          mcpbr run -c config.yaml --output-junit junit.xml

      - name: Publish Test Results
        uses: EnricoMi/publish-unit-test-result-action@v2
        if: always()
        with:
          files: junit.xml
GitLab CI:
benchmark:
  image: python:3.11
  services:
    - docker:dind
  script:
    - pip install mcpbr
    - mcpbr run -c config.yaml --output-junit junit.xml
  artifacts:
    reports:
      junit: junit.xml
Jenkins:
pipeline {
    agent any
    stages {
        stage('Benchmark') {
            steps {
                sh 'pip install mcpbr'
                sh 'mcpbr run -c config.yaml --output-junit junit.xml'
            }
        }
    }
    post {
        always {
            junit 'junit.xml'
        }
    }
}
The JUnit XML format enables native test result visualization in your CI/CD dashboard, making it easy to track benchmark performance over time and identify regressions.
Architecture deep dive - learn how mcpbr works internally.
- Load Tasks: Fetches tasks from the selected benchmark (SWE-bench, CyberGym, or MCPToolBench++) via HuggingFace
- Create Environment: For each task, creates an isolated Docker environment with the repository and dependencies
- Run MCP Agent: Invokes Claude Code CLI inside the Docker container, letting it explore and generate a solution (patch or PoC)
- Run Baseline: Same as MCP agent but without the MCP server
- Evaluate: Runs benchmark-specific evaluation (test suites for SWE-bench, crash detection for CyberGym, tool use accuracy for MCPToolBench++)
- Report: Aggregates results and calculates improvement
The harness uses pre-built SWE-bench Docker images from Epoch AI's registry when available. These images come with:
- The repository checked out at the correct commit
- All project dependencies pre-installed and validated
- A consistent environment for reproducible evaluations
The agent (Claude Code CLI) runs inside the container, which means:
- Python imports work correctly (e.g.,
from astropy import ...) - The agent can run tests and verify fixes
- No dependency conflicts with the host machine
If a pre-built image is not available for a task, the harness falls back to cloning the repository and attempting to install dependencies (less reliable).
mcpbr/
├── src/mcpbr/
│   ├── cli.py           # Command-line interface
│   ├── config.py        # Configuration models
│   ├── models.py        # Supported model registry
│   ├── providers.py     # LLM provider abstractions (extensible)
│   ├── harnesses.py     # Agent harness implementations (extensible)
│   ├── benchmarks/      # Benchmark abstraction layer
│   │   ├── __init__.py      # Registry and factory
│   │   ├── base.py          # Benchmark protocol
│   │   ├── swebench.py      # SWE-bench implementation
│   │   ├── cybergym.py      # CyberGym implementation
│   │   └── mcptoolbench.py  # MCPToolBench++ implementation
│   ├── harness.py       # Main orchestrator
│   ├── agent.py         # Baseline agent implementation
│   ├── docker_env.py    # Docker environment management + in-container execution
│   ├── evaluation.py    # Patch application and testing
│   ├── log_formatter.py # Log formatting and per-instance logging
│   └── reporting.py     # Output formatting
├── tests/
│   ├── test_*.py        # Unit tests
│   ├── test_benchmarks.py # Benchmark tests
│   └── test_integration.py  # Integration tests
├── Dockerfile           # Fallback image for task environments
└── config/
    └── example.yaml     # Example configuration
The architecture uses Protocol-based abstractions for providers, harnesses, and benchmarks, making it easy to add support for additional LLM providers, agent backends, or software engineering benchmarks in the future. See the API reference and benchmarks guide for more details.
┌─────────────────────────────────────────────────────────────────┐
│                         Host Machine                            │
│  ┌───────────────────────────────────────────────────────────┐  │
│  │                    mcpbr Harness (Python)                 │  │
│  │  - Loads SWE-bench tasks from HuggingFace                 │  │
│  │  - Pulls pre-built Docker images                          │  │
│  │  - Orchestrates agent runs                                │  │
│  │  - Collects results and generates reports                 │  │
│  └─────────────────────────┬─────────────────────────────────┘  │
│                            │ docker exec                        │
│  ┌─────────────────────────▼─────────────────────────────────┐  │
│  │              Docker Container (per task)                  │  │
│  │  ┌─────────────────────────────────────────────────────┐  │  │
│  │  │  Pre-built SWE-bench Image                          │  │  │
│  │  │  - Repository at correct commit                     │  │  │
│  │  │  - All dependencies installed (astropy, django...)  │  │  │
│  │  │  - Node.js + Claude CLI (installed at startup)      │  │  │
│  │  └─────────────────────────────────────────────────────┘  │  │
│  │                                                           │  │
│  │  Agent (Claude Code CLI) runs HERE:                       │  │
│  │  - Makes API calls to Anthropic                           │  │
│  │  - Executes Bash commands (with working imports!)         │  │
│  │  - Reads/writes files                                     │  │
│  │  - Generates patches                                      │  │
│  │                                                           │  │
│  │  Evaluation runs HERE:                                    │  │
│  │  - Applies patch via git                                  │  │
│  │  - Runs pytest with task's test suite                     │  │
│  └───────────────────────────────────────────────────────────┘  │
└─────────────────────────────────────────────────────────────────┘
FAQ - Quick answers to common questions
Full troubleshooting guide - Detailed solutions to common issues
Ensure Docker is running:
docker infoIf the harness can't pull a pre-built image for a task, it will fall back to building from scratch. You can also manually pull images:
docker pull ghcr.io/epoch-research/swe-bench.eval.x86_64.astropy__astropy-12907On ARM64 Macs, x86_64 Docker images run via emulation which is slower. This is normal. If you're experiencing issues, ensure you have Rosetta 2 installed:
softwareupdate --install-rosettaTest your MCP server independently:
npx -y @modelcontextprotocol/server-filesystem /tmp/testEnsure your Anthropic API key is set:
export ANTHROPIC_API_KEY="sk-ant-..."Increase the timeout in your config:
timeout_seconds: 600Ensure the Claude Code CLI is installed and in your PATH:
which claude # Should return the path to the CLI# Install dev dependencies
pip install -e ".[dev]"
# Run unit tests
pytest -m "not integration"
# Run integration tests (requires API keys and Docker)
pytest -m integration
# Run all tests
pytest
# Lint
ruff check src/We use an automated workflow for releases. See the Release Guide for full details.
Quick start for maintainers:
# Patch release (bug fixes) - most common
gh workflow run release.yml -f version_bump=patch

# Minor release (new features)
gh workflow run release.yml -f version_bump=minor

# Major release (breaking changes)
gh workflow run release.yml -f version_bump=major
For AI agents: See the AI Agent Guide for a quick reference.
The workflow automatically:
- Bumps version in
pyproject.toml - Syncs version to all package files
- Creates git tag and GitHub release
- Triggers PyPI and npm publication
We're building the defacto standard for MCP server benchmarking! Our v1.0 Roadmap includes 200+ features across 11 strategic categories:
🎯 Good First Issues | 🙋 Help Wanted | 📋 View Roadmap

Phase 1: Foundation (v0.3.0)
- ✅ JUnit XML output format for CI/CD integration
- CSV, YAML, XML output formats
- Config validation and templates
- Results persistence and recovery
- Cost analysis in reports
Phase 2: Benchmarks (v0.4.0)
- HumanEval, MBPP, ToolBench
- GAIA for general AI capabilities
- Custom benchmark YAML support
- SWE-bench Verified
Phase 3: Developer Experience (v0.5.0)
- Real-time dashboard
- Interactive config wizard
- Shell completion
- Pre-flight checks
Phase 4: Platform Expansion (v0.6.0)
- NPM package
- GitHub Action for CI/CD
- Homebrew formula
- Official Docker image
Phase 5: MCP Testing Suite (v1.0.0)
- Tool coverage analysis
- Performance profiling
- Error rate monitoring
- Security scanning
We welcome contributions! Check out our 30+ good first issues perfect for newcomers:
- Output Formats: CSV/YAML/XML export
- Configuration: Validation, templates, shell completion
- Platform: Homebrew formula, Conda package
- Documentation: Best practices, examples, guides
See the contributing guide to get started!
New to mcpbr or want to optimize your workflow? Check out the Best Practices Guide for:
- Benchmark selection guidelines
- MCP server configuration tips
- Performance optimization strategies
- Cost management techniques
- CI/CD integration patterns
- Debugging workflows
- Common pitfalls to avoid
Please see CONTRIBUTING.md or the contributing guide for guidelines on how to contribute.
All contributors are expected to follow our Community Guidelines.
MIT - see LICENSE for details.
Built by Grey Newell