![]()
Programmatically generate high-quality images using standard CSS Flexbox layouts. Powered by Skia and Taffy.

A Python library for efficient image generation using CSS Flexbox. Build complex layouts using familiar web standards, such as justify-content, align-items, flex-grow, then render them as high-quality PNG, JPEG, WebP, or SVG. Perfect for Open Graph, social media graphics, video thumbnails, data visualizations, and automated report generation. Browser-grade layouts without the browser overhead
- CSS Flexbox Layout: Built on industry-standard CSS Flexbox principles with near-complete property support. If you know CSS, you know PicTex. See the CSS Flexbox Compliance table below. Powered by Taffy layout engine (via
stretchable). - Component-Based Design: Compose complex visuals by nesting powerful layout primitives like
Row,Column, andImage. - Rich Styling: Gradients, multiple shadows, borders with rounded corners, and text decorations.
- Advanced Typography: Custom fonts, variable fonts, line height, alignment, and text shaping with kerning and ligatures.
- Automatic Font Fallback: Seamlessly render emojis and multilingual text.
- Flexible Output:
- Raster: Save as PNG/JPEG/WebP, or convert to NumPy/Pillow.
- Vector: Export to a clean, scalable SVG file with font embedding.
- High-Quality Rendering: Powered by Google's Skia graphics engine (via
skia-python).
Important
Upgrading from v1.x? PicTex v2.0 introduces significant changes to the layout and positioning system. Please read the Migration Guide to update your code.
It is highly recommended to install PicTex in a virtual environment to avoid conflicts with system-wide packages and potential permission issues on certain operating systems like Windows.
# 1. Create and activate a virtual environment
python -m venv .venv

# On Windows:
.\.venv\Scripts\activate

# On macOS/Linux:
# source .venv/bin/activate

# 2. Install PicTex into the active environment
pip install pictexCreating a stylized text image is as simple as building a Canvas and calling .render().
from pictex import Canvas, Shadow, LinearGradient

# 1. Create a style template using the fluent API
canvas = (
    Canvas()
    .font_family("Poppins-Bold.ttf")
    .font_size(60)
    .color("white")
    .padding(20)
    .background_color(LinearGradient(["#2C3E50", "#FD746C"]))
    .border_radius(10)
    .text_shadows(Shadow(offset=(2, 2), blur_radius=3, color="black"))
)

# 2. Render some text using the template
image = canvas.render("Hello, World! 🎨✨")

# 3. Save or show the result
image.save("hello.png")
Compose elements like Row, Column, and Text to build complex visuals. PicTex's fluent API makes styling declarative and intuitive.
from pictex import *

# 1. Build your visual components
avatar = (
    Image("avatar.png")
    .border_radius("50%")
    .background_color("silver")
    .border(3, "white")
    .box_shadows(Shadow(offset=(2, 2), blur_radius=5, color="black"))
)

user_info = Column(
    Text("Alex Doe").font_size(24).font_weight(700).color("#184e77"),
    Text("Graphic Designer").color("#edf6f9").text_shadows(Shadow(offset=(1, 1), blur_radius=1, color="black")),
).align_items("center").gap(4)

# 2. Compose them in a layout container
card = (
    Column(avatar, user_info)
    .background_color(LinearGradient(["#d9ed92", "#52b69a"]))
    .border_radius(20)
    .padding(30)
    .align_items("center")
    .gap(20)
)

# 3. Render and save the final image
canvas = Canvas().font_family("NataSans.ttf")
image = canvas.render(card)
image.save("profile_card.png")
| Preview | Description |
|---|---|
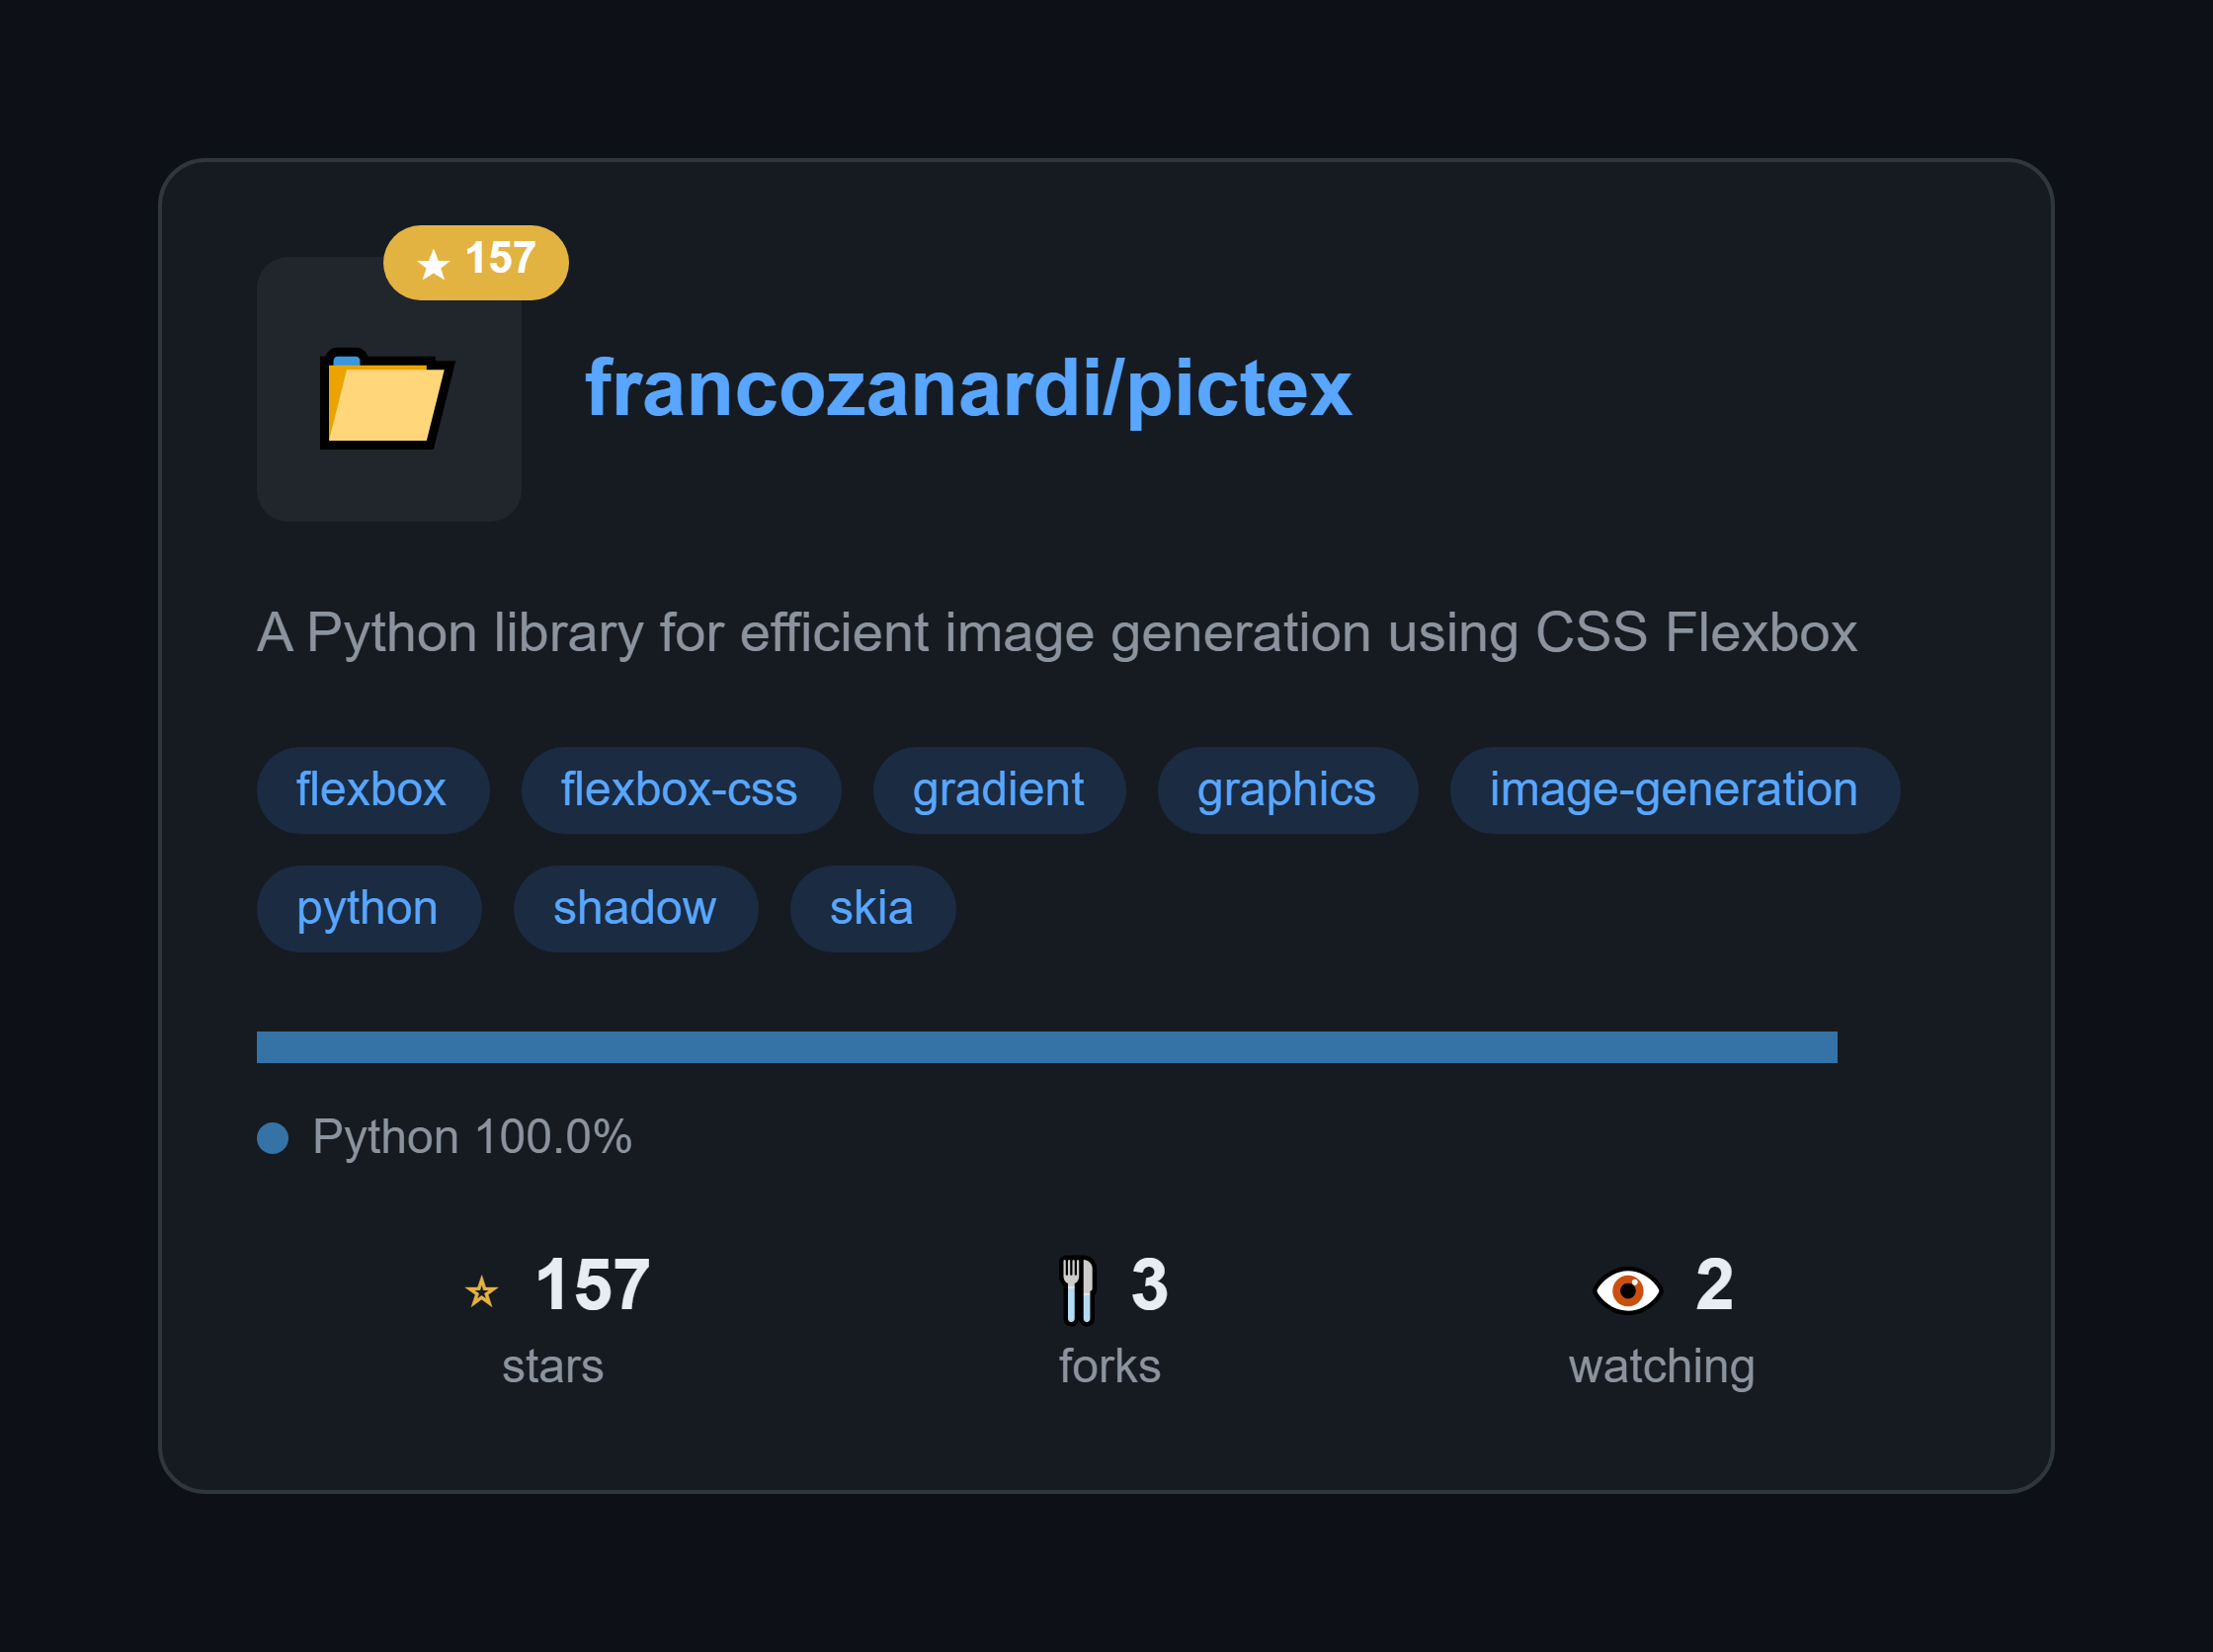 |
GitHub Repository Card Generate beautiful cards for any GitHub repo. Just change the repo name and it fetches real data from the API. View Code » |
 |
Tweet to Image Recreate the look and feel of a tweet, perfect for sharing on other social platforms. View Code » |
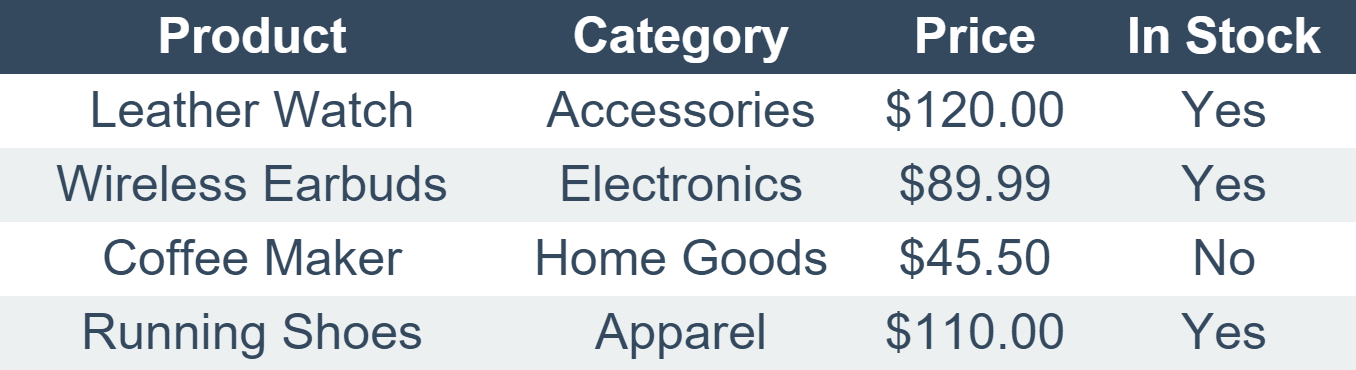 |
Data Table Generate a clean, styled table from a 2D list. Includes headers, zebra-striping, and shadows. View Code » |
 |
Code Snippet Create beautifully syntax-highlighted images of your code snippets for tutorials or social media. View Code » |
Check out the full examples directory for more!
PicTex v2.0 implements CSS Flexbox layout with high fidelity. If you're familiar with CSS, you'll feel right at home. Here's our compliance status:
| CSS Property | Status | PicTex Method | Notes |
|---|---|---|---|
display: flex |
✅ | Row() / Column() |
Implicit in layout containers |
flex-direction |
✅ | Row() / Column() |
Row = row, Column = column |
flex-wrap |
✅ | .flex_wrap() |
nowrap, wrap, wrap-reverse |
flex-flow |
N/A | Shorthand for flex-direction + flex-wrap | |
justify-content |
✅ | .justify_content() |
All standard values supported |
align-items |
✅ | .align_items() |
All standard values supported |
align-content |
Not yet | Planned for multi-line flex containers | |
gap |
✅ | .gap() |
Unified gap (not split into row-gap/column-gap) |
| CSS Property | Status | PicTex Method | Notes |
|---|---|---|---|
flex |
N/A | Shorthand for flex-grow + flex-shrink + flex-basis | |
flex-grow |
✅ | .flex_grow() |
Control growth behavior |
flex-shrink |
✅ | .flex_shrink() |
Control shrink behavior |
flex-basis |
Not yet | Can use .size() as alternative |
|
align-self |
✅ | .align_self() |
Override container alignment |
order |
❌ | Not planned | Less relevant for static image generation |
| CSS Property | Status | PicTex Method | Notes |
|---|---|---|---|
position |
✅ | .absolute_position() / .relative_position() |
Full CSS positioning support |
top / right / bottom / left |
✅ | .absolute_position(top=, right=, ...) |
CSS insets |
width / height |
✅ | .size() |
Pixels, percentages, auto, fit-content |
min-width / max-width |
✅ | .min_width() / .max_width() |
Prevent collapse/overflow |
min-height / max-height |
✅ | .min_height() / .max_height() |
Prevent collapse/overflow |
aspect-ratio |
✅ | .aspect_ratio() |
Maintain proportions |
transform: translate() |
✅ | .translate() |
Post-layout transforms |
Legend: ✅ Fully supported |
This compliance makes PicTex an excellent choice for developers who want to apply their CSS knowledge to generate images programmatically.
For a complete guide on all features, from layout and the box model to advanced styling, check out our full documentation:
- Getting Started
- Core Concepts
- Styling Guide: The Box Model
- Styling Guide: Colors & Gradients
- Styling Guide: Text & Fonts
Symptom: You may notice that advanced typography features, such as font ligatures or complex scripts, do not render correctly on Windows.
Cause: This is typically caused by an incomplete installation of the skia-python dependency, where a crucial data file (icudtl.dat) required for advanced text shaping is missing. This often happens when pip installs the package in a user-level directory without administrator privileges.
Solutions:
-
(Recommended) Reinstall in a Virtual Environment: This is the safest and most reliable method to ensure a correct installation. A virtual environment does not require administrator rights and provides a clean slate.
# If already installed, uninstall first
pip uninstall pictex skia-python

# Create and activate a new virtual environment (see installation section)
python -m venv .venv
.\.venv\Scripts\activate

# Install PicTex again
pip install pictex
-
Reinstall with Administrator Privileges: If you cannot use a virtual environment, running the installation from a terminal with administrator rights will allow
pipto install the package correctly.# Open PowerShell or Command Prompt as an Administrator pip install --force-reinstall pictex
Contributions, issues, and feature requests are welcome! Feel free to check the issues page.
docker build -f Dockerfile.test -t pictex-test .
docker run --rm -v "$(pwd):/app" pictex-test pytestThis project is licensed under the MIT License - see the LICENSE file for details.