New Shapes System
You can define a new shape using the MutableShape object.
The following example defines a rectangle:
$shape = new MutableShape();
$shape
    ->move_to(new ShieldPos(200, 400))
    ->line_to(new ShieldPos(800, 400))
    ->line_to(new ShieldPos(800, 600))
    ->line_to(new ShieldPos(200, 600))
    ->line_to(new ShieldPos(200, 400))
    ->close()
;
Nothing too special:

If you want, you can give coordinates as separate x, y values instead of ShieldPos objects:
$shape
    ->move_to(200, 400)
    ->line_to(800, 400)
    ->line_to(800, 600)
    ->line_to(200, 600)
    ->line_to(200, 400)
    ->close()
;
You can also provide coordinates relative to the last position, by passing true as a last argument
$shape
    ->move_to(200, 400)
    ->line_to(600, 0, true)
    ->line_to(0, 200, true)
    ->line_to(-600, 0, true)
    ->line_to(0, -200, true)
    ->close()
;
Finally, for straight line you can use these functions:
$shape
    ->move_to(200, 400)
    ->horizontal(600, true)
    ->vertical(200, true)
    ->horizontal(-600, true)
    ->vertical(-200, true)
    ->close()
;
If you are familiar with SVG path specs, you'll recognize that the functions used to specify the path correspond to the SVG commands.
You can load a SVG path string as follows:
$shape = SvgDParser::parse_d("M 200,400 L 800,400 800,600 200,600, 200,400 Z");The above is equivalent to the previous example.
You can build a SVG <path> with one of these methods:
// Just the d attribute
$shape->to_svg_d();

// The <path> element
$shape-->to_svg_path([
    "fillrule" => "evenodd",
    "fill" => "#3250b0",
]);There are a couple of functions that modify the path once created:
// Translate all points
$shape->translate(new ShieldPos(100, 50));
// Scale points (around (0, 0))
$shape->scale(2, 1.5);
// Reverse the order of the points
$shape->reverse();A MutableShape corresponds to a SVG <path> element, as such it can contain multiple disjointed shapes, for example when you need multiple elements, to add holes, and such.
You can access these sub-paths like follows:
$shape
    ->move_to(new ShieldPos(200, 400))
    ->line_to(new ShieldPos(450, 400))
    ->line_to(new ShieldPos(450, 600))
    ->line_to(new ShieldPos(200, 600))
    ->line_to(new ShieldPos(200, 400))
    ->close()
// close / move_to will start a new sub shape
    ->move_to(new ShieldPos(550, 400))
    ->line_to(new ShieldPos(800, 400))
    ->line_to(new ShieldPos(800, 600))
    ->line_to(new ShieldPos(550, 600))
    ->line_to(new ShieldPos(550, 400))
    ->close()
;

$shape->sub_paths()[0]; // The rectangle to the left
$shape->sub_paths()[1]; // The rectangle to the right
This is what the shape defined above looks like:

Each sub path can be transformed independently:
$shape->sub_paths()[0]->translate(new ShieldPos(100, 50));You can create deep copies of a path by cloning them:
// Clone one of the sub-paths
$new_path = clone $shape->sub_paths()[0];
// transform the clone (won't affect the original
$new_path->translate(new ShieldPos(0, 300));
// add the new sub-path to the shape
$shape->add_path($new_path);
Sub paths also allow creating offset paths (meaning a path which has been grown or shrunk by a given amount). This is useful for then you need to create hollow shapes:
// Same rectangle as above
$shape = SvgDParser::parse_d("M 200,400 L 800,400 800,600 200,600, 200,400 Z");
// Offset the path, negative means shrink
$hole = $shape->sub_paths()[0]->offset_copy(-50);
// Reverse the points in the hole to satisfy the 'evenodd' fill rule
$hole->reverse();
// Add the new sub-path to the main shape
$shape->add_path($hole);
When you apply edge styles, you need to ensure the shape is tagged correctly so the various patterns are displayed correctly.
When the edge pattern is applied to a shape, the shape will be split into segments based on where the tags are.
This is the default, the pattern is applied to the outside of the shape.
If you don't add tags, every sub-path corresponds to a single NORMAL segment
$shape = new MutableShape();
$shape
->move_to(new ShieldPos(200, 400))
->line_to(new ShieldPos(800, 400))
->line_to(new ShieldPos(800, 600))
->line_to(new ShieldPos(200, 600))
->line_to(new ShieldPos(200, 400))
->close()
;
// Apply the edge style into a new shape called $modified
$edge = EdgeType::load("rayonny");
$compiled = $shape->compile();
$modified = new MutableShape();
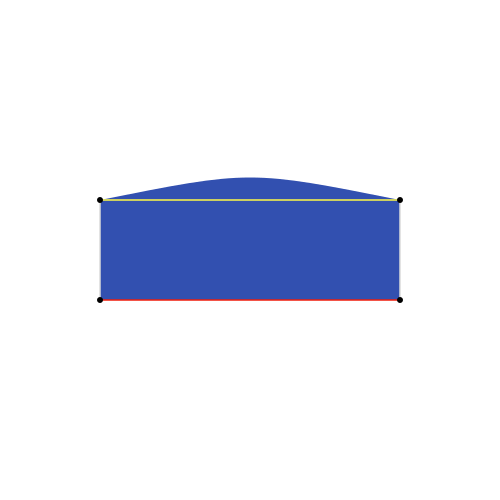
$edge->apply($compiled, $modified, 100, 100);Applied pattern, with the original shape highlighted in orange:
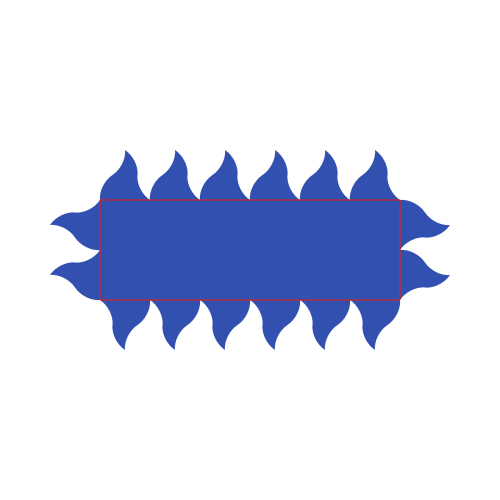
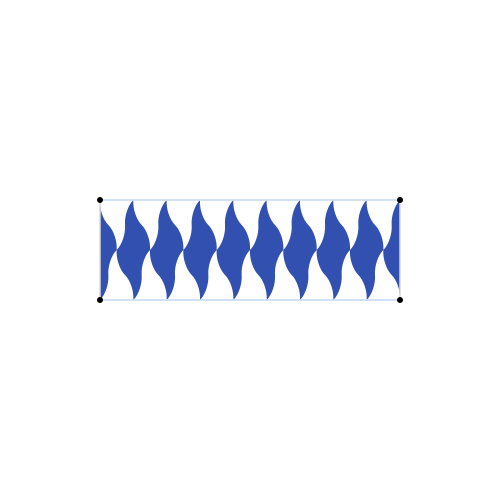
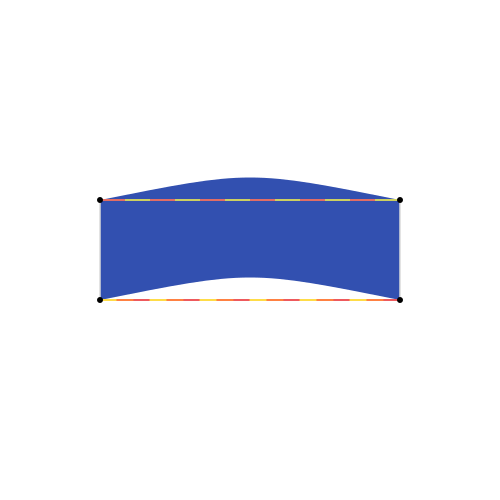
In the example above the pattern size (100) fits nicely within the size of the edges but let's see what happens when we change its size to 70:
$shape = new MutableShape();
$shape
    ->move_to(new ShieldPos(200, 400))
    ->line_to(new ShieldPos(800, 400))
    ->line_to(new ShieldPos(800, 600))
    ->line_to(new ShieldPos(200, 600))
    ->line_to(new ShieldPos(200, 400))
    ->close()
;

// Apply the edge style into a new shape called $modified
$edge = EdgeType::load("rayonny");
$compiled = $shape->compile();
$modified = new MutableShape();
$edge->apply($compiled, $modified, 70, 100);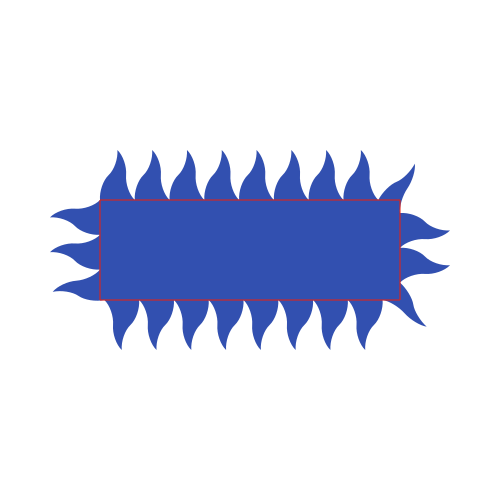
Now the pattern looks off around the corners because the whole rectangle is a single segment.
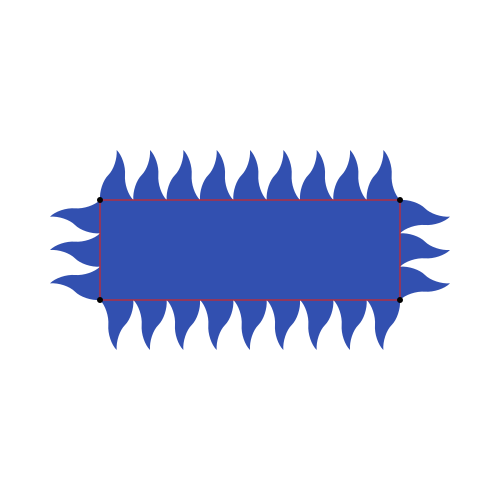
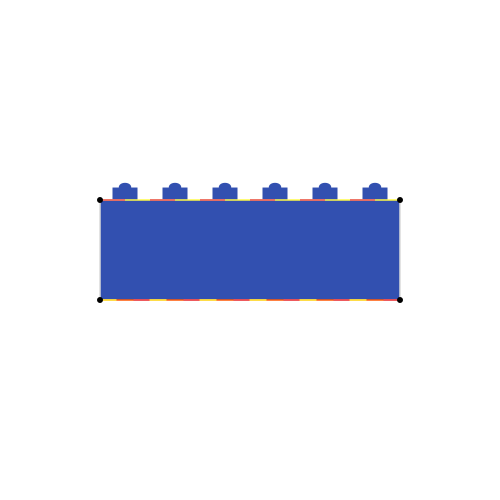
We can tag multiple NORMAL segments to make sure the patterns ends at each corner:
$shape = new MutableShape();
$shape
    ->move_to(new ShieldPos(200, 400))
    ->tag_segment(BezierSegmentFlags::NORMAL)
    ->line_to(new ShieldPos(800, 400))
    ->tag_segment(BezierSegmentFlags::NORMAL)
    ->line_to(new ShieldPos(800, 600))
    ->tag_segment(BezierSegmentFlags::NORMAL)
    ->line_to(new ShieldPos(200, 600))
    ->tag_segment(BezierSegmentFlags::NORMAL)
    ->line_to(new ShieldPos(200, 400))
    ->close()
;

// Apply the edge style into a new shape called $modified
$edge = EdgeType::load("rayonny");
$compiled = $shape->compile();
$modified = new MutableShape();
$edge->apply($compiled, $modified, 70, 100);
Below the end points of each segment have been highlighted with black dots.
This marks segments that shouldn't have the pattern applied to them.
$shape = new MutableShape();
$shape
    ->move_to(new ShieldPos(200, 400))
    ->tag_segment(BezierSegmentFlags::NORMAL)
    ->line_to(new ShieldPos(800, 400))
    ->tag_segment(BezierSegmentFlags::PLAIN)
    ->line_to(new ShieldPos(800, 600))
    ->tag_segment(BezierSegmentFlags::NORMAL)
    ->line_to(new ShieldPos(200, 600))
    ->tag_segment(BezierSegmentFlags::PLAIN)
    ->line_to(new ShieldPos(200, 400))
    ->close()
;

// Apply the edge style into a new shape called $modified
$edge = EdgeType::load("rayonny");
$compiled = $shape->compile();
$modified = new MutableShape();
$edge->apply($compiled, $modified, 70, 100);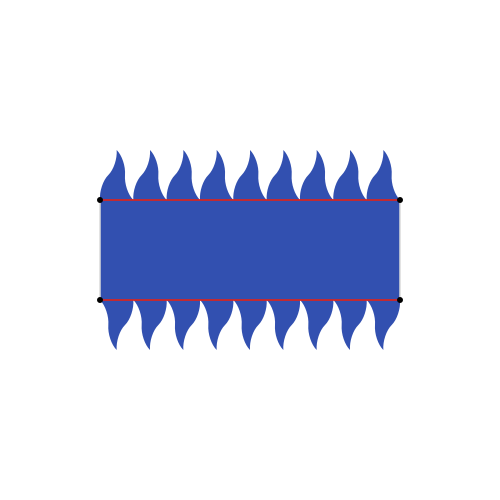
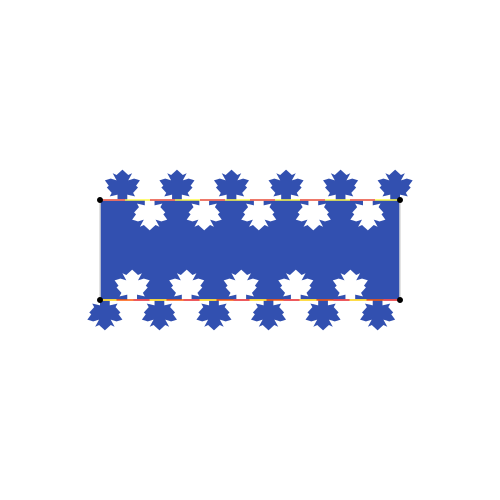
Some edge shapes are applied to the whole length of the segment, these need special tagging as not all shapes are fit for such patterns.
Note that while you can have details in a STRAIGHT segment, it will be treated as a straight line by these patterns.
$shape = new MutableShape();
$shape
    ->move_to(new ShieldPos(200, 400))
    ->tag_segment(BezierSegmentFlags::STRAIGHT)
    ->line_to(new ShieldPos(800, 400))
    ->tag_segment(BezierSegmentFlags::PLAIN)
    ->line_to(new ShieldPos(800, 600))
    ->tag_segment(BezierSegmentFlags::NORMAL)
    ->line_to(new ShieldPos(200, 600))
    ->tag_segment(BezierSegmentFlags::PLAIN)
    ->line_to(new ShieldPos(200, 400))
    ->close()
;

// Apply the edge style into a new shape called $modified
$edge = EdgeType::load("arched");
$compiled = $shape->compile();
$modified = new MutableShape();
$edge->apply($compiled, $modified, 70, 100);
The pattern only applies to the top edge because it's the only one that is marked as STRAIGHT.
Flips the direction of the pattern.
$shape = new MutableShape();
$shape
    ->move_to(new ShieldPos(200, 400))
    ->tag_segment(BezierSegmentFlags::MIRROR)
    ->line_to(new ShieldPos(800, 400))
    ->tag_segment(BezierSegmentFlags::PLAIN)
    ->line_to(new ShieldPos(800, 600))
    ->tag_segment(BezierSegmentFlags::MIRROR)
    ->line_to(new ShieldPos(200, 600))
    ->tag_segment(BezierSegmentFlags::PLAIN)
    ->line_to(new ShieldPos(200, 400))
    ->close()
;

// Apply the edge style into a new shape called $modified
$edge = EdgeType::load("rayonny");
$compiled = $shape->compile();
$modified = new MutableShape();
$edge->apply($compiled, $modified, 70, 100);
Note how the pattern goes on the inside of the rectangle, rather than the outside
Many edge patterns have some symmetry to them, with the same shape alternating between the inside and outside of the modified shape.
By default they just repeat the pattern to fill the length of a segment:
$shape = new MutableShape();
$shape
    ->move_to(new ShieldPos(200, 400))
    ->tag_segment(BezierSegmentFlags::NORMAL)
    ->line_to(new ShieldPos(800, 400))
    ->tag_segment(BezierSegmentFlags::PLAIN)
    ->line_to(new ShieldPos(800, 600))
    ->tag_segment(BezierSegmentFlags::NORMAL)
    ->line_to(new ShieldPos(200, 600))
    ->tag_segment(BezierSegmentFlags::PLAIN)
    ->line_to(new ShieldPos(200, 400))
    ->close()
;

// Apply the edge style into a new shape called $modified
$edge = EdgeType::load("erable");
$compiled = $shape->compile();
$modified = new MutableShape();
$edge->apply($compiled, $modified, 100, 100);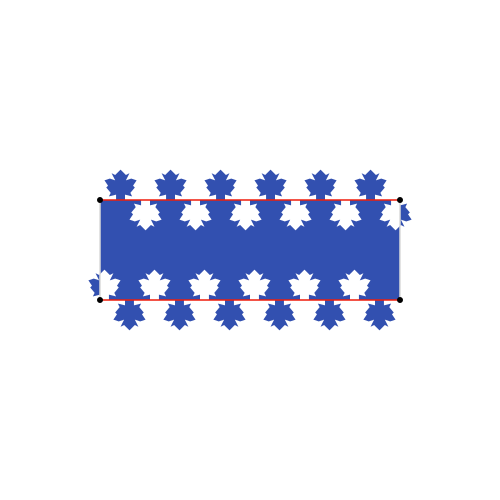
If you tag a segment as SYMMETRICAL such patterns will end on the same side of the shape as they started:
$shape = new MutableShape();
$shape
    ->move_to(new ShieldPos(200, 400))
    ->tag_segment(BezierSegmentFlags::SYMMETRICAL)
    ->line_to(new ShieldPos(800, 400))
    ->tag_segment(BezierSegmentFlags::PLAIN)
    ->line_to(new ShieldPos(800, 600))
    ->tag_segment(BezierSegmentFlags::SYMMETRICAL)
    ->line_to(new ShieldPos(200, 600))
    ->tag_segment(BezierSegmentFlags::PLAIN)
    ->line_to(new ShieldPos(200, 400))
    ->close()
;

// Apply the edge style into a new shape called $modified
$edge = EdgeType::load("erable");
$compiled = $shape->compile();
$modified = new MutableShape();
$edge->apply($compiled, $modified, 100, 100);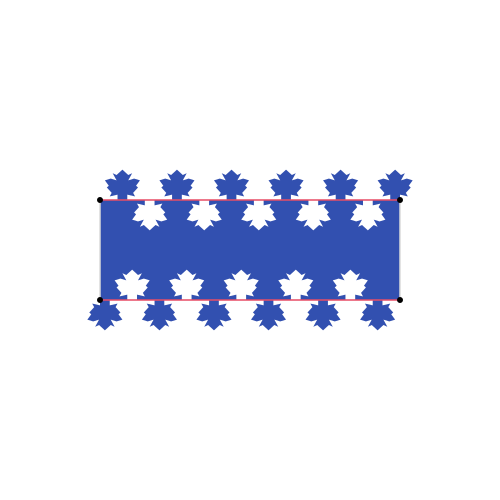
Patterns related to embattled should only be drawn on the "upper" edges of an ordinary, or they otherwise need to be drawn differently based on whether it's an "upper" or "lower" edge.
You can mark these edges with UNDERSIDE.
$shape = new MutableShape();
$shape
    ->move_to(new ShieldPos(200, 400))
    ->tag_segment(BezierSegmentFlags::NORMAL)
    ->line_to(new ShieldPos(800, 400))
    ->tag_segment(BezierSegmentFlags::PLAIN)
    ->line_to(new ShieldPos(800, 600))
    ->tag_segment(BezierSegmentFlags::UNDERSIDE)
    ->line_to(new ShieldPos(200, 600))
    ->tag_segment(BezierSegmentFlags::PLAIN)
    ->line_to(new ShieldPos(200, 400))
    ->close()
;

// Apply the edge style into a new shape called $modified
$edge = EdgeType::load("cupolaed");
$compiled = $shape->compile();
$modified = new MutableShape();
$edge->apply($compiled, $modified, 100, 100);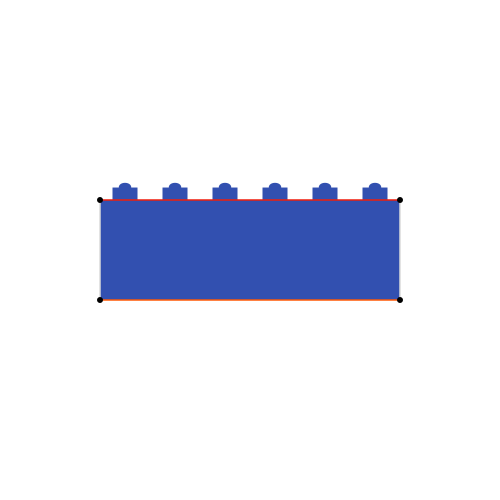
Some flags can be combined together to accomodate different pattern types.
$shape = new MutableShape();
$shape
    ->move_to(new ShieldPos(200, 400))
    ->tag_segment(BezierSegmentFlags::STRAIGHT|BezierSegmentFlags::SYMMETRICAL)
    ->line_to(new ShieldPos(800, 400))
    ->tag_segment(BezierSegmentFlags::PLAIN)
    ->line_to(new ShieldPos(800, 600))
    ->tag_segment(BezierSegmentFlags::UNDERSIDE|BezierSegmentFlags::STRAIGHT|BezierSegmentFlags::SYMMETRICAL)
    ->line_to(new ShieldPos(200, 600))
    ->tag_segment(BezierSegmentFlags::PLAIN)
    ->line_to(new ShieldPos(200, 400))
    ->close()
;
- You must specify the path in clockwise order for the pattern to be applied correctly. If you have a counter-clockwise path, you can call
->reverse()to fix it. You can use counter-clockwise sub paths to add "holes" to your shape. - Make sure to close your paths or some artifacts might appear when applying edge effects
- Not all of SVG is supported, most notably there is no support for "smooth" commands and elliptical arcs.
The patterns need to be applied to compiled shapes, a compiled shape cannot be modified (but you can still modify the original shape) and they allow extracting some useful information, for example positions along the path:
$shape = new MutableShape();
$shape
    ->move_to(new ShieldPos(50, 50))
    ->cubic_to(new ShieldPos(100, 400), new ShieldPos(300, 300), new ShieldPos(450, 450))
;
$compiled = $shape->compile();

$sub_path = $compiled->sub_paths()[0];
$p1 = $sub_path->point_at_length($sub_path->length() / 3);
$p2 = $sub_path->point_at_length($sub_path->length() * 2 / 3);
Compiled shapes also clean up residual dummy sub-paths, such as those created when calling ->close() on a Mutable Shape.
As a rule of thumb, you should use MutableShapes to define and modify the shape and CompiledShape for rendering.
Edge effects are defined as SVG files under svg/edges.
Styling information (like color, stroke width, and similar) are discarded and only the shape of the first <path> element is considered.
You can tag metadata on the <path> element to tell give drawshield certain options on how to handle the edge pattern.
Metadata is provided using attributes in the form data-srawshield-(name)="(value)" in the tables below only the (name) part of the attribute is shown, for simplicity.
| Name | Values | Default | Description |
|---|---|---|---|
flip-y |
0|1
|
0 |
If 1, flips the y coordinates before loading the shape |
reverse |
0|1
|
0 |
If 1, reverses the order of the points before loading the shape |
type |
repeating|full
|
repeating |
Type of pattern (See below) |
For these patterns, the given shape is stretched to cover the whole segment.
For these patterns, the given shape is scaled to fit the feature size and repeated along the segments.
| Name | Values | Default | Description |
|---|---|---|---|
reverse-behaviour |
normal|flip|plain
|
normal |
See "Embattled" below. |
symmetrical |
0|1
|
0 |
If 1, the pattern can be cut in half to better align it on SYMMETRICAL segments |
scale-x |
number | 1 |
How much to scale the pattern based on the feature size (along the path) |
scale-x |
number | 1 |
How much to scale the pattern based on the feature size (along the path normal) |
Embattled patterns need to look different on "upper" and "lower" edges, so they need metadata on how to handle UNDERSIDE segments. This is done with reverse-behaviour:
-
normalTreatUNDERSIDElikeNORMAL(this is the default) -
reverseTreatUNDERSIDElikeREVERSE -
plainTreatUNDERSIDElikePLAIN