Hibernate Introduction and basic opertaion
Hibernate concept and API usages
Hibernate configuration, 1to many and many to many
Hibernate query
- Java EE three Layers
-
Web - struts2 框架
-
Service - Spring 框架
-
Dao - Hibernate 框架
A comparison between JDBC and Hibernate:

- MVC 思想: 是一种公用的思想
-
M: 模型
-
V:视图
-
C:控制器
- What is Hibernate?
框架: 写一个程序,使用框架之后,能帮我们实现一部分功能。使用框架好处,少写一部分代码。
Hibernate(冬眠) 框架:应用在javaEE三层中的dao层的框架。
在dao层里面做对数据库crud操作,使用hibernate实现crud操作,hibernate底层代码就是jdbc,hibernate对jdbc进行了封装。
好处,1.不需要写复杂jdbc的代码了。2. 不需要写sql语句。3. Hibernate开源轻量级框架。4. Hibernate版本5.x。
- What is ORM?
在web中,javabean可以封装数据,在框架阶段,叫做实体类。
Object-Relational-Mapping:对象关系映射, 让实体类和数据表进行一一对应关系,让实体类属性和表里面字段对应。不需要直接操作数据库表,而操作表对应实体类就行。
Find the detailed comparison from the picture under /note.
- Create Hibernate Environment
-
import jar files: folder (JPA + Requires) + log4j.jar + mysql-connector-java.jar + slf4j-api.jar + slf4j-log4j12.jar
-
Create Entity Class (JavaBean)
public class User {
	/* one unique value */
	private int uid;
	private String username;
	private String password;
	private String address;
	public int getUid() {
		return uid;
	}
	public void setUid(int uid) {
		this.uid = uid;
	}
	public String getUsername() {
		return username;
	}
	public void setUsername(String username) {
		this.username = username;
	}
	public String getPassword() {
		return password;
	}
	public void setPassword(String password) {
		this.password = password;
	}
	public String getAddress() {
		return address;
	}
	public void setAddress(String address) {
		this.address = address;
	}
}-
Create database table (Hibernate has tool to create the table automatically without manually doing that).
-
配置实体类和数据库表一一对应关系(映射关系)
-
Create xml configuration file,实体类所在的包里进行创建,实体类名称.hbm.xml
-
Include hibernate xml dtd.
<!DOCTYPE hibernate-mapping PUBLIC
    "-//Hibernate/Hibernate Mapping DTD 3.0//EN"
"http://www.hibernate.org/dtd/hibernate-mapping-3.0.dtd">- Configure mapping information.
<hibernate-mapping>
	<!--
		1. Class Map to Table
		name: Full path to Entity class
		table: Table name in DB
	 -->
	<class name="com.liyiandxuegang.entity.User" table="t_user">
		<!-- 2. Map Entity id to Table id -->
		<!--
			id has two properties:
			name: Entity id name
			column: Table column name
		 -->
		<id name="uid" column="uid">
			<!--
				Increase strategy id by?
				native: primary key, auto_increment
			 -->
			<generator class="native"></generator>
		</id>
		<!-- 3. Map other fields in Entity to Table -->
		<property name="username" column="username" />
		<property name="password" column="password" />
		<property name="address" column="address" />
	</class>
</hibernate-mapping>- Create hibernate core configuration file: name and location is fixed. (under src)
- xml header
<!DOCTYPE hibernate-configuration PUBLIC
	"-//Hibernate/Hibernate Configuration DTD 3.0//EN"
"http://www.hibernate.org/dtd/hibernate-configuration-3.0.dtd">- hibernate操作过程中,自动加载的文件只有核心配置文件,其他配置文件不会加载。
<hibernate-configuration>
	<session-factory>
		<!-- Part 1: DB Information -->
		<property name="hibernate.connection.driver_class">com.mysql.jdbc.Driver</property>
		<property name="hibernate.connection.url">jdbc:mysql://localhost:8889/test</property>
		<property name="hibernate.connection.username">root</property>
		<property name="hibernate.connection.password">root123</property>

		<!-- Part 2: Hibernate Information (Optional) -->
		<property name="hibernate.show_sql">true</property>
		<property name="hibernate.format_sql">true</property>
		<!--
			Hibernate Create table, after we configure the settings
			update: If no table, create table.
		 -->
		<property name="hibernate.hbm2ddl.auto">update</property>
		<!--
			db Dialect
		 -->
		<property name="hibernate.dialect">org.hibernate.dialect.MySQLDialect</property>

		<!-- Part 3: Including mapping xml -->
		<mapping resource="com/liyiandxuegang/entity/User.hbm.xml" />
	</session-factory>
</hibernate-configuration>- Test: Load core setting xml file -> Create SessionFactory -> Create session object -> Open Transaction -> Logic -> Commit -> Close Resources
@Test
	public void test() {
		// 1. Load core xml file, since name and loaction is fixed, so no params needed.
		Configuration cfg = new Configuration();
		cfg.configure();

		// 2. Create SessionFactory, according to mapping relation, create table in DB.
		SessionFactory sessionFactory = cfg.buildSessionFactory();

		// 3. Create session object, like connections in JDBC
		Session session = sessionFactory.openSession();

		// 4. Create transaction
		Transaction transaction = session.beginTransaction();

		// 5. CRUD
		// Insert
		User user = new User();
		user.setUsername("Frank Wang");
		user.setPassword("123456");
		user.setAddress("Canada");
		// Call session save
		session.save(user);

		// 6. Commit transactions
		transaction.commit();

		// 7. Close resources
		session.close();
		sessionFactory.close();
}-
No requires for filename and location
-
Class tag: name property: Entity full path
-
Name property values in id tag and property tags should be same as Entity properties.
-
All subtags should be under
-
Part 1 required, Part 2 optional, Part 3 required.
-
File name and location should be fixed.
Configuration cfg = new Configuration();
cfg.configure();
[Load configuration file] Program will go to src folder, and find "hibernate.cfg.xml" file. Then, load configuration file into Object.
// What will this do?
// 1. Connect to db, and create the table, if it is not disabled.
// 2. It needs lots of resources.
// 3. One project, have one sessionFactory object.
cfg.buildSessionFactory();
How to create only one sessionFactory Object
// Create util class, and use static code block.
public class HibernateUtils {
	private static final Configuration cfg;
	private static final SessionFactory sessionFactory;
	// Static, only run once.
	static {
		cfg = new Configuration();
		cfg.configure();
		sessionFactory = cfg.buildSessionFactory();
	}
	// return session factory
	public static SessionFactory getSessionFactory() {
		return sessionFactory;
	}
}-
session类似于jdbc中的connection
-
调用session里面的方法实现crud的操作。 save, update, delete, get
-
session对象是单线程对象, session对象不能公用,只能自己使用。
-
Transaction Object: beginTransaction(),
-
Methods: commit(), rollback();
-
Concept:
原子性,一致性,隔离性,持久性;
-
Step 1. Open preferences, and search "xml catalog"
-
Step 2. Click Add, fill the following information.
-
Location: Find dtd or schema file from local system.
-
Key Type: URI;
-
Key: Copy the url http://www.hibernate.org/dtd/hibernate-mapping-3.0.dtd;
-
Restart Eclipse.
-
属性私有化
-
方法set和get要使用public修饰
-
实体类有一个属性必须有唯一值。
-
实体类属性,建议不适应基本数据类型,而使用基本数据对应的包装类
-
八个数据基本类型:int-> Integer; char -> Character; double -> Double
-
why? For example: int score;
-
If student got 0, int score = 0; but if the student missed the exam, int score = 0 can not represent the student didn't show up.
-
But if Integer score = 0, means student got 0; If no show, then Integer score = null;
-
<generator class="native"></generator>根据底层数据库对自动生成表示符的能力来选择identity,sequence,hilo三种生成器的一种。
Hibernate采用128为的UUID算法来生成标识符。该算法能够在网络环境中生成唯一的字符串标识符,其UUID被编码为一个长度为32位的十六进制字符串。 这种策略不流行,因为字符串类型的主键比整数类型的主键占用更多的数据库空间。适用于代理主键。
private String uuid;and in xml settings, we need to change id generator by uuid
<generator class="uuid"></generator>- Call method save of session
session.save(user);- Query by Id: call method of get in session
	@Test
	public void test1() {
		// Call sessionFactory
		SessionFactory sessionFactory = HibernateUtils.getSessionFactory();
		Session session = sessionFactory.openSession();
		//Open transactions
		Transaction transaction = session.beginTransaction();
		// Query by id
		User user = session.get(User.class, 1);
		System.out.println(user);
		// Commit
		transaction.commit();
		// Close
		session.close();
		sessionFactory.close();
}- Update: First query and then update
User user = session.get(User.class, 1);
user.setPassowrd("123");
session.update(user); // session.save(user); - Delete:
- Query get the Entity instance, and delete (recommend method)
User user = session.get(User.class, 1);
session.delete(user);- Create Entity instance, and delete (Not recommended)
User user = new User();
user.setUid(1);
session.delete(user);- 瞬时态: 对象中没有id值,对象和session没有关联。主要用来save操作。
User user = new User();
user.setUsername("Frank");
user.setPassword("*sdfsfasww");
user.setAddress("Earch");
session.save(user);- 持久态:对象中有id值。并且和session有关联。
User user = session.get(User.class, 1);- 托管态: 对象有id值,但是对象跟session无关系。 (使用的不多)
User user=  new User();
user.setUid(3);
session.save(user);Add new record
User user = new User();
user.setUsername("jack");
user.setPassword("529");
user.setAddress("Korean");

session.saveOrUpdate(user);
Update record
User user = new User();
user.setUid(6);
user.setUsername("Rose");
user.setPassword("12312");
user.setAddress("Harbour Landing");

session.saveOrUpdate(user);
update record
User user = session.get(User.class, 7);
user.setUsername("LiLei");

session.saveOrUpdate(user);数据存到数据库,而数据库本身是一个文件系统,Java中要使用流的方式来操作效率不是很高。
-
我们可以把数据存到内存中,不需要流方式读取,直接读取内存中数据。
-
把数据放到内存中,提高读取效率
-
Hibernate框架中提供了很多优化方式,hibernate的缓存就是一个优化方式。
-
缓存特点:
-
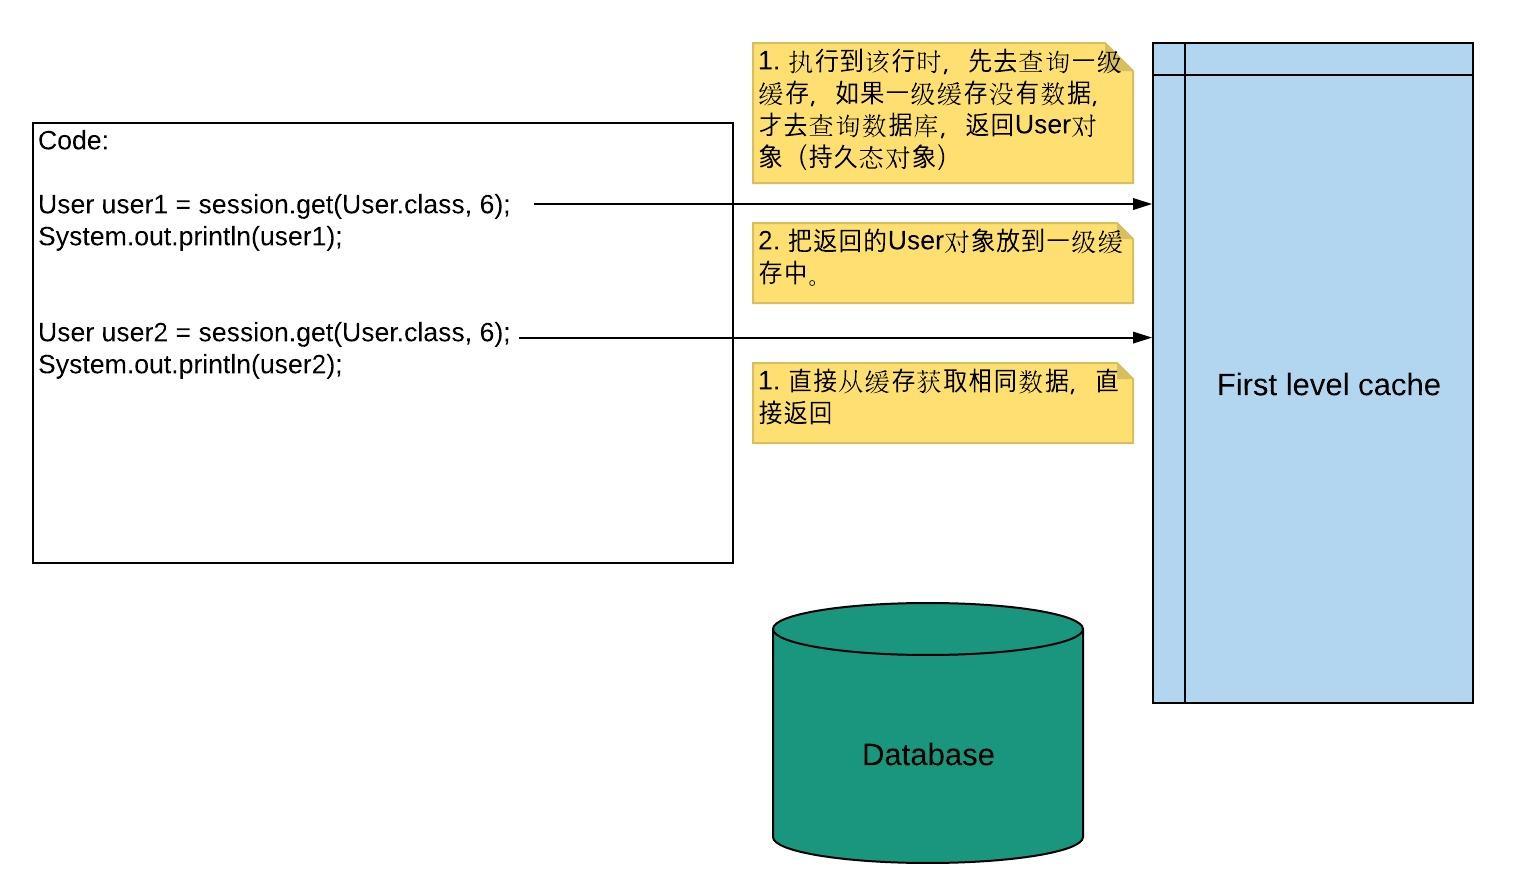
Hibernate first-level cache: 默认是开启状态;使用范围是session范围;存储的数据必须为持久态数据;
-
Hibernate second-level cache: 二级缓存已经被redis替代。需要配置来打开,使用范围是sessionFactory范围。
User user1 = session.get(User.class, 6);
System.out.println(user1);

User user2 = session.get(User.class, 6);
System.out.println(user2);
The second time, hibernate won't query db, and the console prints the message below:
Hibernate:
   select
       user0_.uid as uid1_0_0_,
       user0_.username as username2_0_0_,
       user0_.password as password3_0_0_,
       user0_.address as address4_0_0_
   from
       t_user user0_
   where
       user0_.uid=?
User [uid=6, username=Liyi, password=123456, address=Canada]
User [uid=6, username=Liyi, password=123456, address=Canada]s
It only do the query once.
See below how does it work?
- 持久态实体,会自动更新数据库
User user = session.get(User.class, 1);
user.setUsername("FrankandLiyi"); // data will be updated automatically.
We don't need to call function session.update(user), the data in db has been updated.
How it works?

- 脏读; 2. 不可重复读; 3. 虚读
hibernate.connect.isolation = 4
1 - Read uncommited isolation
2 - Read committed isolation
4 - Repeatable read isolation
8 - Serializable isolcaiton

<property name="hibernate.connection.isolcation">4</property>- code
SessionFactory sessionFactory = null;
Session session = null;
Transaction transaction = null;
try {
	// open transaction
	// commit transaction
	sessionFactory = HibernateUtil.getSessionFactory();
	session = sessionFactory.openSession();
	transaction = session.beginTransaction();

	// you code is here

	transaction.commit();

} catch() {
   // rollback transcation
   transaction.rollback();
} finally {
	// close transaction
	session.close();
	sessionFactory.close();
}-
session is similar to JDBC connection.
-
Bind to local thred.
- Add to core configuration file:
<!-- 配置与本地线程绑定的session -->
<property name="hibernate.current_session_context_class">thread</property>- Get local session method
// retur local thread
public static Session getSessionObj() {
	return sessionFactory.getCurrentSession();
}- No need to close the session if it is defined by this way.
No need to write SQL statement, but you need hql statement. Hibernate query language.
HQL VS SQL?
-
sql works directly on table and talbe fields
-
hql works on Entity class and Entity properties
- How to use? hql
-
Create Query object
-
Class query method and return the result.
- code
Query query = session.createQuery("from User");
// get all user list
List<User> userList = query.list();
for(User user : userList) {
	System.out.println(user);
}Code shows below:
Criteria criteria = session.createCriteria(User.class);
List<User> userList = criteria.list();- Sometimes, we have to call sql statement.
SQLQuery sqlQuery = session.createSQLQuery("SELECT * FROM t_user");
sqlQuery.addEntity(User.class);
List<User> userList = sqlQuery.list();- One to one
- One husband & one wife
- Many to Many
-
example: Order & Prods
-
创建一个第三张表,来维护两者之间的关系


- One to Many
-
example: Categorizations & Prods;
-
Customer & Contact
以客户和联系人为例:
-
创建实体类
-
让两个实体类之间互相表示
-
客户实体类里面表示多个联系人;
-
在联系人里面表示所属客户;
- 配置映射关系
-
把映射基本配置完成
-
在映射文件中,配置一对多关系
- 在客户映射文件中,表示所有联系人
	<!--
			表示所有联系人, 使用set标签
			使用set标签表示所有联系人
			set标签里面有name属性:
				属性值写在客户实体类里面表示联系人的set集合名称
		-->
		<set name="setLinkMans">
			<!--
				hibernate中,双向维护外健,在一和多的地方都需要配置外健。
				key中column值就是外键名称。
			-->
			<key column="clid" />
			<one-to-many class="com.liyiandxuegang.newentity.LinkMan"/>
</set>- 在联系人映射文件中,表示所属客户
    <!--
   		表示联系人所属的关系
   			name: 因为在联系人实体类使用customer对象表示,写customer名称
   			class: customer全路径
   			column: 外键名称
   	 -->
<many-to-one name="customer" class="com.liyiandxuegang.newentity.Customer" column="clid" />- Include to core hibernate settings
<mapping resource="com/liyiandxuegang/newentity/Customer.hbm.xml"/>
<mapping resource="com/liyiandxuegang/newentity/LinkMan.hbm.xml"/>
Test it, and you will find there are two tables created in db.
- 级联保存:
添加一个客户,为这个客户添加多个联系人
实现:添加一个客户,为这个客户添加一个联系人
Solution 1:
			// Add one customer and one link man
			// 1. Create customer and linkman
			Customer customer = new Customer();
			customer.setCustName("SGI");
			customer.setCustLevel("vip");
			customer.setCustMobile("306-581-8888");
			customer.setCustPhone("911");
			customer.setCustSource("Internet");

			LinkMan linkMan = new LinkMan();
			linkMan.setLkm_name("Frank");
			linkMan.setLkm_gender("Male");
			linkMan.setLkm_phone("8384");

			// 2. Create the connection between customer and linkman
			// 2.1 Customer and linkman
			customer.getSetLinkMans().add(linkMan);
			// 2.2 Linkman and customer
			linkMan.setCustomer(customer);

			// 3. Save to db
			session.save(customer);
			session.save(linkMan);
Solution 2
一般是根据客户添加联系人:
第一步: 在客户映射文件中进行配置
<!--Add cascade attribute to set tag-->
<set name="setLinkMans" cascade="save-update">
第二步: 创建客户和联系人对象,只需要把联系人放到客户里面就可以了。
第三步:只需要保存客户就行了。
   @Test
   public void testAdd2() {
   	SessionFactory sessionFactory = null;
   	Session session = null;
   	Transaction transaction = null;
   	try {
   		sessionFactory = HibernateUtils.getSessionFactory();
   		session = sessionFactory.openSession();
   		transaction = session.beginTransaction();

   		// Add one customer and one link man
   		// 1. Create customer and linkman
   		Customer customer = new Customer();
   		customer.setCustName("SGI CANADA");
   		customer.setCustLevel("Normal");
   		customer.setCustMobile("306-581-8080");
   		customer.setCustPhone("911");
   		customer.setCustSource("Book");

   		LinkMan linkMan = new LinkMan();
   		linkMan.setLkm_name("Lee");
   		linkMan.setLkm_gender("FeMale");
   		linkMan.setLkm_phone("88888888");

   		// 2. Create the connection between customer and linkman
   		customer.getSetLinkMans().add(linkMan);

   		// 3. Save to db
   		session.save(customer);

   		transaction.commit();
   	} catch (Exception e) {
   		transaction.rollback();
   	} finally {
   		session.close();
   		sessionFactory.close();
   	}
}- 级连删除
删除一个客户,把相对应的联系人也删除
需求:删除一个客户,并且把客户里面所有的联系人删除
第一步:在客户映射文件set标签中,进行配置
<set name="setLinkMans" cascade="save-update, delete"> 第二步:删除
// delete the customer
Customer customer = session.get(Customer.class, 3);
session.delete(customer);

/*
删除步骤:
1. 查询客户
2. 根据外键值,查询联系人
3. 设置联系人的外键值为null
4. 删除联系人
5. 删除客户

Hibernate:
   select
       customer0_.cid as cid1_0_0_,
       customer0_.custName as custName2_0_0_,
       customer0_.custLevel as custLeve3_0_0_,
       customer0_.custSource as custSour4_0_0_,
       customer0_.custPhone as custPhon5_0_0_,
       customer0_.custMobile as custMobi6_0_0_
   from
       t_customer customer0_
   where
       customer0_.cid=?
Hibernate:
   select
       setlinkman0_.clid as clid5_1_0_,
       setlinkman0_.lkm_id as lkm_id1_1_0_,
       setlinkman0_.lkm_id as lkm_id1_1_1_,
       setlinkman0_.lkm_name as lkm_name2_1_1_,
       setlinkman0_.lkm_gender as lkm_gend3_1_1_,
       setlinkman0_.lkm_phone as lkm_phon4_1_1_,
       setlinkman0_.clid as clid5_1_1_
   from
       t_linkman setlinkman0_
   where
       setlinkman0_.clid=?
Hibernate:
   update
       t_linkman
   set
       clid=null
   where
       clid=?
Hibernate:
   delete
   from
       t_linkman
   where
       lkm_id=?
Hibernate:
   delete
   from
       t_customer
   where
       cid=?
*/- 一对多修改操作
	@Test
   public void testupdate() {
   	SessionFactory sessionFactory = null;
   	Session session = null;
   	Transaction transaction = null;
   	try {
   		sessionFactory = HibernateUtils.getSessionFactory();
   		session = sessionFactory.openSession();
   		transaction = session.beginTransaction();

   		// get linkman,
   		Customer customer = session.get(Customer.class, 1);
   		LinkMan linkMan = session.get(LinkMan.class, 2);
   		// Set persistence value
   		customer.getSetLinkMans().add(linkMan);
   		linkMan.setCustomer(customer);

   		transaction.commit();
   	} catch (Exception e) {
   		transaction.rollback();
   	} finally {
   		session.close();
   		sessionFactory.close();
   	}
   }
因为hibernate双向维护外健,在客户和联系人里面都需要维护外键,修改客户时,修改一次外键,而修改联系人时,外键被修改了又一次。这样会造成资源浪费
解决:让客户这方放弃外健的维护。
<set name="setLinkMans" cascade="save-update, delete" inverse="true">
<!--
Only one time update.
Hibernate:
   select
       customer0_.cid as cid1_0_0_,
       customer0_.custName as custName2_0_0_,
       customer0_.custLevel as custLeve3_0_0_,
       customer0_.custSource as custSour4_0_0_,
       customer0_.custPhone as custPhon5_0_0_,
       customer0_.custMobile as custMobi6_0_0_
   from
       t_customer customer0_
   where
       customer0_.cid=?
Hibernate:
   select
       linkman0_.lkm_id as lkm_id1_1_0_,
       linkman0_.lkm_name as lkm_name2_1_0_,
       linkman0_.lkm_gender as lkm_gend3_1_0_,
       linkman0_.lkm_phone as lkm_phon4_1_0_,
       linkman0_.clid as clid5_1_0_
   from
       t_linkman linkman0_
   where
       linkman0_.lkm_id=?
Hibernate:
   select
       setlinkman0_.clid as clid5_1_0_,
       setlinkman0_.lkm_id as lkm_id1_1_0_,
       setlinkman0_.lkm_id as lkm_id1_1_1_,
       setlinkman0_.lkm_name as lkm_name2_1_1_,
       setlinkman0_.lkm_gender as lkm_gend3_1_1_,
       setlinkman0_.lkm_phone as lkm_phon4_1_1_,
       setlinkman0_.clid as clid5_1_1_
   from
       t_linkman setlinkman0_
   where
       setlinkman0_.clid=?
Hibernate:
   update
       t_linkman
   set
       lkm_name=?,
       lkm_gender=?,
       lkm_phone=?,
       clid=?
   where
       lkm_id=?
-->
- 多对多的配置
实例:用户和角色演示
第一步: 创建实体类,用户和角色
第二步:让两个实体类相互表示
- 一个用户里面有多个角色,使用set集合, User.hbm.xml
<hibernate-mapping>
 	<class name="com.liyiandxuegang.manytomany.User" table="t_user">
 		<id name="user_id" column="user_id">
 			<generator class="native"></generator>
 		</id>
 		<property name="user_name" column="user_name" />
 		<property name="user_password" column="user_password" />

 		<!--
 			在用户里面表示所有角色,使用set标签
 				name属性:角色set集合的名称
 				table属性:第三张表
 		 -->
 		<set name="setRoles" table="t_userrole">
 			<!--
 				配置当前映射文件在第三张表中外键的名称
 			 -->
 			<key column="userid" />
 			<!-- column表示角色在第三张表中外键的名称 -->
 			<many-to-many class="com.liyiandxuegang.manytomany.Role" column="roleid" />
 		</set>
 	</class>
</hibernate-mapping>- 一个角色有多个用户,使用set集合, Role.hbm.xml
 <hibernate-mapping>
 	<class name="com.liyiandxuegang.manytomany.Role" table="t_role">
 		<id name="role_id" column="role_id">
 			<generator class="native"></generator>
 		</id>
 		<property name="role_name" column="role_name" />
 		<property name="role_memo" column="role_memo" />

		<set name="setUsers" table="t_userrole">
			<key column="roleid" />
			<many-to-many class="com.liyiandxuegang.manytomany.User" column="userid"/>
		</set>
 	</class>
 </hibernate-mapping>
第三步:配置映射关系
第四步:在核心配置文件中,引入映射文件
<mapping resource="com/liyiandxuegang/manytomany/User.hbm.xml"/>
<mapping resource="com/liyiandxuegang/manytomany/Role.hbm.xml"/>
测试: how to create table t_userrole
/*
CREATE TABLE `t_userrole` (
 `userid` int(11) NOT NULL,
 `roleid` int(11) NOT NULL,
 PRIMARY KEY (`roleid`,`userid`),
 KEY `FK726f9j5a1sy5ul99knaue6fvm` (`userid`),
 CONSTRAINT `FK726f9j5a1sy5ul99knaue6fvm` FOREIGN KEY (`userid`) REFERENCES `t_user` (`user_id`),
 CONSTRAINT `FK9a4q7igohl5jgv9b2afoh9sf3` FOREIGN KEY (`roleid`) REFERENCES `t_role` (`role_id`)
) ENGINE=InnoDB DEFAULT CHARSET=utf8;
*/- 多对多的保存
-
在用户配置文件中set标签进行配置,casade值save update
-
创建用户和角色对象,把角色放到用户中,进行保存
public class HibernateManytoMany {
   @Test
   public void test() {
   	SessionFactory sessionFactory = null;
   	Session session = null;
   	Transaction transaction = null;
   	try {
   		sessionFactory = HibernateUtils.getSessionFactory();
   		session = sessionFactory.openSession();
   		transaction = session.beginTransaction();

   		// Add two users and add two roles to each user
   		User user1 = new User();
   		user1.setUser_name("Liyi&Tian");
   		user1.setUser_password("123456");

   		User user2 = new User();
   		user2.setUser_name("Frank");
   		user2.setUser_password("1111111");

   		Role role1 = new Role();
   		role1.setRole_name("Manager");
   		role1.setRole_memo("Manager makes more money.");

   		Role role2 = new Role();
   		role2.setRole_name("Director");
   		role2.setRole_memo("Director is the boss in the department.");

   		Role role3 = new Role();
   		role3.setRole_name("VP");
   		role3.setRole_memo("VP is big boss.");

   		// 2 Create connections
   		// user1 -- r1/r2
   		user1.getSetRoles().add(role1);
   		user1.getSetRoles().add(role2);

   		// user2 -- r2/r3
   		user2.getSetRoles().add(role2);
   		user2.getSetRoles().add(role3);

   		// 3. Save user
   		session.save(user1);
   		session.save(user2);

   		transaction.commit();
   	} catch (Exception e) {
   		transaction.rollback();
   	} finally {
   		session.close();
   		sessionFactory.close();
   	}
   }
}- 多对多删除
类似于一对多的操作,在set标签进行配置,添加cascade值delete,然后在程序中进行删除。(一般不用这么删除)
- 维护第三张表
用户和角色是多对多关系,维护关系通过第三张表维护。
- 赋给某个用户某个角色
// Add one role to one user
User user = session.get(User.class, 1);
Role role = session.get(Role.class, 3);

user.getSetRoles().add(role);- 删除某个用户某个角色
// Add one role to one user
User user = session.get(User.class, 2);
Role role = session.get(Role.class, 3);

// remove the role
user.getSetRoles().remove(role);- 根据id查询某个客户,再查询这个客户里面所有的数据
- 根据id查询某一条记录,返回对象
public class HibernateQuery {
	@Test
	public void test() {
		SessionFactory sessionFactory = null;
		Session session = null;
		Transaction transaction = null;
		try {

			sessionFactory = HibernateUtils.getSessionFactory();
			session = sessionFactory.openSession();
			transaction = session.beginTransaction();

			Customer customer = session.get(Customer.class, 1);
			Set<LinkMan> linkMans = customer.getSetLinkMans();
			System.out.println(linkMans.size());

			transaction.commit();
		} catch (Exception e) {
			// TODO: handle exception
		} finally {
			session.close();
			sessionFactory.close();
		}
	}
}Hibernate Query Language: one sql statement from Hibernate.
HQL vs. SQL: 普通sql操作数据库表和字段,hql操作实体类和属性。
- Query对象,写hql语句实现查询
// query all customers: from Entity class name
Query query = session.createQuery("from Customer");
// get result
List<Customer> resultCustomers = query.list();
for(Customer customer : resultCustomers) {
   System.out.println(customer.getCid() + ", " + customer.getCustName());
}- Conditional query: from Entity name where property name =? and ...
// query all customers: from Entity class name
Query query = session.createQuery("from Customer where cid=? and custName=?");

// set condition value: int: position; args: value
query.setParameter(0, 2);
query.setParameter(1, "SGI CANADA");- Query with order
SELECT * FROM t_customer ORDER BY cid DESC;
Query query = session.createQuery("from Customer order by cid desc");
List<Customer> customers = query.list();

/*
Hibernate:
   select
       customer0_.cid as cid1_0_,
       customer0_.custName as custName2_0_,
       customer0_.custLevel as custLeve3_0_,
       customer0_.custSource as custSour4_0_,
       customer0_.custPhone as custPhon5_0_,
       customer0_.custMobile as custMobi6_0_
   from
       t_customer customer0_
   order by
       customer0_.cid desc
*/- Query with pagination
Query has two functions: setFirstResult(0) and setMaxResults(3);
Query query = session.createQuery("from Customer");
query.setFirstResult(0); // start
query.setMaxResults(1); // end- Query with Project (get part of the value, not all the value of the fields)
Query query = session.createQuery("select custName from Customer");
List<Object> customers = query.list();
for(Object customer : customers) {
   System.out.println("Customer: " + customer);
}- Query with aggregation functions (count, sum, avg, max, min)
Query query = session.createQuery("select count(*) from Customer");
Object obj = query.uniqueResult(); // if only one result, you can use uniqueResult()
System.out.println("Total customer: " + obj.intValue());不需要写sQL或者HQL语句,使用方法实现;
- Query all result
Criteria criteria = session.createCriteria(Customer.class);
List<Customer> customers = criteria.list();- Query with conditions
Criteria criteria = session.createCriteria(Customer.class);
// add restrictions
criteria.add(Restrictions.eq("cid", 1));
criteria.add(Restrictions.eq("custName", "SGI"));

/*
SQL
Hibernate:
    select
        this_.cid as cid1_0_0_,
        this_.custName as custName2_0_0_,
        this_.custLevel as custLeve3_0_0_,
        this_.custSource as custSour4_0_0_,
        this_.custPhone as custPhon5_0_0_,
        this_.custMobile as custMobi6_0_0_
    from
        t_customer this_
    where
        this_.cid=?
        and this_.custName=?
*/
like condition:
Criteria criteria = session.createCriteria(Customer.class);
criteria.add(Restrictions.like("custName", "%CANA%"));- QBC with Order
Criteria criteria = session.createCriteria(Customer.class);
criteria.addOrder(Order.desc("cid"));- QBC with pagination
Start position = (current page - 1) * perpageamt;
Criteria criteria = session.createCriteria(Customer.class);
criteria.setFirstResult(1);
criteria.setMaxResults(1);- QBC with Stats
Criteria criteria = session.createCriteria(Customer.class);
criteria.setProjection(Projections.rowCount());
Object count  = criteria.uniqueResult();
System.out.println(((Long)count).intValue());
(1) Projections class has batch of functions. (2) Conn't conver obj to int directly.
- QBC query offline
Offline query: 应用场景:
servlet调用service,service调用dao: dao里面对数据库操作,而使用hibernate框架时,调用session里面的方法,实现功能。
如果在逻辑层拼接条件时,可以使用这种方式来实现
// Create detachedCriteria class
DetachedCriteria detachedCriteria = DetachedCriteria.forClass(Customer.class);
// executable session
Criteria criteria = detachedCriteria.getExecutableCriteria(session);

List<Customer> list = criteria.list();
for(Customer customer : list) {
	System.out.println("Customer: " + customer.getCid() + ", " + customer.getCustName());
}