Expand
Complete the steps at https://github.com/cmcntsh/N6806_Fall2020_DevNotes/tree/master/001_SetupExpand
Original material: https://github.com/DevMountain/web-curriculum-v3/tree/master/01-orientation
CLI (Command Line Interface): Also called the terminal, is the program we will use to interact with our computer's files and directories. It will be important to become proficient in the various commands you can use in the terminal. On Apple computers we are able to use the built in terminal. On Windows machines we will need to download Bash for windows which can be found at https://gitforwindows.org/
- pwd: Stands for present working directory. Show's where you currently are in your file tree.
- ls: Stands for list. Lists available scripts(where you can navigate to in your file tree) from your current location.
- cd: Stands for change directory and is used to navigate the file tree. The command should be formatted like this:
cd [the name of the directory]. You can also navigate up a level by typingcd ... - mkdir directoryname: Stands for make directory. Creates a new directory at your current location.
- touch filename: Creates a new file at the current location. Should be called with the name and extension of the file to be created ie
touch index.html. - rm filename: Deletes a file. Cannot be undone.
- rm -rf directoryname - Deletes a folder and everything in it. Be VERY sure of what is being deleted before running this command, it cannot be undone.
Git is a version control system used to track the progress of our projects. It allows us to commit changes at various points in the development process. A commit is like a milestone. You should get in the habit of committing your code often. GitHub is the website where our git repositories are stored. To store our code remotely, we can "push" our commits to github. Before pushing our code, there are three stages in which a file can exist in relation to git which are represented in this image:
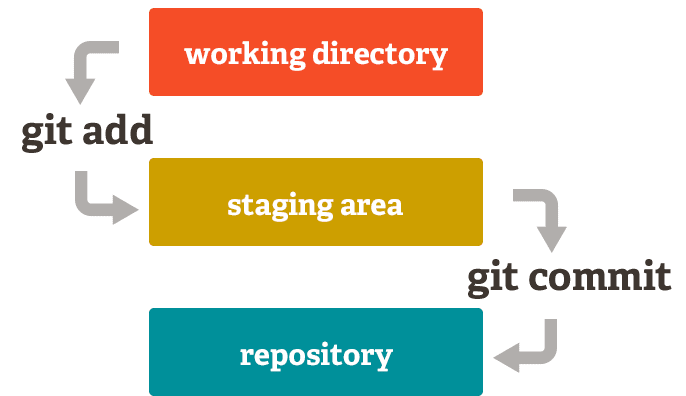
- As we are working on our files, git does not automatically track any changes made. When we are ready to have git track these changes, we use the
git addcommand and provide it with whatever files we want it to watch. By using the commandgit add .we can tell git to catalog all changes in all files in our current directory. This moves our files to the staging area. - The staging area is used by git to prepare any changes ready for saving. In this stage, git has cataloged any changes that we have told it to and is readying them for the next step. We commit our changes by using the
git commitcommand. This will move our files from the staging area to the git repository. This is like pressing the save button. Our commit should always be accompanied a message describing what changes have been made and is formatted like thisgit commit -m "message". - When we commit our code we create a snapshot of it at that moment. This allows us to revert back to that version at any time. Frequently committing our code will create different points in time that we can revert to if we ever need to.
Once our code has been committed, we can "push" it to GitHub which will create a remote version of our code. You will want to get in the habit of frequently "pushing" your code to github. This will protect against any work being lost. Below are the common git commands you will want to be familiar with:
git init initializes git in your current repository. This means that git will start watching all of the files and directories in that location.
git add . tells git to track any changes that have been made. This is the command you can run to start the process of pushing your code to github.
run:
git add .After staging your code using git add . we now need to commit our changes. This is the final step we will take before pushing our code to github. Think about commits as check points or save points in your code. You will need to provide a message about the commit using the -m flag.
run:
git commit -m 'message about your changes'After staging and commiting your code, it is now ready to be pushed up to github. When your code is ready to be pushed, run:
git push origin mastergit status is the command you can run to check what stage of the process you are on to push your code to github.
run:
git statusWe are able to easily make copies of existing repositories on GitHub, this is called cloning. First you need to copy the url for the github repo that you wish to clone down to your local machine then navigate to the directory that you want to clone the repo into. Once you are in the correct directory run:
git clone "url for github repo"- Learn Git Project - https://github.com/wlh18/learn-git
Expand
https://github.com/DevMountain/web-curriculum-v3/tree/master/04-javascript-2
https://github.com/DevMountain/web-curriculum-v3/tree/master/05-javascript-3
JavaScript Advanced (React, Data Flow, Components, Axios, React Router, Redux, hooks, unit testing, debugging)
Expand
https://github.com/DevMountain/web-curriculum-v3/tree/master/12-react-1
https://github.com/DevMountain/web-curriculum-v3/tree/master/13-react-2
https://github.com/DevMountain/web-curriculum-v3/tree/master/14-react-3
https://github.com/DevMountain/web-curriculum-v3/tree/master/15-react-4
https://github.com/DevMountain/web-curriculum-v3/tree/master/23-react-5
https://github.com/DevMountain/web-curriculum-v3/tree/master/25-react-6
https://github.com/DevMountain/web-curriculum-v3/tree/master/31-react-7
https://github.com/DevMountain/web-curriculum-v3/tree/master/32-testing
https://github.com/DevMountain/web-curriculum-v3/tree/master/33-debugging