This web application is developed with the Next.js framework.
Next.js is a React framework that enables several extra features, including server-side rendering and generating static websites.
Developing a Next.JS project centers around the two main directories pages and public in the root of the application:
pages- Each file name in this folder represents an associated route. For examplepages/prof/profile.tsxis mapped to/prof/profilepublic- Stores static assets such as images, fonts, etc. Files inside this directory can then be referenced by code starting from the base URL (/).
Next.js is built around the concept of pages.
A page is a React Component exported from a .js, .jsx, .ts, or .tsx file in the pages directory.
We can even add dynamic route parameters within the filename.
We have a main site developed following the layered architecture style as per 3rd task requirements.
The distributed architecture style has been used with management of the compilation service.
There is an orchestrator microservice that dispatches compilation requests to available compilator microservices.
For simplicity the orchestrator microservice randomly chooses the service to dispatch compilation requests to.
Generally, layered architectures consist of four standard layers:
- presentation
- business
- persistence
- database
For the project we have chosen the following variant. This variant physically separates the presentation layer into its own deployment unit, with the business and persistence layers combined into a second deployment unit. With this variant, the database layer is usually physically separated through an external database or filesystem.

Each layer of the layered architecture style has a specific role and responsibility within the architecture.
The presentation layer is responsible for handling all user interface and browser communication logic, whereas the business layer is responsible for executing specific business rules associated with the request.
Each layer in the architecture forms an abstraction around the work that needs to be done to satisfy a particular business request.
The presentation layer doesn’t need to know or worry about how to get customer data; it only needs to display that information on a screen in a particular format.
Similarly, the business layer doesn’t need to be concerned about how to format customer data for display on a screen or even where the customer data is coming from; it only needs to get the data from the persistence layer, perform business logic against the data (such as calculating values or aggregating data), and pass that information up to the presentation layer.
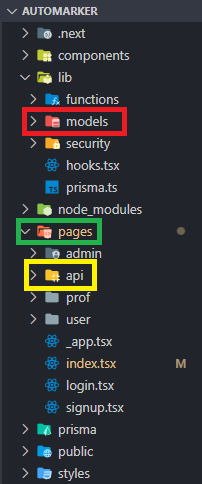
In our project we divided the roles as follows:
- In the
modeldirectory there are the functions that interact directly with the database. To interact with the database we use Prisma, Prisma is an open source next-generation ORM (Object-Relational Mapping). This directory is identified as the database layer. - The
apidirectory contains all the bussiness logic and takes care of managing the requests that arrive directly from the persistence layer. We also made another api since the NextJS runtime does not allow the use of the shell execution module available in the nodejs runtime. This api is run in parallel with the site and is found in thecompiler_apifolder. As mentioned above, we have unified the business layer and the persistence layer into one layer. - Finally, the
pagesdirectory (excluding theapidirectory) contains all the front-end files with which the user interacts. This is identified as the presentation layer.
The project has a total of 4 components:
- The site, contained in the
automarkerfolder - The complier api, contained in the
compiler_apifolder - The database whose scheme is defined with Prisma in the
automarkerfolder and uses postgres as the chosen db. - The orchestrator, contained in the
orchestratorfolder.
Each of these represents a container in docker.
There are however 2 compiler machines available, therefore the total number of containers amounts to 5.
There are a total of 5 ports used, each for a specific container:
port 3000: the main site containerport 5469: the postgres db containerport 8079: the orchestrator containerport 8080: the 1st compiler containerport 8081: the 2nd compiler container
Simply run the following command.
docker-compose up
It may take anywhere from under a minute to a whole 10 minutes to build the images with their dependencies. This is very much affected by internet connection speed.
A dump of an already populated database for the trial of the site is available in the dbData.sql file.
To import this data, run the following command in the CLI of the automarker_db container.
psql -d automarker -U postgres -f /home/dbData.sql
The following accounts are present in the database dump that can be imported (see the docker section):
- Admin:
- Email:
admin@admin.it - Password:
123
- Email:
- Student:
- Student 1:
- Email:
francesco98vinci@gmail.com - Password:
123
- Email:
- Student 2:
- Email:
antonio.cimino@gmail.com - Password:
123
- Email:
- Student 3:
- Email:
filippo.bedon@gmail.com - Password:
123
- Email:
- Student 4:
- Email:
marco.tubia@gmail.com - Password:
123
- Email:
- Student 3:
- Email:
davide.bresaola@gmail.com - Password:
123
- Email:
- Student 1:
- Professor:
- Prof 1:
- Email:
pietro.ferrara@gmail.com - Password:
123
- Email:
- Prof 2:
- Email:
michele.bugliesi@gmail.com - Password:
123
- Email:
- Prof 1:
Log in as a professor in the login section. On the profile page, a summary will be displayed for everything concerning the professor's sphere.
The number of students enrolled in each course, the number of prof's courses and the number of ongoing tasks will be displayed.
A professor can:
- create/delete/modify a task
- mark a submission (only if it expired)
- see all students enrolled in his course (on development).
A task can be:
- created
- deleted
- modified (only if not expired)
The task page displays the ongoing tasks and those expired divided by course.
On this page you can see how many students have submitted a task by clicking on the row of the table that corresponds to the task.
To evaluate (mark) a submission, just click on the 💯 button so the code written by the student will be displayed.
A Student can:
- see the tasks of the courses he is enrolled in
- create/modify/submit a solution for a task
- enroll in a course
On the main page a summary will be displayed for all that concerns the student, ongoing or expired assignments and those submitted.
On the course page it is possible to search for and enroll in a course.
Simply press the search button with the empty text field to display all available courses.
In order to carry out a task, just click on it from the profile page or from the course page.
A task can be:
- saved
- run
- submitted (until it expires)
An Admin can:
- create/delete/modify courses
- assign a professor to a course
- create/delete/modify a professor account
- create/delete/modify an admin
On the main page it will be possible to see a summary of the system with the profs, courses and admins.
A professor can:
- create/delete/modify a task
- mark a task
- see all students enrolled in his course
A Student can:
- see the tasks of the courses he is enrolled in
- create/modify/submit a solution for a task
- enroll in a course
An Admin can:
- create courses
- assign a professor to a course
- create a professor account
ER Crow's Foot Notation
erDiagram
	USERS ||--|{ COURSES : prof
	USERS  ||--o{  REGISTRATIONS  : o
	REGISTRATIONS  }|--||  COURSES  : o
	USERS ||--o{ SUBMISSION : makes
	TASKS ||--|{ SUBMISSION : has
	TASKS }o--|| COURSES : refers_to

USERS  {
	string id
	string name
	string lastName
	string username
	string hash
	string salt
	string craetedAt
	string role
}
REGISTRATIONS {
	string id
	string user_id
	string course_id
	string createdAt
}

COURSES {
	string id
	string name
	string user_id
	string academicYear
}

SUBMISSION {
	string id
	string user_id
	string task_id
	double mark
	string workspace
	bool   isSubmitted
	string submittedAt
}

TASKS {
	string id
	string course_id
	string title
	string assignment
	string deadline
	string testCase
	string hint
	string solution
	string createdAt
	string language
	string placeholder
}
enum Role {
  USER
  PROF
  ADMIN
}The first time you start the project you need to install the dependencies
npm installonce the installation is complete run the application
npm run devbe sure to create the .env file, inside which it must be inserted
DATABASE_URL="postgresql://nome_utente:password@127.0.0.1:5432/automarker"
TOKEN_SECRET="32_caratteri_random"Synchronize Prisma schema with database schema
npx prisma db pushOpen Prisma studio
npx prisma studiohttps://www.postgresql.org/download/
npm installThe api expects a request body as follows
{
    "language" : "",
    "code" : ""
}
The language field can be either one of these, case does not matter.
c
c++
rust
java
javascript
python
The code field can be directly taken from a text input
but it must be processed by JSON.stringify() before sending it in the request.
Requests must be done in POST to the /api route.
The api responds with a body as follows
{
  "request_body": {
    "language": "",
    "code": ""
  },
  "compiler_output": "",
  "compiler_error": ""
}