Invoke Jenkins jobs from slack


Deploying a JenkinsSlack bot using Docker Container
This bot is an implementation of CI/CD Process Integration with ChatOps and building a Slack App with Slack's Python SDK, python-slackclient.
We'll cover all the steps you'll need to configure and deploy JenkinsSlack Bot to your Slack Workspace.
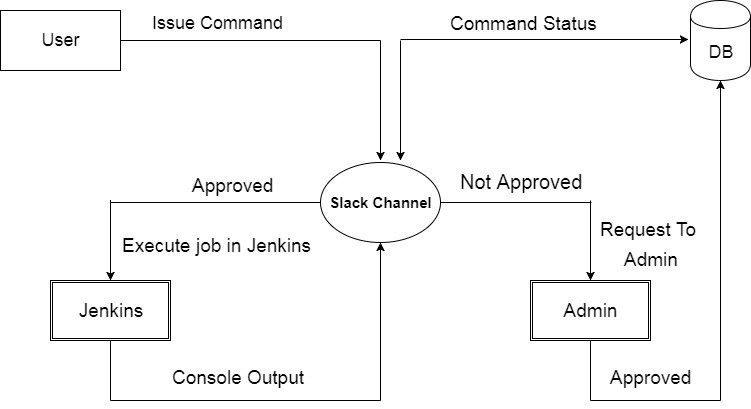
JenkinsSlack Bot is designed to help DevOps engineers to execute the CI/CD Process from the chatroom. Additionally, In order to have control over unauthorized deployment of code to different application environment, there is authorization mechanism so that only approved commands can trigger the deployment.
Let's start with the jenkinsSlack bot ✨
Creating a new Slack App on api.slack.com
In your browser, on api.slack.com/apps you'll find a green button labeled Create New App on the top right of the page.

👉 ✅

Let's create new Bot User so our app can communicate on Slack. On the left side navigation of your app's settings page you'll find the Bot Users tab where you can create a new bot user for your app.

Once you have created the Slack App and Bot User, let's have it subscribe to some events in Slack!
On your app's settings page you'll find Event Subscriptions on the left navigation bar and turn on the Enable Events.
Near the bottom of the page under the WorkSpace Events section you'll be able to subscribe your bot to the events.

This project uses the following events:
After you've subscribed to all the events your app will need, you need to enable the interactive components. Before Proceeding, make sure to save the changes.
On your app's settings page you'll find Interactive Components on the left navigation bar.
Click on button Enable Inteactive Components and Add the URL like below:
http://HOST:PORT_NO/slack/message_actions (Select the port of your machine which you want to expose)

When you are done, make sure to Save Changes and copy the URL you will need to have it while building the bot.
Once you have subscribed the bot events and interactive components, let's install the App to the Slack Workspace
On your app's settings page you'll find OAuth & Permissions on the left navigation bar and click on Install App to Workspace button.
After clicking on button, you will need to authorize the bot on next page.

Now under the Bot User OAuth Access Token section you'll be able to find the Bot Token.
Please copy the bot token from the page and save it you will need to use it while building the bot.

environment:
       MYSQL_ROOT_PASSWORD : "MYSQL_PASS"
       SLACK_BOT_TOKEN : "BOT_TOKEN"
       CHATBOT_NAME : "BOT_NAME"
       APPROVER_SLACK_NAME : "APPROVER_SLACK_ID"

 ports:
      - "HOST_PORT"
docker-compose.yml up
- Vivek Grover:


- Denny Zhang:

