Installation and Tutorial
On this page, we explain all the steps to install the required components for fully experience the TactJam device. We then provide explanations how to use the device with the GUI.
- one TactJam PCB
- one ESP32 dev board by AZ-Delivery (product page)
- eight actuators (ERM) with cable (each 1.5m) and JST connector
- two strips of Kinesio-tape (each 0.5m)
- two micro USB cables
- one cable to power the TactJam dev kit (no data lines needed for this purpose)
- one cable to transfer data between your PC and the TactJam dev kit
- computer with Linux, Windows, or macOS
- Unpack every part and check for any visible damage. In case of any damage don’t move on to next step.
- Unscrew the bottom plate.
- Plug the ESP dev board onto the headers of the bottom side of the TactJam PCB.
- Plug the actuator cables into the JST connectors on the bottom side of the TactJam PCB.
- Screw the back plate back onto the TactJam PCB.
- connect the power supply with the PCB
- connect the ESP to the computer
This part is a bit more tricky as it requires you to download a software, install required plugins, then open the source code of the TactJam firmware, and finally flash the code on the device. But no worries, we'll go through that together 🤝
- Get the firmware source code: choose your preferred option (spoiler, option 1 is the easier one 😉)
-
Option 1: use git
- Open the Terminal and navigate to a directory where you want to clone the repository into.
- Type the following git command:
git clone --recurse-submodules https://github.com/TactileVision/TactJam-firmware.git
-
Option 2: download from GitHub manually
- In your browser go to the repository TactJam Firmware.
- Select the "main" branch (dropdown menu at the top-left), then download the source code (click on the green button named "code", then "download zip") or download the latest release as ZIP archive.
- Unzip the archive to a directory of your choice.
- In your browser go to the repository libvtp.
- Download the source code (click on the green button named "code", then "download zip").
- Unzip the archive into
TACT/lib/directory inside the TactJam Firmware. - Rename the unzipped folder to libvtp.
-
Option 1: use git
- Next, download the Visual Code Studio software and install it. This software will help you connecting to the device via USB and flash the code to make everything run smoothly 😌
- To do this, we need the Platform IO plugin. You can follow the installation instruction on this page.
- Once the plugin is installed, you should be able to detect your device. Connect it through USB, and go to the
device panelof the Platform IO (see image below). If you do not see the device connected, you are likely missing the driver to detect it. You can download and install the driver from this page.
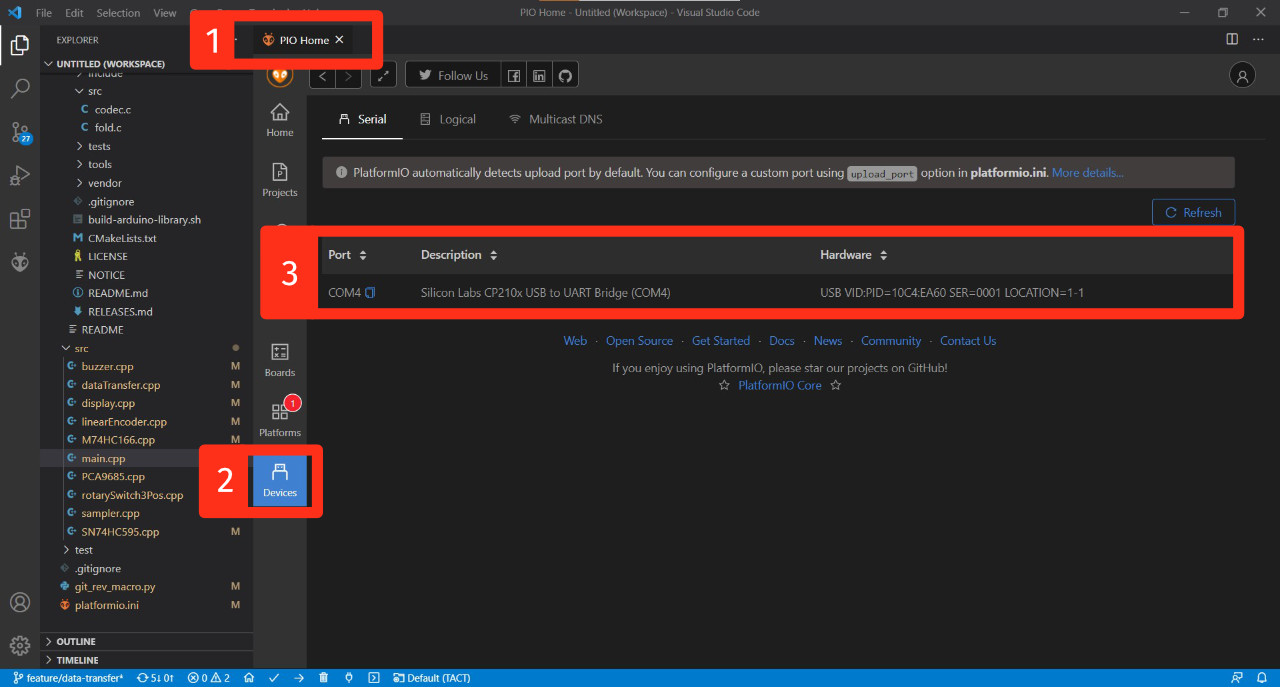
- Once you can detect the device, you can open the project you downloaded on step 1. with the Platform IO plugin. Go to the "Projects" menu of the "PIO Home" tab (similar to the step above), then click on "Add Existing" in the top-right corner. Go to the folder where you downloaded the source code, and select the
TACTfolder inside it as the root folder of the project. - Once the project opened, open the
platformio.inifile and update the upload port to the one used by your machine. For example,upload port = COM4orupload_port = /dev/cu.SLAB_USBtoUART(you can check which port is used on step 4.) - Almost there 💪. You should now be able to build the source code by clicking on the check mark icon at the bottom of the window *see image below). If the build is successful, you can upload the binaries by clicking the arrow icon next to the checkmark (see image below). Note, if you get a timeout error while uploading the firmware try again and push the BOOT button on the ESP32 (left side of the USB connector) for a second. This should do the trick. If you still get timeout errors, unscrew the back plate and unmount the ESP32 from the device's pin headers.

- If everything worked, your TactJam device should now be ready to use! Enjoy 😎
The TactJam device is standalone, hence you do not need to install the GUI to use it. The GUI, however, enables you to visualize tactons, document them, and share them with others. It also enables you to download tactons from others, and experience them with your body! 🧍♂️🧍🧍♀️
To install the GUI follow this link and download the latest executable for your machine (.exe for Windows, .dmg for OS X, .tar.gz for Linux distributions).
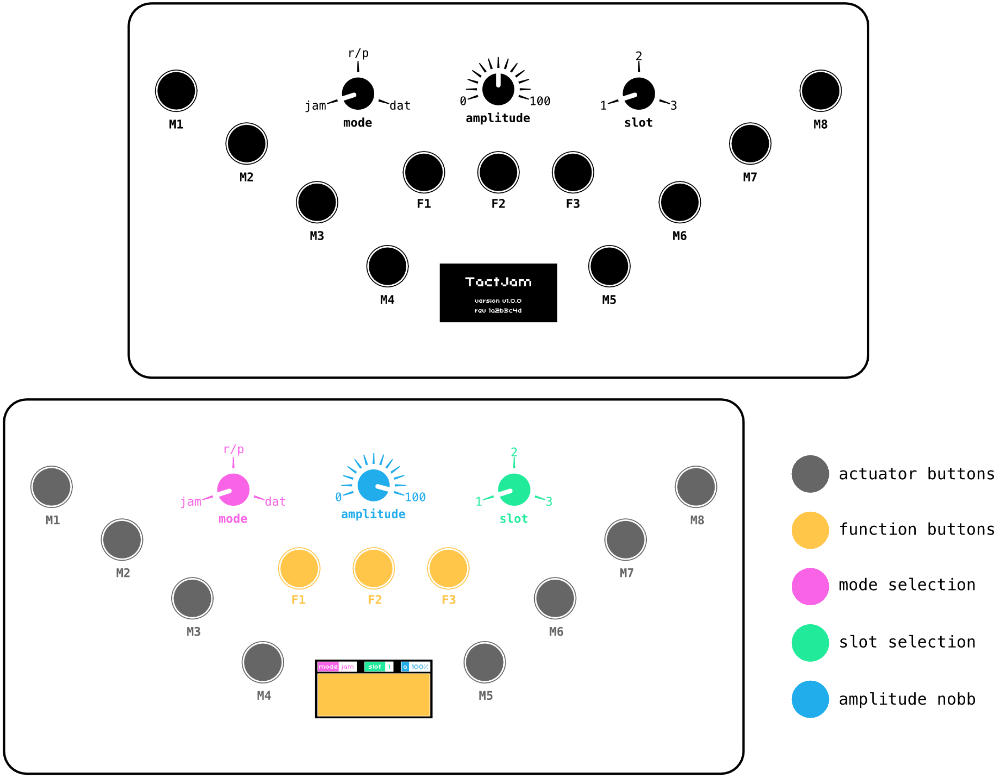
The TactJam device provides three modes: a jamming mode in which you can quickly test tacton variants, a recording mode to save the tactons and play them back, and a data transfer mode to send and receive tactons from the GUI (see image below). You can switch between modes using the left-most dial of the device.
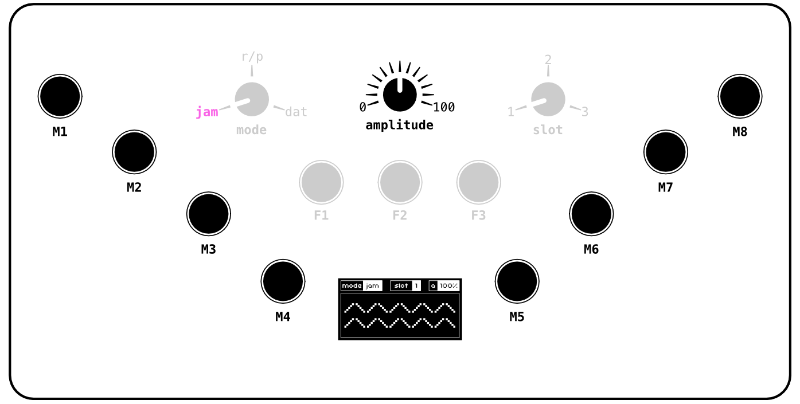
In this mode, you can press buttons to actuate all the actuators and experience tacton variants quickly. You can change the amplitude of the vibrations by rotating the dial in the center of the device.
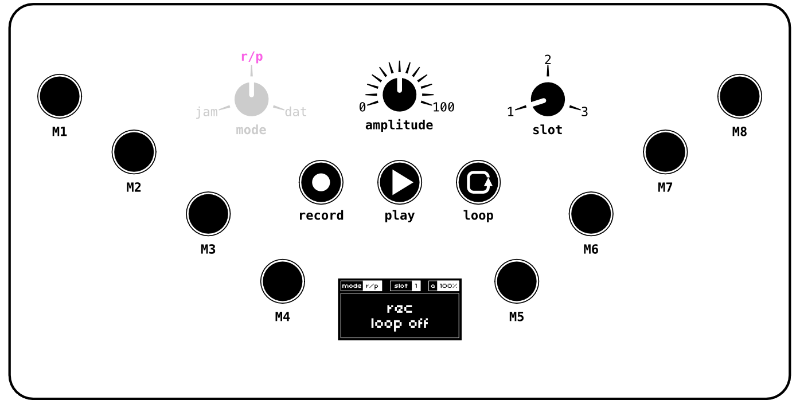
In contrast with the jamming mode, the recording mode enables one to... record tactons 🤯. You can press the record button (left button in the center), then record a tacton by pressing buttons linked to actuators, and finishing recording by pressing again the record button. To play back this tacton, you can press the play button (middle button in the center). You can also loop the playback by pressing the loop button (right button in the center) and press the play button again. The TactJam device enables to record three tactons at once for facilitating comparison using slots. You can choose the slot in which you are currently recording a tacton by rotating the right-most dial.
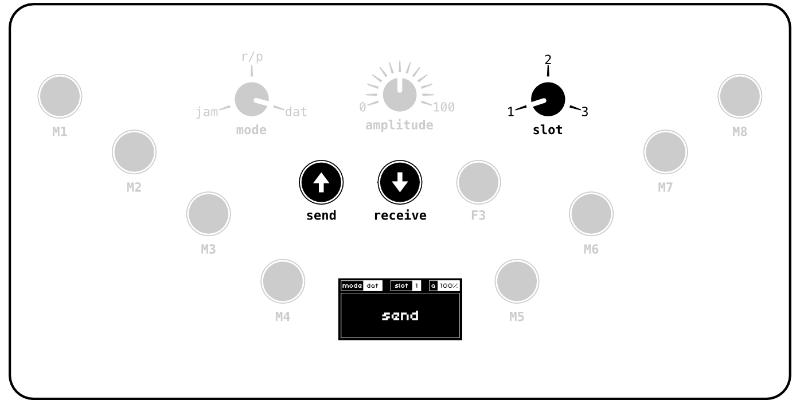
Finally, to keep track of your work, you can connect the device to the TactJam GUI and save your tactons there. By plugin your device through USB to your computer with the running GUI, the device will connect automatically (a message should appear on the GUI). You can then send a tacton to the GUI by pressing the send button (left button in the center) if a tacton is present in the current slot. Similarly, you can receive a tacton from the GUI by pressing the receive button (middle button in the center).