Outdoor Long Range Ubiquitous Projectiles Tracking System Using P-MPLR and Computer Vision
| Name | University | Department | Contact | |
|---|---|---|---|---|
| Donghyeon Na | Sangmyung University | Dept. of Human Centered AI | skehdgus401@gmail.com | https://github.com/xialGuri |
| Hansu Jeong | Sangmyung University | Dept. of Computer Science | 7471919@naver.com | https://github.com/8471919 |
| Minjae Kim | KyungHee University | Dept. of Software Convergence | kmj5596@khu.ac.kr | https://github.com/MinJaeKim2796 |
| Jeongwon Moon | Kyungpook Nat’l University | Dept. of Computer Science & Engineering | bella7365@knu.ac.kr | https://github.com/gaarden |
| Woojin Choi | Sun Moon University | Dept. of Computer Science & Engineering | twinsno119@gmail.com | https://github.com/woojin-choi518 |
| Ethan O'Sullivan | Purdue University | Dept. of Computer and Information Technology | ethanext17@gmail.com | https://github.com/ethanext |
| Sophia Lee | Purdue University | Dept. of Computer and Information Technology | phia9130@gmail.com | https://github.com/lee3155 |
Shotmarker is a program designed for a F-class shooting competition, which is conducted from 300 to 1000 yards only using prone position. This system has several complications, initially, it is overpriced. Secondly, this system depends on environmental factors such as wind and rain. The average error in an ideal state is within 2~3mm, but an error rate can be higher when the weather is not at its best for shooting. Lastly, this system is dedicated to a specific type of gun, a gun that uses supersonic bullet. In other words, if the gun does not use a supersonic bullet Shotmarker is not functional. For the gunshot detection, ShotSpotter is used to detect gunshots in cities such as New York and Chicago, however it has a low accuracy issue. In effect, around 50,000 alerts for probable gunshots has been notified with only 9.1% resulting in evidence of a gun-related offense. Also, LoRa is the fastest growing technology that researchers are interested in these days, the benefits of LoRa are long battery life, long distance communication, and low cost of the application. However, LoRa is not the best in outdoors because there are chances of having packet loss using LoRa due to various environmental factors.
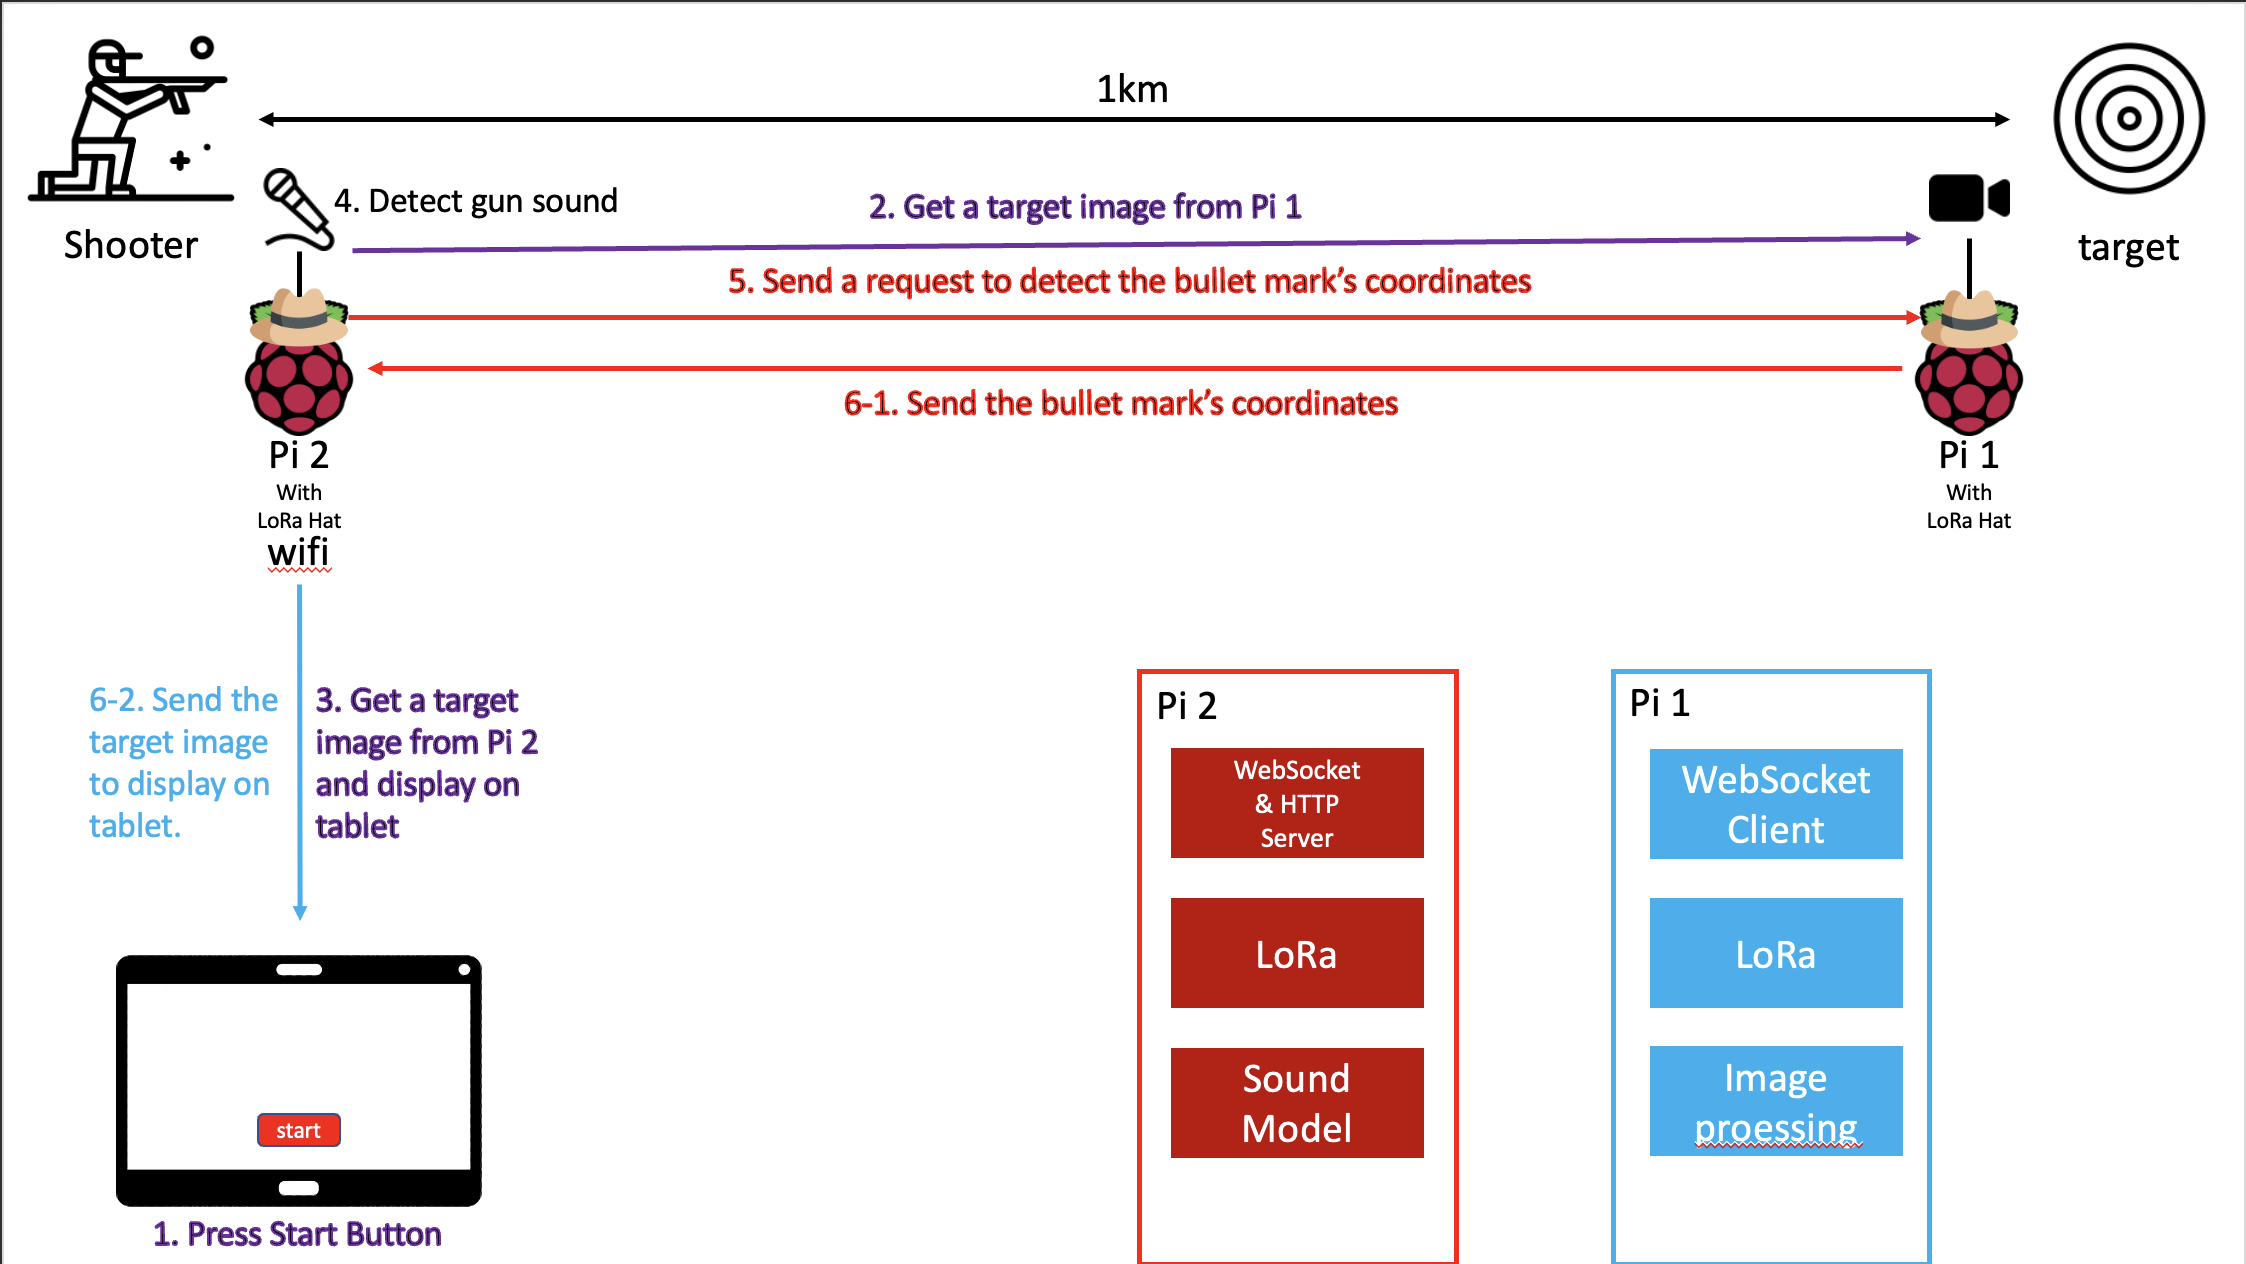
This program presents a new approach to the projectile mark detecting system. The proposed system shows high accuracy without any environmental constraints by using LoRa, Computer Vision and sound detection. Compared to ShotMarker, this system has a high target tracking accuracy. Also, unlike ShotSpotter, the proposed module starts only when a gun shot sound is detected; this method is also cost-effective. Therefore, the gunshot detection system that derives high accuracy is developed by this program. In this program, the proposed system applies the handshaking algorithm to ensure that transferring data is successful. Moreover, the LoRa protocol was used to remove packet loss, and the latency of image transmission was lowered. It also has flexibility applicable to regardless to bullets and targets. However, transmitting large data using LoRa, takes a while due to low power. To solve this problem, this system transmits only coordinates, instead of an image or video.
| Division | Stack |
|---|---|
| Client | |
| Server | |
| Code Management | |
| Formatting | |
| Computer Vison | |
| IoT | |
| Deep Learning |
- Before Start the project need to clone the repository first
git clone https://github.com/MINJILEE-PURDUE/KSW_2022_Fall_Program.git
-
This Raspberry pi is placed near by target.
-
Raspberry pi model : Raspberry pi 4B 8G RAM
-
LoRa Hat : Waveshare SX1262 915M LoRa HAT(915M model is for USA)
-
Camera : Raspberry pi HQ Camera
-
OS : Raspberry pi OS 64bit(Raspbian)
-
Language : Python(3.9.2)
-
Before you read, you should make a directory for setting and all cloned files/directories must be in that directory.
Camera Setting
- put camera into Raspberry pi
- After turn on Raspberry pi, Menu -> Preferences -> Raspberry pi configuration -> Interfaces -> select
Camera : Enable
LoRa Hat Setting
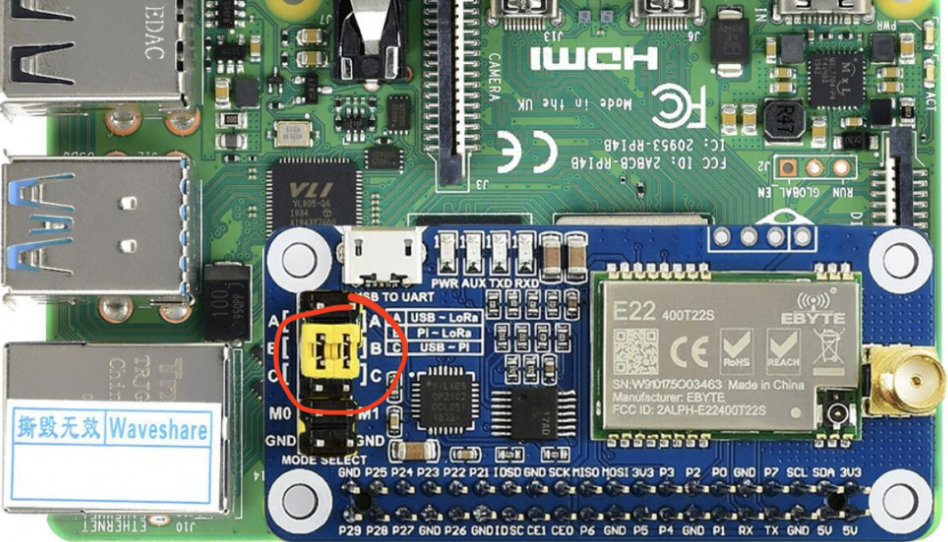
- Set the LoRa mode using jumpers
- Using the Yellow jumpers on photo, place the jumper like photo.
- Enable Serial port
- In terminal, run command
sudo raspi-config-> Interfacing Options -> Serial -> No -> Yes
LoRa Setting
-
Install Python version 3.9.2
-
Go to SharpShooter file
cd SharpShooter
- Go to Code
cd code
- change working directory
cd SharpShooter-pi1
- Install python dependencies
pip install -r requirements.txt
- Run
python main.py
-
This Raspberry pi is placed near by shooter.
-
Raspberry pi model : Raspberry pi 4B 8G RAM
-
LoRa Hat : Waveshare SX1262 915M LoRa HAT(915M model is for USA)
-
Microphone : HP-DK40(SIZHENG)
-
OS : Raspberry pi OS 64bit(Raspbian)
-
Language : Python(3.7.15), Node.js(16.17.1)
-
Before you read, you should make a directory for setting and all cloned files/directories must be in that directory.
-
**Every setting must be run in separate terminal window
Microphone setting
- just put microphone into Raspberry pi
Access Point(Wifi generator) Setting
1. Setting up Network Manager for Wi-Fi Access Point
-
Set up a Raspberry Pi if you don't have one already. See our guide on how to set up a Raspberry Pi.
-
Connect your Raspberry Pi to an Ethernet connection. Our Pi will become a wireless access point, but our connection to a router will be via Ethernet. This provides the strongest connection and ensures the highest speed possible.
-
Open a terminal window on the Pi or an SSH connection to the Raspberry Pi.
-
Make sure your Raspberry Pi is up to date, by running the latest update commands. This isn’t strictly necessary, as the latest Raspberry Pi OS release will already be fairly up-to-date. Consider this a best practice.
sudo apt update
sudo apt upgrade -y
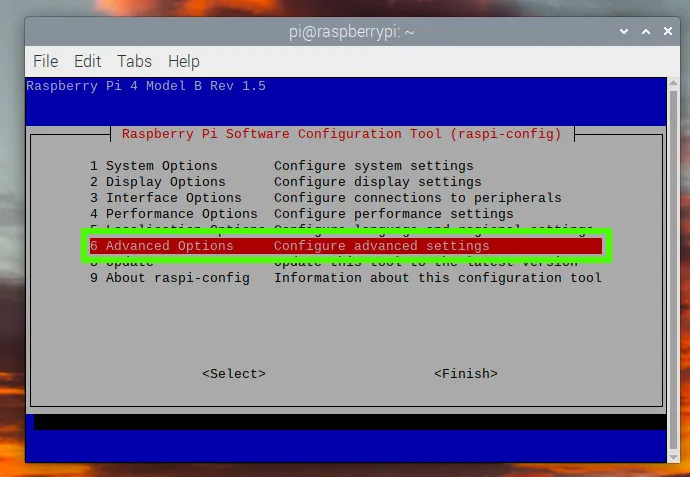
- Use raspi-config to edit the configuration of your Raspberry Pi. The network manager option is currently only available via raspi-config, and not via the GUI editor.
sudo raspi-config
-
Using the cursor keys, navigate to Advanced Options and press Enter.
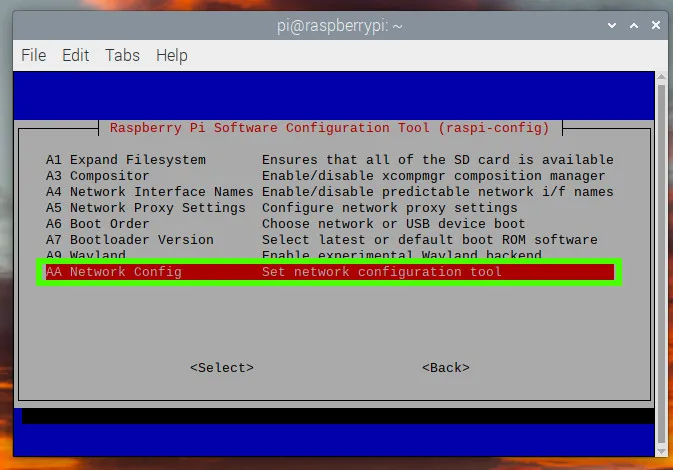
-
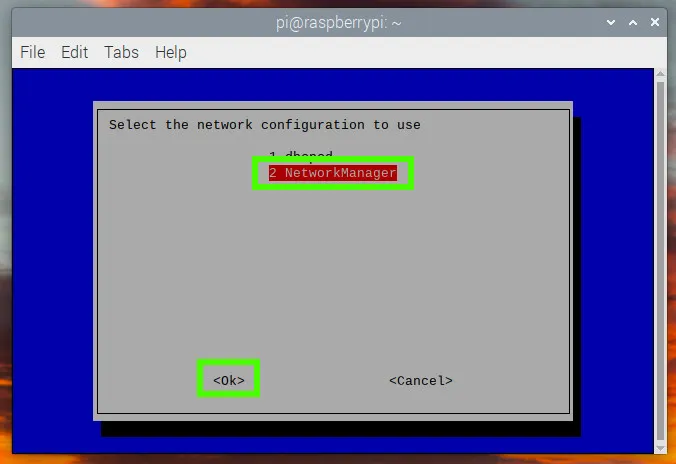
Navigate to Network Config and press Enter.
-
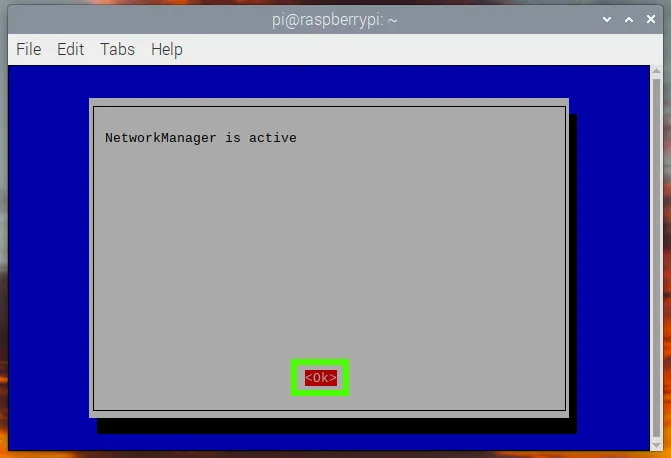
Select Network Manager and then click OK.
-
Click on OK.
-
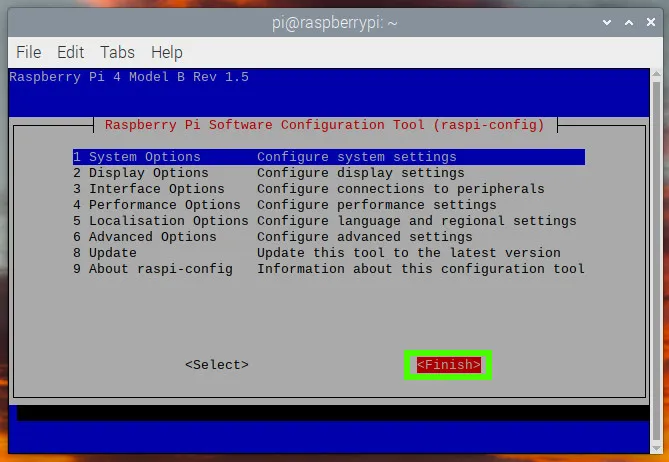
Click Finish.
-
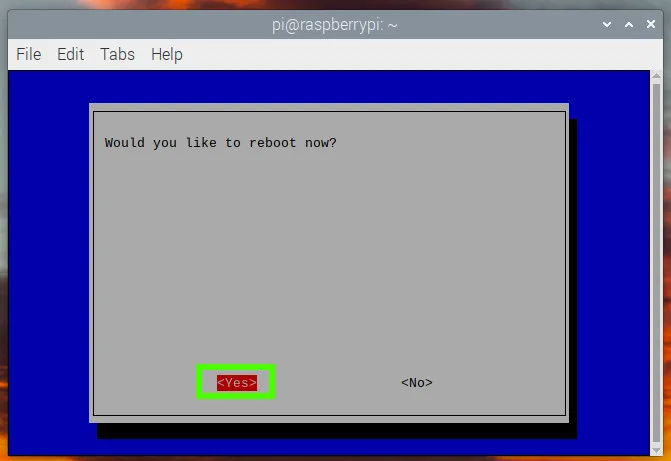
Select Yes to reboot.
2. Setting up the Access Point on Raspberry Pi
- Our access point will provide Wi-Fi access using the Raspberry Pi’s onboard Wi-Fi chip. In this section, we will set up the name and security for the access point. Note that our Raspberry Pi will need to be connected to our home Internet connection via Ethernet. This provides us with the best possible connection.
-
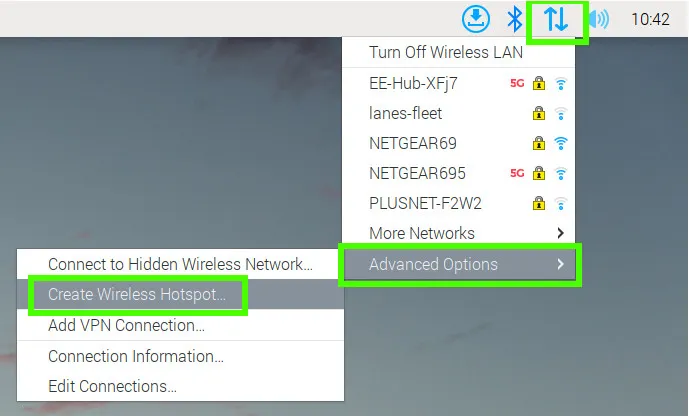
Left click on the Network icon, select Advanced Options and then Create Wireless Hotspot.
-
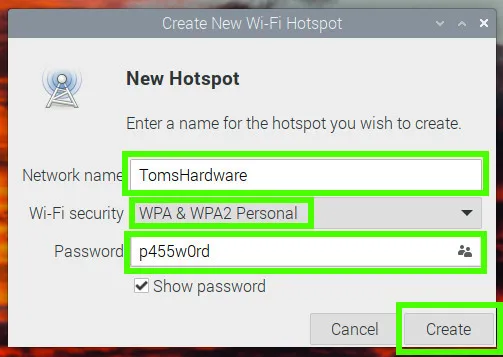
Set the Network name of the access point, Wi-Fi security to WPA2, and then set the password for the AP. Click create to save.
-
Reboot the Raspberry Pi.
-
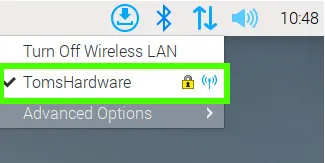
Click on the Network icon to check that the access point is active.
3. Setting the Raspberry Pi Access Point to start on boot
- We want to turn this project into an appliance, a device that will power up and just work. For that we need to tweak the access point settings so that it starts when our Raspberry Pi powers up. Luckily this only takes a few steps.
-
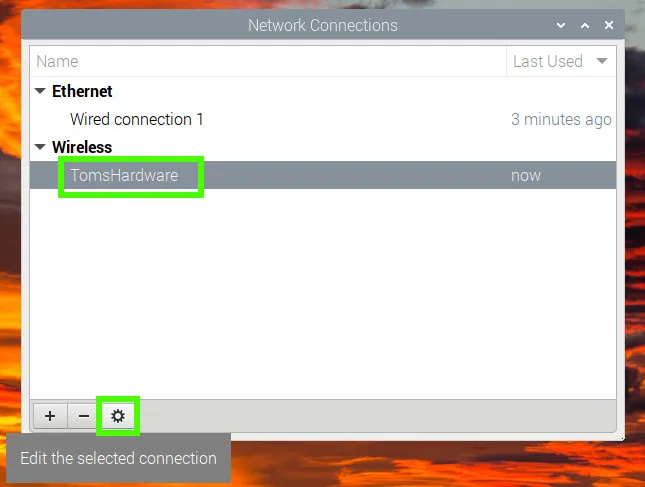
Click on the Network icon and click on Advanced Options >> Edit Connections. This will enable us to make changes to the access point configuration.
-
Select the wireless access point name, and click on the settings cog to make changes.
-
Under the General tab, check the “Connect automatically with priority” box and set the priority to 0. Click save to make the change. This will set our access point to start whenever the Pi starts.


4. Connecting to the Raspberry Pi Access Point The access point works just like any other Wi-Fi router / access point.
-
Connect your computer / mobile device to the new access point. It will appear under the name that we have given it.
-
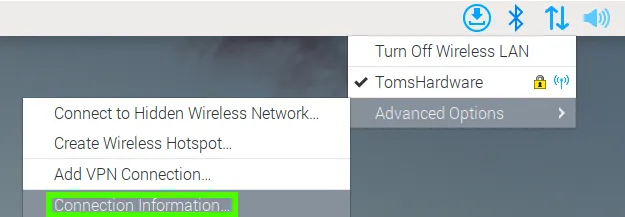
Alternatively on the Raspberry Pi click on the Network icon, and select Advanced Options >> Connection Information.
-
Using a compatible device, scan the QR code to automatically connect to the access point. The information dialog contains all of the information necessary for our access point.
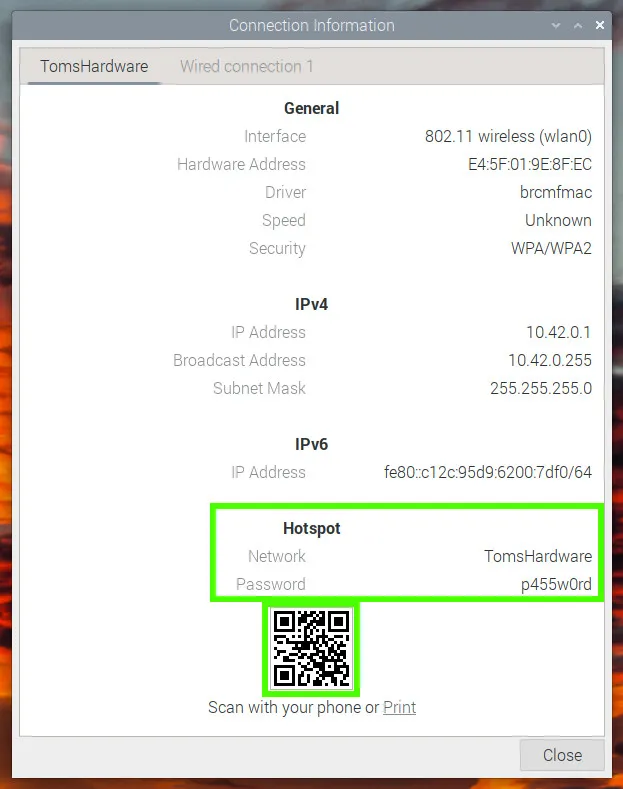
- Client IP Address setting (necessary)
- Go to SharpShooter-Front/src/components/InfoModal.jsx line 16 and SharpShooter-Front/src/components/StorageModal.jsx line 9 and SharpShooter-Front/src/pages/TargetPage.jsx line 236 replace the code with IPv4 IP address shown in the picture (your access point) above instead of localhost.
ex)
  const client = new W3CWebSocket(`ws://localhost:3030`);
  ->
  const client = new W3CWebSocket(`ws://10.42.0.1:3030`);

  ws.current = new WebSocket(`ws://localhost:3030`);
  ->
  ws.current = new WebSocket(`ws://10.42.0.1:3030`);
SharpShooter-Front/src/components/InfoModal.jsx
- LoRa Hat Setting
- Set the LoRa mode using jumpers
- Using the Yellow jumpers on photo, place the jumper like photo.
- Enable Serial port
- In terminal, run command
sudo raspi-config-> Interfacing Options -> Serial -> No -> Yes
Server setting
- Server is made with node.js.
- In server, There are many secret keys. so we creat
.envfile and push that into github repository .envfile must be placed on root directory(SharpShooter-Server directory)
-
Install node.js version 16.17.1
-
Go to SharpShooter file
cd SharpShooter
- Go to Code
cd code
- change working directory
cd SharpShooter-Server
- Install node.js dependencies
npm install
- Run
npm start
LoRa Setting
- Before setting this, You must finish Server setting first.
-
Install python version 3.7.15
-
change to sharpshooter folder
cd SharpShooter
- change to sharpshooter code folder
cd code
- change working directory
cd SharpShooter-pi2
- Install python dependencies
pip install -r requirements.txt
- Run
python main.py
Client server setting
- Client server is made with react.
- Before setting this, You must finish Server setting first.
-
Install node.js version 16.17.1
-
Go to SharpShooter file
cd SharpShooter
- Go to Code
cd code
- change working directory
cd SharpShooter-Front
- Install node.js dependencies
npm install
- Run
npm start