To begin using Google Earth Studio, follow these steps:
-
Open a web browser that runs on the Chrome engine.
-
Search for "Google Earth Studio".
-
Open the first link.

First, click on Try Earth Studio. This will take you to a sign-in page.

You need to register with your Google account to use this service.

Note: While it's possible to use other accounts besides Google, it's more complicated.
Google Earth Studio operates similarly to Adobe After Effects, allowing you to work on small project tiles to create scenes. To get started, click on "Blank Project".


When creating a new project, it's essential to understand various parameters, including:
These parameters are crucial and become more important as you become familiar with Google Earth Studio, enabling you to create advanced animations and videos. Click on each parameter to learn more.
[Describe the work window and user interface here]
In this section, you'll learn how to create your first animation using Google Earth Studio. We'll create a short clip showing our school's transition from space to its location.
[Insert video link or media]
Google Earth Studio is a web-based animation tool developed by Google for creating animated videos and imagery using Google Earth and Maps data.
- November 28, 2018: Google Earth Studio was officially announced and launched by Google.
- Late 2018 - Early 2019: It gained popularity among content creators and animators.
- Initial Release Features: Google Earth Studio offers both a free version with limited features and a paid version.
- Ongoing Development: Continuous development to improve features and user experience.
Google Earth Studio is utilized for:
-
Marketing and Advertising - Creating engaging animations for promotional content.
-
Educational Content - Visualizing geography and history for educational purposes.
-
Environmental Analysis - Tracking environmental changes and natural disasters.
-
Tourism Promotion - Offering virtual tours of destinations.
-
Real Estate Tours - Showcasing properties in a unique way.
-
Event Promotion - Creating event location overviews.
-
Filmmaking - Adding aerial shots and flyovers to productions.
-
Urban Planning - Visualizing urban development projects.
-
Scientific Research - Supporting research with visual data.
-
Custom Map Creation - Making personalized maps for various purposes.
These applications demonstrate the versatility of Google Earth Studio in creating captivating visual content.
As you have seen above you have many factors that you must take into account to create a Studio Project. Here I will go a bit deeper into those parameters and how to understand them.
The name of your Project. My recommendation is that you make this name short and easy to understand. This makes it very easy for you in the future or others that are going to use your project.
Earth Studio supports multiple celestial bodies, including Earth, Moon, and Mars. This gives you a lot of creative freedom.
Your output resolution when saving snapshots or rendering a project. When one dimension is changed, Earth Studio will adjust the other to maintain your project's aspect ratio. You can unlock the dimensions by clicking the icon. Earth Studio supports a max resolution of 4096x2304.
The length of your project. When changing the length, Earth Studio will simply add or subtract the difference in frames by default. You can scale your existing keyframes to the new duration by checking the corresponding checkbox.
This is easy to understand because your project will use frames as a time movement. This gives you fine and precise precision in your measurements.
This is self-explanatory. We can use the seconds options to set the project length.
Frame rate in video production refers to the number of frames or images displayed per second in a video. Common frame rates include 24 fps for a cinematic look, 30 fps for standard video, and 60 fps for smooth motion. Higher frame rates, like 120 fps, are used for slow-motion effects. Frame rate choice affects the video's motion and visual style.
If you want a video explanation, here is a great example
I will go through the UI in Earth Studio step by step. So you will get a very detailed grasp of how to use the software. This section is also very useful if you need to refer to a specific tool.
This is the screen that you will be shown after the configuration of your project settings (project screenshot). This might be very overwhelming at first, but we will go through it bit by bit so it will be easy for you to understand.
The application interface features a prominent search bar at the top, accompanied by a taskbar containing six essential buttons. Let's delve into the functionalities of each:
-
Datei - This section is dedicated to managing your files, offering options such as creating new projects, opening existing ones, and accessing recently opened projects.
-
Bearbeiten - The Edit section provides fundamental file editing functions, including undo, redo, cut, copy, paste, delete, select all, and deselect.
-
Ansicht - Adjust the display options of your files in this section. It encompasses settings for multi-view, preview quality, guides, fullscreen toggle, view port mask, available areas, map style, and track points.
-
Overlays - Explore the Overlays section to enhance your files with imported overlay files or track points. This section also covers exporting options for After Effects and guidance on obtaining 3D track points.
-
Animation - Create dynamic content with animation features. The Animation section includes rendering options, animation settings such as auto-ease, ease in/out, linear, and step.
-
Hilfe - Find assistance and resources in the Help section, which includes documentation, a user forum, feedback submission, and a comprehensive list of keyboard shortcuts.
-
Search icon - Utilize the search function with the search icon to efficiently locate specific content within your files.
Here you will find the core controls for your project.
This menu allows you to initiate a new project, open existing projects, or quickly access recently opened projects.
A very cool feature in this menu is the premade animation functions that you will find under "New". These are lifesavers when you need to do a simple animation, and you need to do it fast. Now you just go to New and select which one you want. While this feature is very useful, it has its limitations. If you want to make more complex and intricate animations, you will have to do them yourself.
Efficiently save your current project or create a new copy with a distinct name using the Save and Save As options.
While Overlays and KMLs enable the addition of simple elements to Earth imagery (e.g. text, borders, and shapes), more complicated elements must be added outside of Earth Studio.
3D Camera Export, currently compatible with Adobe After Effects, makes this process incredibly straightforward. By natively exporting camera data from Earth Studio, you can be sure that composited elements will perfectly line up with your footage.
You can also create and export Track Points along with a project's camera data. Track Points are represented as null objects in After Effects and are helpful for positioning elements in your scene. Set a Track Point anywhere you plan to place an element in post-production, or set a few to use as reference.
Take a look at our Permissions for more information about annotations and adding custom graphics over Google Earth imagery.
If you want to use your camera and track points outside of Earth Studio, you'll need to export that data in a format that a third-party program can understand.
For After Effects, this is an Adobe ExtendScript file (.jsx), which recreates the camera and any track points within a new After Effects composition.
In most cases, it's best to export tracking data along with a render. This ensures that your camera and track points are perfectly up-to-date with the underlying footage.

To get tracking data when you render, select the desired format under 3D Tracking Data in the Advanced Settings. The tracking data script will be included with your image sequence and project file in the resulting zip.
Some situations might require you to export tracking data for a project that has already been rendered. For example, you might need to add additional track points to an existing animation.

At any time, you can use File > Export > 3D Tracking Data... to export tracking data without re-rendering. Select which tracking elements you need (3D Camera and/or Track Points), and Earth Studio will begin downloading your tracking data as a .jsx or JSON file.
Here you will find the main project settings as before in the start menu. And you can change everything as before.
Customize your user experience by configuring preferences in the following categories:
- General - Explore and adjust general settings for the application.
- Project - Tailor settings related to project configuration.
- Rendering - Fine-tune options and configurations for the rendering process.
- User - Personalize settings specific to your user profile.
In General, you will find your landing page. This is the page you will be shown at the start of your project. You will also find "default multi-view". Under it, you will see Default playback. Playback Mode Cycles how playback is handled once the playhead reaches the end of the work area. Playback loops by default but can also ping-pong (play in reverse) or stop.
Here you will find almost the same settings as the start menu but with some more detailed attributes. These can set the map style, the atmosphere, and the cloud settings.
Very simple. How the project will render when the render button is clicked. And allows you to set more projects to be rendered with the same actions.
Here you'll find the same settings as the Google account manager, but tailored to Each studio. Like search history, data from your projects, and to reset the whole editor to factory settings, which is very useful in troubleshooting.
The Edit section houses fundamental functions essential for file manipulation. Each function is detailed below:
-
Undo (Ctrl+Z):
- Description: Revert the last action performed in your project.
-
Redo (Ctrl+Y):
- Description: Reverse the last Undo action, restoring the previously undone change.
-
Cut (Ctrl+X):
- Description: Remove the selected content and place it in the clipboard for later use.
-
Copy (Ctrl+C):
- Description: Duplicate the selected content, copying it to the clipboard without removing it from its original location.
-
Paste (Ctrl+V):
- Description: Insert the content from the clipboard at the current cursor position in your project.
-
Delete:
- Description: Remove the selected content without placing it in the clipboard.
-
Select All (Ctrl+A):
- Description: Highlight and select all content within the active document or window.
-
Select None:
- Description: Clear any active selections, leaving no content highlighted.
The View section provides a range of options for configuring your project's display. Explore each sub-section for detailed insights:
-
- Cycle View Points
- Switch between different views in your project seamlessly.
- View 1, View 2, View 3, etcetera: Customize and navigate through various project views.
- Cycle View Points
-
- Low, Normal, High: Adjust the quality of the preview display to suit your needs.
-
- Show Guides
- Safe Margins, Thirds, Center, Custom Image: Configure guide settings for precise alignment in your project.
- Show Guides
-
- Has the same function as fullscreen button
- Toggle between full-screen and regular view for an immersive editing experience.
- Has the same function as fullscreen button
-
- Configure the viewport mask settings to control the visible area in your project.
-
- Specify the available areas in your project to focus on specific regions during editing.
-
- Clean, Explorational, Everything: Choose a map style that suits your project requirements.
-
- Here is more detail on Track Points: Access detailed settings for managing track points in your project.
In basic Earth Studio usage, everything is done through the eye of the lens. Obviously, this has its limits—if you're always inside the camera, there's no way to clearly visualize the path your camera will take between two key frames.
Multi-View enables an entirely new method of animating Earth imagery. You can see the position and shape of your camera path from an outside perspective, edit that path, and even display multiple viewports at once.
When we talk about multi-view, we're covering two concepts:
- How to enable and switch to the perspective of non-Camera viewports.
- How to work within those viewports to build and edit animations.
There are six viewports in all, including the Camera viewport. Multi-View consists of the Top view and the four Side views (North, South, East, and West).
Multi-View can be accessed via the View > Multi-View menu or through the dropdown in the bottom-right corner of the viewport. Select a number of viewports, and Earth Studio will update to display them. You can use the 1–4 keys to quickly toggle to that number of viewports.

The number of viewports that can be displayed is dependent on the size of your browser window. Earth Studio disables the 3 and 4 viewport options when your browser is too small.
Multi-View will also be activated by default when you set a camera target.
Switching Viewport Angles In any viewport, you can change the angle by using the dropdown in the upper-left corner. This is also an option when only one viewport is visible—you can switch out of the default Camera view at any time.

The settings menu in the upper-left corner of each multi-view has two options for adjusting the view. Follow Camera on Playback will automatically move and scale the viewport when the camera leaves the frame during playback. Show Full Path on Playback will re-frame the viewport to fit all paths in view on playback. Deselecting both will keep the Multi-View static during playback.
Earth Studio handles navigation differently between the top and side views.
Top View: Moving around in the Top view is similar to navigating in Google Maps. Click and drag the map to move around, and scroll to zoom in. To quickly navigate, hold while dragging to create a selection around a set of key frames. Then press Z to zoom to fit the selection into the frame.
Side Views: Moving around in a side view is similar to navigating in the curve editor. Hold while dragging to pan your view, and scroll to zoom in.
Switch between different views in your project seamlessly, providing a comprehensive perspective on your work.
Adjust the quality of the preview display, allowing you to tailor the viewing experience based on your project's requirements, and adjusting to hardware limitations.
Configure guide settings for precise alignment in your project, including safe margins, thirds, center, and custom image guides.
Toggle between full-screen and regular view to optimize your workspace based on your editing preferences.
Configure the viewport mask settings to control the visible area in your project, allowing for focused editing.
Specify the available areas in your project to customize your editing environment based on specific regions.
Earth Studio supports Map Styles. This allows you to turn on borders and labels for easier navigation of the globe. These map styles will not be included when rendering your animation. To view map styles, right-click the globe and select Map Style from the context menu.
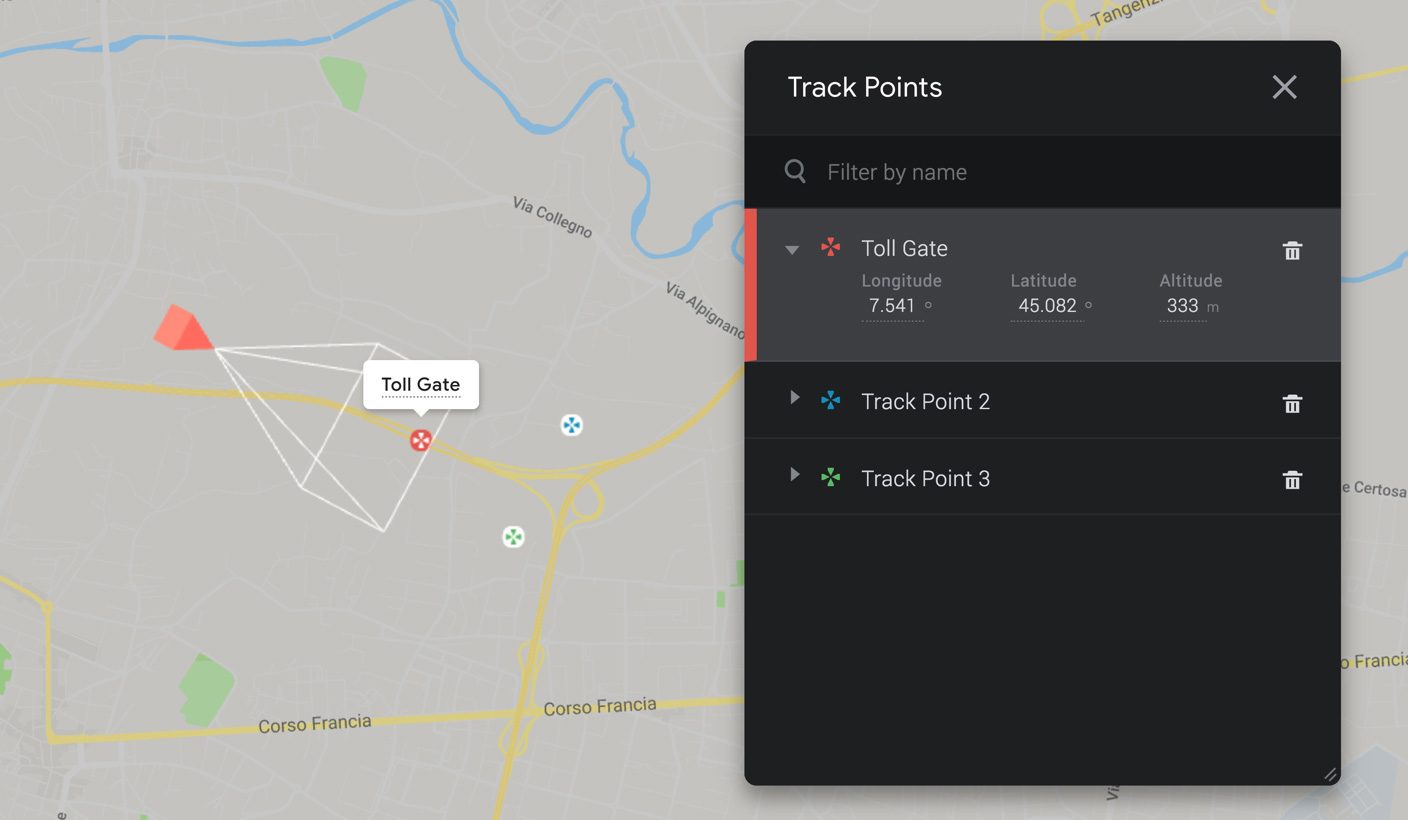
All existing Track Points are listed in the Track Point panel, which appears in the viewport whenever a new Track Point is created. From the panel, you can edit a Track Point's name, display color, or exact coordinates. Use the trash icon to delete a Track Point.
You can access the Track Point panel at any time from View > Track Points.
Explore the Overlays section to enhance your projects with additional features:
- Import KML
- Upload for your device
- Drive
Import Keyhole Markup Language (KML) files for your project, bringing in spatial and geographic data.
- Upload for your device
- Description: Upload KML files directly from your local device.
- Drive
- Description: Access and import KML files stored in your Google Drive.
Display overlay panels in your project, allowing you to visualize additional elements within your workspace.
Remove overlay panels from your project, streamlining your workspace and focusing on essential content.
Unlock the potential of dynamic content creation with the Animation section:
-
- linked with Render Button
- Initiate the rendering process for your animation.
- Recover Last Render: Retrieve the last rendered frame for quick reference.
- Cloud Renders: Explore options for rendering projects in the cloud.
- linked with Render Button
Initiate the rendering process for your animation, with additional options for recovering the last render and exploring cloud rendering capabilities.
- linked with Render Button
- Recover Last Render: Quickly retrieve the last rendered frame for reference.
- Cloud Renders: Explore rendering options in the cloud for efficient processing.
Customize animation options to achieve the desired motion effects:
- AutoEase: Enable automatic easing for smoother transitions.
- Ease in: Apply easing at the beginning of animations for gradual acceleration.
- Ease out: Apply easing at the end of animations for gradual deceleration.
- Linear: Create animations with a consistent speed throughout.
- Step: Generate animations with distinct, stepped transitions.
Navigate the Help section for comprehensive resources and support:
- Documentation
- Description: Access detailed documentation for in-depth guidance on using the application.
- User Forum
- Description: Engage with the user community in the forum to seek advice, share experiences, and collaborate.
- Feedback
- Description: Provide feedback to contribute to the ongoing improvement of the application.
- Keyboard Shortcuts
- About

Access detailed documentation for a comprehensive understanding of the application's features and functionalities.
Engage with the user community in the forum to seek advice, share experiences, and collaborate on projects.

Contribute to the ongoing improvement of the application by providing valuable feedback on your user experience.
Master keyboard shortcuts across various categories:
Access information about the application, including version details and credits to the development team.
The Media Control Bar offers familiar functionalities found in other Google products like YouTube. With a total of 7 buttons, each serves a specific purpose:
- Toggle Full Screen - Toggle the display between full screen and regular view.
- Loop Playback - Cycles how playback is handled once the playhead reaches the end of the work area. Playback loops by default, but can also ping-pong (play in reverse) or stop.
- Jump to Workspace Start - Move the playback cursor to the beginning of the workspace.
- Previous Frame - Navigate to the frame immediately before the current frame.
- Play/Stop - Start or stop the playback of the animation.
- Next Frame - Navigate to the frame immediately after the current frame.
- Jump to Workspace End - Move the playback cursor to the end of the workspace.
- Frame Number - Display or input a specific frame number. Clicking on the frame counter toggles between frames and seconds.
- Playhead - The playhead marks the project's current active frame. On playback, the playhead moves left to right through the work area, at the framerate defined by the playback controls.
Once you're happy with how your animation looks, it's time to render.
Explore rendering options and functionalities in the Render section:
- Save Current Frame to JPEG
- Description: Save the current frame of your animation as a JPEG image.
- Render Button
- Description: Initiate the rendering process for your animation.
- Feedback Button
- linked with Feedback Page
- Description: Provide feedback on your rendering experience.
- linked with Feedback Page
The snapshot button is the fastest way to export still images from Earth Studio. When you take a snapshot, your current view is immediately rendered and downloaded as a .jpg file at the resolution specified in the project settings.
For animations, Earth Studio offers two ways to render: a robust client-side renderer, which renders an image sequence directly on your computer to a directory you specify on your local hard drive, and a cloud-based renderer which runs remotely on Google's servers. To set up your render, click the render button.
On the left is a preview of your final output, restricted to the frame range of your work area. This is a low-fidelity preview—use it as a rough guideline to double-check that everything in your animation is cropped and moving as expected.
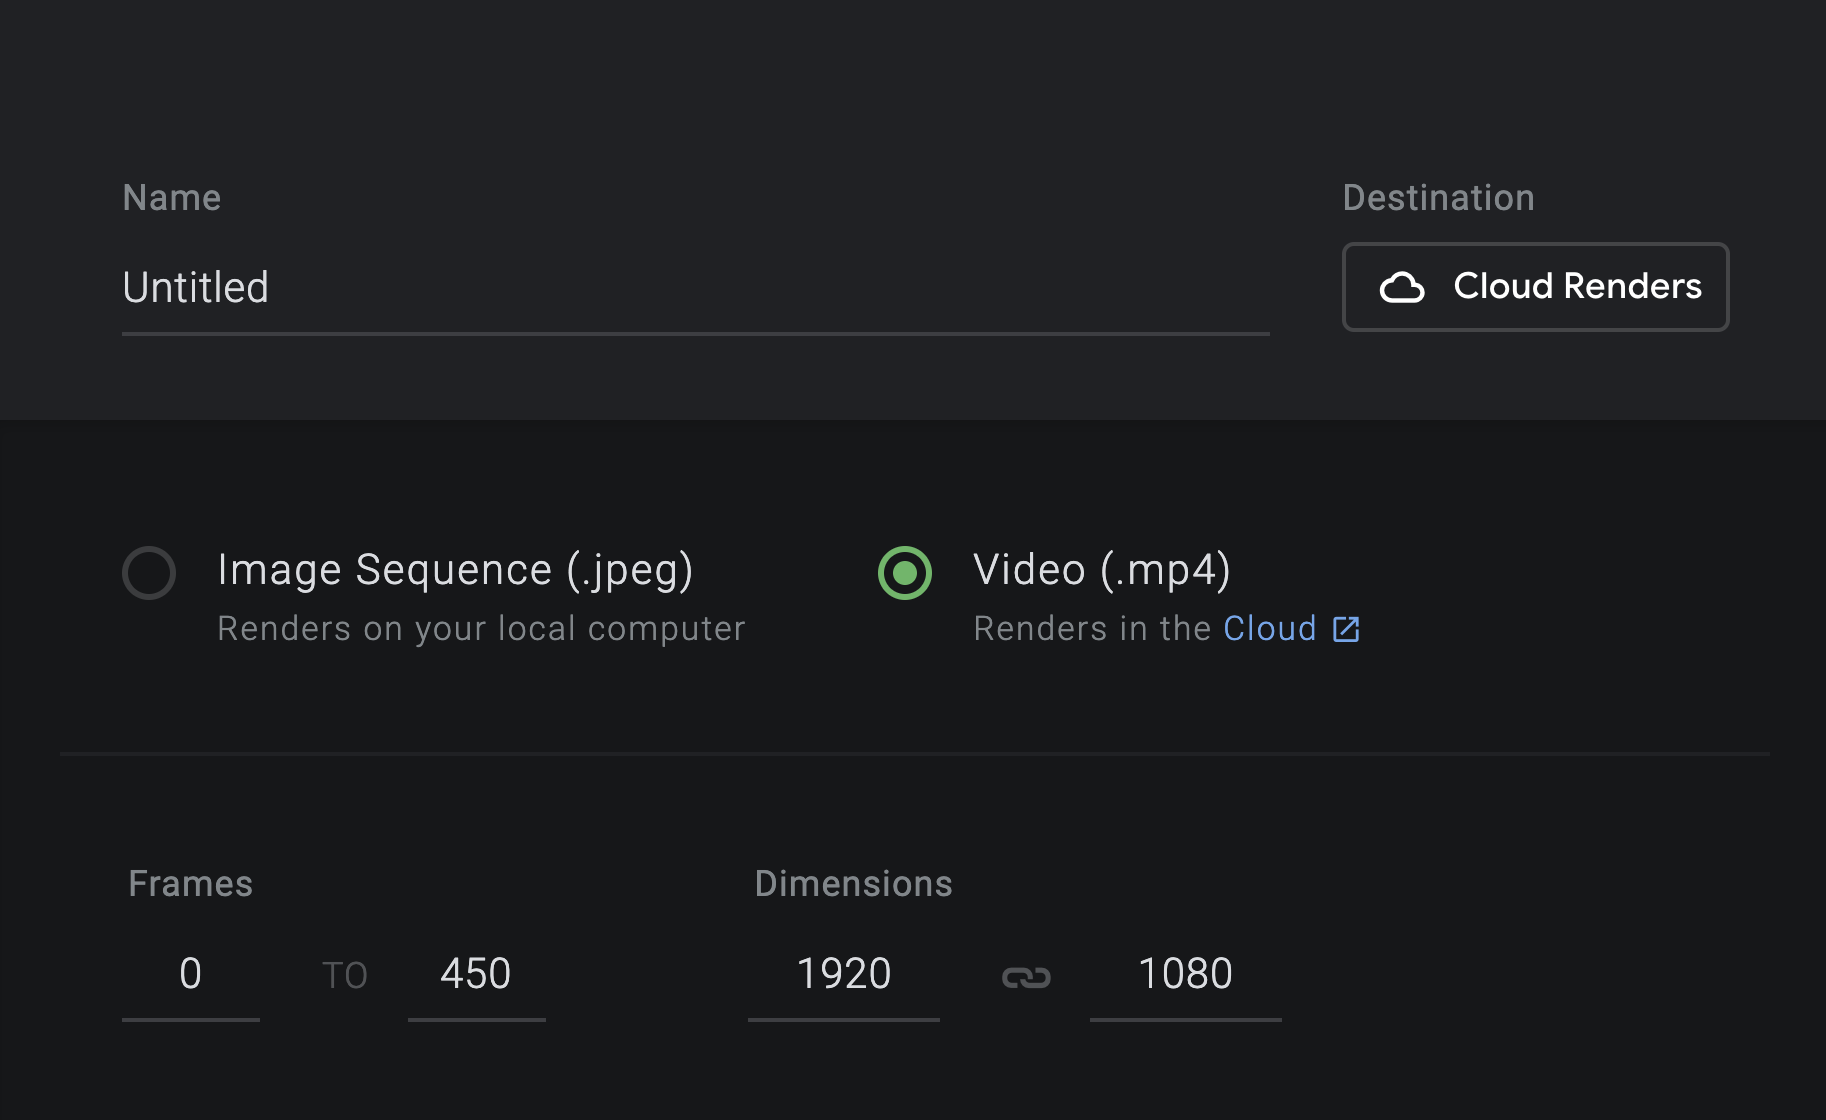
On the right are the render settings, which are covered in depth below. Once you're ready to render, type in your file name, select your render method, and hit start.
Cloud rendering (experimental) enables users to render videos directly from Earth Studio in the cloud.
Create an animation and click Render at the top right of the UI. From there, select the format Video (.mp4) and click Submit.
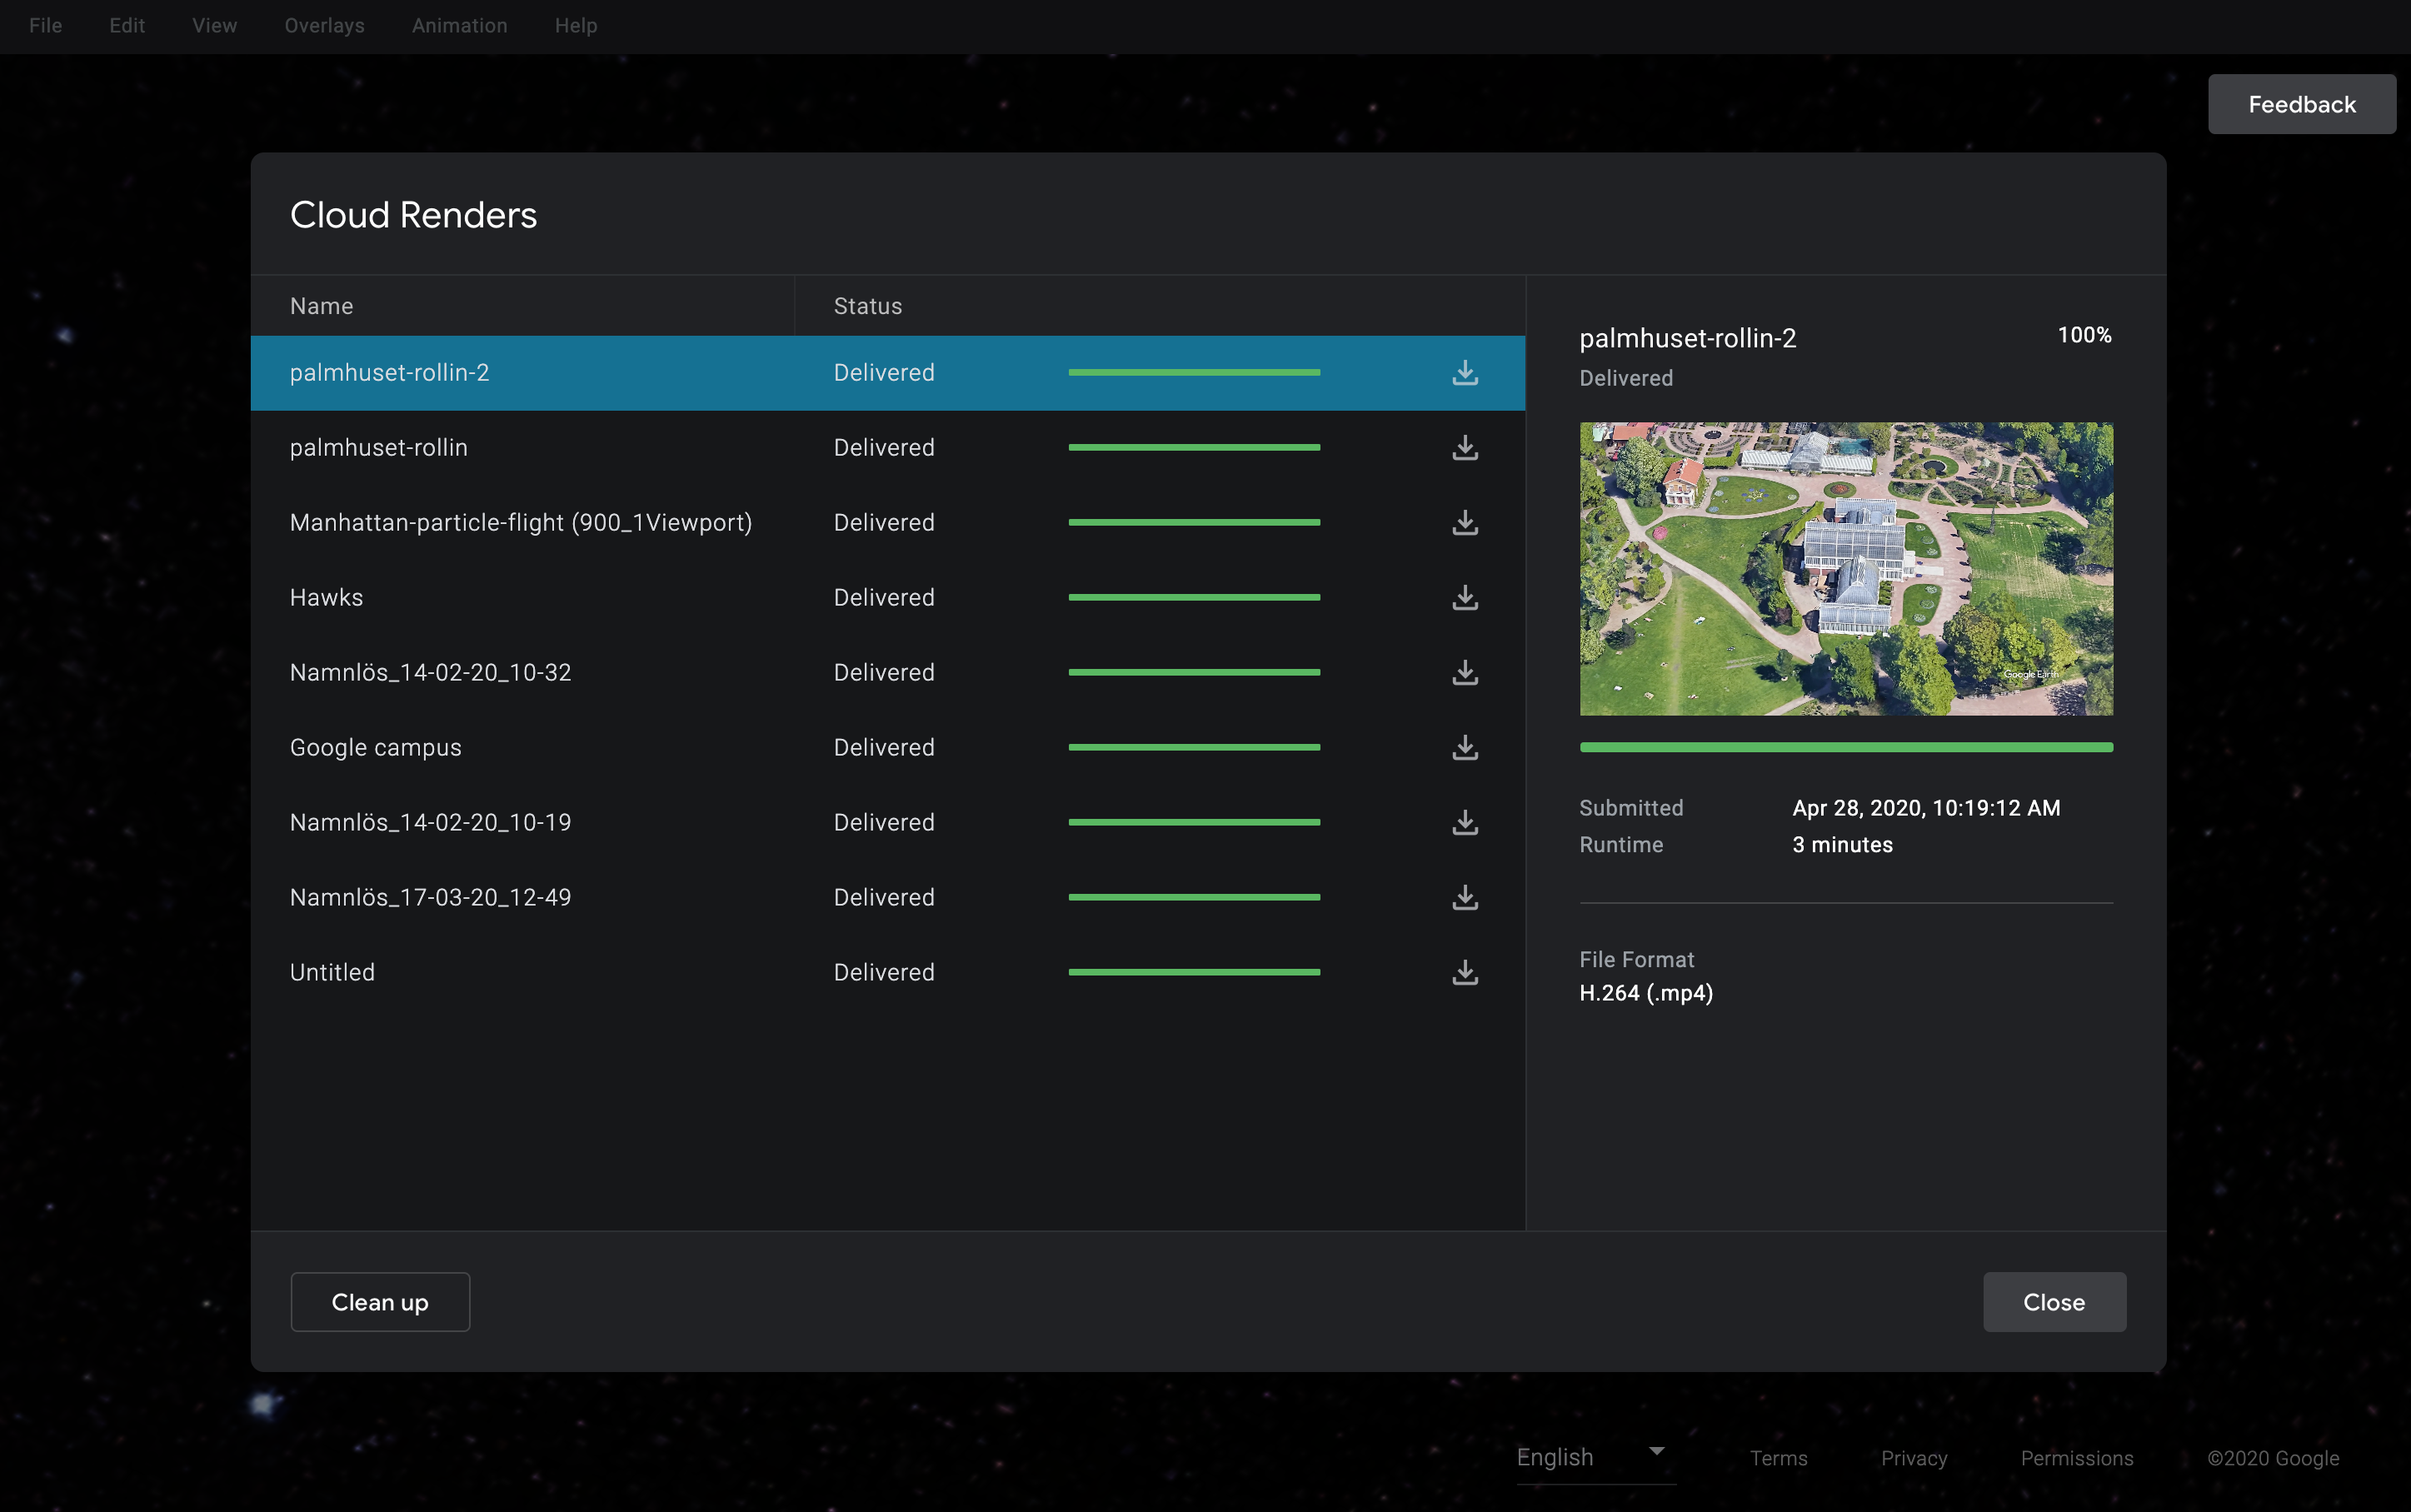
You will be notified via email when the render has been completed with a link to download. Note that completed renders are available for download for 10 days before they are deleted. You can also download completed renders in the Render Queue.
In the top menubar, select Animation > Cloud Renders… to bring up the render queue. Pressing AltQ (Mac) or ALTQ (Windows, Linux) while in the UI will bring up the queue too.
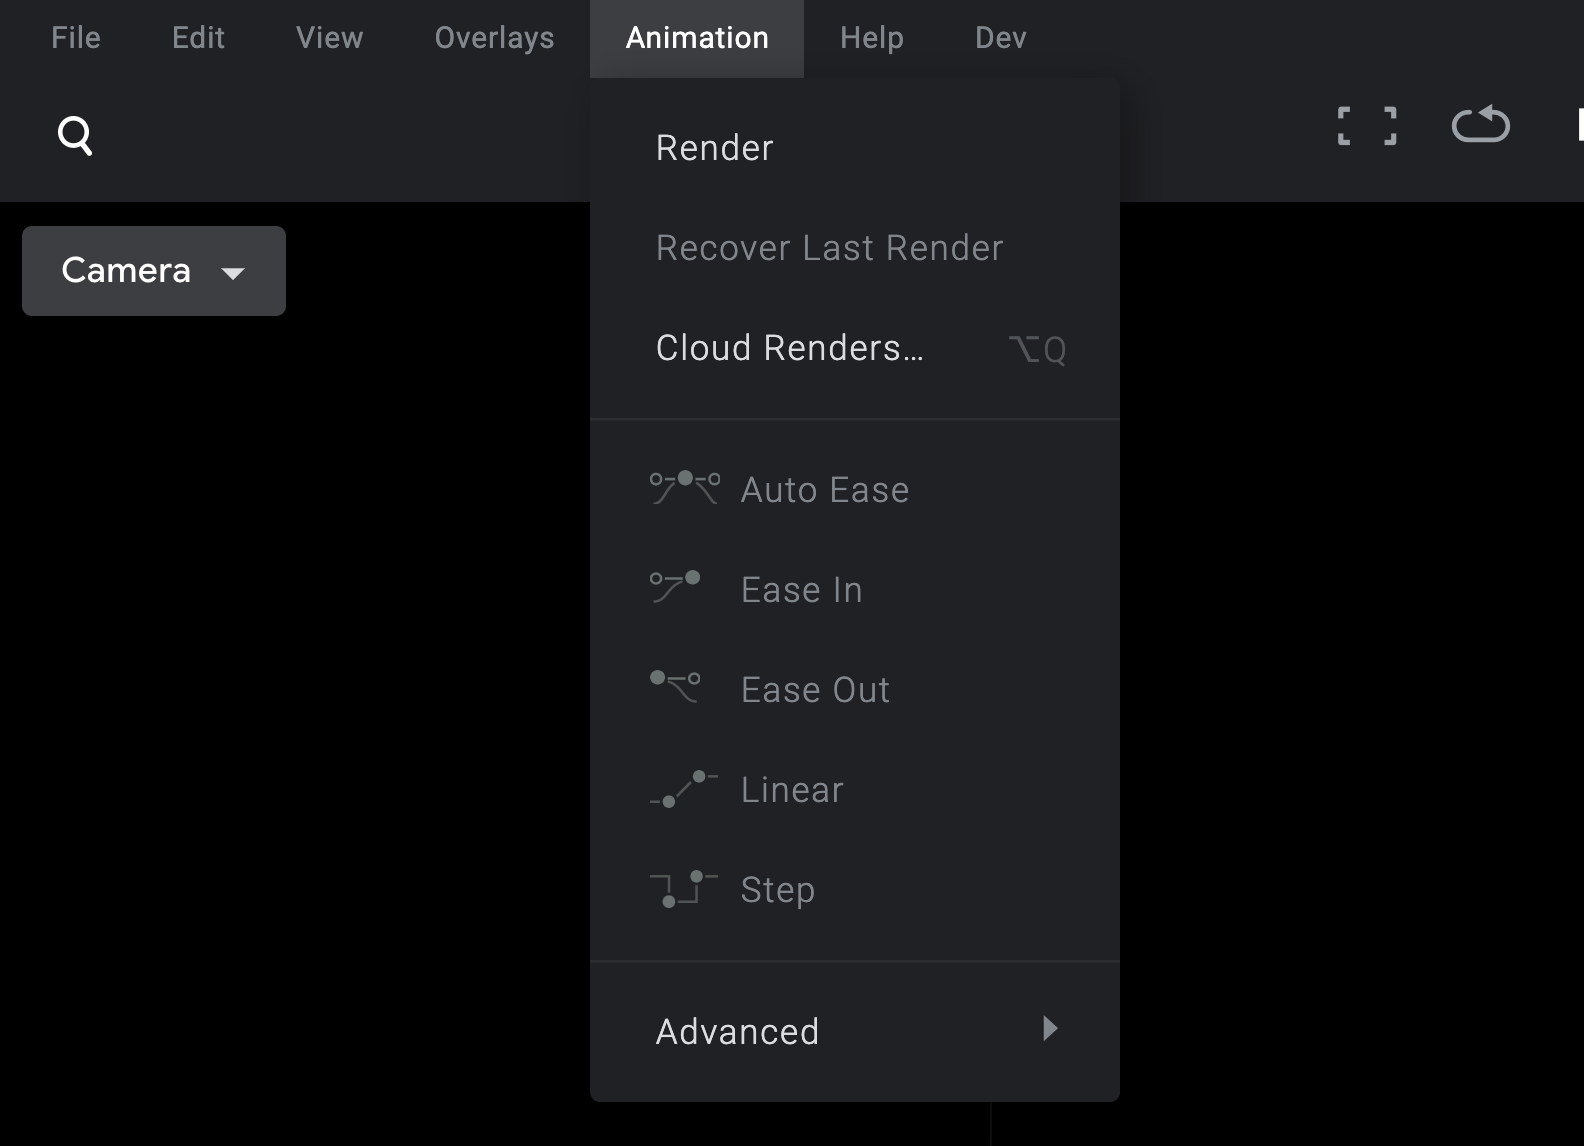
You can monitor the progress of your cloud renders and manage them here including the option to download and delete completed renders as well as resubmitting previously rendered projects.
Cloud rendering allows you to render videos (H.264 / MPEG-4) that can contain overlays and KMLs, but with a few caveats:
18,000 frames daily quota (10mins at 30fps) Completed cloud renders will be available to download for 10 days only Does not include JPEG sequences in renders (only video) Does not include Map Styles (‘Exploration’ and ‘Everything’) in renders Does not include Planets (Moon and Mars) in renders Any remote files referenced by a KML file must be accessible to Google's web crawler We recommend rendering locally for iterating animations or proxy workflows, and using cloud rendering for final renders.
When rendering locally, Earth Studio steps through each frame of the animation and saves it to your local file system. If the render crashes or is abandoned, you can recover your progress the next time you open Earth Studio. Note that render speed is highly dependent on your internet connection. The faster your internet, the faster your animation will render.
All the frames are rendered as an image sequence to the local directory you specify as you destination. If you've never turned an image sequence into a video, try Adobe Media Encoder or Adobe After Effects.
The local directory on your computer where the rendered project will be saved into. Before the rendering starts the browser will ask for special permission to read and write files to the selected directory on your file system. Earth Studio will create a sub-directory in your selected folder with the same name as your render.
The directory only needs to be selected once unless the directory is moved around or removed from your file system.
Frames The frame range of the project to render. By default, this matches your project's work area.
Dimensions Change the output dimensions of your render. Aspect ratio is maintained by default, but can be unlinked and adjusted. The preview will update dynamically to reflect the new dimensions.
Controls where and how attribution displays on your rendered frames. Read more about our attribution requirements.
Select elements to export in addition to the rendered footage. Currently supports 3D Camera Export via the Include 3D Tracking Data option.
Include points of interest, roads, and country/region borders in the final render output. By default, this will be set to the map style that was selected in the timeline view, and can be adjusted here.
Adjusts the texture and mesh fidelity of your rendered output. Keep this at "High" to ensure you're getting the best possible data.
Be aware that because the "High" quality setting loads the highest possible texture quality at a given location, tiling issues can be revealed when rendering. Try changing the render quality to "Normal" or even "Low" in these situations.
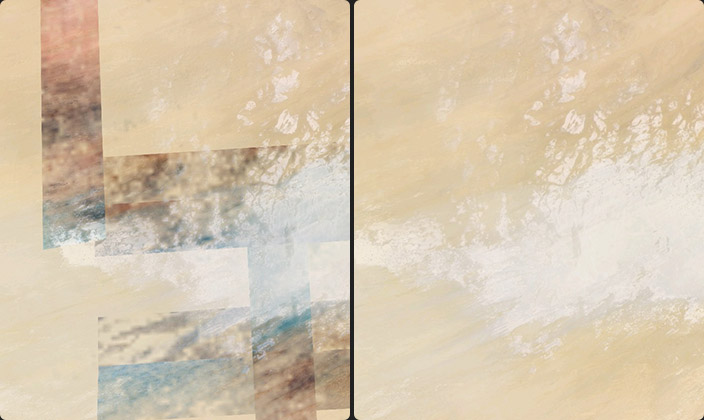
The "High" quality render reveals tiling issues in remote Africa, which aren't visible at "Normal" quality
When selected Earth Studio will render a panoramic equirectangular image for use in VR headsets or interactive videos, e.g. on YouTube. Before rendering, make sure to enable the "Time of Day" attribute to mitigate visible seams. See comparison images below. When exporting image sequences for use on YouTube, convert your Image Sequence to video and then make sure you inject metadata that helps YouTube understand your video is supposed to be viewed in 360, using e.g. the Spatial Media Metadata Injector.
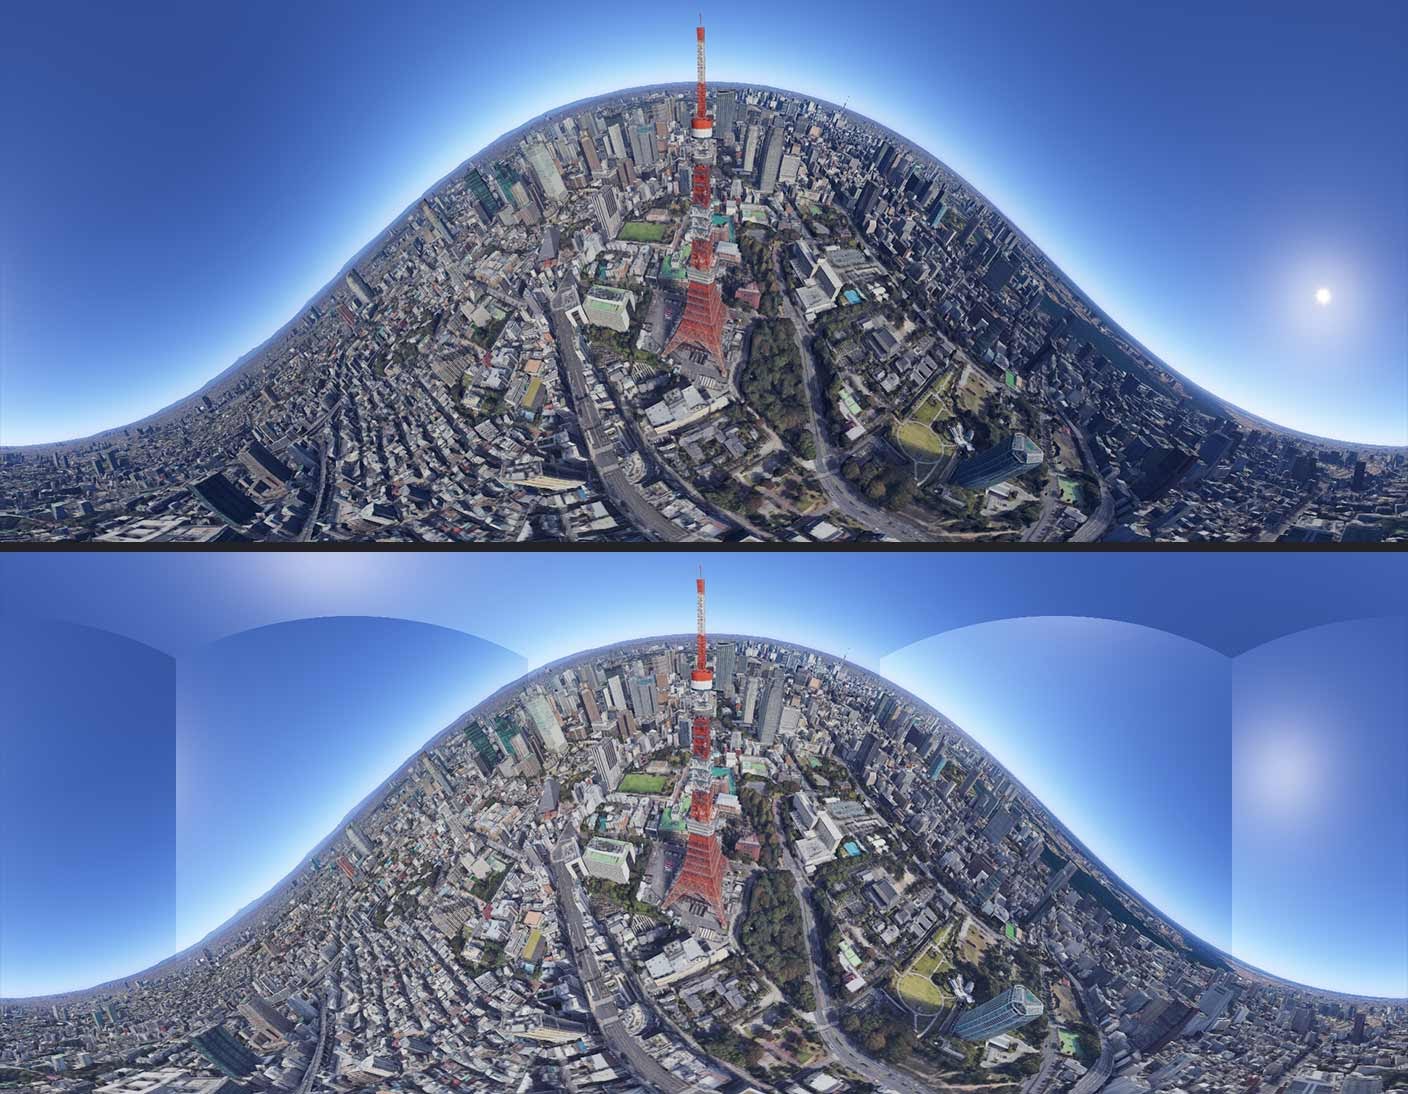
When rendering 360° spherical enable the “Time of Day” attribute to remove visible seams.
Navigate the Camera Window for specialized settings and controls:
- Camera Select
- Camera
- Top
- North
- South
- East
- West
- Panel Select
Choose from various camera perspectives to customize your viewing experience:
- Camera: Default camera view.
- Top: Overhead view.
- North, South, East, West: Cardinal direction views.
Explore functionalities and controls within the Main Window:
- Add Attributes
- Description: Add additional attributes to elements in your project.
- Editing Panel
- Description: Access tools and features for editing elements in your project.
- KeyFrame Button
"Attributes" are elements of the globe that can be animated, like the camera's position or rotation. Each attribute is displayed next to its current value, and a keyframe button. Attributes are arranged into groups based on function.

Additional attributes can be added from the Add Attributes menu. These enable exciting effects, like Time of Day to animate a sunset, or animate zoom with Field of View.
Most animation in Earth Studio is handled by the Camera Position and Camera Rotation attributes. Additional attributes allow you more creative control over the appearance of the Earth.
Attributes can be added and removed from the Attribute List using the Add Attributes menu. Simply check an attribute to enable and display it in the timeline, and it's ready to be keyframed and animated.
If you uncheck an attribute, it will disappear from your timeline and revert to its default value. However, the “disappeared” keyframes are saved and will reappear when the attribute is added back to the scene.
While animating, you'll often need the camera to track a point of interest. You can do this manually by animating the Pan and Tilt attributes, but this leaves room for error.
The Camera Target attributes are a powerful way to control your camera's view. You can animate a target's position, and even adjust its influence on your existing Camera Rotation values.
Setting a Camera Target The easiest way to set a Camera Target is directly in the Camera view. Simply right-click the point where you want your camera to look, and choose Set Camera Target from the menu.
The Camera Target group will be added to your Attribute List, with position values matching the location of your click. The camera will point directly at this new target. As you playback your animation, your camera's rotation will update to keep this point in the center of your view.
You can also set a Camera Target through the Add Attributes menu. Enable the Camera Target group, and Earth Studio will create a target at the center of the camera's current view.
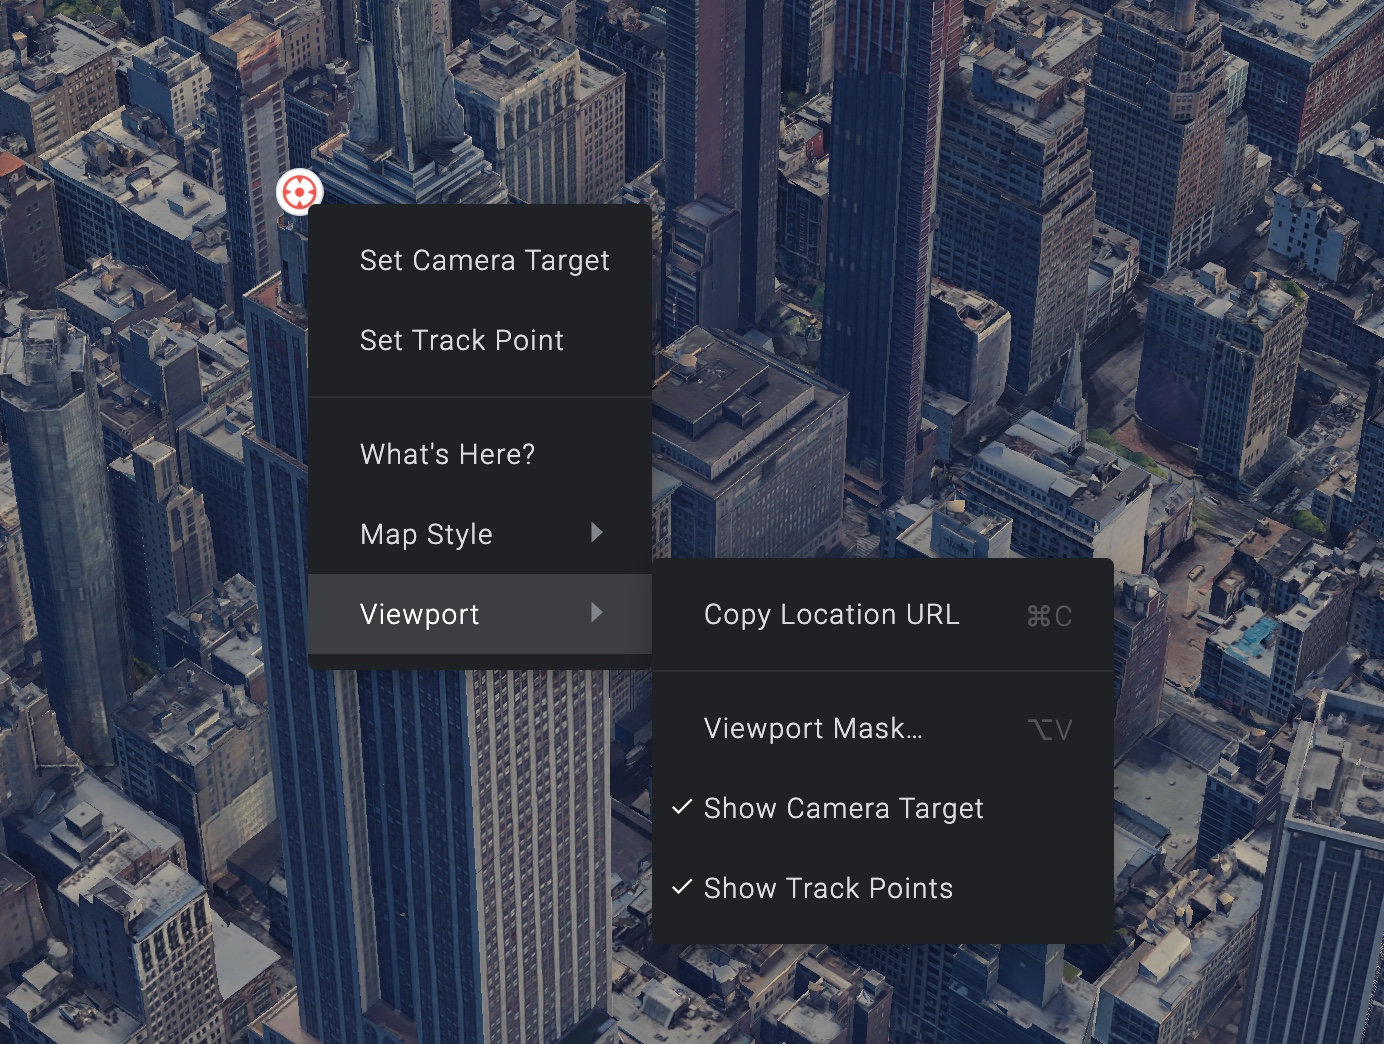
By default, the camera target will be visible in your camera viewport. Note that the camera target will not be part of your final render output, but works as a visual helper to where you have focused your camera. Its visibility setting can be changed by right-clicking anywhere in the camera viewport under Viewport > Show Camera Target.
Right-click menu to toggle the visibility of the camera target
To move the Camera Target to another location in the Camera view, you can hold Alt while dragging.
The Roll attribute allows you to bank the camera to create interesting compositions and fly throughs.
Banking with Camera Roll The feature is currently experimental as there are a few known issues: Atmosphere fades off when rolling the camera at low tilt, and Sun location inverts when hitting 90-degree roll while the camera is tilted. This can be mitigated by enabling the “Time of Day” Attribute. Additionally, we recommend using the timeline scrub inputs to navigate, as the mouse navigation controls are not optimized for Roll.
The Field of View attribute controls how much of the world displays in the frame. Changing this value is like changing the focal length of your camera lens.
Changing Field of View from the default 20° to 5° (zoom in), and then to 60° (zoom out) In Earth Studio, the field of view is measured as an angle in degrees. At higher angles, you see more of the world (a wide-angle lens effect). Lower values restrict the camera's view (a telephoto lens effect).
Time of Day is a powerful cinematic effect. When enabled, Earth Studio renders realistic lighting, stars, and atmospherics based on the position of the sun. These elements are controlled by a date and time (GMT) value.
Depending on your location and the time of day at that location, Earth Studio will simulate daylight, nighttime, dawn, and dusk. At high altitudes, Earth Studio renders a nighttime texture of the Earth with city lights. This texture fades out between 8000 km and 3000 km.
The appropriate shading is applied to 3D features on top of their existing textures, based on the angle of light. Shadows are cast by clouds on the landscape beneath them.
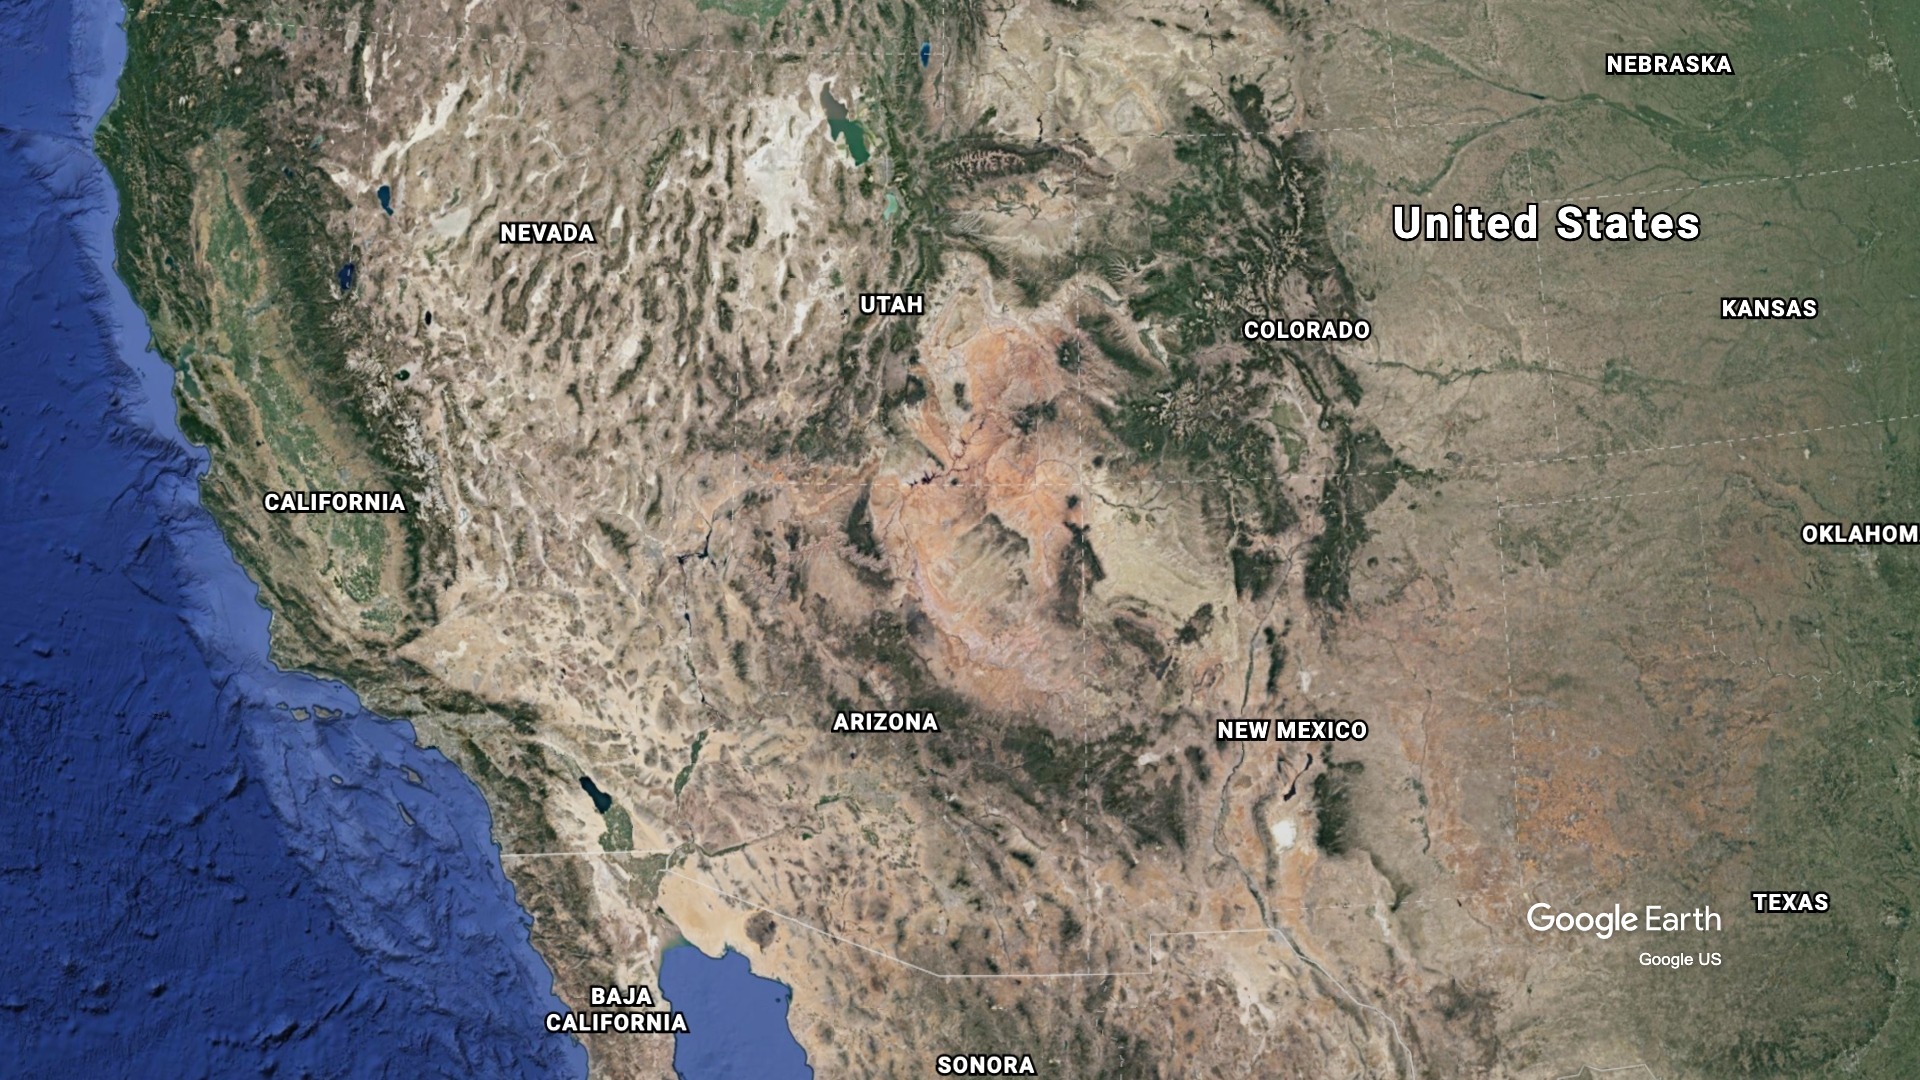
Star data is sourced from the European Southern Observatory and is positioned in the sky appropriately based on the set date and time. This data is incredibly precise. All the celestial bodies are correctly mapped; even a solar eclipse will be visible in Earth Studio at the exact time it's scheduled. (Don't believe us? Check out the USA on 08/21/2017 at 18:27 GMT)
When Time of Day is enabled, Earth Studio will generate accurate atmospheric effects. These look especially beautiful at dawn and dusk.
Just like in reality, atmospherics are affected by the weather. So if it's cloudy or rainy at your location, the scene will appear blue and overcast.

A clear sky vs. a cloudy sky at the same Time of Day. Overcast skies create a blue cast in the atmosphere.
Earth Studio renders clouds over the Earth by default. Cloud data is pulled from NOAA multiple times a day, so you'll always have a fairly accurate depiction of current weather patterns around the world.
When Time of Day is turned off, clouds begin to fade out at 20,000 km. Below 8000 km, they don't render at all.
Sometimes, you might not want to display the clouds at any altitude—they might be blocking your subject or generating dreary weather atmospherics with Time of Day enabled. The Clouds attribute allows you to toggle clouds on and off as needed.
By default, Earth Studio displays the ocean topography when rendering the world's oceans. Set the Ocean Overlay attribute to on to render a smooth ocean surface. When combined with Time of Day, you can achieve beautiful lighting effects as the sun reflects off the water.

Ocean Overlay off vs. on Depending on the angle of your camera, the ocean overlay will fade out between 630 km and 400 km until the ocean topography is fully visible again.
Beneath the viewport is the editor, our primary workspace for animation. The editor contains the Attribute List on the left and the Timeline on the right.

Earth Studio uses a traditional linear timeline to represent animations. The timeline is subdivided horizontally by frames and vertically into tracks.
Frames are distributed evenly across the top of the timeline. You can change from frames to seconds in the project settings. Tracks correspond to their neighboring attribute. When a keyframe is added for an attribute, it appears in the track.
Scrolling up and down will scroll the timeline tracks and the attribute list together. Resizing the scrollbar at the bottom of the timeline will horizontally zoom your timeline view to a particular frame range. Double-click the scrollbar to zoom out to the whole timeline.
Google Earth Studio offers powerful tools for creating captivating animations and visualizations using satellite imagery and 3D terrain. Integrating OpenStreetMap (OSM) data into Google Earth Studio can enhance your projects by providing detailed and up-to-date map information.
Start by obtaining the necessary map data from OpenStreetMap. OSM is a collaborative mapping project that provides free, editable maps and geographic data globally. You can export OSM data in various formats, such as GeoJSON or KML, which is compatible with Google Earth Studio.
Convert the downloaded OSM data into a format compatible with Google Earth Studio. This may involve converting GeoJSON or KML files into a format supported by Earth Studio for seamless integration.
Use the Earth Studio interface to import the converted OSM data. Google Earth Studio allows users to import custom KML files, enabling the overlay of OSM information onto the Earth Studio environment. This step is crucial for aligning your animation with the geographic context provided by OpenStreetMap.
Ensure that the imported OSM data aligns correctly with the Earth Studio environment. Adjust the timing and synchronization of your animation to coincide with the geographic features present in the OpenStreetMap data.
Leverage the combination of Google Earth Studio's animation capabilities and the rich map information from OpenStreetMap to create visually compelling and informative content. This integration allows for dynamic storytelling with accurate geographic context.
One of the advantages of using OpenStreetMap is its community-driven, regularly updated nature. Consider incorporating real-time or periodically updated OSM data into your Google Earth Studio projects to reflect the latest changes in the mapped area.
Explore the customization options within Google Earth Studio to style the OpenStreetMap data layers according to your project requirements. This may include adjusting colors, line styles, and feature visibility to achieve the desired visual impact.
By seamlessly integrating Google Earth Studio with OpenStreetMap, you can unlock a new dimension of storytelling and visualization, combining the power of satellite imagery and 3D terrain with up-to-date and detailed map information.