This repository contains the core server files and configurations. It includes fixes for database performance, quest logic, and crucial setup scripts.
For installation and configuration, see instructions below.
- Dragon stone antiflags: Dragon stone items with grade between Rough and Rare are no longer tradable, droppable or sellable (consistency with the official).
- Dragonsoul Qualification: Minimum level hardcoded in the checks for qualification.
- Item Proto: Some affect item values adjusted, minor translation improvements
If everything is done right in the setup and build of the Server Source, this process should be quick and easy! If you haven't yet setup your Server Source, now is the chance to do so as it is a required step to continue!
Below you will find a comprehensive guide on how to configure all the necessary components from scratch.
This guide is made using a Windows environment as the main environment and showcases both Windows and FreeBSD (virtual machine) implementation. If you are not using Windows, please feel free to adapt these instructions for your operating system.
This guide also uses the latest versions for all software demonstrated as of its creation date at February 4, 2026.
© All copyrights reserved to the owners/developers of any third party software demonstrated in this guide other than this project/group of projects.
If one or more of the previous items is not yet configured please come back to this section after you complete their configuration steps.
- ✅ M2Dev Server Source
▶️ M2Dev Server [YOU ARE HERE]- ⏳ M2Dev Client Source
- ⏳ M2Dev Client [ALSO CONTAINS ADDITIONAL INFORMATION FOR POST-INSTALLATION STEPS]
The source and the server project can be ran in either a FreeBSD or a Windows environment. Other Linux flavors are not fully supported and may not be fully compatible yet.
This tutorial will be showing how to install in both FreeBSD and Windows environments.

First things first, find a folder of your choosing where you will be cloning the Serverfiles project (server). In your terminal, cd into that location and download the project using git.
Here's how
This example will use
/usr/home/gameas the working directory.Execute these commands:
mkdir /usr/home/game
cd /usr/home/game
git clone https://github.com/d1str4ught/m2dev-server.git .
Mind the
.in the end of the last command.With the
., the project will be cloned right in/usr/home/game, while without it, it will be cloned as/usr/home/game/m2dev-server.This is just a preference, either way is fine.
Before getting into the actual configuration of the files, it is very important that you get your compiled binaries into the right places.
If you haven't compiled the Server Source yet, you should pause here, compile everything and come back to this point!
After your builds are done
What you need to do is distribute the built binaries in their respective locations within the Server project and assign full system permissions (
0777). You will find the built binaries in theserver-src/buildfolder:
- game
- db
- qc
First,
cdinto that directory and then execute these commands (replace the directories with your own structure!!!):cd /usr/home/src/build/bin cp ./game /usr/home/game/share/bin/game chmod 777 /usr/home/game/share/bin/game cp ./db /usr/home/game/share/bin/db chmod 777 /usr/home/game/share/bin/db cp ./qc /usr/home/game/share/locale/english/quest/qc chmod 777 /usr/home/game/share/locale/english/quest/qcNote: For
qc, replaceenglishwith your locale if you have changed it.
You should now have the following files in their respective directories with full system permissions assigned:
/usr/home/game/share/bin/game/usr/home/game/share/bin/db/usr/home/game/share/locale/english/quest/qc
This step is gonna be extremely easy and most of you are very familiar with it.
Here's what to do
First,
cdinto the destination directory of yourqcbuilt binary:cd /usr/home/game/share/locale/english/questNext, run the
make.pyfile to execute theqcand build all your quests:python make.pyWARNING: You need to first
cdinto the quests folder before executing themake.pyscript! Commands like:python /usr/home/game/share/locale/english/quest/make.pywill result in errors!
This happens because when you
cdin a folder you are changing thecwd(current working directory). If yourcwdis not thequestfolder, themake.pyscript will not be able to find your quests and hence, an error will appear.
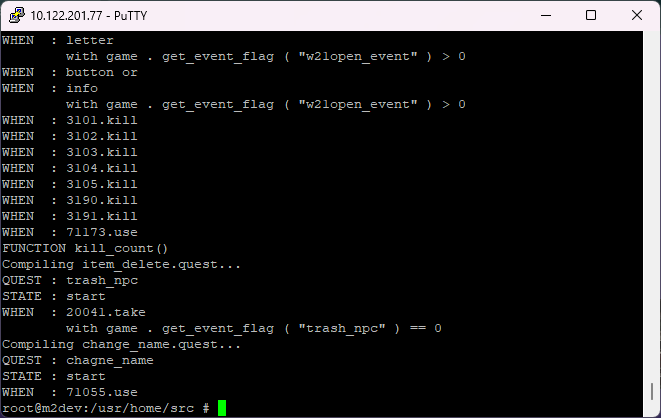
After
qchas done its job, your terminal should be looking like this:
If you've configured your database correctly in the Server Source part and you can successfully connect to your root account with your terminal or/end your database management software (Navicat), then this process is gonna be very easy.
The process
There's 5 different databases that you need to import into your MariaDB/MySQL Server:
accountcommonhotbackup(empty database, needs to simply exist)logplayer
You have 2 options to import these databases and their tables
First, you need to create the 5 databases before importing their tables and data.
In your terminal type these commands:
CREATE DATABASE account;
CREATE DATABASE common;
CREATE DATABASE player;
CREATE DATABASE log;
CREATE DATABASE hotbackup;
exit;
Next, in your
/usr/home/game/sql(or wherever you installed the serverfiles) you have some*.sqlfiles (account.sql,common.sql, etc...).You can use these files to import everything with a simple command.
First
cdinto the/sqlfolder:cd /usr/home/game/sqland then:
mysql -u root -p account < account.sql
mysql -u root -p common < common.sql
mysql -u root -p log < log.sql
mysql -u root -p player < player.sql
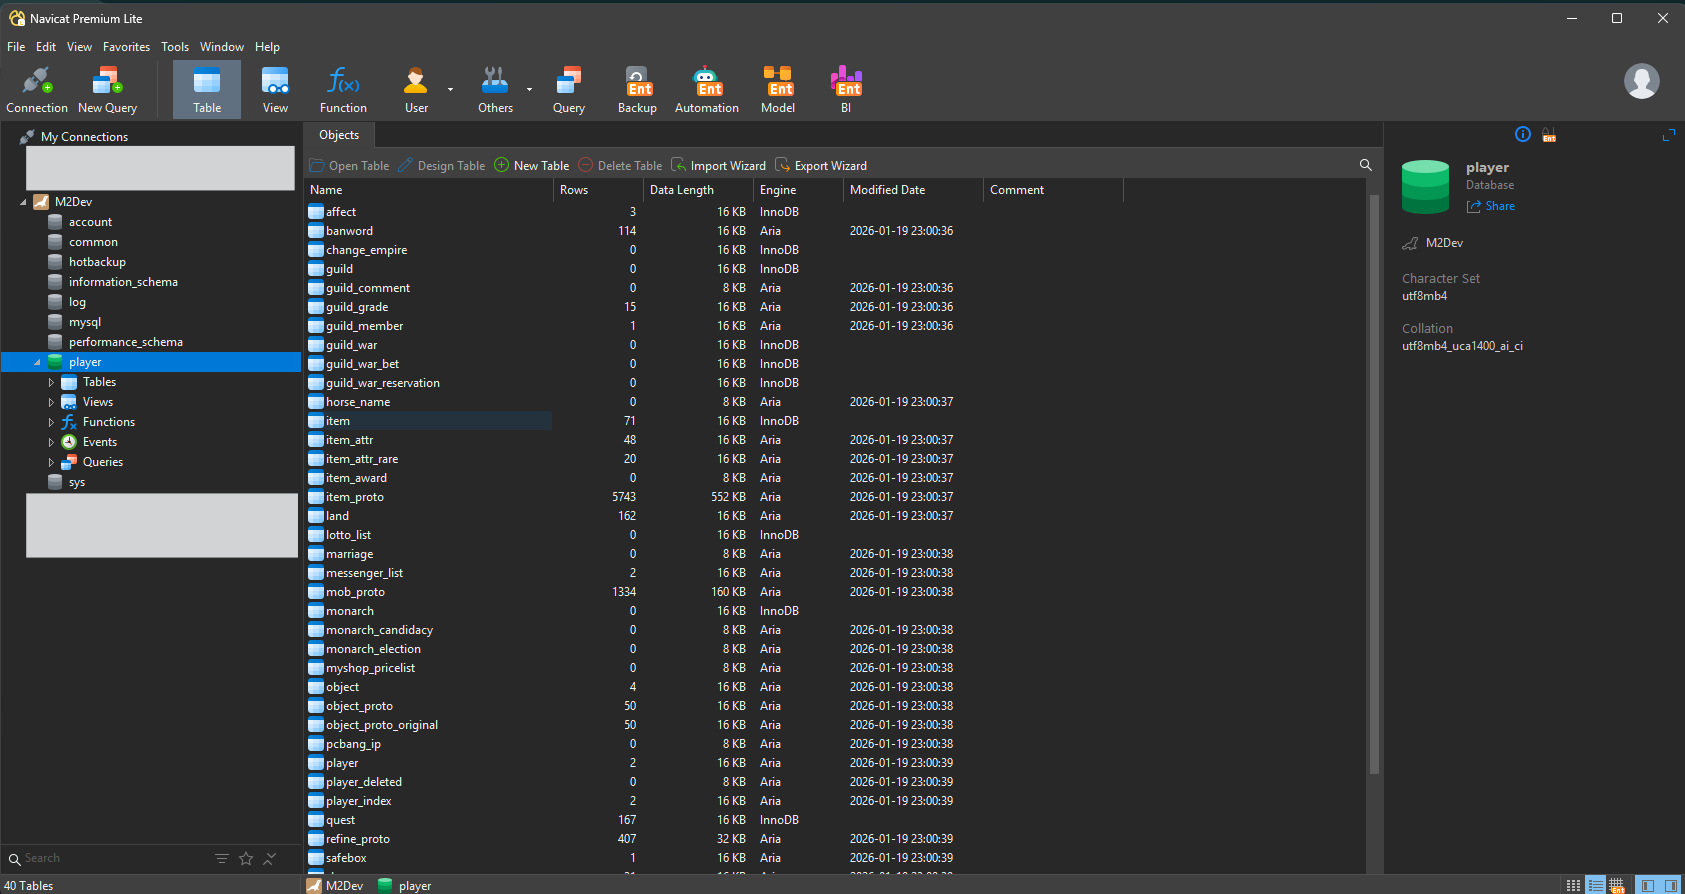
If you open up your MariaDB connection in Navicat, your tables should be now visible!
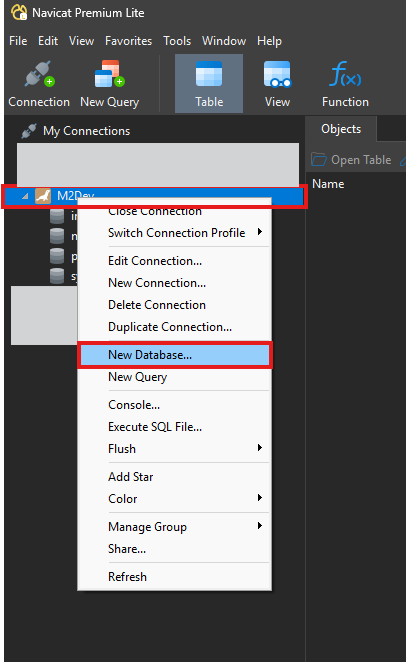
In Navicat, double click your connection to open it. Next, select New Database...
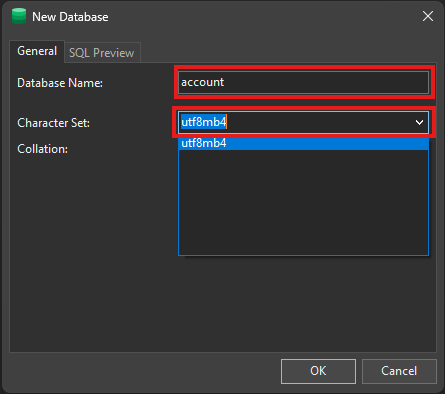
A dialog will popup, there enter the name of your database name (e.g.,
account) in Database Name and make sure that Character Set is set toutf8mb4for all cases.
Do that for all 5 databases:
accountcommonhotbackuplogplayer
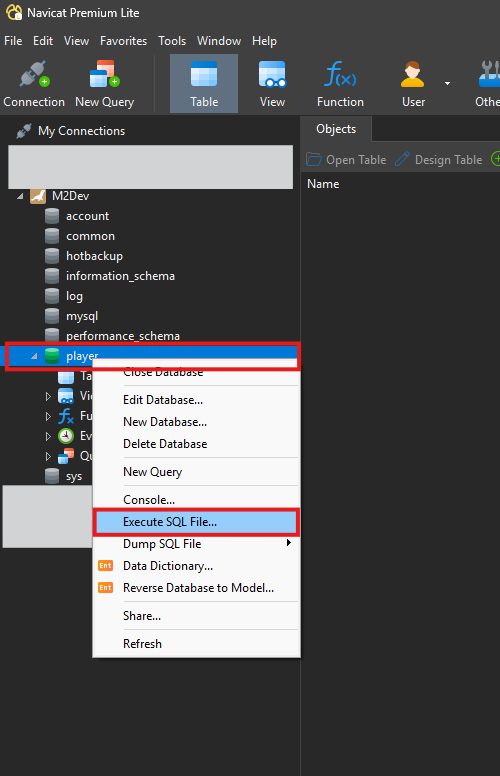
Next, double click in a database to open it. It should turn green. Once it's open, right click on it and select Execute SQL File...
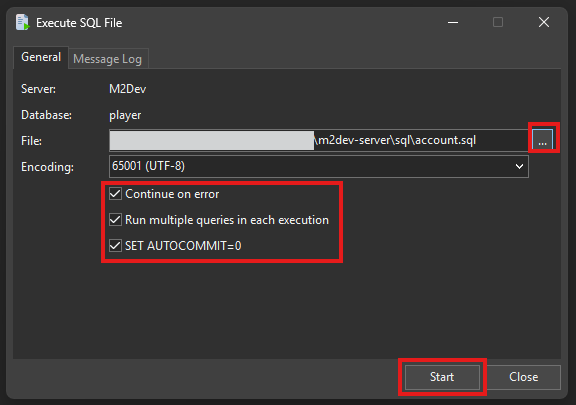
A dialog will popup, leave all checkboxes to the default values and click the ... button to browse through your file system (the
sqlfiles need to be downloaded from the VM to your physical drive) and select the file. Once selected, click Start and wait for the process to finish.
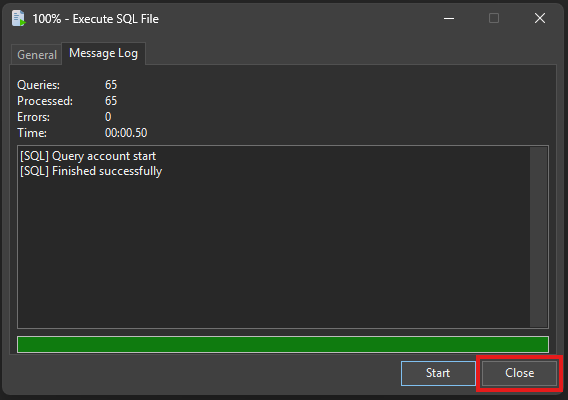
Once this pops up, you can click Close.
Make sure you repeat this process for all created databases (you can skip
hotbackup)
If you right click and hit Refresh in the empty space, you should be seeing all your tables.

If you've done everything right so far, you are ready to turn on the server for the first time.
One-step configuration
Simply
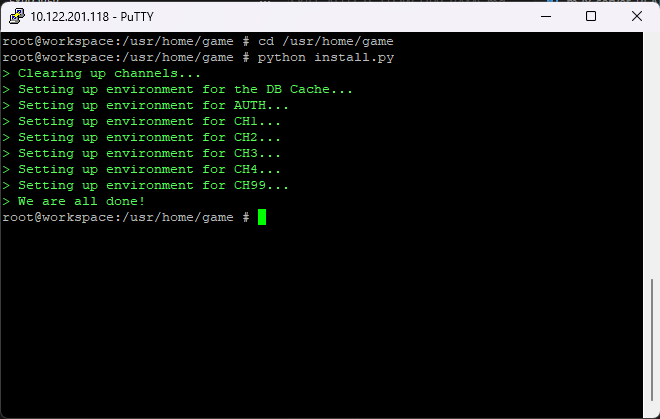
cdto your serverfiles' root directory (e.g.,/usr/home/gameand execute theinstall.pyfile)cd /usr/home/game python install.pyYou should be seeing this:
All you need is one command in the terminal.
The command
Simply
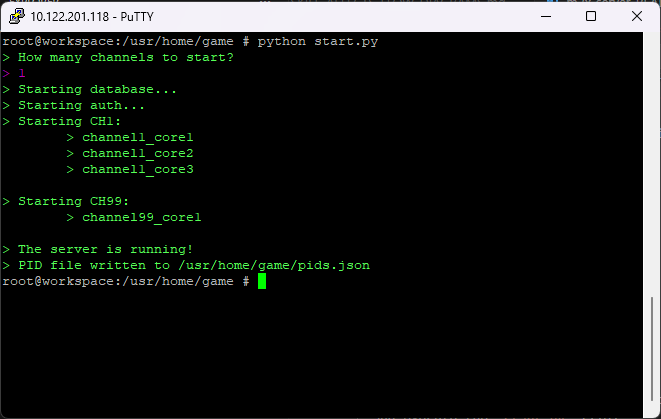
cdto your serverfiles' root directory (e.g.,/usr/home/gameand execute thestart.pyfile)cd /usr/home/game python start.pyNext, select how many channels you would like to start and hit ENTER.
You should be seeing this:

This process will be almost identical to the FreeBSD method, only a few little things change here.
Please make sure that you have installed the following software in your machine before continuing:
Python: The software used to execute python scripts. It is recommended to ADD TO PATH at the end of the installation. Download

First things first, find a folder of your choosing where you will be cloning the Serverfiles project (server).
Here's how
Create a new folder in a location of your choosing and open up a command prompt into that folder (or
cdthere).The, execute this command:
git clone https://github.com/d1str4ught/m2dev-server.git
Before getting into the actual configuration of the files, it is very important that you get your compiled binaries into the right places.
If you haven't compiled the Server Source yet, you should pause here, compile everything and come back to this point!
After your builds are done
What you need to do is distribute the built binaries in their respective locations within the Server project. You will find the built binaries in the
server-src\buildfolder:
- game.exe
- db.exe
- qc.exe
Simply copy them from the
buildfolder and into their respective destinations:
m2dev-server\share\bin\game.exe
m2dev-server\share\bin\db.exe
m2dev-server\share\locale\english\quest\qc.exeNote: For
qc, replaceenglishwith your locale if you have changed it.
This step is gonna be extremely easy and most of you are very familiar with it.
Here's what to do
First, open up a command prompt (or
cd) into the destination directory of yourqcbuilt binary.Next, run the
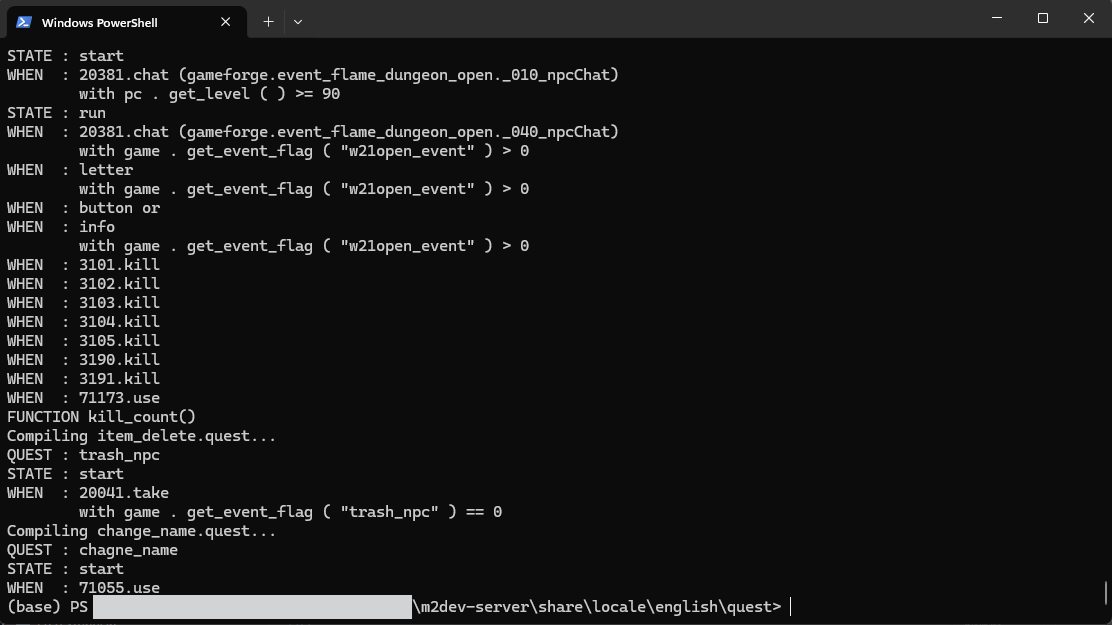
make.pyfile to execute theqcand build all your quests:python make.pyWARNING: You need to first
cdinto the quests folder before executing themake.pyscript! Commands like:python C:\m2dev-server\share\locale\english\quest\make.pywill result in errors!
This happens because when you
cdin a folder you are changing thecwd(current working directory). If yourcwdis not thequestfolder, themake.pyscript will not be able to find your quests and hence, an error will appear.
After
qchas done its job, your terminal should be looking like this:
If you've configured your database correctly in the Server Source part and you can successfully connect to your root account with your terminal or/end your database management software (Navicat), then this process is gonna be very easy.
The process
There's 5 different databases that you need to import into your MariaDB/MySQL Server:
accountcommonhotbackup(empty database, needs to simply exist)logplayer
You have 2 options to import these databases and their tables
First, you need to create the 5 databases before importing their tables and data.
In your command prompt type these commands:
CREATE DATABASE account;
CREATE DATABASE common;
CREATE DATABASE player;
CREATE DATABASE log;
CREATE DATABASE hotbackup;
exit;
Next, in your
m2dev-server\game\sql(or wherever you installed the serverfiles) you have some*.sqlfiles (account.sql,common.sql, etc...).You can use these files to import everything with a simple command.
First, open up a command prompt inside or
cdinto the\sqlfolder and then:'C:\Program Files\MariaDB 12.1\bin\mariadb.exe' -u root -p account < account.sql 'C:\Program Files\MariaDB 12.1\bin\mariadb.exe' -u root -p common < common.sql 'C:\Program Files\MariaDB 12.1\bin\mariadb.exe' -u root -p log < log.sql 'C:\Program Files\MariaDB 12.1\bin\mariadb.exe' -u root -p player < player.sqlMake sure you use your own installation path.
If you open up your MariaDB connection in Navicat, your tables should be now visible!
In Navicat, double click your connection to open it. Next, select New Database...
A dialog will popup, there enter the name of your database name (e.g.,
account) in Database Name and make sure that Character Set is set toutf8mb4for all cases.
Do that for all 5 databases:
accountcommonhotbackuplogplayer
Next, double click in a database to open it. It should turn green. Once it's open, right click on it and select Execute SQL File...
A dialog will popup, leave all checkboxes to the default values and click the ... button to browse through your file system (the
sqlfiles need to be downloaded from the VM to your physical drive) and select the file. Once selected, click Start and wait for the process to finish.
Once this pops up, you can click Close.
Make sure you repeat this process for all created databases (you can skip
hotbackup)
If you right click and hit Refresh in the empty space, you should be seeing all your tables.
If you've done everything right so far, you are ready to turn on the server for the first time.
One-step configuration
Simply
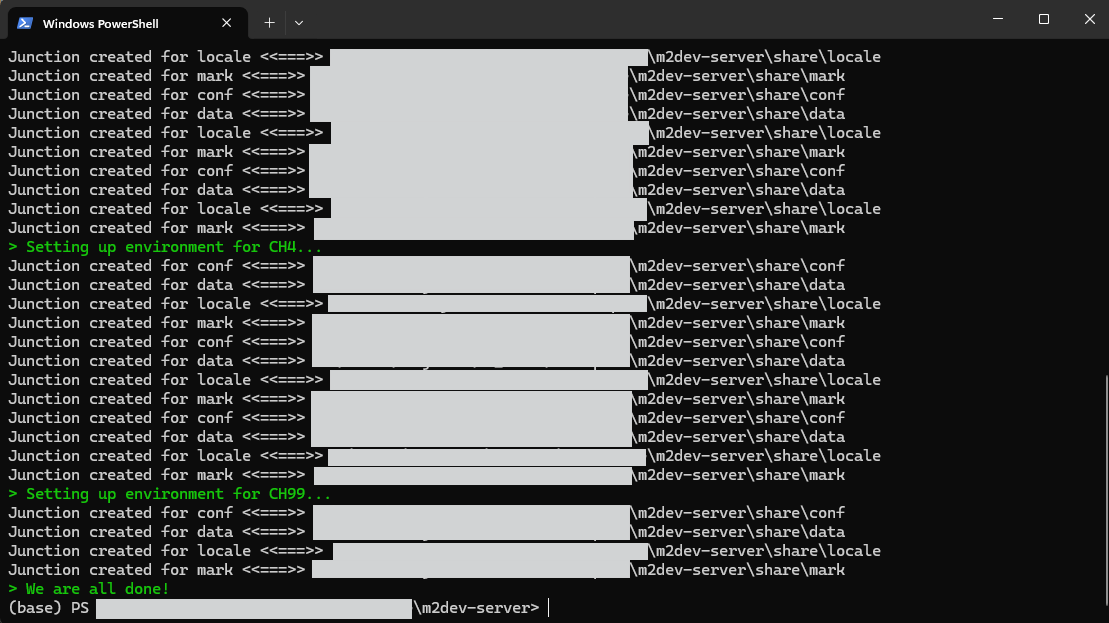
cdto your serverfiles' root directory (e.g.,/usr/home/gameand execute theinstall.pyfile)cd /usr/home/game python install.pyYou should be seeing this:
All you need is one command in the terminal.
The command
Simply
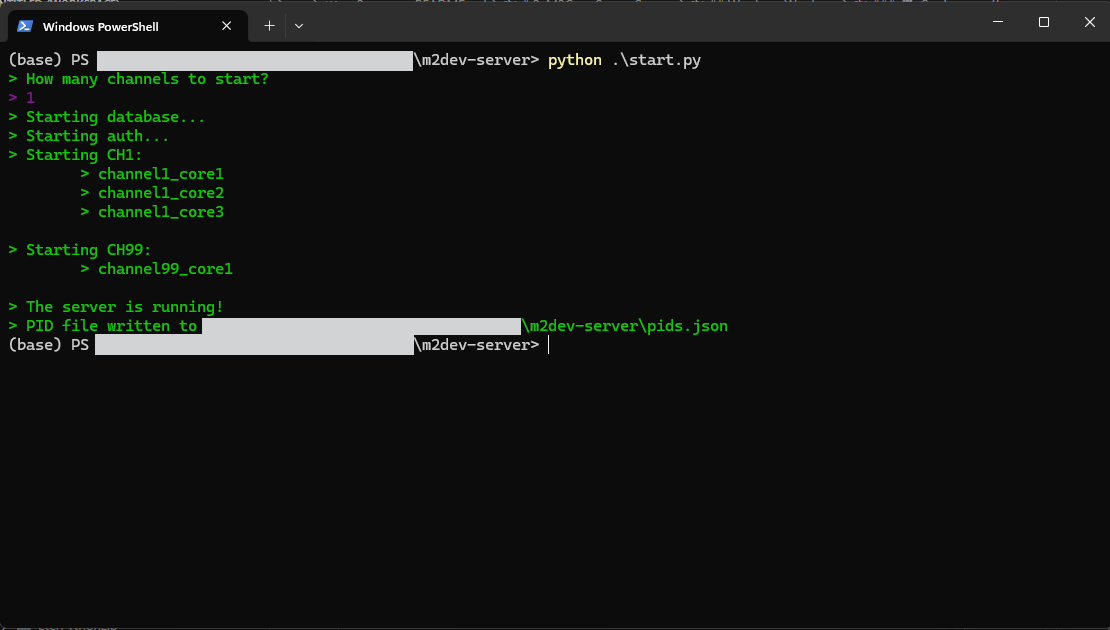
cdto your serverfiles' root directory (e.g.,/usr/home/gameand execute thestart.pyfile)cd /usr/home/game python start.pyNext, select how many channels you would like to start and hit ENTER.
You should be seeing this:
Below is a little list of what the scripts inside the root folder of the project do. The names are pretty self-explanatory but here they are anyway:
start.pystarts the selected number of channelsstop.pystops all channel instances and the databaseinstall.pyinstalls the channels and links the folders insideshareto each channel coreclear.pyclears all logs from every channel core (pid.json,syserr.log,syslog.log, any.corefiles as well as thelogfolder)channels.pydependency ofinstall.py, running it doesn't do anythingperms.py(Linux only) assigns full permissions to the binaries (game,dbandqc)
After finishing this part, you should now have knowledge of:
- The base structure of the serverfiles
- Creating and populaing MariaDB databases and tables through
sqlscripts using the terminal/command line or Navicat's interface - Building the quests
- Managing the server (starting/stopping/clearing/installing)
After following either the FreeBSD method or the Windows method, you should be ready to proceed to cloning, building and distributing the Client Source project
⭐ NEW: We are now on Discord, feel free to check us out!