- Kevin Wong
- Lena W.
- David Z.
- Oleg Y.
- Abraiz K.
- Muhammad V.
Goopy Guardians is a strategy and tower defense hybrid that combines action, roguelike, and resource management elements within a cute alien twist. Players control a sentient, goopy hivemind defending a post-apocalyptic Earth from humanity’s mechanized return, protecting a mysterious hive that powers them with goop. Unlike traditional tower defense games, the player must move through the world to build, upgrade, and gather resources, forcing them to make real-time decisions under pressure. Inspired by Vampire Survivors, Thronefall, and Overcooked, our game blends progressive difficulty, hands-on resource management, and a sense of “controlled chaos” to create a fast-paced experience where timing and quick thinking is key.
Our game is keyboard input only, with controls as follows:
As of M1 we have player movement and ability to turn towers on and off
-
W / A / S / D – Move the player character up, left, down, and right.
-
E - Turn tower on/off if player is currently facing a tower or is in its proximity and is not holding anything
-
E - If in build mode, place down tower
-
E - Use tool that you are currently holding
-
E (hold) - Destroy enhancer if currently facing one (updated for M3: now the enhancer is made movable again so that it can be placed somewhere else.)
-
Q - Enter/exit build mode if not holding an item
-
Q - Drop held item (enhancer/module/freeze gun/wrench)
-
Q (hold) - Destroy tower if currently facing one
M4 Additions
- ESC - opens pause menu if in game, closes game if in menu
- Shift - player dash
- R - Teleport wrench(s) close to the hive
- T - Teleport freeze gun(s) close to the hive (if available)
For more detail, and greater accuracy, please refer to the test plan.
The gameplay of Goopy Guardians borrows from that of tower defense and real time strategy games: Unlike most tower defense games, the player controls a character and is free to move and dash around the map.
The player must go to the location in which they want to build towers, as well as walk around to collect minerals, enhancers, modules, and pick up tools. This adds a layer of spatial strategy to the game not seen in most games of the tower defense genre.
Minerals must be collected and deposited in the hive. This is the currency that enables you to build towers. Acquiring a certain amount of minerals also increases your goop capacity, allowing you to have more active towers on the map at once.
Enhancers give stat bonuses to towers touching them, allowing the player to adapt to the escalating difficulty.
Modules completely change the way a tower behaves, making them better suited for specific tasks. For example, the mortar and radial modules are great for dealing with hoards of enemies, while the aerial module specializes in destroying flying enemies.
Tools are powerful items that the player has direct control over, allowing them to participate in the fight and tip the scales in their favor. Tools include items such as the wrench, freeze gun, portal gun, and magnet.
The player must use all these affordances at their disposal to protect the mysterious hive that contains the power to change the tide of the war.
- Ensure you have cmake version 3.3.1 or newer installed.
- After cloning the repository, run
[team11]$ git submodule update --init --recursivefrom the project root directory (This will install all external dependencies). - Create a separate build directory and navigate to it, run
[team11]$ mkdir build && cd build(This will ensure build files are not polluting the root project directory and are localized inside the build directory). - Generate the build files, run
[team11/build]$ cmake ..(You may need to add an argument to specify a CMAKE_MINIMUM_POLICY_VERSION option, see the options subsection below) - Build the project, run
[team11/build]$ makeor[team11/build]$ cmake --build .. - Run the executable,
[team11/build]$ ./GoopyGuardiansor[team11/build]$ ./GoopyGuardians.exe(Please note, the Debug release has ImGui windows rendering debug information. To turn this off, please specify the CMAKE_BUILD_TYPE option, see the options subsection below).
You can pass options to cmake to specify certain build configurations. This is done using the -D<OPTION> argument; note that arguments you have previously passed are cached and will be used for subsequent builds unless otherwise specified by changing the argument. Example to build the Debug version with standard build options: [team11/build]$ cmake -DCMAKE_BUILD_TYPE=Debug ..
CMAKE_BUILD_TYPE={Debug|Release}: This option will specify whether you want to build the Debug version or the Release version. Currently, the Release version omits some console print statements and does not render the ImGui UI. NOTE: this does NOT work for Windows, you must instead run[team11/build]$ cmake --build . --config {Release|Debug}with the configuration you want to build.CMAKE_POLICY_VERSION_MINIMUM=<Number>: This option needs to be set on some machines according to the error being thrown. If you have an error that mentions this option while building, more likely than not you need to run[team11/build]$ cmake -DCMAKE_POLICY_VERSION_MINIMUM=3.5 ..(MacOS) or[team11/build]$ cmake -DCMAKE_POLICY_VERSION_MINIMUM='3.5' ..(Windows).IMGUI_VIEWPORTS_ENABLED={ON|OFF}: This option will render the ImGui windows as separate windows (viewports) when set toON, and will render ImGui entirely within the main window if set toOFF. Defaults toON.OLEG={ON|OFF}: This option uses Oleg's custom build configuration (Runs some commands during the build process, namely building thecscope.outfile) when set toON. Defaults toOFF.
 For M1 we have setup our basic game system with our core features rendered with placeholder sprites.
(1) Key stats of the game are stored and rendered on screen with text and UI
(2) The play is able to rotate and move around the screen with WASD keys and interact with the tower to turn it on and off
(3) The tower shoots projectiles at the enemy and updates the goop resource displayed on screen using the goop system
(4) The projectiles targets the enemy and moves towards it in a smooth motion through interpolating the position of the tower and enemy each frame
(5) The enemy makes its way to the hive while avoiding obstables through pathfinding
(6) The map has borders to create a clear game space boundary
(7) The map also has walls and obstacles that the enemy and player cannot move through
(8) The hive works with the goop system to update the goop capacity and acts as a target for enemy pathfinding
- Rendering – Textured geometry
- There are placeholder assets for the background, entities, and ui which have been loaded and rendered on screen
- In terms of draw order, background is always behind everything and UI is always on top of everything so there is no unexpected behaviour
- Rendering – Basic 2D transformations
- Translation: The player and enemy entities can move around the screen.
- Rotation: Both the player and projectile sprites can rotate according to its motion (faces the direction it is going in)
- Scaling: The UI sprites and entity sprites are scaled in the renderer to fit their coordinate spaces properly
- Rendering – Key-frame/state interpolation
- Projectile motion is interpolated in between each screen for smooth movement
- Projectile rotation is interpolated as well
- Gameplay – Keyboard/mouse control
- the WASD keys control both the movement and orientation of the player
- Gameplay – Random/coded action
- The enemies are spawned on different locations of the map
- Gameplay – Well-defined game-space boundaries
- A game map the size of the screen has been created with clear boundaries on the edges of the map so the player cannot leave the screen
- No jitters or unexpected behaviour when a player collides with a boundary
- Gameplay – Simple collision detection & resolution (e.g., between square sprites)
- The player can collide with objects in the game such as towers, walls, obstacles, the hive, and game boundaries. Once a collision is detected, the payer is then moved to the nearest valid location. Collision detection is currrently done with a collision map and circle collision detection.
- Stability – Stable frame rate and minimal game lag
- There is no noticable lag or artifacts with the frame rate
- README – All README sections and sub-sections above are completed as described
- The read me is complete (please refer to the present file).
- Software Engineering – Test plan that covers gameplay and expected outcomes
- A test plan has been created in the
docdirectory.
- Reporting – Using GitHub Issues, record any bugs
- Issues have been created throughout M1 to keep track of bugs and features yet to be implmeneted.
Advanced decision-making: Enemy Pathfinding using AStar algorithm ((quasi-)advanced/basic feature)
Implemented in PathfindingSystem::calculatePath() (src/pathfinding_system.cpp, lines 36-144).
Standard A* using priority queue, closed set, and parent pointers. Each node stores information needed for pathfinding (ref implementation in inc/pathfinding_system.hpp).
Operates on a 23x40 grid (16x16 pixel cells). The system converts between grid space (integer, top-left origin) for pathfinding and world space (float, center origin) for entity movement via the CoordinateSystem class.
- 8-Directional Movement: Cardinal and diagonal directions supported.
- Euclidean Distance Heuristic: Uses
sqrt(dx^2 + dy^2)for natural diagonal paths. - Collision Map Integration: 0 = walkable, 1 = obstacle. Includes walls and towers (3x3 grid per tower); player is ignored.
- ECS Integration: Paths stored in
PathfindingAStarcomponent.EnemyMovementSystemmoves entities along waypoints at 100 units/sec (configurable inenemy_movement_system.hpp).
- Static Paths: Calculated once at spawn, not updated. Dynamic pathfinding can be added via EnTT's observer pattern, but not needed for present implementation.
- No Player Collision: Player doesn't affect enemy paths (intentional for M1).
- Uniform Costs: Diagonal and cardinal costs equal (no terrain mechanics).
- Fixed Target: Egg is hard-coded as the target for all enemies. [There is a variable that allows you to change the target, however.]
- Path Failures: Invalid paths return empty vector; enemies are destroyed on first update (lines 62-72,
enemy_movement_system.cpp).
- Custom
Vec2Comparecomparator forglm::ivec2in std::set/map. - Manual memory management for nodes.
- See
inc/pathfinding_system.hppfor Node structure.
PathfindingSystem initialized in src/game.cpp with registry, coordinate system, and collision map. SpawnSystem calls calculatePath() and stores waypoints in PathfindingAStar component. EnemyMovementSystem reads waypoints and updates velocity; PhysicsSystem handles position updates.
External Integration: EnTT ECS System (Basic Feature) For this creative element, we added a number of external libraries to our codebase to help with development, and to learn more about complex build systems and maintenance. The libraries we used that were presented in class are:
- FreeType
- gl3w
- GLFW
- GLM
- STB_Image
In addition to these libraries, we decided to use a number of external libraries for a number of reasons:
- EnTT: We decided to use an external entity management system because we found the one we used in A1 and throughout the course to be lacking in functionality and optimizations needed for our game.
- Functionality: EnTT has a dynamic store system, that is still statically compiled, as we don't have to specify new containers for each and every new component.
- Filtering: The biggest selling point of EnTT is the view functionality; being able to fetch entities with only specific components and iterate over them while keeping only a reference to a lightweight iterator lets us create as many views as we want and not have to iterate through every component of one time just to see if an entity in that container has another component we're interested in.
- Events: EnTT offers event sinks for common component events, which will let us hook up listeners to see, for instance, when a component or its parent entity is being destroyed, or if it has been modified, etc. This is useful because it means we can optimize away checks that don't need to happen every frame, but rather only when a specific component was updated, or destroyed.
- Dear ImGui: We decided to use Dear ImGui because it offers a quick and easy way to help debug our application and see information about the game state without needing to attach to a debugger, draw the data on the screen manually, or print to the console (for information, we retain the console primarily for error messages and updates).
- Debugging: Currently, we have a couple windows in use, one to display information about all entities in the world, and their components in order to understand the current state of the world, and another specifically for monitoring the player's state to see how our input processing and character interactions work in the world.
- Interactivity: If we want to change a value dynamically without having to edit the source code, re-build the project and run it again, Dear ImGui gives us tools to update values from within input fields, letting us see our changes reflected in real-time.
- Ease of Use: Dear ImGui makes rendering complex structures and information to the screen very easy, and also provides a tidy and easy-to-use interface for rendering information to the screen. This lets us keep the standard output clear for error checking and monitoring, while displaying all the data we need on screen, neatly and in an easy-to-parse fashion.
And, although not technically an external library, we added a linter and formatter to be run on builds so that when examining pull requests we see actual functional code changes rather than the numerous formatting changes that are ever so present when working in large teams. This was done by setting up a custom .clang-format specification file, and running it prior to compiling the source code. We used clang-format for formatting, and clang-tidy for linting (this is set using the CXX_CLANG_TIDY property).
Add, label, and describe at least one screenshot of your game to showcase what has been achieved during the second milestone.

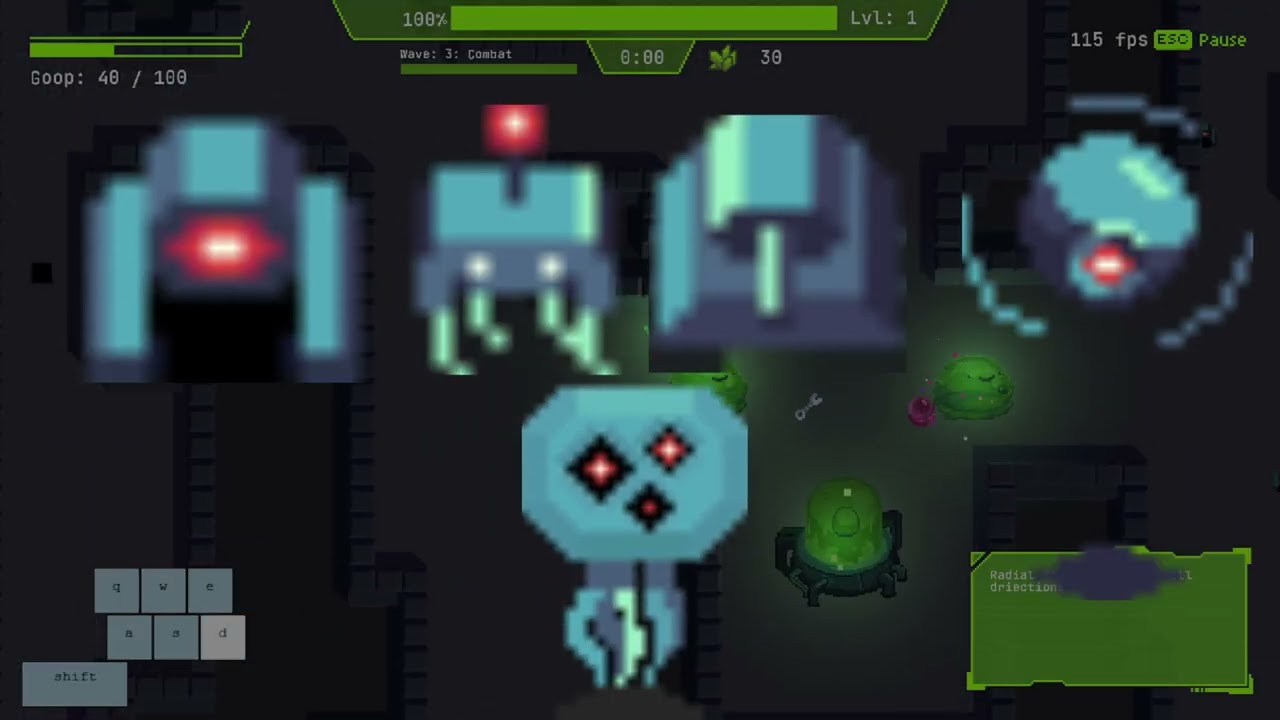
- We added an FPS counter to display performance to the bottom right of the game screen
- There are a number of helpful UI elements such as mineral collected, backpack capacity, and the wave system
- Added a text box to the bottom let corner for the tutorial as well as displaying helpful information
- The build system shows the player a preview of the structure they are placing and whether the location they are placing it at is valid
- The enhancers buff towers in various ways when placed near one
- Modules change the way towers fundamentally behave and look, such as the sniper tower module
- There are various enemy types now including ones that attack the towers
- Tools have been added into the game, such as the wrench that enables you to repair towers or the freeze gun that freezes enemies
- Some placeholder sprites have been replaced with new artwork such as the enhancer, sniper module, and player and enemy.
- Player and enemy animations have been added on movement/attack
- The game world has now expanded beyond viewport size
- Game AI - State/decision tree
- There is now a data-driven "scripted" decision tree.
- The decision tree uses code-embedded data to construct a tree dynamically, which is traversed at fixed intervals during run-time using the game’s current state.
- There are several variants of actions and conditions that constitute the internal and leaf nodes of the tree respectively, and this allows creation of reusable variants of trees for randomised spawning & targeting behaviour.
- Rendering - Animations and the atlas
- Now use Aseprite’s atlas packer to create one single atlas that all sprite and font glyphs sample from to support batched rendering.
- Implemented animation data parsing and an attachable AnimationPlayer component.
- Rendering - UI and assets
- A lot more UI infrastructure was added for features like the build system, tutorial loop, and wave system.
- Sprite assets were created for the new features added in this milestone, and animation sheets were also made for the player and enemies' walking and attacking cycles.
- Gameplay - Meshed based collsion
- For mesh-based collision detection, we added a freeze gun with a cone mesh AOE effect.
- When used, a cone mesh spawns which checks for enemies within the bounds of the mesh. If a collision is detected, the enemy is frozen in place.
- Gameplay - Help/Tutorial
- Before the game loop starts, the player goes through a tutorial, allowing the player to familiarize themselves with the core game mechanics, such as building and interacting with towers, mineral collection, enemy defence, and module, enhancer and tool usage.
- Once the player completes the required actions to finish the tutorials, the game starts.
- Improved Gameplay - FPS Counter
- To help test game stability, we added an FPS counter with text rendering at the bottom right of the game screen.
- Playabilty and Stability - Non-repetitive, no crashes, consistent frame rate
- Changing our renderer to use batched draw calls has improved our resting framerate.
- Gameplay has been fleshed out to be non-repetitive.
Camera controls (basic)
- The camera system uses a dedicated
CameraSystemclass that manages a camera entity with aCameracomponent which updates every frame in the game loop - Smooth camera movement formula: position = position + (target - position) _ lerpSpeed _ dt
- Camera position is clamped to defined map boundaries to prevent viewing outside the playable area
- Zoom functionality is implemented with a zoom level parameter (1.0 = normal, 0.5 = 2x zoomed in, 2.0 = 2x zoomed out)
- The view matrix is constructed in
RenderSystem::setCamera()using scale and translation transformations
- Smooth following: uses
glm::mix()for smooth interpolation between current and target positions - Zoom control: easily modifiable zoom level clamped to reasonable range (0.1-10.0)
- Boundary clamping: prevents camera from showing areas outside the map by clamping to half-view dimensions
- Target flexibility: can follow any entity with a
Positioncomponent via `setTarget()
Simple rendering effects (basic)
- Opacity and tint uniforms are passed as part of the buffer to the fragment shader program from the render system in the drawSprite function.
- To apply these effects the SpriteRenderer component needs to be changed with the desired values, otherwise opacity=0 and tint = glm:vec4{1.0f,1.0f,1.0f,1.0f} by default.
- Tint strength is controlled by blending the tint colour with the original texture colour based off of the alpha value of the tint:
vec3 mixedColor = mix(texColor.rgb, texColor.rgb * tint.rgb, tint.w);
- Build System: The build system has a semi-transparent blueprint of the item currently being placed to let the player know where they are placing it. The blueprint turn red if the placement is invalid and flashes if there is not enough resources to place the item.
- Tower Effects: The towers pulse different colours depending on the module attached to it using the tint effect
- Enemy Damage: The enemy flashes red to indicate it has been hit by a tower and damage has been taken.
(For the menu: use WASD to navigate and E to enter/select.)
Add, label, and describe at least one screenshot of your game to showcase what has been achieved during the third milestone.

- Map overhaul to allow for more strategic gameplay with tower placement and enemy pathing (more chokepoints, more allowance for strategy, etc.)
- Improved UI elements for clarity and theming
- More informative tooltips for player actions
- Tower visual improvements: range indicator, build overlay, and sprite changes reflecting tower health and state
- Highlight boxes to indicate selected items for interaction
- Particle system for visual effects such as active enhancers and towers being affected by enhancers
- New integrated assets for towers, enemies, the hive, and miscellanous (enhancers, modules, etc.) increasing game appeal and content
- Change to 3/4th perspective for better visuals
Finally, there were also many optimisations done to the game to improve performance and stability.
- Playability
This section builds on all we have achieved previously, as well: we have not excised any of the previous features; we have increased coherence. (Small summary for brevity: we already had towers, enemies, a decision tree for spawning enemies, a build system, a tutorial system, modules, enhancers, etc. We built on these )
- Added a radial module to make gameplay more varied (now there are two modules: a sniper module that has great range, slow rate of fire, and great attack, and the radial (the new one) that has a smaller range, fast rate of fire, and decent attack). The radial module can be thought of emitting concentric "rings of fire." All Enemies that are in its proximity are hit by an attack. The 16 diverging projectiles are intended to represent the ring.
- Multiple tutorials (6) were created along with a new tutorial system to teach the player different mechanics. Each tutorial builds on the previous one and it is highly envcouraged that all tutorials be completed, so that the player may have a good idea as to how to best play the game.
- A new map was created to make the player think more strategically about tower placement.
- Visual and audio feedback were added to improve player experience.
- A more refined HUD was created to display information about the player's resources, enemy count, and wave information.
- All enemeis were balanced to let the gameplay be more engaging and less punitive.
- The drop rates of minerals, modules, enhancers, and the freeze gun (now only spawns once) were adjusted.
- A design decision was made to allow all the towers to heal at the end of wave. The hive still retains damage.
- The new interface mechanics are expected to help the player with placing and interacting with objects in the game world more easily.
In sum, first play the tutorials to acquaint yourself and then play the game trying to survive for as long as possible.
- Robustness
- All previous creative features are still included and working which may be confirmed.
- A proper user scheme is provided for the player and is taught through the tutorials. There are no bugs that abort() the game. Invalid keys are appropriately handled. There is no way to "soft-lock" the main game i.e., singleplayer.
- The game was optimised with regards to particle effects, enemy pathfinding and collision detection, and other software artefacts to ensure a smooth experience.
Please refer to the below flamegraph for a visual representation of the performance of the game.
 See that the game logic does not constitute much of the computation time, and that the ratio between rendering and game logic follows best practices. (Please note that the graph necessarily would vary depending on the machine; is intended to be an approximation.)
Please refer to the below screenshots for visual representations of proper memory management (no memory leaks)
 (run for about 5 mins of singleplayer gameplay)
 (ran all tutorials, then ran singleplayer for a couple mins)
- Stability
- As stated before, all previous creative and required features can be tested.
- The game is stable and does not crash or freeze.
- There has been comprehensive debugging and testing to ensure that the game is stable.
- The main game loop is stable and accounts for all expected behaviour. This can be inferred via the above screenshots as well.
- The game is cross-platform consistent as we have both Mac and Windows users.
- You may play the game to your heart's content, to verify.
- Please do look at
enhancementsin our issues, lest a feature is misinterpreted as a bug. Many thanks.
- To Verify Robustness and Stability
We implemented a feature to help you debug, should you feel inclined.
You avail yourself of this feature you must build debug mode with flag -DCMAKE_BUILD_TYPE=Debug.
The inserted screeshots here are intended to be illustrative of how to use.
A point of note is that for percents (for enhancers) the enhancer spawned would represent a percentage increase. e.g. if you type 100, and you have ... percent selected you would spawn a 100% increase enhancer in whatever attribute you chose.

(The window you should verify spawned. Note each option spawns a new window.)

(Cheat Menu and Wave Manager were clicked and appropriate windows were spawned.)

(Click Spawn on the Cheat Menu window so as to spawn an enhancer. Please extrapolate for other types of spawns.)
Also, you can press R and T to teleport wrench(es) and gun(s) close to the hive for accessibility.
Particle System (advanced feature)
Because we expect to extensively use particles for our game, we wanted to design a system that can update the particles quickly, without having to do a slow iteration loop in our main game loop over every single tiny particle. For this reason, we decided to pursue a GPU-driven physics update approach for our particle system. Currently, only colored point particles are supported, but the system was created in a way to flexibly support textured particles.
Each emitter uses up a certain amount of memory based on the information they need to pass into the GPU for updating and rendering each individual particle. Particles are fully packed within multiple GPU VBOs (because the fragment shader can draw 4 floats worth of data to each render target per pixel, the data/structs that are passed to the GPU are split by size and limited to be exactly 4 floats big), which are used as the input for the compute shader. Within the fragment shader for the compute step is where we perform any physics updates to the particles, and push them into the frame buffer object (again, segmented by size, so for colored particles we have 2 frame buffers, since we need 8 floats worth of data to be passed/updated). After the frame buffer is filled, we copy over the data back into the VBOs, which are then later used for rendering in our RenderSystem. This ensures all physics is done on the GPU, and we perform absolutely zero particle computations locally. Within the RenderSystem, we pass the VBOs as inputs to the new shader program for rendering the particles, which are rendered as points with variable size and color in a single call to glDrawArrays.
Thus, the data in a VBO/FBO are packed as follows
- VBO1: {
- {particle[0].float1, particle[0].float2, particle[0].float3, particle[0].float4},
- {particle[1].float1, particle[1].float2, particle[1].float3, particle[1].float4}},
- ...
- VBO2: {
- {particle[0].float5, particle[0].float6, particle[0].float7, particle[0].float8},
- {particle[1].float5, particle[1].float6, particle[1].float7, particle[1].float8}},
- ...
and if more data is needed, we can easily use up existing floats that are used as padding, or add a new VBO for storing that information (with the unused bits as padding).
First, one must attach a particle emitter component to the desired entity. This component has a number of fields, notably the source position, the lifetime range, the scale range, the total number of particles, and the direction in which particles are emitted. The ranges mentioned above are used so that there is a random effect for each particle (where some are bigger than others, some last longer than others, etc.) If the stopEmitting parameter is set to true, no new particles will be computed nor rendered once the existing ones have exceeded their lifetimes. The buffers remain allocated on the GPU until the component is explicitly deleted, at which point any buffers are deleted. This is useful for effects such as an enemy being damaged, where we want to keep the buffer allocated, since if they are hit, they are likely to be hit again and we don't want to perform re-allocations.
Finally, the implementation uses more GPU than CPU compute satisfying the need(s) (e.g. efficiency regarding rendering many instances of the same object) highlighted by instanced rendering as described on the suggested features page, as can be furnished from the above explanation.
Basic Integrated Assets (basic feature)
In an endeavour to make our game more appealing, we decided to create and integrate our own assets for the game using Aseprite. We used Aseprite to draw static and animated sprite assets for in game entities and Aseprite's command line interface to pack all sprites to a texture atlas with accompanying JSON file for parsing. This atlas can be found inside our assets folder (assets/master_atlas.png). The JSON file can be found inside our assets folder also (assets/master_atlas.json). Both are used in concert to give impart flair that matches our conception for the game.
Of the many assets we integrate to align with gameplay, here are a handful:
- Tower Sprites: We have three different types of towers (basic, sniper, radial) with each tower having a unique sprite, as well as their own sprites representing their health (amount of damage taken -> the more damage you take, the less happy/more injured you look) and state (deactivated i.e. sleeping or awake).
- Enemy Sprites: We have three fully fledged enemies all with their unqiue attack and movement sprites (TANK, BLITZ, NORMAL).
- Hive Sprite: We have an eldritch hive sprite with an egg contained within.
- UI Sprites: We have multitudinous UI sprites for the wave progress, goop bar, etc.
- Miscellaneous sprites for enhancers, modules, minerals, etc.
All the sprites lend a unique feel to our game, and accord with our themes of the confluences of goop and science.
Below are two screenshots to illustrate our assets' works in progress.


(WIP screenshots for the TANK enemy, enhancer, modules, and hive sprites.)
Audio Integration (basic feature)
Used miniaudio library (https://github.com/mackron/miniaudio), a single-file audio playback library for C/C++. Utilized its spatialization capabilities to load and playback 3D sound effects relative to the player and entity positions (e.g. playSoundAt(...)).
We have two background music tracks (we switch b/w them to match the "feel/tones" of the game (the journey b/w tranquil prep phases and tense combat phases)):
- One for the "prep" phase; is intended to be relaxing; is a looped sound. (assets/audio/alien_remarks.mp3)
- One is for the "battle" phase; is intended to be tense; is full-fledged, rhythmic, and dynamic. (assets/audio/combat_music.mp3).
We have also incorporated a bunch of sound effects:
- sound effect for the freeze gun.
- sound effect for the wrench (repairing tower).
- sound effect for traversing as the player.
- sound effect for placing a tower.
- sound effect for depositing minerals into the hive.
- sound effect for placing a module (sniper/radial) on a tower.
- sound effect for a sniper (tower) shot.
- sound effect for a normal (tower) shot.
- etc.
All music and sound effects are covered by the Creative Commons licence and all creators are appropriately credited via the links below.
Added free-to-use sound clips from OpenGameArt and Kenny.nl, as well as a main music motif reflecting the game’s intensity
The audio is also incorporated such that it adds to the immersive experience and uniqueness of the game.
Thank you.
- New Towers: mortar tower that deals with swarms and aerial tower that deals with flying enemies
- New Enemies: Aerial enemy that flies over walls, boss enemy that spawns more enemies
- New Tools: magnet tool that collects minerals and portal gun that lets you teleport with portals
- Game Visuals: Projectiles and modules now have unique sprites for each tower type
- Boids: creates better enemy swarms
- Enemy Spawn Points
- Player Dash
- Pause Screen: lets you navigate to the main menu or quit
- Win Screen
- Progress Bar: shows the progress for the hold actions (like tower destruction enhancer movement)
- Mineral Autodeposit
- Alert System: alerts you of oncoming enemies
- 2.5D Lighting
Additional features such as new tools, towers, and enemies have been added this milestone to add more interesting strategy and to sustain 10 minutes of new gameplay detailed below:
- Mortar Tower: Lobs an explosive shells towards the enemy
- Aerial Tower: Specializes in attacking aerial enemies
- Aerial Enemy: Flies over walls and beelines directly for hive
- Boss Enemy: Large enemy that spawns more enemies
- Magnet Tool: Collects nearby minerals and deposits them to the hive
- Portal Gun: Lets you create portals you can teleport between to traverse the map better
- New Map: created through playtesting that allows for more strategic gameplay and more open areas to build
- Enemy Swarms: Add more "fun" and difficulty to the game
- Player Dash: Allows the player to move through the map faster
- Enhancers snap to towers in build mode and have deterministic stats
- All features from previous milestones continue to be supported and playable
- We have fixed bugs found in previous milestones such as tutorial softlocks, items getting stuck in towers/walls, and UI bugs (incorrect key prompts, placeholder icons etc)
- The game resolution and aspect ratio continue to stay the same across different machines
- The game does not crash in release mode and exits gracefully when prompted to do so in the pause menu
- The tutorial menu has now been revamped to display the name of each tutorial
- Tutorials have been extended and updated where needed to accurately reflect gameplay
- A pause menu has been added to allow players to navigate between game screens
- Additional tools and features such as player dash and portal guns were added to make navigating the map easier
- Our game continues to have no memory leaks and no unexpected crashes
- Invalid input and unexpected environment settings continue to be handled by our game correctly
- To test these out please use the methods mentions in M3.Robustness
- The frame rate is stable and hovering around a 60 fps
 Screen space ray march rendering scheme supported by multi-pass deferred lighting pipeline in conjunction with g-buffer
Implementation: Occlusion calculation: All world sprites have option to write their own normal and height maps to g-buffer, occlusion checking lights use DDA ray marching to sample space from fragment to light source and determine illumination status. Non-occlusion checking simple lights perform basic falloff and normal calculation only.
Compositing: To avoid expensive lighting calculations, game world is rendered at lower resolution first, upscaled in composite pass and layered under UI elements , mesh renders and particle effects.
GPU buffer management: Instance information for lights are passed in vec4 aligned std140 format to corresponding UBOs for lighting pass shader.
Integration with ECS: PointLight, InfiniteLight and CastShadow are attachable components to any in-game entity.
- multiple rounds of playtesting was conducted to find a perfect balance of fun and challenge by tweaking parameters such as enemy spawns, item drops, and tower stats