admin_guide
Audience: A ITK DB user with privileges to log in to the Administration portion of the tool to make edits and add data.
- Get the URL from IT _____________________________________________
- Update the default user passwords (How?):
- admin
- editor
- readonly
- Record the Admin, Editor, and Read-Only passwords in a secure location
- Update your site configurations (How?)
- Set Header Settings
- Set site initialism
- Set site logo
- Set Homepage settings
- Set Homepage text color
- Set Homepage text background color
- Set Homepage image
- Set Homepage image background color
- Set Homepage image attribution
- Set Map Focus
- Set Maximum Search Result Count
- Set Header Settings
- Add content for the following pages (How?):
- Welcome
- About
- Help
- Add any other initial users as needed (How?)
- Schedule a training session for all:
- administrators
- editors
- GIS professionals
- other core stakeholders in the tool
- Update the 'Tribes' Lookup entries
The admin view can be accessed in a number of ways:
- via URL: Typing your site's address into your browser address bar and adding '/admin'
-
via menu: Logging in to your application as an administrator, then selecting 'Administration' from the top-right menu

The Admin Dashboard is organized into different sections under blue bars, and a few extra features around importing and exporting data. Administrators will have full access, Data Editors are limited to editing the 'Records' and 'Relationships' sections, and 'Read Only' users have no access to the admin.

The bars are as follows:
-
ACCOUNTS
- This is where you will manage users and permissions
- AUTHENTICATION AND AUTHORIZATION
- More fine-tuned control over permission groups - not a common task
- CONFIGURATION
- Controls for the look/feel of the application, from how the homepage looks to ease-of-use updates for data-entry
- EXPLORE
- Where Welcome, Help, and About content for the site can be edited
-
RECORDS
- Where to enter and edit entries and information regarding the key data components of Activities, Places, Media Files, Resources, and Bibliographic Citations. More on this below.
-
RELATIONSHIPS
- Where to enter and edit information about the relationship between 'records'.
- SUPPLEMENTAL LOOKUPS
- These manage what selections are available in many drop-downs when editing 'records' and 'relationships'
To access the Users page, click "Users" link under the 'ACCOUNTS' section of the Admin Dashboard.
On the Users page you can create, edit, or delete user accounts.
Only users with Administrator privileges can access this page.

- Click on the "ADD USER +" button in the top right of the page
- Give the user a username and a password
- password must:
- differ substantially from the username
- contain at least 8 characters
- not be a common password
- not be entirely numeric
- password must:
- Click 'SAVE' to move on to edit the details about the user (covered in next section)

The following fields are all directly editable except password, which provides a form to update.
- Username - name used for logging in. Best kept short and simple
- Password - password user will use for logging in
- To change this, notice there is a link to change the password using 'this form.'
- You cannot view a user's password, or even look it up. They are all encrypted upon storage. If a password is lost, it must be reset.
- First Name
- Last Name
- Email address - this data is neither shared beyond the tool, nor part of an automated email list.
- not required
- Affiliation - the Tribe the user is affiliated with
- Title - The user's title
- Access level:
- -----
- Defaults to the same permissions as 'Reader' (Read Only). See below.
- Administrator
- Can browse the database.
- Can Add, Edit, or Delete anything.
- Only give this to those who need it and can be trusted (the fewer the better)
- NOTE: if passwords are lost, the Systems Administrator or IT department should be able to get you back in via the SysAdmin Documentation.
- Editor
- Can browse the database.
- Can Add, Edit, or Delete 'Records' and 'Relationships' only.
- Reader
- Can browse the database
- If a Media record is marked as 'Limited Access' they will not be able to view or download the file, only the record describing it.
- -----
- Last login
- The date and time that the user last logged in to the ITK DB
- This data is tracked automatically, but can be set by hand here.
- Date joined
- The date and time that the user's record was created.
- This data is tracked automatically, but can be set by hand here.
Part of storing your people's traditional knowledge in a digital repository requires making the space your own. This includes visual elements like logos and text in the header (do you like to call it 'ITK', 'TEK', or something else?), to other aspects like spelling out what region to zoom maps to by default or how many records you think your server and users' browsers can handle at once. Because of this, there is the 'Configurations' form.
Every page users see while browsing your records will have a header at the top with some handy links for easy navigation and consistency. By default, it looks something like this:

Updating the text/copy for the pages associated with each of these header links is handled later in this document (See "Explore - Page Contents"). However, in the Configurations form, you have two areas of control: The text for the logo in the upper left, and the logo itself:

If you don't like the default 'Weave' logo, perhaps you like the 'Droplet' better, or you can upload your own logo. If you don't like the initialism 'ITK', pick something else (but keep it to 8 characters).
By default, the homepage all of your users will be greeted by will look like this:

However, you can change the color of the text, the color of the backgrounds, the image, and it's attribution from this form:

The results will hopefully be more appealing than this demo:

There are still a few different configuration options remaining:

Maximum no. of search results: This field allows you to limit the total number of results that could be returned by a user's query. While we certainly want to encourage 'browsing', returning too many results could both slow down the user's experience and possibly put unnecessary strain on your application server. For now, 500 is recommended, as it is unlikely to put undue burden on anyone's computers, and also should give a casual browser a LOT to look through.
Area of Interest: This field is primarily to support your staff with data entry. When adding a new 'Place' record (see below), they will want to map that they will draw the place onto to start zoomed in near where they want to work (so they don't have to zoom in from a global view every time they start a new record). Using this field, you may draw a 'Focus Area' that will set this default zoom.
- You can skip this - the maps will zoom to North America + the North Pacific by default.
- Defining an area of interest doesn't prevent adding place records outside of your drawing. Place records can be nearly anywhere on the planet.
- If the base map isn't helping you figure out where to draw, you may use the switcher on the left to find one with different features like:
- streets and political boundaries
- topography/bathymetry or other contour lines
- different landmarks and points of interest
- Drawing the polygon is easy:
- Click to drop your first point
- Click more times to place more points to enclose your area
- Double click to drop one last point and stop drawing
- See the polygon drawing instructions below for more details (skip the first step)
- You may edit your drawing by clicking and dragging on any point or lines to move them
- You can remove your drawing or start over by clicking on the 'Delete all Features' button
After a brief description of the general layouts of the forms, a few of the unique forms will be highlighted below. If you are looking for more information on how the records are all related, check out the Relationships and Layer Definitions.
Whether creating or editing a record, the forms will look the same. Forms will be filled in like any other web form. There are a few things to note on each of these forms:
- History (Button)

- A button in the top right - it will reveal all changes, when, and by who made to the record you have open.
- As of 2022, this button now allows you to revert changes made to your records as well!
- Drop Downs - Most (not all) of the drop downs pull their values from the records in the 'Supplemental Lookups' section. These are only editable by Administrator users.
- Some drop downs represent relationships with other records.
- Pencil and Plus icons - if these icons appear next to a drop down, it means you can change details about the options you have to select from.
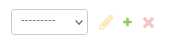
- Click the pencil to edit the selected option.
- Click the plus to add an entirely new option.
- History (Blue Bar)
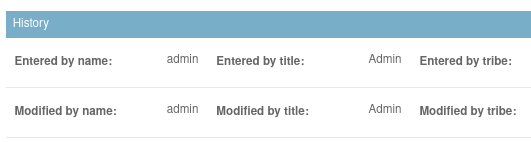
- Fields immediately below this bar are read-only. The tool keeps track of who creates or edits what and when.
-
Relationships ("Related...")
- For Records:
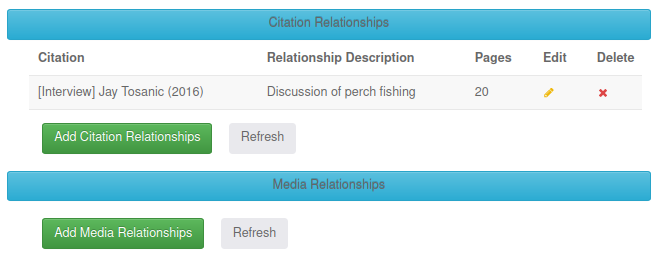
- At the bottom of each form you can create the relationships between these records directly (rather than having to create one record, then another one to reference it). All available relationships should have a blue bar reading '[relationship record name] Relationships'. You may click on the bar to 'collapse' it down if it gets too long.
- Click 'Add _____ Relationships' to reveal the form fields in a pop-up.
- If your browser blocks the pop-up, you can accept the recommendation to open in a new window/tab
- Fill out or edit these forms as you would any other
- After creating the relationship record, click the 'refresh' button on the original form to see your new record in place.
- For 'Places-Resources' Relationships:
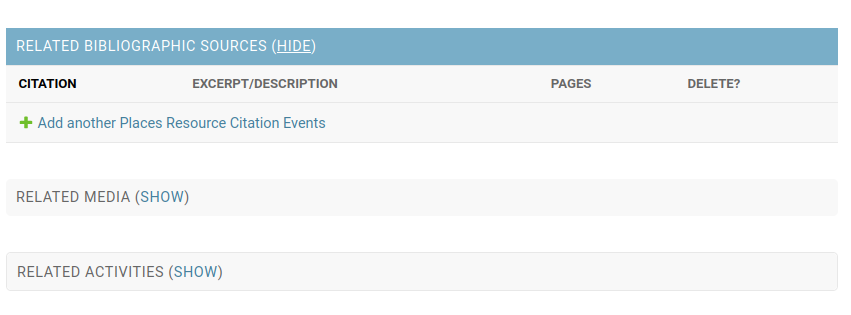
- At the bottom of this form you can create the relationships between these records directly just as you can with Records forms, but the forms live on the same screen. All available relationships should have a gray bar reading 'Related [relationship record name] (SHOW). Click on 'SHOW' to view the form.
- Click '+ Add _____' to reveal the form fields.
- Click '+ Add another _____' to continue creating multiple relationships in a single session
- Fill out or edit these forms as you would any other
- Click 'HIDE' (where 'SHOW' was) if you want to hide the forms for this relationship.
- For Records:
- Bottom Buttons

- Delete - push this if you want to delete the record
- You will first be prompted to confirm that you wish to delete it
- You will be shown all records related to the one you have chosen to delete.
- If you delete this record, all revealed related records will be deleted too.
- Save and add another
- Save and continue editing
- Save
- returns you to the selection screen for the record type you are currently modifying
This section is unique:
- The page records are already created for you
- Do not add 'PAGE CONTENT' records to this list
- Be sure to always have the following records:
- Welcome
- Help
- About
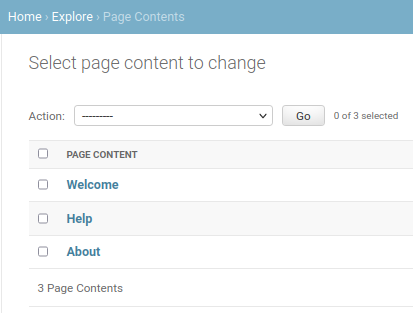
- Rather than the usual text and select fields, this record has a 'Rich Text Editor' for its main field
- Data can be entered into two ways.
Taking a look at the fields you have:
- Page - This determines what page on the site will display the content you enter into the fields below. Currently the tool only offers 3 pages that can be controlled from here: 'Welcome', 'Help', and 'About. All three are required, so be sure to have 3 records, each with a separate value for this field.
- Content - The rich text editor allows any user who can use a word processor to control the content and the look/feel of the web page as displayed to the user. This includes images, font-style, font-color, highlighting, lists, justification, and even links.
- Is html - If selected, 'Content' will be ignored and the page will render whatever HTML you put in the 'Html content' field.
*Html content - We don't expect users to know HTML, but if the time comes when you want more control over the look of the landing page beyond what the rich text editor offers - and you can express that in HTML, then select the 'Is html' field above, then insert your HTML here.

There are 5 key types of records that this database will have entries for:
- Activities
- Ceremonies, practices, events, phenomena, etc...
- Bibliographic Sources (formerly 'Citations')
- Reference Type must be selected before you are presented with fields to fill in for the source.
- Media
- Limited Access? - If 'Yes', 'Reader' users will not be able to view or download the media file, only the record information.
- Historic Location - This field will only show if migrating from the old MTKEDB tool
- Shows the location that the file had been stored so it can be found and uploaded to the new tool
- Once a file has been uploaded, this field will disappear
- Places
- Place Geometry - A map field. Read the section below for tips on how to best use it.
- Resources
- Items, collectables, artifacts, this is a pretty broad category.
Entries to describe the relationship between records, or add alternative names
- Activity - Media
- Activity - Sources
- Media - Sources
- Place-Resources - Media
- Place-Resources - Sources
- Places - Alternate Names
- Places - Media
- Places - Resources
- Places - Sources
- More complex than the others due to the close relationship with activities, seasonality, and the multiple uses of some resources.
- Resource Alternative Names
- Resources - Media
- Resources - Resources
- Saving one of these will create two entries (one for each resource related)
- Deleting one of the pair will delete both (as any related entry would be deleted)
- Resources - Sources
The data in these fields drives the selection options for many of the drop down lists encountered while editing Relationship or Record entries. For this reason, most of these are just a single text field.
- Activities (types)
- Author Types
- Customary Uses
- Habitats
- Media Types
- Name field and category (if type of data should be handled the same as another)
- Participants
- Parts Used
- People
- Planning Units
- Reference Types
- Resource Groups
- Seasons
- Techniques
- Timings
- Tribes
- User Info
Drawing spatial data directly in the tool is one of the greatest strengths of the ITK tool.

Navigating the map should feel familiar for anyone who's used Google Maps, Bing Maps, Apple Maps, or any of the common web maps out there.
- Move the map ('Pan') - Click and drag with a mouse
- If in drawing mode, this will still work, but you can also click the hand button 'Drag Map' to be sure.
- Zoom in or out - Use the on-screen buttons, or use your mouse's scroll wheel if it has one.
- Attribution - The base maps have owners who deserve credit for presenting them and keeping them up to date.
- Base Layers - Change the underlying map based on what information best helps you add accurate information. Different maps are better for:
- Natural landmarks
- Streets, towns, and political boundaries
- Aerial imagery
- Topography, bathymetry, or other contours
You can draw three different types of shapes: Points, Lines (paths), and Polygons (areas)
Note: Once a drawing is started, the buttons to switch between point/line/polygon disappear. You can always click on the 'Delete all Features' button to start over -- the point/line/polygon buttons will reappear.
- Click on the Pencil icon
- Click on the map to place a point
- Click on and drag your point if you need to move it.
- Click on the 'Delete all Features' button if you want to remove your point or start over.

- Click on the 'Draw Line' button
- Click on the map once to place first point in the line
- Click again to add more segments to your path
- Double-click to set your last point on your path
- Click on the 'Delete all Features' button if you want to remove your path/line or start over.

- Click on the 'Draw Area' button
- Click on the map to set your first corner (or vertex)
- Keep clicking to add more corners (vertices)
- After your second click, a shaded area will appear to show you what your shape will look like with each click
- Double-click to drop your final corner and finish your shape
- Click on the 'Delete all Features' button if you want to remove your drawung or start over.

If your shape is just slightly wrong, you don't have to delete it and start over. Instead you can move any point or vertex you wish, as well as add new ones to lines and polygons.
Note: If you need to change your drawing type (i.e. from point to polyon, or to line), you will need to click on the 'Delete all Features' button at the bottom of the map to make the point/line/polygon buttons visible again.
- With your drawing on the map, hover over it.
- A circle will appear under your mouse pointer on your point, your line, or your polygon's outline.
- Click and drag to move that part of your drawing
- If it is a point, or a corner/vertex of a line or polygon, you will move the existing point/corner/vertex.
- If you are in between corners/vertices on a line or polygon's outline, you will create a new corner/vertex.
- Hold the 'shift' key on your keyboard when clicking on an existing point/corner/vertex to delete it.
- This will not allow you to:
- delete 'point' records
- have less than 2 vertices for lines
- have less than 3 vertices for polygons
- This will not allow you to:
If you are not ready to have a drawing associated with your place, click the 'Delete all Features' button beneath the map to clear everything.
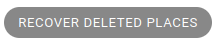
Sometimes we all make mistakes. Accidentally deleting a record is not easy to do, but can happen, or sometimes plans can change. If you need to find or restore an old record that has been deleted, do the following:
- From the admin dashboard, select the type of record you wish to find to see a list of all current similar record types.
- In the top right corner of your screen, you will see a button called "RECOVER DELETED XXX" where "XXX" is your record type.
- Example:
- Example:
- Clicking on this button, you should be presented with a list of all records of this type that have been deleted, and when they were deleted.
- Example:
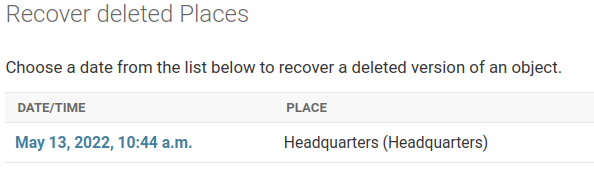
- Example:
- By clicking on the blue time/date of the deleted record, you will be brought to a form showing the record in it's final form prior to deletion.
- If you want to restore this record to the database, all you need to do is click the 'SAVE' button at the bottom.
- Any changes you make to this form while restoring will be kept as if you were editing a live record.
As of 2022, there are two new functions available from the Administrator Dashboard: 'Export Database' and 'Import Database'. Depending on your screen size, these will either be in the top-right corner (most likely) or at the bottom (for very narrow screens).
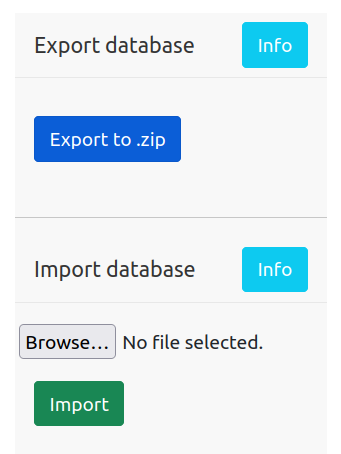
Clicking on the blue 'Export to .zip' button will trigger the site to create and download the current state and content of your ITK database.
To use:
- Click on the light blue 'Info' button and read it thoroughly to confirm you know what you're doing, why, and that you understand all of the risk.
- Click the 'Export to .zip' button when ready
-
You may need to wait quite some time before the file is ready and returned.
- don't close or refresh your browser until you see a prompt or can confirm that the file has finished downloading.
- If your browser asks you if you want to allow the download, agree.
This file will be a .zip with the following contents:
- A '.json' file named with today's date in YYYYMMDD format: YYYYMMDD_backup.json
- a 'media' folder, containing all of your media files that have been uploaded into your database.
WARNING: This can be very dangerous. Currently your data all lives on a secured server where it can be protected against exposure to the outside world. Once you download this zip file, you hold an unencrypted and very vulnerable form of all of your organization's traditional knowledge collected to date. It is not safe to email these files, upload them to Google Drive or trust them with anyone outside of your organization's IT department. Please work with IT professionals to design a safe and secure practice for regular backups, which may or may not involve this tool, and do not use this feature casually -- certainly not on a computer that you or your organization does not own and keep robust anti-malware services running.
If using the 'Export Database' tool is part of your backup plan, or if you are migrating from one server to another, this is what to do with those .zip files created by exporting the database.
To Use:
- Click on the light blue 'Info' button and read it thoroughly to confirm you know what you're doing, why, and that you understand all of the risk.
- Have a zipped backup file created using the above 'Export Database' process
- It should have a name like
YYYYMMDD_backup_RANDOM.zipwhere YYYYMMDD is the date the file was downloaded, and 'RANDOM' is a random series of numbers and letters.
- It should have a name like
- Click the 'browse' button to locate and select the exported database .zip file on your computer.
- Click on the 'Import' button.
- Read the text in the prompt to be absolutely sure if you wish to continue
- If confident, click 'OK'
-
You may need to wait quite some time before the file uploaded and read into the database.
- don't close or refresh your browser while waiting.
- You will be alerted with a pop-up once the process is complete.
- If you do get an error, review the current state of your database. It's possible the records were still imported, that the media files recovered, and that any old data is gone.
WARNING: While this is an easy tool for conveniently migrating into a new, updated server, this tool will delete all data currently in the database. It is unlikely that you will want to use this tool once the database has been started. Please consult with IT if you have any doubt about how to proceed. If your database already includes data, it is highly recommended you work with IT to create a backup of your server prior to attempting this.