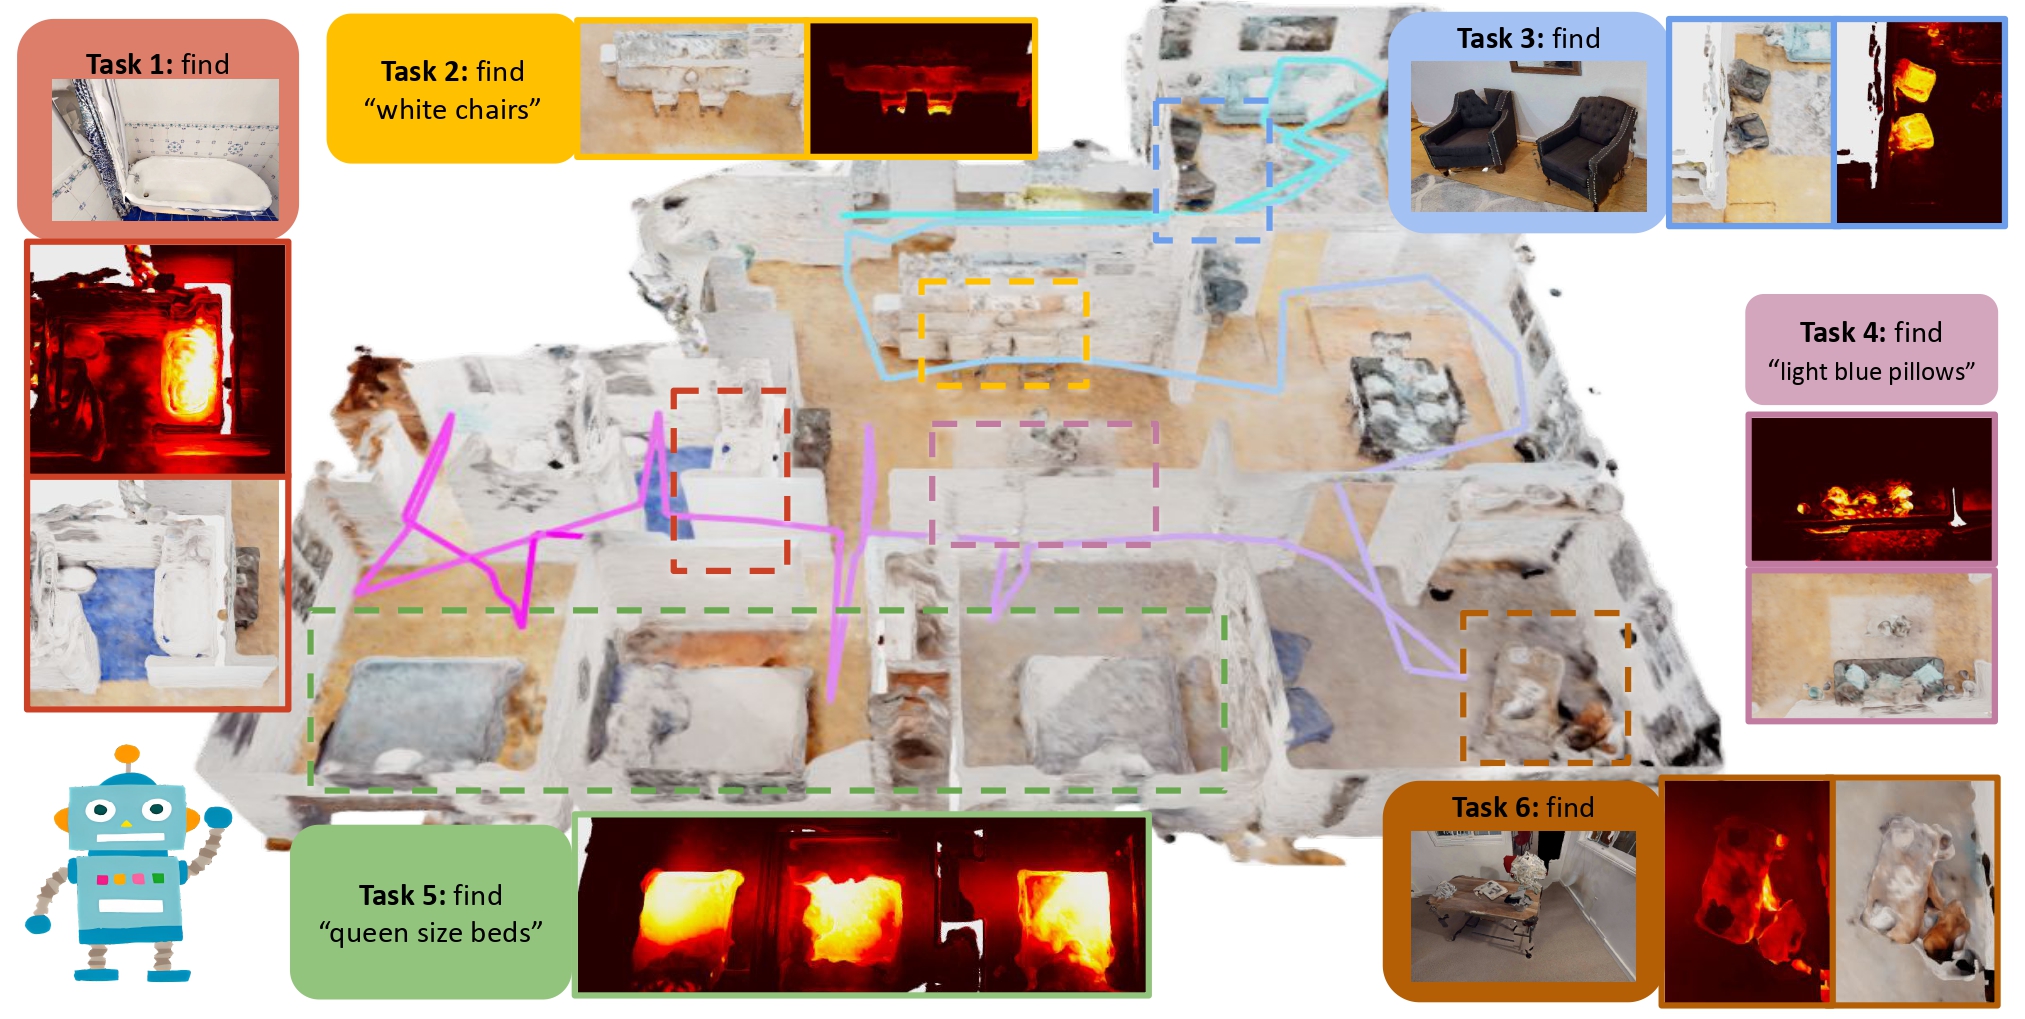
This is the implementation for Prompt Then Ground: Task-Aware Scene Understanding via Online Neural Implicit Mapping.
sudo apt install -y ros-noetic-rviz-imu-plugin ninjamkdir -p ~/Workspace/giftednav_ws/src && cd ~/Workspace/giftednav_ws/src && catkin_init_workspaceOur environment has been tested on 20.04 (CUDA 11.8).
Clone the repo and create conda environment
git clone git@github.com:Cassie-Lim/GiftedNav.git ~/Workspace/giftednav_ws/src/GiftedNav && cd ~/Workspace/giftednav_ws/src/GiftedNav && git checkout kzj18
git submodule update --init --progress

# create conda env
conda env create -f environment.yml
conda activate giftednav
If you do not have ros in your environment and are not sudoer, you can use the following command to install ros.
# install ros
# minimal version
conda install ros-noetic-ros-environment ros-noetic-catkin ros-noetic-roscpp ros-noetic-rospy ros-noetic-cv-bridge ros-noetic-image-transport ros-noetic-tf ros-noetic-nav-msgs -c robostack
# full ros support [recommended]
conda install robostack::ros-noetic-desktop-full
[Extra] if you are using vscode ros debugger and install ros in conda environment, you might want to change the ros plugin setting:
"ros.rosSetupScript": "$CONDA_PREFIX/setup.sh" // if terminal not activate the env right, try reinstall python extensionInstall pytorch by following the instructions. For torch 2.0.1 with CUDA version 11.8:
# If you do not have cuda 11.8:
conda install -c "nvidia/label/cuda-11.8.0" cuda-toolkit


pip install torch==2.0.1+cu118 torchvision==0.15.2+cu118 torchaudio==2.0.2+cu118 --extra-index-url https://download.pytorch.org/whl/cu118

pip install -r requirements.txt

# Note here pytorch3d and tinycudann requires ~10min to build
pip install git+ssh://git@github.com/facebookresearch/pytorch3d.git
# If you have small memory, you can use `taskset -c [core_id_0,core_id_1,...] pip install git+ssh://git@github.com/facebookresearch/pytorch3d.git` to limit the number of cores

pip install git+ssh://git@github.com/NVlabs/tiny-cuda-nn/#subdirectory=bindings/torch
# If you have small memory, you can use `taskset -c [core_id_0,core_id_1,...] pip install git+ssh://git+ssh://git@github.com/NVlabs/tiny-cuda-nn/#subdirectory=bindings/torch` to limit the number of coresHabitat-lab and habitat-sim need to be installed for simulation. We use v0.2.3 (git checkout tags/v0.2.3) for habitat-sim & habitat-lab and install the habitat-sim with the flag --with-cuda.
cd habitat/habitat-lab && git checkout tags/v0.2.3
pip install -e habitat-lab
pip install -e habitat-baselines
cd habitat/habitat-sim && git checkout tags/v0.2.3

# if you have bad network, you can use the following command to speed up
sed -i 's/https:\/\/github.com\//git@github.com:/g' .gitmodules # use `sed -i 's/git@github.com:/https:\/\/github.com\//g' .gitmodules` to restore

git submodule update --init --progress --recursive
python setup.py install --with-cuda
GOAT-Bench is used for evaluation.
mkdir -p habitat/goat-bench/data
ln -s [/path/to/hm3d_data/scene_datasets] habitat/goat-bench/data
cd habitat/goat-bench/data
pip install gdown
gdown https://drive.google.com/uc?id=1N0UbpXK3v7oTphC4LoDqlNeMHbrwkbPe
unzip habitat/goat-bench/data/goat-bench.zip -d habitat/goat-bench
cd habitat/goat-bench
pip install -e .
pip install -r requirements.txt
pip install git+ssh://git@github.com/openai/CLIP.git
pip install ftfy regex tqdm GPUtil trimesh seaborn timm scikit-learn einops transformers wget
pip install salesforce-lavis
git submodule update --init --progress
cd habitat/goat-bench/eai-vc
pip install -e ./vc_modelsmkdir -p perception/weights
wget -P perception/weights -cv https://huggingface.co/spaces/An-619/FastSAM/resolve/main/weights/FastSAM.pt
cd perception/FastSAM
# if you have bad network, you can use the following command to speed up
sed -i 's/git+https:\/\/github.com/git+ssh:\/\/git@github.com/g' setup.py # use `sed -i 's/git+ssh:\/\/git@github.com/git+https:\/\/github.com/g' setup.py` to restore
pip install .
cd perception/YOLO-World
# if you have bad network, you can use the following command to speed up
sed -i 's/https:\/\/github.com\//git@github.com:/g' .gitmodules # use `sed -i 's/git@github.com:/https:\/\/github.com\//g' .gitmodules` to restore
git submodule update --init --progress
pip install -e .pip uninstall mmcv opencv-python opencv-contrib-python
pip install opencv-contrib-python==4.9.0.80 opencv-python==4.9.0.80
pip install mmcv==2.1.0 -f https://download.openmmlab.com/mmcv/dist/cu118/torch2.0/index.htmlIf you use a proxy, enable proxy interminal (reference).
export https_proxy=http://127.0.0.1:7890
export http_proxy=http://127.0.0.1:7890
export all_proxy=socks5://127.0.0.1:7890cd ~/Workspace/giftednav_ws && catkin_make -DPYTHON_EXECUTABLE=/usr/bin/python3
echo "source ~/Workspace/giftednav_ws/devel/setup.bash" >> ~/.bashrcFollow the instructions from HOVSG up to this step https://github.com/hovsg/HOV-SG/tree/71a806961adc057607c4017015c4056f3defcba6?tab=readme-ov-file#habitat-matterport-3d-semantics.
In your config/user_config.json, specify the path to the generated dataset from HOVSG.
        "hovsg":{
            "root": "Your path to hovsg/data folder"
        }
In your launch file, add the following tasks:
        {
            "name": "HOVSG",
            "type": "ros",
            "request": "launch",
            "target": "${workspaceFolder}/launch/entry_points/lerf.launch",
            "arguments": [
                "config:=config/datasets/hovsg.json",
                "scene_id:=00843-DYehNKdT76V",
                "mode:=MANUAL_PLANNING"
            ]
        },
Once the datastream ends the model will be saved automatically.
If you wanna evaluate the model via interactive query, change the args of above launch task to "mode:=EVAL". (Note that you will need to mannually hit construct mesh button each time for querying during evaluation.)
-
To run Active Neural Mapping on the
Denmarkscene ofGibsondataset, run the following command.roslaunch giftednav habitat.launch
-
To run Active Neural Mapping on the
Pabloscene ofGibsondataset, run the following command.roslaunch giftednav habitat.launch scene_id:=Pablo
-
To run Active Neural Mapping on the
zsNo4HB9uLZscene ofMP3Ddataset, run the following command.roslaunch giftednav habitat.launch config:=config/datasets/mp3d.json
-
To run Active Neural Mapping on the
YmJkqBEsHnHscene ofMP3Ddataset, run the following command.roslaunch giftednav habitat.launch config:=config/datasets/mp3d.json scene_id:=YmJkqBEsHnH
-
To run Active Neural Mapping on the
goat-bench, run the following command.roslaunch giftednav habitat.launch config:=config/datasets/goat.json