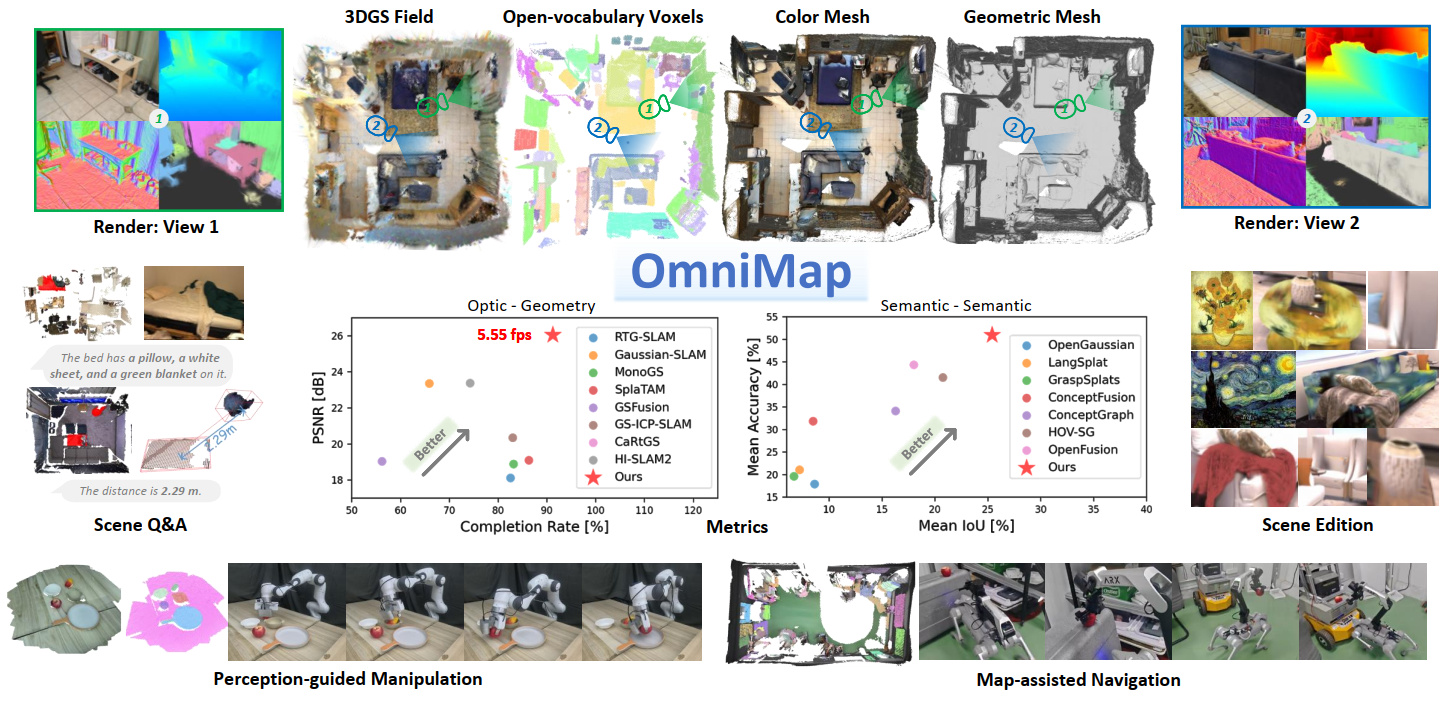
Robotic systems demand accurate and comprehensive 3D environment perception, requiring simultaneous capture of a comprehensive representation of photo-realistic appearance (optical), precise layout shape (geometric), and open-vocabulary scene understanding (semantic). Existing methods typically achieve only partial fulfillment of these requirements while exhibiting optical blurring, geometric irregularities, and semantic ambiguities. To address these challenges, we propose OmniMap. Overall, OmniMap represents the first online mapping framework that simultaneously captures optical, geometric, and semantic scene attributes while maintaining real-time performance and model compactness. At the architectural level, OmniMap employs a tightly coupled 3DGS–Voxel hybrid representation that combines fine-grained modeling with structural stability. At the implementation level, OmniMap identifies key challenges across different modalities and introduces several innovations: adaptive camera modeling for motion blur and exposure compensation, hybrid incremental representation with normal constraints, and probabilistic fusion for robust instance-level understanding. Extensive experiments show OmniMap's superior performance in rendering fidelity, geometric accuracy, and zero-shot semantic segmentation compared to state-of-the-art methods across diverse scenes. The framework's versatility is further evidenced through a variety of downstream applications including multi-domain scene Q&A, interactive edition, perception-guided manipulation, and map-assisted navigation.
Tested on Ubuntu 20.04/24.04 with CUDA 11.8.
git clone https://github.com/BIT-DYN/omnimap.git
cd omnimapconda env create -f environment.yaml
conda activate omnimappip install torch-scatter -f https://data.pyg.org/whl/torch-2.1.2+cu118.htmlRun this every time before using the environment, or add to conda activation script:
export CUDA_HOME=$CONDA_PREFIX
export PATH=$CUDA_HOME/bin:$PATH
export LD_LIBRARY_PATH=$CUDA_HOME/lib:$LD_LIBRARY_PATH
To make it permanent, add to conda activate script:
mkdir -p $CONDA_PREFIX/etc/conda/activate.d
echo 'export CUDA_HOME=$CONDA_PREFIX
export PATH=$CUDA_HOME/bin:$PATH
export LD_LIBRARY_PATH=$CUDA_HOME/lib:$LD_LIBRARY_PATH' > $CONDA_PREFIX/etc/conda/activate.d/cuda_env.shpip install --no-build-isolation thirdparty/simple-knn
pip install --no-build-isolation thirdparty/diff-gaussian-rasterization
pip install --no-build-isolation thirdparty/lietorchNote: The mmyolo package has been copied from YOLO-World repository into thirdparty/mmyolo/ to resolve a dependency conflict. The original YOLO-World had a version constraint that prevented using mmcv versions newer than 2.0.0, but this project requires mmcv 2.1.0. This issue has been fixed in the local copy.
cd ..
git clone --recursive https://github.com/AILab-CVC/YOLO-World.git
cd YOLO-World
pip install mmcv==2.1.0 -f https://download.openmmlab.com/mmcv/dist/cu118/torch2.1/index.html
pip install -r <(grep -v "opencv-python" requirements/basic_requirements.txt)
pip install -e . --no-build-isolation
cd ../omnimap
Fix YOLO-World syntax error: In YOLO-World/yolo_world/models/detectors/yolo_world.py line 61, replace:
self.text_feats, None = self.backbone.forward_text(texts)with:
self.text_feats, _ = self.backbone.forward_text(texts)Download pretrained weights YOLO-Worldv2-L (CLIP-Large) to weights/yolo-world/.
pip install flash-attn==2.5.8 --no-build-isolation
pip install git+https://github.com/baaivision/tokenize-anything.git
Download pretrained weights to weights/tokenize-anything/:
pip install -U sentence-transformers
pip install transformers==4.36.2
Note: If you see sentence-transformers 5.2.0 has requirement transformers<6.0.0,>=4.41.0, but you have transformers 4.36.2. just skip it - it's okay.
Download pretrained weights to weights/sbert/:
cd weights/sbert
git clone https://huggingface.co/sentence-transformers/all-MiniLM-L6-v2pip install --no-build-isolation git+https://github.com/lvis-dataset/lvis-api.git
python -m spacy download en_core_web_sm(This part is unnecessary because data folder already exists with all required scripts)
mkdir -p data/coco/lvis && cd data/coco/lvis
wget https://huggingface.co/GLIPModel/GLIP/resolve/main/lvis_v1_minival_inserted_image_name.json
cd ../../..
cp -r ../YOLO-World/data/texts data/Change the address of the above models in the configuration file in config/.
(some packages may change your mmcv version, please reinstall mmcv and check if it's version is 2.1.0)
pip install mmcv==2.1.0 -f https://download.openmmlab.com/mmcv/dist/cu118/torch2.1/index.htmlIf you encounter AttributeError: module 'torch.utils._pytree' has no attribute 'register_pytree_node', install the compatible version of transformers:
pip install transformers==4.36.2This version is compatible with PyTorch 2.1.2. Newer versions of transformers require PyTorch 2.2+.
python -c "import torch; import mmcv; import mmdet; from tokenize_anything import model_registry; print('Setup complete')"Note:: You may get the ERROR: AssertionError: MMCV==2.2.0 is used but incompatible. Please install mmcv>=2.0.0rc4, <2.1.0.. If so - just go to __init__.py and change mmcv_maximum_version to 2.2.0.
OmniMap has completed validation on Replica (as same with vMap) and ScanNet. Please download the following datasets.
- Replica Demo - Replica Room 0 only for faster experimentation.
- Replica - All Pre-generated Replica sequences.
- ScanNet - Official ScanNet sequences.
Update the dataset path in config/replica_config.yaml or config/scannet_config.yaml:
path:
data_path: /path/to/your/datasetRun the following command to start the formal execution of the incremental mapping.
# for replica
python demo.py --dataset replica --scene {scene} --vis_gui
# for scannet
python demo.py --dataset scannet --scene {scene} --vis_gui
You can use --start {start_id} and --length {length} to specify the starting frame ID and the mapping duration, respectively. The --vis_gui flag controls online visualization; disabling it may improve processing speed.
# Replica
python demo.py --dataset replica --scene room_0

# ScanNet
python main.py --dataset scannet --scene scene0000_00
After building the map, the results will be saved in folder outputs/{scene}, which contains the rendered outputs and evaluation metrics.
We use the rendered depth and color images to generate the color mesh. You can run the following code to perform this operation.
# for replica
python tsdf_integrate.py --dataset replica --scene {scene}
# for scannet
python tsdf_integrate.py --dataset scannet --scene {scene}omnimap/
├── config/
│ ├── replica_config.yaml
│ ├── scannet_config.yaml
│ └── yolo-world/
├── data/
│ ├── coco/lvis/
│ └── texts/
├── weights/
│ ├── yolo-world/
│ ├── tokenize-anything/
│ └── sbert/
├── thirdparty/
│ ├── simple-knn/
│ ├── diff-gaussian-rasterization/
│ ├── lietorch/
│ └── mmyolo/
└── demo.py
If you find our work helpful, please cite:
@article{omnimap,
  title={OmniMap: A Comprehensive Mapping Framework Integrating Optics, Geometry, and Semantics},
  author={Deng, Yinan and Yue, Yufeng and Dou, Jianyu and Zhao, Jingyu and Wang, Jiahui and Tang, Yujie and Yang, Yi and Fu, Mengyin},
  journal={IEEE Transactions on Robotics},
  year={2025}
}We would like to express our gratitude to the open-source projects and their contributors HI-SLAM2, 3D Gaussian Splatting, YOLO-World, and TAP. Their valuable work has greatly contributed to the development of our codebase.