hackBCA V, 2020
Aidan Glickman
Welcome to this VueJS tutorial. This repo is meant as a guide for the workshop I am teaching at hackBCA V, but you could probably follow along from the code examples and this document.
If you are simply looking for a jumping off point to build your own class or workshop, feel free to use my code or language, just make sure you credit me in your project 😄.
In this tutorial, we will be learning VueJS by jumping right in and doing a project. We will be building and continuously improving a todo list application as an example.
$ wtf vue
VUE: a progressive framework for building user interfaces
Essentially, it is a really popular javascript framework for building UIs and frontend apps.
If you are taking this course, I assume you have some basic web development knowledge. Specifically, I assume you possess the following skills:
- HTML
- Vue components essentially look like glorified HTML, so this will be crucial
- NOT STRICTLY NECESSARY: CSS
- We are going to want to make our websites pretty, so you are going to want to know CSS (I will probably be using SCSS during this course, but you should be able to understand fine just knowing CSS)
- JS
- Know the fundamentals (conditionals, data types, arrays, objects, etc.)
- NOT STRICTLY NECESSARY: There will be ES6 syntax in this course, so that would be useful as well (and arrow functions)
- NOT STRICTLY NECESSARY:
async/await? Might not get to this, but it will change the way you use javascript and is a good thing to learn
To go through this course, you will need to have a few things installed ahead of time.
- WINDOWS ONLY: git-bash or WSL if you don't want to deal with actually developing on Windows.
- nodeJS
- 🔲 If you are on Windows then download it from the website. (You could also use something like Chocolatey if you are in to that.)
- 🍎 If you are on MacOS I highly recommend using homebrew and running
brew install node - 🐧 If you are on linux just install from your package manager
- ⬆️ Arch:
pacman -S nodejs npm - 🔴 Ubuntu:
apt install -y nodejs - 🐟 Gentoo: Lol you don't need my help (
emerge nodejs)
- ⬆️ Arch:
- OPTIONAL: Yarn
- I just prefer
yarntonpmfor package management, but it isn't required. Anyyarncommands used in this documentation can be replaced with theirnpmequivalents.
- I just prefer
- OPTIONAL: It is also very helpful to have a vue extension in your text editor of choice, as you get nice features like intellisense and syntax highlighting
- 💎 VS Code: Vue provides an extenison called Vetur for Vue language support.
- ✔️ Vim: I recommend vim-vue-plugin if you are using Vim.
- 🔀 Sublime Text: Vue provides a package called Vue Syntax Highlight for Vue language support.
 Atom: Vue doesn't seem to have an official Atom package, but language-vue has a lot of downloads.
- Vue devtools
- Install the relevant extension for whatever browser you use
- ☢️ Chrome Extension
- 🔥 Firefox Addon
- If you don't use Firefox or something Chromium based, then you can also use the standalone electron app (Looking at you, guy who thinks he's cool because he uses QuteBrowser)
- Install the relevant extension for whatever browser you use
- VueCLI
- This is the tool we will use to generate all of the boilerplate for our Vue projects
- install with
yarn global add @vue/cliornpm i -g @vue/cliif you didn't install yarn
Why are we learning Vue instead of another framework like React or Angular?
- Lower learning curve than other frameworks
- Really fast and light
- Increasingly popular
- I'm better at it
If you have learned basic web development in the past, you may remember the "Seperation of Concerns" paradigm, where you split up your HTML, CSS, and JS in to different files. Throw that idea away. Now. 😄

VueJS works on the "component" model, where instead of seperating things based on their function (layout, style, control) we seperate things in to little chunks called components, which we can often reuse.
Components have each of the three things we use in a web app within them, making them portable and easy to edit. Here is what a basic Vue component looks like:
<template>
  <h1 :class="'red':activated" @click="onClick">
    Hi! I'm a Vue component called {{title}}! Click me!
  </h1>
</template>

<script>
  export default {
    name: 'Example Vue Component',
    props: { title: String },
    data: () => {
      return {
        activated: false,
      };
    },
    methods: {
      onClick: () => {
        this.activated = !this.activated;
      },
    },
  };
</script>

<style lang="scss" scoped>
  .red {
    color: red;
  }
</style>
Let's break down some of the things in this component so that we can get a better understanding of what's going on.
First of all, what does the <template> tag mean? <template> is actually a weird little HTML5 tag that does not display content unless it is directed to. In Vue land, <template> is what we put the things that we actually want to be rendered when the component is mounted. We'll get back to the weird looking fields in the H1 tag in a second.
Secondly, what is going on in the <script> tag? Vue components wouldn't really be all that useful without some data and functionality, so we put those in our <script>. First of all, we give every Vue component we create a name to identify it.
Next, we can pass a Vue component props when we create it, much like an HTML attribute. We can define what props our component takes, and what type we expect the data to be in the props field.
The next field in our <script> is data, which looks a little different than the others... Why is it a function? Well, data holds all of our state data for our component, and we need each instance of the component to have a unique set of data, so we use functions.
Finally (for this example), we have methods. This is simply an object holding all of the different methods we may want to call from this component. In this example, it holds the mutator that changes our data when the <h1> is clicked.
So, now we can go back to the attributes in our <h1>. Vue gives us a bunch of special attributes that we can use to make our app do things. All of these attributes are prefixed with a : if they are a way to display data, and a @ if they call something.
Finally, we can take a quick look at our <style> tag. What is special about the <style> tag here are the two attributes that come with it. The first one, lang, describes what language the <style> content is in, so that our preprocessor knows how to interpret and compile it. The second one, scoped, can be included to keep our styles scoped to just the component that the style is in, and not have an effect on the rest of our app. (See what I meant when I said to forget "Seperation of Concerns"?)
For a full Vue app, we are essentially just sticking a bunch of components together with some overhead to make a complete thing.
Now that we understand that Vue is made up of components, let's plan out our application on a component level.
Our application will probably end up looking something like this: (Not exactly, this is just a mockup)

Now let's plan out what our components:

Now that we have a concrete plan, we are ready to jump in and start building our project!
Now that we have a basic understanding of what Vue is, let's jump right in and start writing our first app!
Start by navigating to wherever you want your project to live.
cd ~/Documents # Or wherever you want to put your projectThen we can use VueCLI to create a project for us.
vue create todo-listThis command will give us a menu to guide us through all of the boilerplate that our Vue application will need. This includes configuring important tools like babel and webpack for us, so that we don't need to deal with those and can get right in to the fun stuff.
? Please pick a preset: Manually select features
? Check the features needed for your project: Babel, CSS Pre-processors, Linter
? Pick a CSS pre-processor (PostCSS, Autoprefixer and CSS Modules are supported by default): Sass/SCSS (with dart-sass)
? Pick a linter / formatter config: Prettier
? Pick additional lint features: (Press <space> to select, <a> to toggle all, <i> to invert selection)Lint on save
? Where do you prefer placing config for Babel, ESLint, etc.? In dedicated config files
? Save this as a preset for future projects? No
These are the settings that we will use for this project, so go through the menu and select the same options (if you would like to save it as a preset that's fine.)
Now that we have created our project, we can actually go in and run it right away! Sadly, VueCLI did not read our minds and write our whole project for us, but it did add some sample code to get us started. Let's go ahead and get our development environment up!
cd todo-list
yarn serve
NOTE: From here on out I will assume that you are in your todo-list directory in every command.
Now if we follow the link in our terminal output, we can see a webpage that looks something like this:

NOTE: This is a good time to open up your todo-list directory in your text editor.
Cool! Just like that we have a development environment. And the coolest thing is it will update any time we make a change to our source code!
That example page is great and all, but we don't really need it for our project. Let's go ahead and strip out the example code.
rm src/components/HelloWorld.vueThen we can move over to our src/App.vue file, and strip it down. After deleting the styling and references to HelloWorld, you should end up with a barebones component that looks something like this:
<template>
  <div id="app"></div>
</template>

<script>
  export default {
    name: 'App',
  };
</script>

<style lang="scss"></style>Now that we have our web page ready, there are some decisions we have to make about our coding style. Most importantly, what order are we going to do things? We can either try to build our application from the top down - starting with the root components and working our way down to the lower level ones - or from the bottom up - essentially the opposite.
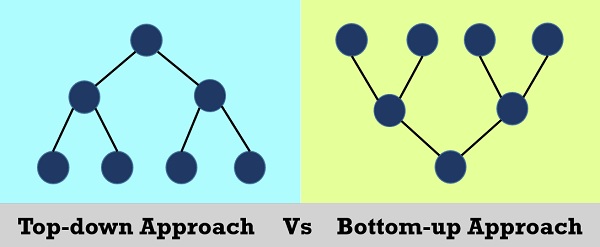
In this project I will be following a bottom up approach, so we will start with our most basic components and put them together at the end.
Let's get started with our simplest component, the todo component. This component will be a small piece that will display each one of our todos. It will then be rendered in a list so that all of our todos are shown.
Start by creating a Todo.vue file in /src/components.
touch src/components/Todo.vueNow go ahead and open the Todo.vue file in your text editor.
We will start off extremely basic, with a component that simply displays our todos. That would look something like this:
<template>
  <div class="todo-item">
    <p>{{todo}}</p>
  </div>
</template>

<script>
  export default {
    name: 'Todo',
    props: {
      todo: String,
    },
  };
</script>

<style lang="scss"></style>
With this code, we simply pass a todo prop to our new component and it will display it in an <p>. Let's move over to our App.vue and give it a try.
If we want to include the Todo component in our App.vue, we need to import it just like we would any other javascript thing.
We can do that in the <script> section of our App.vue. We also need to create a components field and add it to our App script, then add Todo as a field. After doing that, your <script> section should look like this:
<script>
  import Todo from '@/components/Todo.vue';
  export default {
    name: 'App',
    components: {
      Todo,
    },
  };
</script>
You may be wondering what that @ is doing in the file path. To put it simply, you can use the @ symbol as a standin for the root of your Vue project, so that you don't need a mess of ..s in your code that you would need to update if you move a file.
If we now add some <Todo>s to our <template>, we can see the fruits of our labor. Go ahead and try to make some <Todo>s. Keep in mind that since <Todo> doesn't take any children, we can use it as a self closing tag, so both of the following are valid:
<Todo todo="Hello, World!"></Todo> <Todo todo="Hello Again!" />If we move back over to our browser, we can see that our page is updated!

Cool! We are finally rendering things to the screen! 🎉
now that we have the basics of our todo component done, let's make the todos component that will actually be responsible for all of our todos. What we want to do here is make a component that renders a list of a list of todos as todo components. Create a Todos.vue file in your components folder and let's get started!
touch components/Todos.vueAs a quick tip, there is no reason to rewrite all of our standard boilerplate every time you make a new component. Either use a text editor extension (I think all of the official extensions use the vue keyword to generate this template) that gives you snippets, or copy paste from another component and go from there.
Go ahead and import the Todo component and include it just like we did in our App.vue to get started. Now it's time to learn about v-for.
Often times on a web app, we want to render an entire list of data through a template. The way to do this without frameworks is extremely messy (writing an HTML string and adding it to the DOM). Vue provides a super easy way to do this, using the v-for attribute.
Here, we can make a list in our Todos, and then just render a list of Todo objects.
if we take in todos as a prop, then we can simlpy do something like this:
<Todo v-for="todo in todos" :todo="todo" :key="todo" />Let's dissect this line a bit, and discuss some potential issues.
v-for takes a statement in the for "x in y" or "x of y", (doesn't matter which) which gives us an alias, x that represents each element of the iterable y. When we use a v-for, it is important that we also include a :key field, so that Vue knows how to tell the difference between the different elements and update them accordingly. Here, we are simply using the todo as a placeholder key, but this would be problematic if we ever have multiple todos with the same text, so we will deal with that later. You may also notice that we put a : infront of the todo prop here. This is so that Vue knows that we are not defining todo as the string "todo", but rather the todo alias from our v-for.
Now let's update our App.vue to show our Todos instead of just individual Todos. In the <script> section we can simply switch all of the mentions of Todo to Todos to import our new module. We will also want to define an array in our data field (remember that from the example? If not go take another look.)
<script>
  import Todos from '@/components/Todos.vue';
  export default {
    name: 'App',
    components: {
      Todos,
    },
    data: () => {
      return {
        sampleTodos: ['Hello, World!', 'Hello Again!', 'yoyoyo'],
      };
    },
  };
</script>
Now that we have all of that set up, we can simply add a Todos component that renders our sampleTodos in our <template>.
<Todos :todos="this.sampleTodos" />Just like that, we are rendering our samples to the screen! 🎉

Now that we are really starting to build things, let's just take a second to better organize things. We'd rather not have all of our logic taken care of in our App component, so we can break out all of our todo logic in to a container component that will be responsible for handling all of our todo based stuff. Let's call it TodoContainer.
Basically what we want to do is set up TodoContainer to look very similar to how App looks right now, and change App to have a TodoContainer component.
TodoContainer should look something like this:
<template>
  <div>
    <Todos :todos="this.sampleTodos" />
  </div>
</template>

<script>
  import Todos from '@/components/Todos.vue';
  export default {
    name: 'TodoContainer',
    components: {
      Todos,
    },
    data: () => {
      return {
        sampleTodos: ['Hello, World!', 'Hello Again!', 'yoyoyo'],
      };
    },
  };
</script>

<style lang="scss" scoped></style>
And App will look like this:
<template>
  <div id="app">
    <TodoContainer />
  </div>
</template>

<script>
  import TodoContainer from '@/components/TodoContainer.vue';
  export default {
    name: 'App',
    components: {
      TodoContainer,
    },
  };
</script>

<style lang="scss"></style>
Now that we have that done, we will have a more sensible structure for things in the future.
Now that we have the basics of rendering our todos down and a more functional container, let's start adding some of our functionality! First of all, we want a component that will let us add new todos.
Lets go ahead and add another component to deal with this.
touch components/NewTodo.vueNow set it up with boilerplate just like our other components.
In our script tag, we can go ahead and set it up with a data field called todo, which will hold what the user types in our input field. Then, we need to add a method that will help us add it to our list of todos. Since we don't have any form of state management at the moment. We will need to propagate the change up to where we are storing our todos.
To send data back up to our parent component, we will use this.$emit();. This function can trigger a custom event in our parent component, which we can then use to call a function. In our NewTodo component, we can write a method that reads the contents of our todo state variable, propogates it up, and then resets it.
addTodo: function() {
  this.$emit("add-todo", this.todo);
  this.todo = "";
}
NOTE: We can not use an arrow function here because that changes the parent context, breaking the use of this.
Now that we have our NewTodo emitting our todo, we can just add a prop to it in our TodoContainer.
<NewTodo v-on:add-todo="addTodo" />We also need a method called addTodo to actually add our todo to the list.
NOTE: I switched out sampleTodos in our data for todos as they are no longer just a sample. If you do this too, make sure you update every reference to that variable.

Now that our todos are going to start getting a bit more complicated, let's stop using plain Strings for our todos and switch to objects so that we can hold more than just the name of the todo. This will also be important as we will need some sort of id to identify different todos.
To do this, we need to update a few things in each of our files. In TodoContainer, we will start by wiping out our todos to not have any sample data.
data: () => {
  return {
    todos: []
  };
},
Now, we can update our addTodo method. We are now going to expect an object from the NewTodo component, but we will need to add a unique id to it. This is a good opportunity to look at how to include libraries in our application.
To generate ids, we can use the shortid package. We will start by adding the package to our project by running the following from our terminal.
yarn add shortidNow we can go import it in to our TodoContainer and start using it! Add this line with our other imports at the top of our script section.
import shortid from 'shortid';Now we can update our addTodo method to add an id to each todo.
methods: {
  addTodo(todo) {
    var newTodo = { ...todo, _id: shortid.generate() };
    this.todos.push(newTodo);
  },
},
Now we need to update our NewTodo component to give us objects instead of strings. This will be useful if we decide to add attributes like tags or something in the future. To do this update our data to now use an object. For now we are just going to give it a name attribute, but we may want to add more in the future.
data: () => {
  return {
    todo: { name: '' },
  };
},
Now we need to update our v-model on our input to point to v-model="todo.name" to match our data.
Finally in NewTodo, we need to update our addTodo method to deal with objects.
methods: {
  addTodo: function() {
    this.$emit('add-todo', this.todo);
    this.todo.name = '';
  },
},
And to end off our conversion to objects, let's go to our Todos component and switch our :key to use todo._id instead of todo, as that is really the kind of thing we are meant to use.
Now let's just check on our app to make sure everything is still working, and use our Vue Devtools to check out our data.
To use Vue Devtools, inspect the page (ctrl+shift+i) then navigate to the Vue panel (may be hidden in the » menu.) Now, we can inspect the state of our app by navigating through the component tree. Let's take a look at our TodoContainer component and see what happens when we add a todo.

Cool! Our todos array now has an object with the name we put in and a unique id! We can keep adding objects and they will each get a new id!
Now that we have our todos split in to objects, it will be really easy for us to add a field for completed objects. First, let's add a completed field to each new todo by adding completed: false to the todo that we create in addTodo in our TodoContainer. Now we can add some things in our Todo component.
We are going to add the ability to mark a todo done and to delete a todo.
To mark a todo done, we will add a checkbox in our Todo component:
<input type="checkbox" v-on:change="complete" v-model="todo.completed" />Now, since marking something as done is essentially just cosmetic, we don't really need to propogate this back up to our TodoContainer. What we will do though is apply a css class to our todo to add a strikethrough if it is marked as completed.
To do this, we will add :class attribute to our <p> tag. What this does is conditionally gives our <p> the completed class if todo.completed is true.
<p :class="{ completed: todo.completed }">{{ todo.name }}</p>Now we can just add a small css class in the <style> section of our component to actually add the strikethrough.
.completed {
  text-decoration: line-through;
}
Now go ahead and give it a try!
Our method of deleting todos is going to be a bit more complex, as we need to propogate our request up to our TodoContainer.
First, let's add a button and a method in our Todo component.
<button v-on:click="deleteTodo">X</button>methods: {
deleteTodo() {
this.$emit('delete-todo', this.todo._id);
},
},This will emit our delete-todo up to Todos, so we need to pass it up another level. Edit Todos to have v-on:delete-todo="deleteTodo" as part of our <Todo>.
Then add a deleteTodo method like this:
methods: {
  deleteTodo(todoId) {
    this.$emit('delete-todo', todoId);
  },
},
Finally, we can actually delete the todo in our TodoContainer. Add v-on:delete-todo="deleteTodo" to <Todos>, and then add the following method to actually delete the todo.
deleteTodo(todoId) {
  this.todos.splice(
    this.todos.findIndex(el => el._id === todoId),
    1,
  );
},
Now we can both mark our todos as completed and delete them! Cool! Give it a try and check it out in the Vue devtools.

Now we can add our last piece of core functionality from our schematic, our tag system. We want to have a tagging system where we can assign tags to todos, and then select which tags we want to see at any given time. Let's start by adding a second input field to our NewTodo component where users can specify a tag. Update NewTodo to look like this:
<template>
  <form @submit.prevent="addTodo">
    <input
      type="text"
      v-model="todo.name"
      name="todo"
      placeholder="Add a Todo..."
      required
    />
    <input
      type="text"
      v-model="todo.tag"
      name="tag"
      placeholder="Add a Tag..."
    />
    <input type="submit" value="Submit" class="btn" />
  </form>
</template>

<script>
  export default {
    name: 'NewTodo',
    data: () => {
      return {
        todo: { name: '', tag: '' },
      };
    },
    methods: {
      addTodo: function() {
        this.$emit('add-todo', this.todo);
        this.todo.name = '';
        this.todo.tag = '';
      },
    },
  };
</script>

<style lang="scss" scoped>
  input:invalid {
    box-shadow: none !important;
  }
</style>
Then to display our tag we can add another <p> in our Todo component. There is no point displaying the tag field if there is no tag, so I added a v-if as well.
<p v-if="todo.tag">Tag: {{ todo.tag }}</p>If we want to make a tag menu, we are going to want to have access to a list of the tags in use in our todos. This gives us a great opportunity to learn about computed properties. Head over to you TodoContainer component for this.
Computed properties in Vue are a way for us to get data that requires processing on the fly. To make a computed property, we simply write a function in the computed field of our <script> tag of our component, and whatever it returns will be assigned to the field we specify. Vue does some magic behind the scenes to make sure that computed functions are only run when they should update, and it works pretty well. Let's make a computed field that returns a list of all of the unique tags used in our todos.
computed: {
  tags: function() {
    return Array.from(new Set(this.todos.map(x => x.tag)));
  },
},
This function is just a simple array map to extract all of the tags, which we then convert to a set to get rid of duplicates, and then back to an array.
Now we can create a new component that will manage our tag selection. Go ahead and create a new component called TagSelector. This component will take a list of tags as a prop, and display a menu for us to select which ones we want to view.
First, create the file and set up our standard boilerplate. Then we can add an empty array in the data field that will act as our list of selected tags. We also obviously need a prop to take in the list of all possible tags.
Next, we can write a <div v-for=...> in our template to render our checkboxes and labels.
After we add all of that, your TagSelector.vue should look something like this:
<template>
  <div>
    <div v-for="tag in tags" :key="tag">
      <input :value="tag" v-model="selected" type="checkbox" :id="tag" />
      <label :for="tag">{{ tag }}</label>
    </div>
  </div>
</template>

<script>
  export default {
    name: 'TagSelector',
    data: () => {
      return {
        selected: [],
      };
    },
    props: {
      tags: Array,
    },
  };
</script>

<style lang="scss" scoped></style>
Now let's just add the TagSelector component to our TodoContainer so that we can see it. Include the component like we have in the past, and then just add it in at the top of the template.
<TagSelector :tags="tags" />
<hr />
I added an <hr /> as well here, because until we style this page it will be hard to differentiate between the last item of our TagSelector menu and the first checkbox of our actual Todos.

Cool! We have our menu displaying! Now we need a way to send our list of selected tags back up to our TodoContainer. We already learned how to do this with a button, so let's try to do it whenever our selected tags change.
Simply add a method to update your tags that emits this.selected so that we can ingest it in our container.
updateTags() {
      this.$emit("update-tags", this.selected);
},
Then we can add a v-on:change to our input to call it. Now whenever we update our selected tags, it will be emitted to our container. Since we will often just want to see all of our todos, I also added a button that selects every tag. Simply add a button like this:
<button v-on:click="addAll">Show All</button>addAll() {
this.selected = this.tags;
this.updateTags();
}Let's move over to TodoContainer to ingest that and forward the information to our Todos.
First, add a v-on:update-tags to our <TagSelector> to call an updateTags function. Then, add a data field called selectedTags or something similar that starts as an empty array. Then, add an updateTags(tags) method that sets selectedTags to tags.
Now, we need to add a prop to Todos that takes a list of tags. in TodoContainer add :tags="selectedTags" to the call to Todos.
Now, we need to edit Todos so that it only displays the todos with applicable tags. First, add tags as a prop that takes an array. Now, we can add a computed property called visibleTodos that filters out all of the todos that don't have a selected tag.
computed: {
  visibleTodos: function() {
    const visible = this.todos.filter(todo => this.tags.includes(todo.tag));
    return visible;
  }
}
Now, we can just switch out todos in our v-for for visibleTodos and we should be all set!
If we don't want to listen to DOM events to call our update function, we can use a watcher instead. Watchers call functions any time a data field is changed.
watch: {
  selected: function() {
    this.updateTags();
  },
},
By adding this function, we can take out our v-on:change from our input and handle the updates outside.

Just like that, we already have all the functionality that we promised done! The only difference between our project and the schematic is just how ugly it looks to be honest. We can fix that pretty easily by either writing our own CSS, or using a preexisting library. I really like Bootstrap, which conveniently has a library for Vue called BootstrapVue. I won't be holding your hand through the code in this part of the tutorial like I have up until now, but I highly encourage you to dive in and try to make the site look pretty on your own.
I will be styling this project with BootstrapVue based on the Nord color scheme, which is the theme I use for pretty much everything.
There are some styles that we are going to want to include globally (project wide font, color definitions, etc.) To do this, we can add a styles folder to our assets folder. Then you can write whatever styles you want in files in there, and then import them to your App.vue styles.
The BootstrapVue library provides a bunch of custom Vue components that we can use in place of normal components. If we want to be able to access these components in all of our components, we simply need to add BootstrapVue to our Vue runtime. To do this, add a few lines to your main.js file. Import BootstrapVue by adding
import BootstrapVue from 'bootstrap-vue';and
Vue.use(BootstrapVue);I went ahead and converted the whole app to BootstrapVue and added some styling. I'm really not that great at visual stuff so it's not as good as it could be and I'm sure there are some mistakes, but feel free to poke around and check it out!
