Skip to content

Latest commit


History

History
138 lines (101 loc) · 8.88 KB

File metadata and controls

138 lines (101 loc) · 8.88 KB
title Stable Diffusion
createdAt Tue Jan 14 2025 01:12:16 GMT+0000 (Coordinated Universal Time)
updatedAt Mon Aug 04 2025 17:10:48 GMT+0000 (Coordinated Universal Time)
<script type="application/ld+json" dangerouslySetInnerHTML={{ __html: JSON.stringify({ "@context": "https://schema.org", "@type": "HowTo", "name": "How to Run Stable Diffusion on Vast.ai", "description": "A complete guide to running Stable Diffusion using Automatic1111's web interface on Vast.ai, including setup, configuration, model management, and image generation.", "step": [ { "@type": "HowToStep", "name": "Setup Your Vast Account", "text": "Create a Vast.ai account and add credits via the Billing tab. Vast uses Stripe for credit card payments and accepts major cryptocurrencies through Crypto.com. $20 should be enough to start. You can setup auto-top ups for low balances." }, { "@type": "HowToStep", "name": "Pick and Edit the WebUI Template", "text": "Click the Change template button from the create page. Click the edit button on the Stable Diffusion template. It's important to edit the template to set a username and password first before creating an instance." }, { "@type": "HowToStep", "name": "Set Your Username and Password", "text": "At the beginning of the Docker Options, add the arguments '-e WEB_USER=YOUR_USERNAME -e WEB_PASSWORD=YOUR_PASSWORD' to set authentication credentials. Alternatively, add the variables one by one in the env input fields." }, { "@type": "HowToStep", "name": "Pick a GPU Offer", "text": "Stable Diffusion can only run on 1X GPU, so select 1X from the filter menu. Some Stable Diffusion models require large amounts of GPU VRAM. For max settings, use the GPU RAM slider to find offers with over 20GB. We recommend an A6000, A40, or A100 for maximum settings. If available, pick a host with the datacenter label for more reliability." }, { "@type": "HowToStep", "name": "Connect and Start Making Art", "text": "The instance can take 3-5 minutes to start. Once ready, a blue connect button will appear. Click it to open the web GUI. The web GUI can take an additional 1-2 minutes to load. If you get a blank page or error, wait 1-2 minutes and reload. You can now use the Automatic1111 interface to generate images." }, { "@type": "HowToStep", "name": "Upload Other Model Checkpoints (Optional)", "text": "The template has both SSH and Jupyter HTTPS launch modes enabled. To upload a model checkpoint, click the Jupyter button on the instances card to open Jupyter, then upload the .ckpt file to /workspace/stable-diffusion-webui/models/Stable-diffusion directory. You may need to install the Jupyter certificate or use SSH for file transfers." }, { "@type": "HowToStep", "name": "Destroy the Instance When Done", "text": "After generating artwork, DESTROY the instance using the trash can icon to incur no further charges. If you STOP the instance, you'll still incur storage charges. We recommend destroying instances to avoid storage charges while not using the system." } ] }) }} /> Stable Diffusion is a deep learning, text-to-image model that has been publicly released. It uses a variant of the diffusion model called latent diffusion. There are a few popular Open Source repos that create an easy to use web interface for typing in the prompts, managing the settings and seeing the images. This guide will use the webui Github repo maintained by Automatic111 [here](https://github.com/AUTOMATIC1111/stable-diffusion-webui). The docker image used comes pre-loaded with Stable Diffusion v2.1, and it is possible to upload other models once you have the instance up and running. The recommend template will also setup Jupyter so you can use a web browser to download and upload files to the instance. For all questions or issues with the web GUI, the project has a [readme](https://github.com/AUTOMATIC1111/stable-diffusion-webui) with links. ## 1) Setup your Vast account The first thing to do if you are new to Vast is to create an account. Then head to the Billing tab and add credits. This is pretty self-explanatory. Vast uses Stripe to processes credit card payments and also accepts major cryptocurrencies through Crypto.com. $20 should be enough to start. You pre-buy credits on Vast and then spend them down. ## 2) Pick the webui template Click on the Change template button from the create page. Then click on the edit button on the Stable Diffusion template. We will need to set a username and password, so it is very important that we *edit* our template to set a username and password first. ![Stablediffusionedit](https://vast.ai/uploads/StableDiffusion/StableDiffusionEdit.png "Stablediffusionedit") ## 3) Set your username and password > To set your username and password, go to the beginning of the Docker Options and add the arguments ```text Text -e WEB_USER=YOUR_USERNAME -e WEB_PASSWORD=YOUR_PASSWORD ``` as shown below. ![Stablediffusionoptions](https://vast.ai/uploads/StableDiffusion/StableDiffusionOptions.png) You can also add the variables one by one in the env input ![Stablediffusionenv](https://vast.ai/uploads/StableDiffusion/StableDiffusionEnv.png) ## 4) Pick a GPU offer Stable Diffusion can only run on a 1X GPU so select 1X from the filter menu on the top nav. This will then update the interface to show 1X GPU offers. Note that some Stable Diffusion models require large amounts of GPU VRAM. For max settings, you want more GPU RAM. Use the GPU RAM slider in the interface to find offers with over 20GB. We recommend an A6000, A40 or A100 if you want to max the Stable Diffusion settings. ![Spaces Mgwtdaam0Bo2Skpvyo6Q Uploads Pyphz4Oz3M2Fz8Kwl7Wo Stable Diffusion Gpu Selection](https://vast.ai/uploads/crawl/spaces_mgwtdaam0bo2skpvyo6q_uploads_pyphz4oz3m2fz8kwl7wo_stable_diffusion_gpu_selection.png) If available, it is also best to pick a host with the datacenter label, as those machines are more reliable. Click the blue RENT button to spin up the instance. You can then watch progress from the instance tab. ## 5) Connect and start making art The instance can take 3-5 minutes to start. Once it is ready a blue connect button will appear. Click on that to open the web gui. **WARNING**
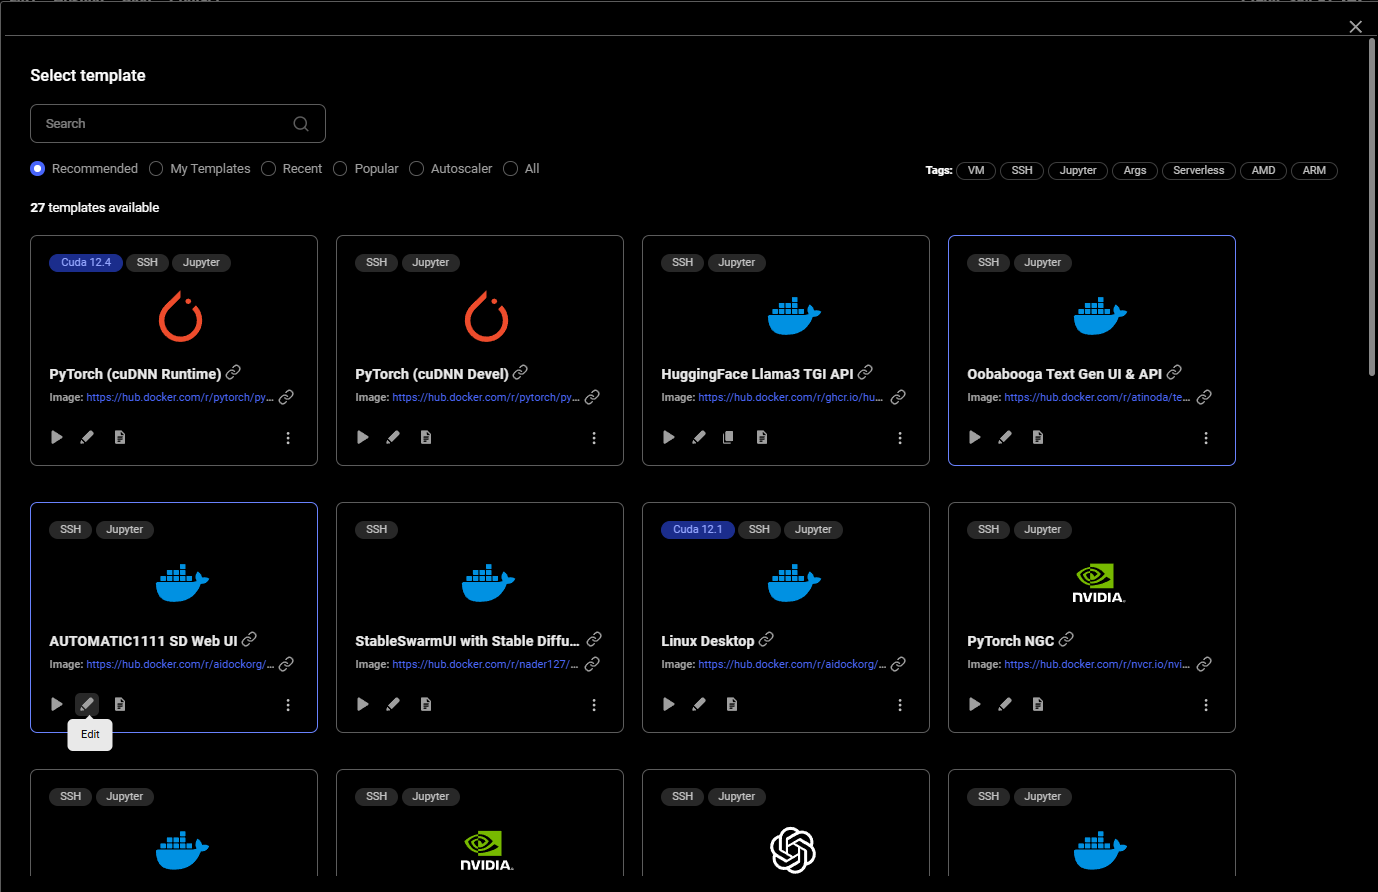
The web gui can take an additional 1-2 minutes to load. If you click on the connect button and get a blank page or error, simply wait 1-2 minutes and reload the page. And there you go! Please read the [Automatic111 documentation](https://github.com/AUTOMATIC1111/stable-diffusion-webui) for how the web GUI works. There are buttons to save and download the artwork, and also to zip it up. ![Spaces Mgwtdaam0Bo2Skpvyo6Q Uploads Klcmg0Mgpmu9Bmipwvsv Stable Diffusion Working](https://vast.ai/uploads/crawl/spaces_mgwtdaam0bo2skpvyo6q_uploads_klcmg0mgpmu9bmipwvsv_stable_diffusion_working.png) ## 
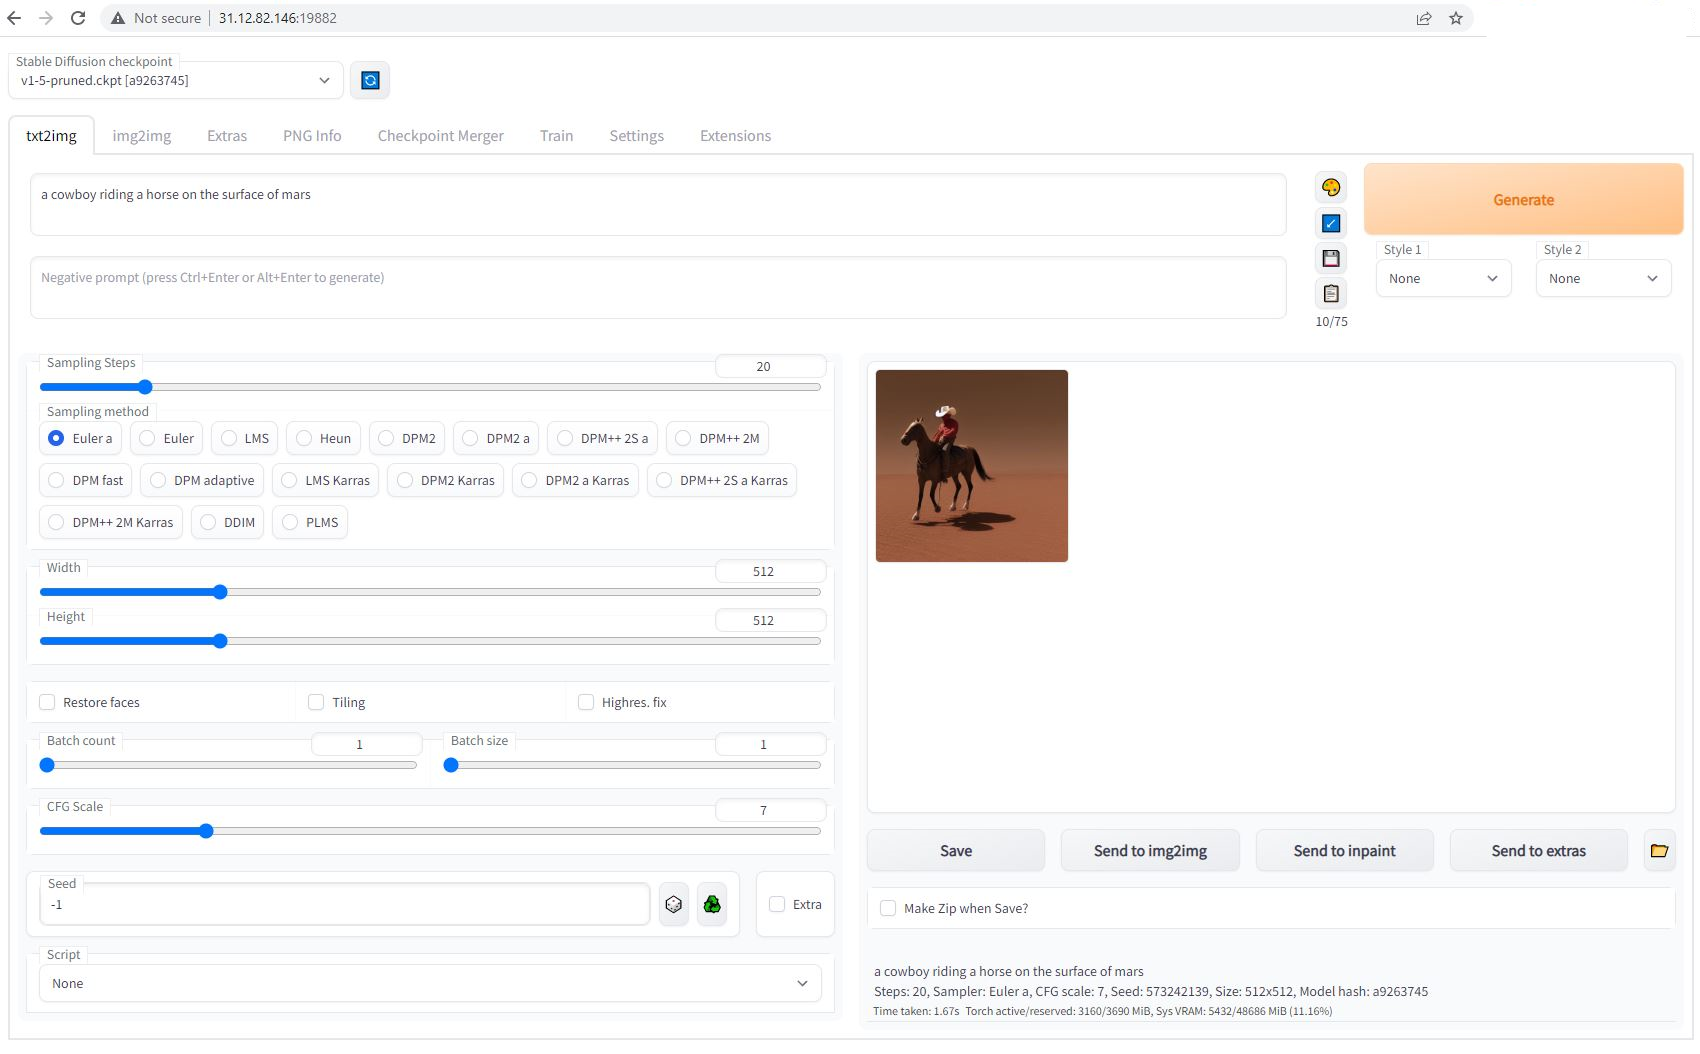
6) Upload other model checkpoints The recommended template has both SSH and Jupyter HTTPS launch modes enabled. To upload a model checkpoint, the simplest way is to click on the Jupyter button on the instances card to open Jupyter and then to upload the .ckpt file to the /workspace/stable-diffusion-webui/models/Stable-diffusion directory. The Jupyter HTTPS launch mode will require you to install a certificate on your local machine. On macOS, this is not optional. Windows and Linux will show an error if the cert is not installed but there is a way to click through the error. To install the Jupyter certificate for Vast, follow the instructions [here](/documentation/instances/jupyter). To use SSH, you will need to create an SSH key and upload the public portion to Vast. Learn more [here](/documentation/instances/sshscp). For Linux/macOS users, SCP will also work. ## 7) Done? Destroy the instance After you generate your artwork and are done with the instance, you have a few options. If you STOP the instance using the stop button, you will no longer pay the hourly GPU charges. **However you will still incur storage charges** because the data is still stored on the host machine. When you hit the START button to restart the instance, you are also not guaranteed that you can rent the GPU as someone else might have rented it while it was stopped. We don't recommend that you stop an instance once done. To incur no other charges you have to DESTROY the instance using the trash can icon. **We recommend you destroy instances** so as not to incur storage charges while you are not using the system. Have fun!