This is a simple demo template running only the base docker image.
All included software is enabled by default.
- About the Base Image
- Connecting to the Instance
- Additional Software
- Application Management
- Instance Startup Process
- Python Package Management
- Environment Variables
- Dynamic Provisioning
- Useful Links
This is our foundational Docker base image, designed to serve as the starting point for all containerized development. It is hosted in Vast's dedicated repository, ensuring long-term availability and stability for all users.
The image is publicly available and comes pre-configured with TLS and token-based authentication, eliminating the need for users to implement these security features themselves.
Built from upstream development images, it includes all essential libraries needed for development. Docker's image caching ensures fast startup times when building derivative images.
There are several methods you can use to interact with your instance.
Press the Jupyter button to be immediately logged in to Jupyter Lab or Notebook (Configure this in the template settings). Here you can:
- Manage your files
- Run Jupyter notebooks
- Open a terminal session
Press the SSH button to reveal the SSH connection details for your instance. We only support key based SSH login so check out this guide for help setting this up.
SSH sessions will automatically launch inside tmux to keep the session active even if you disconnect. You can disable this behavior by running the following command touch ~/.no_auto_tmux and then re-connecting.
If you prefer not to add SSH keys, you can use Jupyter based terminals instead.
Instead of connecting to ports exposed to the internet, you can use SSH port forwarding to securely access services on your instance. This method connects directly to the internal ports, bypassing the Caddy authentication layer.
| Service | External Port | Internal Port |
|---|---|---|
| Instance Portal | 1111 | 11111 |
| Tensorboard | 6006 | 16006 |
| Syncthing | 8384 | 18384 |
| Jupyter | 8080 | 8080 |
When creating SSH port forwards, use the internal ports listed above. These ports don't require authentication or TLS since they're only accessible through your SSH tunnel. See the Instance Portal for more details on this security model.
- Note: Jupyter is not proxied when run in the default 'Jupyter' startup mode, so forwarding this will require a connection to https://localhost:8080 and you will need to supply the auth token which is stored in the instance in environment variable
JUPYTER_TOKEN. To run a proxied Jupyter application, you should run the instance in SSH or Entrypoint mode with Jupyter's configuration retained in thePORTAL_CONFIGvariable.
To forward Tensorboard to your local machine:
ssh root@INSTANCE_IP -p SSH_PORT -L 6006:localhost:16006This command:
- Creates a SSH local port forward for your localhost:6006
- Connects to the instance internal Tensorboard port (16006)
- Allows you to access the application at http://localhost:6006 on your machine
- Maintains a secure, encrypted connection through SSH
The application will now be available on your local machine without requiring the authentication that would be needed when accessing the externally exposed port.
The Instance Portal is your gateway to managing web applications running on your instance. It uses Caddy as a reverse proxy to provide secure TLS and authentication for all your applications.
-
Set Up TLS: To avoid certificate warnings, install the 'Jupyter' certificate by following our instance setup guide.
-
Access Your Applications: Simply click the 'Open' button on your instance card:

This sets a cookie using your OPEN_BUTTON_TOKEN, granting you access. Without this, you'll see a login prompt (username: vastai, password: your OPEN_BUTTON_TOKEN).
For automated or API access, you can authenticate to any application by including a Bearer token in your HTTP requests:
Authorization: Bearer <OPEN_BUTTON_TOKEN>This is particularly useful for scripts, automated tools, or when you need to access your applications programmatically without browser interaction.
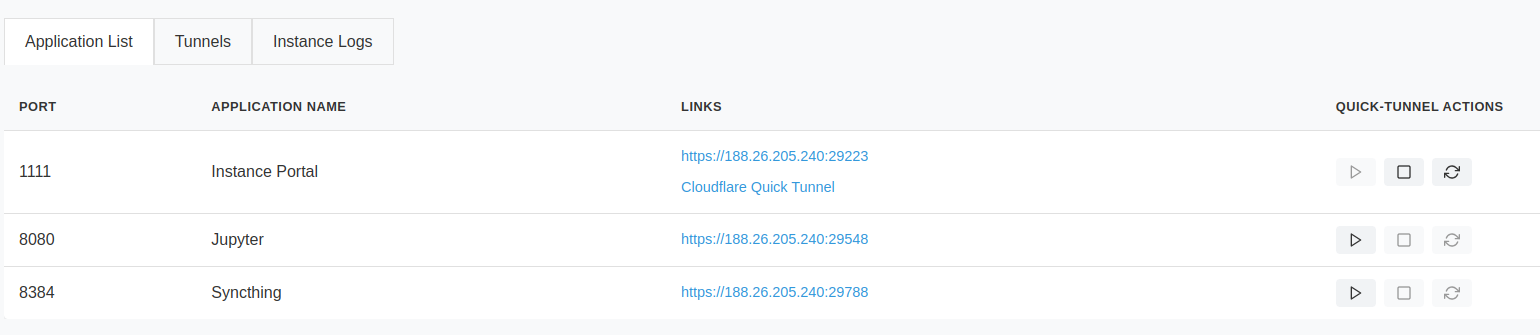
Once logged in, you'll see your application dashboard
The dashboard shows all available ports and their corresponding applications. The Instance Portal can create Cloudflare tunnels - perfect for sharing temporary application links or accessing your instance when direct connections aren't available.
Start, stop, and refresh tunnel links using the dashboard controls.
The Tunnels tab displays your active Cloudflare tunnels. You can:
- View existing tunnels linked to running applications
- Create new 'quick tunnels' to any local port
- Test applications without opening ports on your instance
Tunnels displayed in this tab will show the direct mapping between the local and tunnel addresses. Authentication tokens will not be appended so clicking these may lead to an authentication dialog if the auth cookie has not already been set from a previous visit.
Want to use custom domains or virtual networks? Set the CF_TUNNEL_TOKEN environment variable to enable domain mapping. Check out the Cloudflare documentation for details.

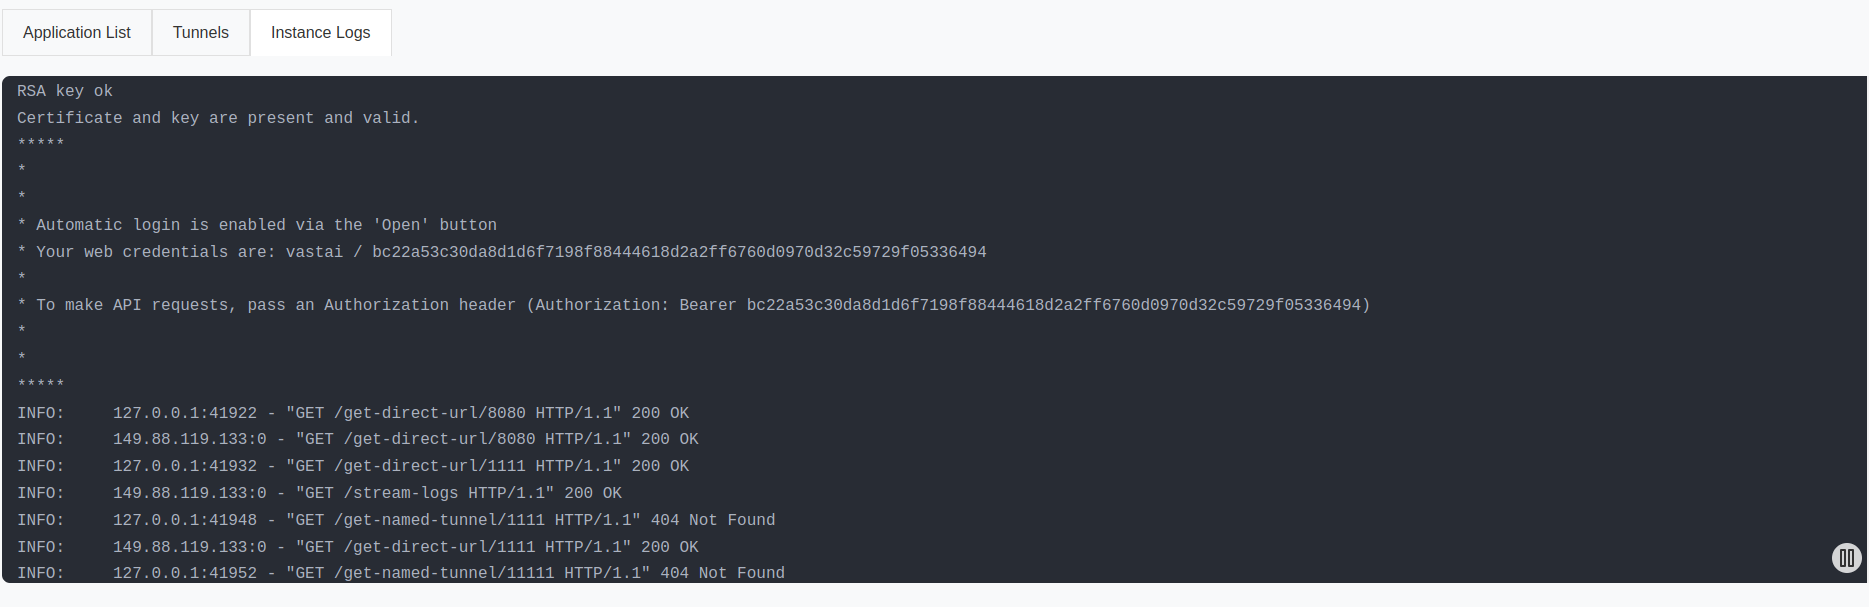
The Logs tab provides live streaming of all *.log files from /var/log/portal/. Outputs for the included applications are piped to tee -a /var/log/portal/${PROC_NAME}.log, making them accessible both within your instance and through the Vast GUI logging button.
The Instance Portal configuration lives in /etc/portal.yaml, generated on first start using your PORTAL_CONFIG environment variable. Learn more about this variable in the Environment Variables section.
Need to modify the configuration in a running instance? Edit /etc/portal.yaml anytime, then restart Caddy with supervisorctl restart caddy. Remember that any new applications will need their external ports to be available for direct access.
Jupyter is always started when run with the Jupyter launch mode. All other software is managed by supervisord.
Manage application startup by modifying the PORTAL_CONFIG environment variable before instance start, or by editing the file /etc/portal.yaml in a running instance.
Caddy is a web server that adds HTTPS encryption and user authentication to web applications running on your cloud instance.
Here's how it works:
- Your applications run on your cloud instance, but they're only accessible through the instance's
localhost - Caddy acts as a secure gateway between these applications and the internet
- When you try to access your cloud applications from your personal computer, you connect through Caddy
This setup gives you two convenient ways to access your cloud applications:
- Through your web browser with HTTPS security and login protection
- Directly through SSH Port Forwarding from your computer, bypassing the need for HTTPS or login credentials
A powerful file synchronization tool that keeps your development environment in sync across devices. Ideal for maintaining consistent workspaces across multiple instances or syncing datasets. Features:
- Peer-to-peer file synchronization
- Real-time file updates
- Conflict resolution
- Selective sync options
See the Syncthing documentation for setup instructions.
Configure startup of Syncthing through the PORTAL_CONFIG environment variable.
Visualization toolkit for machine learning experiments, helping you track metrics, view model graphs, and analyze training results. Our configuration:
- By default, monitors
${WORKSPACE}(default/workspace) - Customize log directory via
TENSORBOARD_LOG_DIRenvironment variable - Automatically detects and displays new experiments
Configure startup of Tensorboard through the PORTAL_CONFIG environment variable.
The reliable Linux task scheduler, perfect for automating routine tasks in your instance:
- Schedule model training jobs
- Automate data downloads
- Run periodic maintenance tasks
- Enabled in all launch modes
Just add entries to your crontab to get started.
A standardized framework for parallel programming across heterogeneous computing platforms. Ideal for high-performance computing tasks that can leverage GPUs, CPUs, and other processors. Features:
- Cross-platform compatibility
- Hardware-agnostic code execution
- Support for data and task parallelism
- Memory management optimization
The Vast.ai CLI tool comes pre-installed on your instance, allowing you to stop it from within. An instance-specific API key is already configured, giving you the ability to control this instance while you're logged in.
To stop the instance from inside itself, run:
vastai stop instance $CONTAINER_IDYou can incorporate this command into scripts that run on the instance itself - for example, to shut down based on specific conditions. Combined with cron, you can automate when your instance stops based on your needs.
Manages Node.js environments, essential for many modern AI tools and visualization frameworks:
- Pre-installed with latest LTS Node.js version
- Supports popular ML visualization tools like TensorBoard.js
- Enables local development of model visualization dashboards
- Compatible with various AI/ML web interfaces and tools
We use Supervisor to orchestrate applications in the container. Configuration files live in /etc/supervisor/conf.d/, with startup scripts in /opt/supervisor-scripts/.
Rather than directly launching applications, we use wrapper scripts for better control. This allows us to check for application entries in /etc/portal.yaml - if an application isn't configured here, we assume you don't want to run it.
Common Supervisor commands:
# View all processes
supervisorctl status

# Control specific services
supervisorctl start tensorboard
supervisorctl stop syncthing
supervisorctl restart caddy

# Reload configuration after changes
supervisorctl reload

# Read recent logs
supervisorctl tail caddy
supervisorctl tail -f syncthing  # Follow mode
Need more details? Check out the Supervisor documentation.
The Docker image uses /opt/instance-tools/bin/entrypoint.sh as its startup script. This script handles both initial setup and routine startup tasks.
First Time Setup:
- Updates the
vastaiPython package to the latest version - Sets up the
${WORKSPACE}directory with proper permissions for both admin and user access - Configures login settings to:
- Automatically activate the default Python environment
- Start in the
${WORKSPACE}directory - Creates a backup of the default Python environments
- Runs any custom setup script defined in the
PROVISIONING_SCRIPTenvironment variable
Every Time the Instance Starts:
- Sets up SSH access keys
- Creates new security certificates if needed
- Launches
supervisordto manage running applications
Default Environment:
- Python packages install to the
/venv/main/virtual environment - This environment activates automatically when you:
- Connect via SSH
- Open a terminal in Jupyter
- Run Jupyter notebooks
Automatic Backups:
- Every 30 minutes, the system creates a backup of your Python packages
- Backups are stored in
/workspace/.venv-backups/{INSTANCE_ID}/ - These backups let you:
- Undo recent package changes
- Recreate your exact environment on a new instance
Backup Settings:
- By default, keeps 48 backups (24 hours worth)
- Adjust using the
VENV_BACKUP_COUNTenvironment variable - Set to
0to turn off backups
Some more useful environment variables are provided for instance customization.
| Variable | Type | Default | Description |
|---|---|---|---|
WORKSPACE |
string | /workspace |
Set the workspace directory |
ENABLE_AUTH |
bool | true |
Enable or disable token-based and basic authentication |
AUTH_EXCLUDE |
string | Disable authentication for specific ports. eg. 6006,8384 |
|
ENABLE_HTTPS |
bool | true |
Enable or disable TLS |
PORTAL_CONFIG |
string | See note below | Configures the Instance Portal and application startup |
VENV_BACKUP_COUNT |
int | 48 |
Number of venv backups to retain |
PROVISIONING_SCRIPT |
string | URL pointing to a shell script (GitHub Repo, Gist) | |
TENSORBOARD_LOG_DIR |
string | /workspace |
Log directory for Tensorboard |
The structure of this variable is:
- Each application is separated by the
|character - Each application parameter is separated by the
:character - Each application must specify
hostname:external_port:local_port:url_path:Application Name
The hostname in Docker instances will always be localhost
Where the internal port and local port are not equal then Caddy will be configured to listen on 0.0.0.0:external_port acting as a reverse proxy for hostname:local_port
If the external_port and local_port are equal then Caddy will not act as a proxy but the Instance Portal UI will still create links. This is useful because it allows us to create links to Jupyter which is not controlled by Supervisor in Jupyter Launch mode.
url_path will be appended to the instance address and is generally set to / but can be used to create application deep links.
The caddy_manager script will write an equivalent config file at /etc/portal.yaml on boot if it does not already exist. This file can be edited in a running instance.
Important: When defining multiple links to a single application, only the first should have non equal ports - We cannot proxy one application multiple times.
Note: Instance Portal UI is not required and its own config declaration can be removed from PORTAL_CONFIG. This will not affect the authentication system.
Sometimes you need flexibility without rebuilding the entire image. For quick customizations:
Host a shell script remotely (GitHub, Gist, etc.)
Set the raw URL in PROVISIONING_SCRIPT
Here's a typical provisioning script:
#!/bin/bash

# Cause the script to exit on failure.
set -eo pipefail

# Activate the main virtual environment
. /venv/main/bin/activate

# Install your packages
pip install your-packages

# Download some useful files
wget -P "${WORKSPACE}/" https://example.org/my-application.tar.gz
tar xvf ${WORKSPACE}/my-application.tar.gz"

# Set up any additional services
echo "my-supervisor-config" > /etc/supervisor/conf.d/my-application.conf
echo "my-supervisor-wrapper" > /opt/supervisor-scripts/my-application.sh
chmod +x /opt/supervisor-scripts/my-application.sh

# Reconfigure the instance portal
rm -f /etc/portal.yaml
export PORTAL_CONFIG="localhost:1111:11111:/:Instance Portal|localhost:1234:11234:/:My Application"

# Reload Supervisor
supervisorctl reload