Start by formatting the WD USB hard drive to the ext4 filesystem. Then connect the external HD to the rasbery pi. Burn the loRa Pi image to the provided 16 GB sd Card. Connect both the SD card and the WD hard drive to the rasbery pi and follow the instructions given below.
-
connect power through the micro USB.
-
To open up a terminal you can try one of two ways -- Using Nmap and Screen: use nmap to figure out the ip address of the pi and then use screen/putty to get access through ssh --- For Screen
screen /dev/ttyUSB0 115200-- Use the serial usb cable provided. Th eproper way to plug in to the GPIO port is shown below.{ADD PIC Here }
- Checking if the HD is connected
sudo apt-get install lshw
sudo lshw -class disk -short
Output should look like this.
H/W path        Device     Class      Description
=================================================
/1/1/5/0.0.0    /dev/sda   disk       1TB My Passport 25E1
Be sure the hard drive you want to use is formatted in the ext4 filesystem.
- Mounting the HD
sudo su
mount /dev/sda1 /mnt
- Transfer your root partition to the new drive:
sudo rsync -axv / /mnt
sudo cp /boot/cmdline.txt /boot/cmdline.txt.bak
sudo nano /boot/cmdline.txt
- Change the lines as follows:
dwc_otg.lpm_enable=0 console=serial0,115200 console=tty1 root=/dev/sda1 rootfstype=ext4 elevator=deadline fsck.repair=yes rootwait rootdelay=5
- Chnaging the Boot Order
sudo nano /mnt/etc/fstab
Then add the following line:
/dev/sda1 / ext4 defaults,noatime 0 1
Make sure to get the spacing right
Comment the SD Boot
#/dev/mmcblk0p7 / ext4 defaults,noatime 0 1
Then restart the system.
sudo reboot
cd ~
mkdir mintsData
mkdir gitHubRepos
cd gitHubRepos
git clone git@github.com:mi3nts/centralHub.git
sudo apt-get install screen
sudo apt-get install python3-pip
sudo pip3 install getmac
sudo pip3 install pyserial
sudo pip3 install netifaces
sudo pip3 install pynmea2
source /home/rxhf/lora/bin/activate
pip install getmac
pip install pyserial
sudo reboot
export VISUAL=nano; crontab -e
These changes should be made
# m h  dom mon dow   command
@reboot cd /home/rxhf/gitHubRepos/centralHub/firmware/pi && ./runAll.sh
*/30 * * * * cd /home/rxhf/gitHubRepos/centralHub/firmware/pi && python3 deleter.py
*/1 * * * * rsync -avzrtu -e "ssh -p 2222" /home/rxhf/mintsData/raw/ mints@mintsdata.utdallas.edu:raw/
cd /home/rxhf/gitHubRepos/centralHub/firmware/pi && ./runAll.sh
sudo crontab -e
Add a command for auto reboot
# m h  dom mon dow   command
0 9 * * * sudo reboot
cd ~
mkdir Downloads
cd Downloads/
wget https://www.dwservice.net/download/dwagent_generic.sh
chmod +x dwagent_generic.sh
sudo ./dwagent_generic.sh
Use default paths for the installation.
cp lora.tar.gz /var/lib/
Delete the mysql folder at /var/lib/ and extract lora.tar.gz to take its place.
reboot the device
Plug in an HDMI monitor to the rasberri Pi. Open your browser and type in the ip address of the Lora Gateway(Rasberry Pi)
Then go to the application tab and create an application under the credentials given below

Under the application created click on the table icon. Here you can register your Lora Nodes.

sudo apt-get install screen
sudo apt-get install python3-pip
sudo pip3 install getmac
sudo pip3 install pyserial
sudo pip3 install netifaces
sudo pip3 install pynmea2
sudo adduser $USER dialout
sudo adduser $USER tty
sudo apt-get install screen
sudo apt-get install python3-pip
sudo pip3 install getmac
sudo pip3 install pyserial
sudo pip3 install netifaces
sudo pip3 install pynmea2
@reboot cd /home/teamlary/gitHubRepos/centralHub/firmware/jetson && ./runAll.sh
* * * * * rsync -avzrtu -e "ssh -p 2222" /home/teamlary/mintsData/raw/ mints@mintsdata.utdallas.edu:raw
*/2 * * * * cd /home/teamlary/gitHubRepos/centralHub/firmware/jetson && python3 skyCamReaderWithSave.py
2,4,6,8,12,14,16,18,22,24,26,28,32,34,36,38,42,44,46,48,52,54,56,58 * * * * cd /home/teamlary/gitHubRepos/CentralHub/firmware/jetson && python3 skyCamReaderNoSave.py
*/5 * * * * cd /home/teamlary/gitHubRepos/centralHub/firmware/jetson && python3 deleter.py
If using a pre-used Images uninstall and again install dwservice with a new ID
sudo rm -rf /usr/share/dwagent
dwagconfigure
This kit provides all the basic tools needed to collect and transfer data among all your LoRa nodes.

Dimensions: 200mm x 130mm x 50mm
| Parts | Quantity | Details |
|---|---|---|
| Raspberry Pi 3 | 1 | https://static.raspberrypi.org/files/product-briefs/Raspberry-Pi-Model-Bplus-Product-Brief.pdf |
| Seeeduino LoRaWAN with GPS | 1 | https://wiki.seeedstudio.com/Seeeduino_LoRAWAN/ |
| Gateway module RHF0M301 – 868 | 1 | - |
| PRI 2 Bridge RHF4T002 | 1 | - |
| 8GB Micro SD Card – Class 10 | 1 | - |
| USB to UART Adapter | 1 | - |
| 0dBi Rubber Duck Antenna | 1 | - |
| Micro USB Cable 20cm | 1 | - |
| Micro USB Cable 100cm | 1 | - |
| RJ45 Ethernet Cable 100cm | 1 | - |
| 5V/2.1A American Standard Adapter with Micro USB Connector | 1 | - |
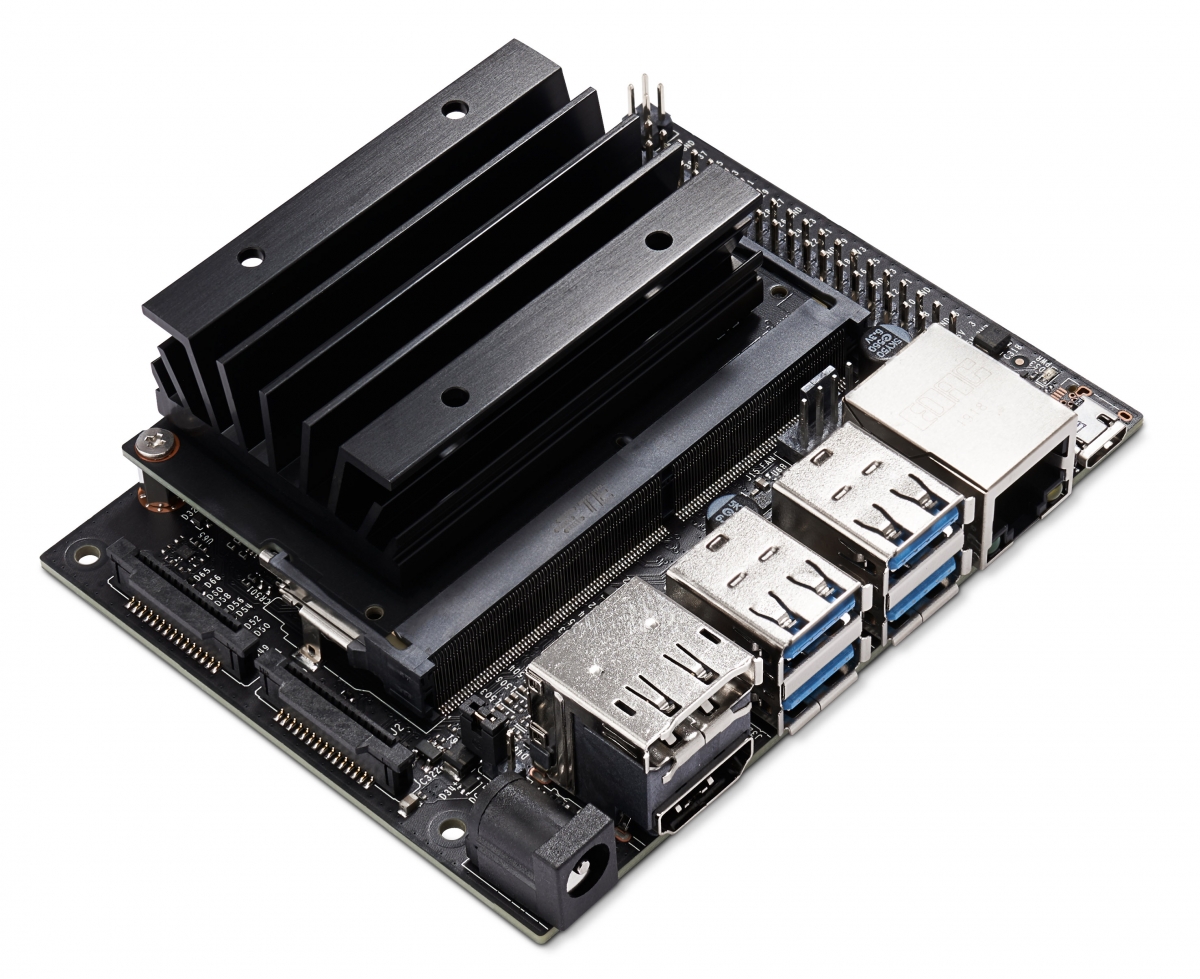
NVIDIA® Jetson Nano™ Developer Kit is a computer that lets you run multiple neural networks side by side for applications like image classification, object detection, segmentation, and speech processing.
CPU: Quad-core ARM A57 @ 1.43 GHz
-Jetson Nano Developer Kit
-Small paper card with quick start and support information
-Folded paper stand
WD External HD is a portable harddrive in which you can store massive amounts of files, inculding photos, videos, and music.

Interface: USB 3.0/2.0
Dimensions: 4.33in x 3.21in x 0.64in
WIWAV's 5-Port Switch is a low power consumption device that series up to 5 Ethernet devices for critical applications in hazardous environments, such as smart traffic, factory automation, and outdoor access connection for video surveillance / FTTx and Wi-Fi coverage.
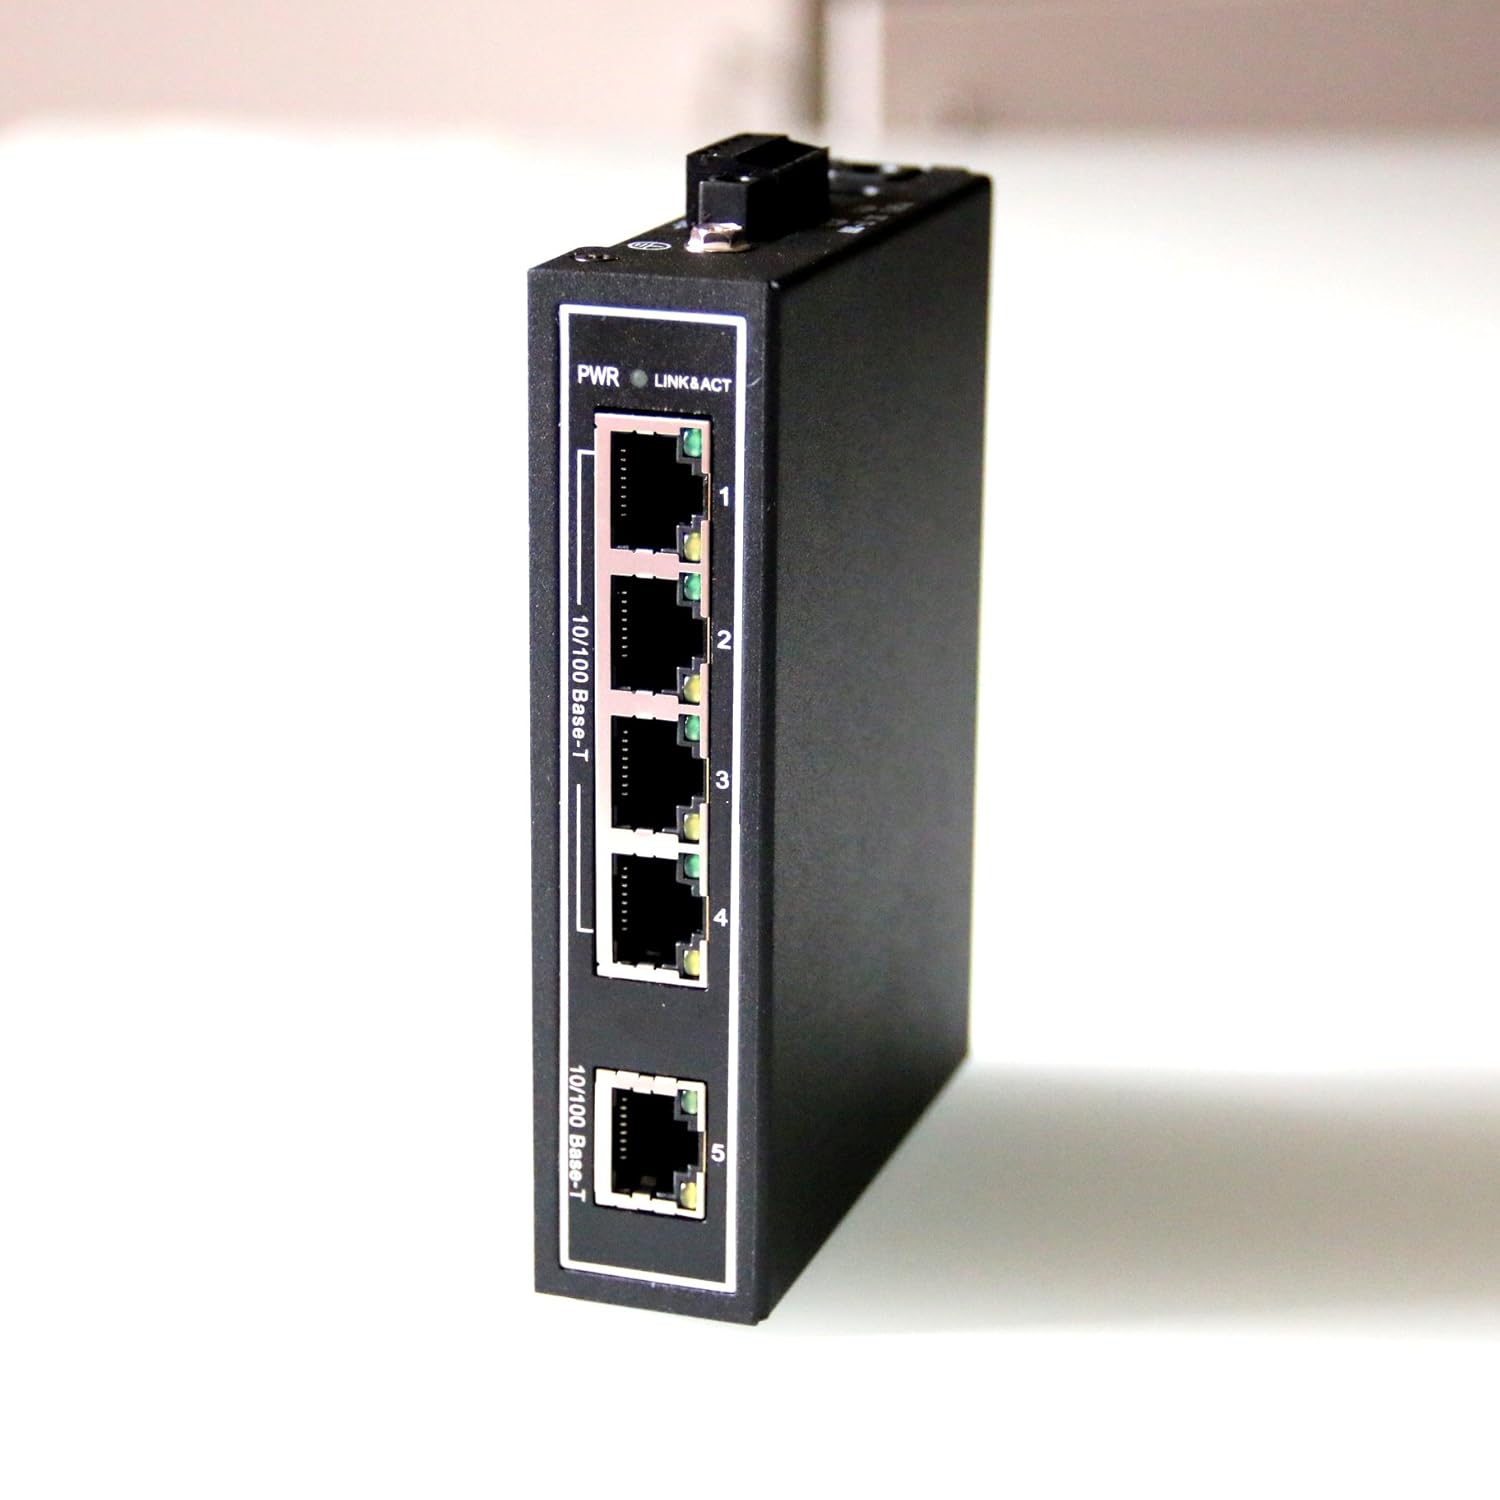
Interface: 5 x RJ45
Transmission Speed: 10/100Mbps
Dimensions: 28mm x 118mm x 89mm
Range of Operating Temperatures: -30°C ~ +75°C