The SEN0232 from DFRobot is a sensor that can accurately measure the sound levels of it's surrounding enviornment.

Dimensions: 60mm x 43mm
Measurement Range: 30dBA ~ 130dBA
Input Voltage: 3.3 ~ 5.0V
Output Voltage: 0.6 ~ 2.6V
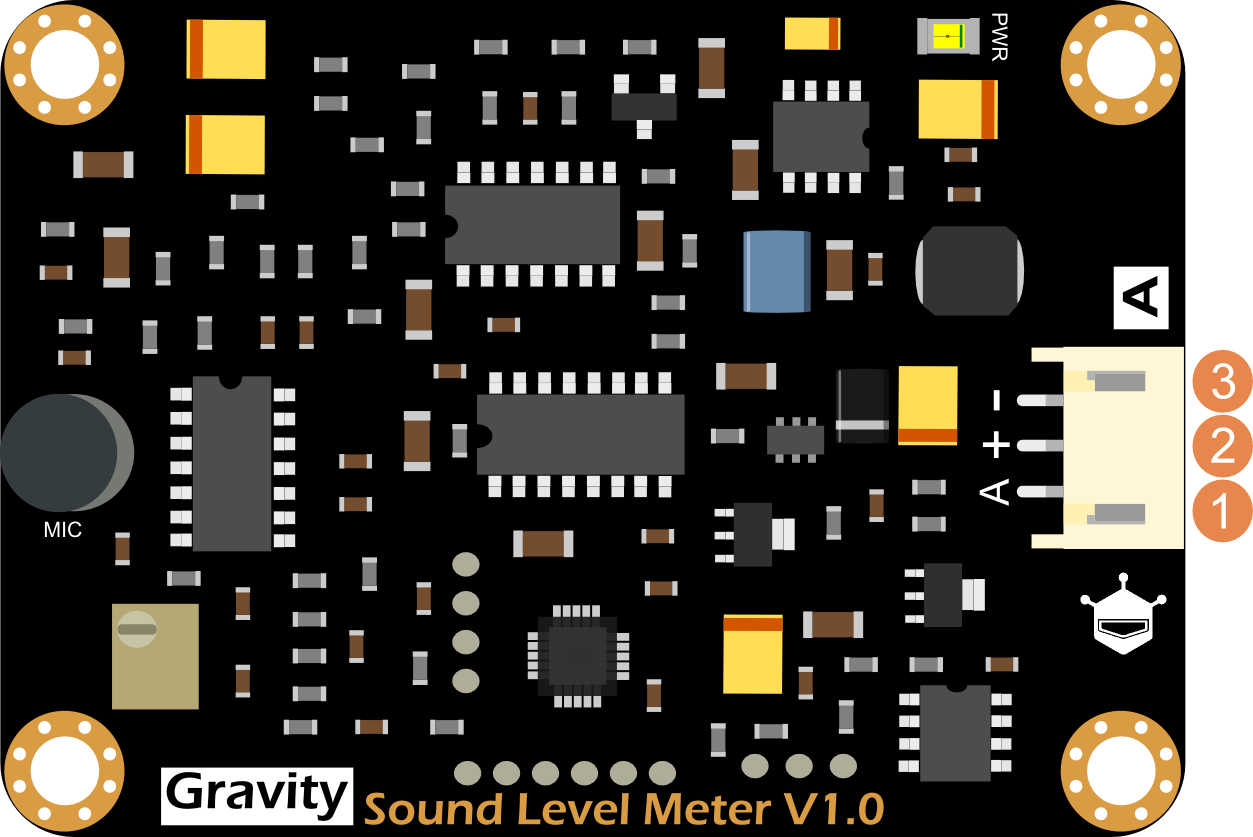
| Number | Label | Description |
|---|---|---|
| 1 | A | Analog Signal Output (0.6~2.6V) |
| 2 | + | Power VCC (3.3~5.0V) |
| 3 | - | Power GND (0V) |
This sensor uses AMS AS3935 Franklin lightning sensor IC and Coilcraft's MA5532-AE antenna to examine lightning distance, intensity, and frequency both indoors or outdoors.

Dimensions: 30.0mm x 22.0mm
Input Voltage: 3.3V ~ 5.5V
Maximum Detection Range: 40 km
Distance Detection Resolution: 1 ~ 4 km
Intensity Detection Resolution: 21 bits
Interface: Gravity I2C (Addresses: 0x03, 0x02, 0x01)
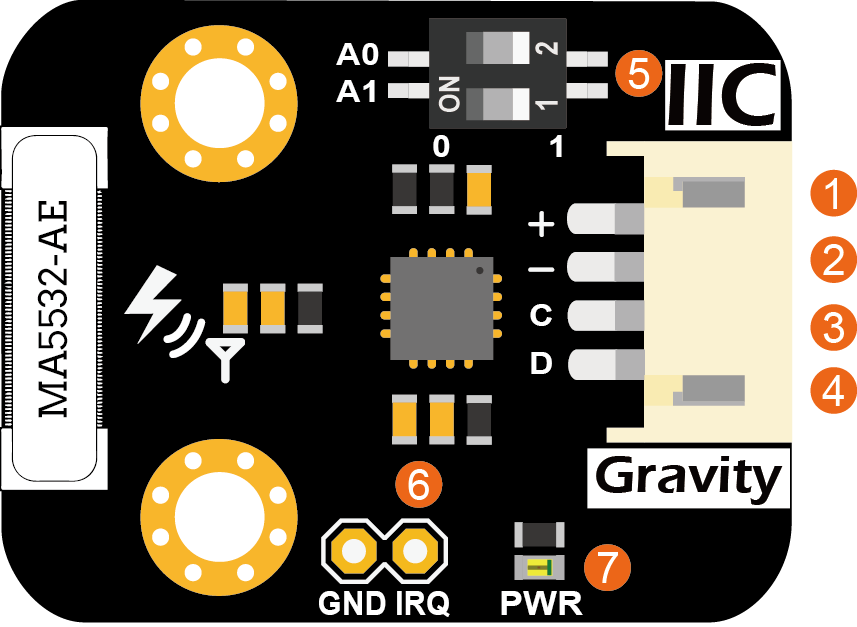
| Number | Label | Description |
|---|---|---|
| 1 | VCC | Power VCC(3.3 ~ 5.5V) |
| 2 | GND | Power GND |
| 3 | SCL | I2C clock signal |
| 4 | SDA | I2C data signal |
| 5 | ADDR | I2C address DIP switch |
| 6 | IRQ | Lightning alarm interrupt pin |
| 7 | PWR | Power indicator (red) |
The Pro Audio External Lavalier Microphone is a high quality mic that's ideal for video use. It even comes with a lapel clip to connect onto objects easily, as well as a foam windscreen to keep out unwanted noise.

Frequency Range: 35Hz ~ 18KHz
Sensitivity: -30dB +/-3dB / 0dB=1V/Pa, 1kHz
Cable length: Microphone: 1.2m
Mic Adapter: 11cm
Connector: Mini USB plug
- 3-D Printed Base
- 3-D Printed Stand
- M3 Bolts, Washers, and Nuts
- M5 Screws, Washers, and T-Slot Fasteners
- Nylon OD 3/16" and 5/16" Spacers
- Metal Stand
- WC-37 Outdoor Enclosure
- PG7s and PG9s
- DFRobot Analog Sound Level Meter
- DFRobot Lightning Distance Sensor
- Arduino Base
- 1/4 inch Drill Bit
- 1/2 inch Spade Bit
- 5/8 inch Spade Bit
Align the DFRobot Analog Sound Level Meter along the right side of the 3-D Printed Base. The large hole of the Base should be on the top left and the wire port of the DFRobot Analog Sound Level meter should be pointing down. See image for reference. Take four M3 bolts and slide an M3 washer onto each. Insert them into the four corners of the Meter and through the Base. Add an M3 washer and then an M3 nut to the opposite side and tighten.


Flip over the 3-D Printed Base so that the DFR Analog Sound Meter is facing down and the large hole of the 3-D Printed Base is on the top right. Align the Arduino Base along the right side with the golden colored USB connector on the opposite side of the large Base hole. Slide an M3 Washer onto an M3 Bolt and insert into the hole from underneath the 3-D Base and up through the Arduino Base. Slide an M3 Washer onto the bolt length, and place an M3 Nut onto the bolt and rotate a few times to begin securing. Use a wrench to stablize the nut while using a drill to tighten the bolt. See images for reference.


With the Arduino Base facing towards you and the large hole of the 3-D Printed Base at the top right, attach the 3-D Printed Stand using the two small holes to the left of the large hole. Using either end of the stand, place the 3-D Printed Stand on top of the 3-D Printed Base. Slide on an M3 Wahser onto an M3 Bolt and insert it from underneath the base and up through the stand hole. Slide a washer onto the bolt from the top, then tighten with an M3 Nut. Repeat for the second hole.


Attach the DFRobot Lightning Distance Sensor to the top of the 3-D printed stand with the wires laying across the Base. Align the holes and slide an M3 Washer onto an M3 Bolt and insert them from the top of the DFRobot Lightning Distance Sensor and down through the stand. Slide a M3 Washer from underneath onto the Bolt, then add an M3 Nut and tighten. Repeat for the second hole.


Orient the enclosure as shown. Drill 2 holes using the 1/4 inch drill bit, 3 holes using the 1/2 inch spade bit, and one hole using the 5/8 inch spade bit as illustrated in the image

Unscrew the bottom piece of 3 of the PG7 glands and place into the 1/2 inch spade holes. Reattach bottom pieces and tighten. Repeat with one PG9 gland in the 5/8 inch spade hole.


Slide an M5 washer onto an M5 screw and insert form underneath enclosure. Screw T-Slot Fastener, flat side down, to the top of the box, leaving enough space to slide on metal stand while still remaining secure. Fasteners should be in line with each other. See images for reference.


Slide any side of the metal stand onto the T-Slot Fasteners, starting on the side closest to the tabs. Move the metal stand across the box until it is level with the second PG glan. If the metal stand does not feel secure, remove and tighten the Fasteners. Reattach and reeveluate.


Screw or drill four M3 bolts into the corners of the base on the side with the DFRobot Lightning Distance Sensor. Flip the unit over and add spacers to each bolt. Use the 3/16" spacers on the side next to the DFRobot Analog Sound Level Meter as shown in image. Add a small amount of hot glue to the bottom of the spacers to secure them to the 3-D Printed Base, being careful not to place glue on the bolt or electronics.


With the 3-D printed stand pointed upward, place the completed sensor unit into the Enclosure with the metal stand pointed downward. See image for reference. The PG7 hole should line up with the large hole in the 3-D printed base. The four bolts with spacers should fit into the four provided threaded inserts in the box. Tighten the four bolts.


The + (VCC), - (GND), C (SCL), and D (SDA) wires coming out from the wire port of SEN0290 (DFRobot Lightning Distance Sensor) should be connected to the 5 V, GND, A5 and A4 terminals of the Arduino Base respectivly. Solder one end of a single wire to the IRQ terminal of SEN0290 board and the other end to the D2 terminal of the Arduino Base. Connect the -, + and A wires coming out from the DFRobot Analog Sound Level meter to the GND, 5 V and A1 terminals of the Arduino Base respectivly.
Apart a micro USB cable at 10 cm away from the USB port and connect the micro USB port to the Arduino Base. Mount the 3-D Print Base with the circuit inside the enclosure by fitting four bolts with spacers and cut end of the micro USB cable should be come out throught side hole of enclosure.

