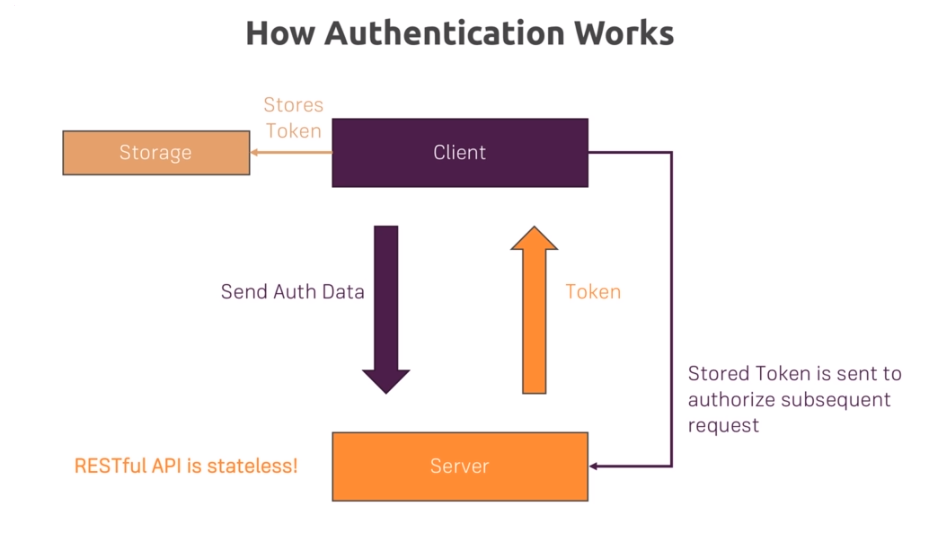
- REST API는 세션을 사용하지 않습니다.
- 세션 대신 토큰을 사용하는데 토큰은 JSON DATA + Signature로 구성되어 있습니다.
- 토큰은 JSON Web Token (JWT) 라고 부릅니다.
- 사용자에게 토큰을 주고 사용자는 매 request마다 토큰을 서버에게 전달합니다.
- 서버는 토큰을 전달받고 유효한 토큰인지 검사합니다.
-
routes/auth.js
-
login router 만들기
router.post('/login', authController.login);
-
-
controllers/auth.js
-
login controller 만들기
exports.login = (req, res, next) => {
  const email = req.body.email;
  const password = req.body.password;
  let loadedUser;
  User.findOne({ email: email })
    .then(user => {
      if (!user) {
        const error = new Error('이메일이 존재하지 않아요!');
        error.statusCode = 401;
        throw error;
      }
      loadedUser = user;
      return bcrypt.compare(password, user.password);
    })
    .then(isEqual => {
      if (!isEqual) {
        const error = new Error('잘못된 password 에요');
        error.statusCode = 401;
        throw error;
      }

    })
    .catch(err => {
      if (!err.statusCode) {
        err.statusCode = 500;
      }
      next(err);
    });
};
-
-
JSON Web Token 적용하기
-
$npm i --save jsonwebtoken -
controllers/auth.js 에 적용하기
const jwt = require('jsonwebtoken');

exports.login = (req, res, next) => {
...
  User.findOne({ email: email })
    .then(
    	...
    })
    .then(isEqual => {
      if (!isEqual) {
		...
      }
        // token 설정하기
      const token = jwt.sign(
        {
          email: loadedUser.email,
          userId: loadedUser._id.toString()
        },
        'somesupersupersecretfromminjae',
        { expiresIn: '1h' }
      );
      res.status(200).json({ token: token, userId: loadedUser._id.toString() });
    })
    .catch(err => {
		...
};
-
-
React Front Page : app.js
-
loginHandlerloginHandler = (event, authData) => { event.preventDefault(); this.setState({ authLoading: true }); fetch('http://localhost:8080/auth/login', { method: 'POST', headers: { 'Content-Type': 'application/json' }, body: JSON.stringify({ email: authData.email, password: authData.password }) }) .then(res => { if (res.status === 422) { throw new Error('Validation failed.'); } if (res.status !== 200 && res.status !== 201) { console.log('Error!'); throw new Error('Could not authenticate you!'); } return res.json(); }) .then(resData => { console.log(resData); this.setState({ isAuth: true, token: resData.token, authLoading: false, userId: resData.userId }); localStorage.setItem('token', resData.token); localStorage.setItem('userId', resData.userId); const remainingMilliseconds = 60 * 60 * 1000; const expiryDate = new Date( new Date().getTime() + remainingMilliseconds ); localStorage.setItem('expiryDate', expiryDate.toISOString()); this.setAutoLogout(remainingMilliseconds); }) .catch(err => { console.log(err); this.setState({ isAuth: false, authLoading: false, error: err }); }); };
-
middleware/is-auth.js
-
토큰 검증하는 미들웨어 만들기
const jwt = require('jsonwebtoken');

module.exports = (req, res, next) => {
  const authHeader = req.get('Authorization');
  if (!authHeader) {
    const error = new Error('Not authenticated.');
    error.statusCode = 401;
    throw error;
  }
  const token = authHeader.split(' ')[1];
  let decodedToken;
  try {
    // 2번째 인자는 이전에 설정했던 토큰 암호
    decodedToken = jwt.verify(token, 'somesupersupersecretfromminjae');
  } catch (err) {
    err.statusCode = 500;
    throw err;
  }
  if (!decodedToken) {
    const error = new Error('Not authenticated.');
    err.statusCode = 401;
    throw error;
  }
  // decode 됐기 때문에 이전에 설정해주었던 userId에 접근할 수 있다.
  req.userId = decodedToken.userId;
  next();
};
-
-
React Front Page : .../Feed.js
-
get 요청에서는 body에 토큰을 보낼수 없습니다. 그래서 Head에 Token을 넣어 줍시다.
  loadPosts = direction => {
    if (direction) {
      this.setState({ postsLoading: true, posts: [] });
    }
    let page = this.state.postPage;
    if (direction === 'next') {
      page++;
      this.setState({ postPage: page });
    }
    if (direction === 'previous') {
      page--;
      this.setState({ postPage: page });
    }
    fetch('http://localhost:8080/feed/posts?page=' + page, {
      headers: {
          // Bearer은 토큰을 검증할때 주로 붙이는 관습
        Authorization: 'Bearer ' + this.props.token
      }
    })
      .then(res => {
        if (res.status !== 200) {
          throw new Error('Failed to fetch posts.');
        }
        return res.json();
      })
      .then(resData => {
        this.setState({
          posts: resData.posts.map(post => {
            return {
              ...post,
              imagePath: post.imageUrl
            };
          }),
          totalPosts: resData.totalItems,
          postsLoading: false
        });
      })
      .catch(this.catchError);
  };
-
-
routes/feed.js
-
is-auth미들웨어 가져오고getPosts에 적용하기const isAuth = require('../middleware/is-auth'); router.get('/posts',isAuth, feedController.getPosts);
-
-
routes/feed.js
-
Token 적용하기
router.get('/posts', isAuth, feedController.getPosts);

router.post(
  '/post',
  isAuth,
  [
	...
  ],
  feedController.createPost
);

router.get('/post/:postId', isAuth, feedController.getPost);

router.put(
  '/post/:postId',
  isAuth,
  [
	...
  ],
  feedController.updatePost
);

router.delete('/post/:postId', isAuth, feedController.deletePost);

module.exports = router;
-
-
React Front Page : .../Feed.js
-
프론트페이지에 있는 fetch 함수에서 Server로 Token 보내주기
    fetch('http://localhost:8080/feed/post/' + postId, {
      headers: {
        Authorization: 'Bearer ' + this.props.token
      }
    })
-
-
models/post.js
-
creator에 user 정보 넣기
const mongoose = require('mongoose');
const Schema = mongoose.Schema;

const postSchema = new Schema(
  {
    title: {
      type: String,
      required: true
    },
    imageUrl: {
      type: String,
      required: true
    },
    content: {
      type: String,
      required: true
    },
    creator: {
      type: Schema.ObjectId,
      ref: 'User',
      required: true
    }
  },
  { timestamps: true }
);

module.exports = mongoose.model('Post', postSchema);
-
-
controllers/feed.js
-
createPost: is-auth.js에서 설정한req.userId = decodedToken.userId에서 userId를 가져와서 user정보를 설정합니다.exports.createPost = (req, res, next) => { ... const post = new Post({ title: title, content: content, imageUrl: imageUrl, creator: req.userId }); ... }
-
User Schema에는 사용자가 생성한 post들이 배열로 들어있습니다. 따라서 post를 생성하고 posts 배열안에 push 해야합니다.
// User 스키마에 저장하기 위해 User Schmea 가져오기
const User = require('../models/user');

exports.createPost = (req, res, next) => {
  const errors = validationResult(req);
  if (!errors.isEmpty()) {
		...
  }

  if (!req.file) {
    	...
  }

  const imageUrl = req.file.path.replace('\\', '/');
  const title = req.body.title;
  const content = req.body.content;
  let creator;
  const post = new Post({
    title: title,
    content: content,
    imageUrl: imageUrl,
    creator: req.userId
  });
  post
    .save()
    .then(result => {
      return User.findById(req.userId);
    })
    .then(user => {
      creator = user;
      user.posts.push(post);
      return user.save();
    })
    .then(result => {
      res.status(201).json({
        message: 'Post created successfully!',
        post: result,
        creator: { _id: creator._id, name: creator.name }
      });
    })
    .catch(err => {
      if (!err.statusCode) {
        err.statusCode = 500;
      }
      next(err);
    });
};
-
-
controllers/feed.js
-
updatePostexports.updatePost = (req, res, next) => { const postId = req.params.postId; const errors = validationResult(req); if (!errors.isEmpty()) { ... } const title = req.body.title; const content = req.body.content; let imageUrl = req.body.image; if (req.file) { imageUrl = req.file.path.replace('\\', '/'); } //imageUrl = req.file.path.replace('\\', '/'); if (!imageUrl) { ... } Post.findById(postId) .then(post => { if (!post) { ... } // post DB와 토큰에서 가져온 userId 값 비교 if (post.creator.toString() !== req.userId) { const error = new Error('Not Authorized!'); err.statusCode = 403; throw error; } ... };
-
deletePostexports.deletePost = (req, res, next) => { const postId = req.params.postId; Post.findById(postId) .then(post => { if (!post) { const error = new Error('Could not find post.'); error.statusCode = 404; throw err; } // post DB와 토큰에서 가져온 userId 값 비교 if (post.creator.toString() !== req.userId) { const error = new Error('Not Authorized!'); err.statusCode = 403; throw error; } // Check logged in user clearImage(post.imageUrl); return Post.findByIdAndRemove(postId); }) ...
-
-
-
controllers/feed.js
-
deletePostexports.deletePost = (req, res, next) => { .. .then(result => { // User mongoDB 객체 찾고 return User.findById(req.userId); }) .then(user => { // user에 있는 포스트 삭제하고 저장 user.posts.pull(postId); return user.save(); }) .then(result => { res.status(200).json({ message: 'Delete Post.' }); }) .catch(err => { if (!err.statusCode) { err.statusCode = 500; } next(err); }); };
-
-
routes/auth.js
-
getUserStatus: 사용자 status 가져오는 라우터 만들기router.get('/status', isAuth, authController.getUserStatus);
-
-
controllers/auth.js
-
getUserStatuscontroller 만들기exports.getUserStatus = (req, res, next) => { User.findById(req.userId) .then(user => { if (!user) { const error = new Error('User not found.'); error.statusCode = 404; throw error; } res.status(200).json({ status: user.status }); }) .catch(err => { if (!err.statusCode) { err.statusCode = 500; } next(err); }); };
-
-
React Front Page : .../Feed.js
-
componentDidMount()componentDidMount() { fetch('http://localhost:8080/auth/status', { headers: { Authorization: 'Bearer ' + this.props.token } }) .then(res => { if (res.status !== 200) { throw new Error('Failed to fetch user status.'); } return res.json(); }) .then(resData => { this.setState({ status: resData.status }); }) .catch(this.catchError); this.loadPosts(); }
-
-
routes/auth.js
-
updateUserStatus: 유저 status 업데이트하기 위해 라우터 작성router.patch('/status', isAuth, authController.updateStatus);
-
router에 status 검증 로직 추가
router.patch(
  '/status',
  isAuth,
  [
    body('status')
      .trim()
      .not()
      .isEmpty()
  ],
  authController.updateStatus
);
-
-
controllers/auth.js
-
updateUserStatuscontroller 만들기exports.updateStatus = (req, res, next) => { const newStatus = req.body.status; User.findById(req.userId) .then(user => { if(!user) { const error = new Error('User not found'); error.statusCode = 404; throw error; } user.status = newStatus; return user.save(); }) .then(result => { res.status(201).json({ message: 'status is updated', status: status }); }) .catch(err => { if (!err.statusCode) { err.statusCode = 500; } next(err); }); };
-
-
React Front Page : .../Feed.js
-
statusUpdateHandlerstatusUpdateHandler = event => { console.log('123123', event); event.preventDefault(); fetch('http://localhost:8080/auth/status', { method: 'PATCH', headers: { Authorization: 'Bearer ' + this.props.token, 'Content-Type': 'application/json' }, body: JSON.stringify({ status: this.state.status }) }) .then(res => { if (res.status !== 200 && res.status !== 201) { throw new Error("Can't update status!"); } return res.json(); }) .then(resData => { console.log(resData); this.setState({ status: resData.status }); }) .catch(this.catchError); };
-