public class HelloWorld {
  public static void main(String[] args) {
    System.out.println("Hello World!");
  }
}- 컴퓨터가 이해할 수 있도록 하는 정해진 문법이 존재함
// 한 줄의 주석/*
여러 줄의 주석을 작성할 때 사용
*/public class HelloWorld {
} public static void main(String[] args) {
// Statements
}System.out.println("Hello World!");- 컴파일러가 공백을 무시하기 때문에 코드를 알아보기 쉽게 하기 위해서 tab, sapce, newline과 같은 whitespace를 사용할 수 있다.
- 정수형 데이터를 저장한다.
- -2147483648 ~ 2147483647
- 8진수 (0으로 시작) 와 16진수 (0x 로 시작) 를 나타낼 수 있다.
- 정수형 자료형
- -9223372036854775808 ~ 9223372036854775807
- long 변수에는 L접미사를 붙여준다.
int의 범위를 넘어가는 숫자 또는 소수와 같은 실수형 데이터를 저장한다.
long과 마찬가지로 F 접미사를 붙여준다.
true와false를 나타낸다.
-
single quotes, 즉 ' ' 를 사용하여 저장한다.
-
2 Byte 를 저장하며, 유니코드 정수 형태로 저장된다.
-
char a1 = 'a';
char a2 = 97;
char a3 = '\u0061';

System.out.println(a1); // 문자
System.out.println(a2); // 아스키코드
System.out.println(a3); // 유니코드
- " " 를 사용하여 단어나 문장을 저장할 수 있다.
-
문자열을 추가하거나 변경할 때 주로 사용하는 자료형
-
객체 생성에는 일반 String 보다 느리고 무거우나, 변경 작업이 많을 경우에는 StringBuffer 을 사용한다.
append: 문자열 추가insert: 원하는 위치에 문자열 삽입substring: String 자료형의 substring 메소드와 동일
public class test{
    public static void main(String[] args) {
        StringBuffer sb = new StringBuffer();
        sb.append("hello");
        sb.append(" ");
        sb.append("World");
        System.out.println(sb.toString());
        // hello World

        sb.insert(0, "hh ");
        System.out.println(sb.toString());
        // hh hello World

        System.out.println(sb.substring(0, 4));
        // hh h
    }
}
-
덧셈 :
+ -
뺄셈 :
- -
나머지 :
% -
초과 :
>, 미만 :< -
동일 :
== -
같지 않다 :
!=(not :!) -
이상 :
>=, 이하 :<= -
String 에서는 같다는 의미로
equlas()를 사용한다. -
+연산자는 String 에서도 사용이 가능하다.
public class Dog {
  // instance field
  String breed;
  // constructor method
  public Dog(String dogBreed) {
    /*
    value of parameter dogBreed
    assigned to instance field breed
    */
    breed = dogBreed;
  }
  public static void main(String[] args) {
    /*
    create instance:
    use 'new' operator and invoke constructor
    */
    Dog ddangchilli = new Dog("poodle");
    /*
    fields are accessed using:
    the instance name, `.` operator, and the field name.
    */
    ddangchilli.breed;
    // "poodle"
  }
}-
클래스의 구성
- 필드 : 데이터가 저장되는 곳 (
dataType fieldName;) - 생성자 : 초기화 (
className();) - 메소드 : 실행 블록(
void mothodName(){})
- 필드 : 데이터가 저장되는 곳 (
-
인스턴스는 클래스로 만들어진 변수를 의미한다.
-
class instance = new class();로 class 인스턴스를 만들 수 있다.-
new : 메모리 공간 확보
생성자 : 메모리공간에 인스턴스를 만듦
-
non-static, 객체 없이 사용 불가능
-
-
static 형
- 대표적인 예 :
main메소드 - 객체를 생성하지 않고 사용 가능
- 대표적인 예 :
if (condition1) {
    // code1
} else if (condition2) {
    // code2
} else {
    // code3
}- 조건문이
true일 때, 해당하는 실행문이 실행된다.
switch (varaible) {
  case value1:
    // code1
    break;
  case value2:
    // code2
    break;
  default:
    // code3
   	break;
}variable이 해당case의value에 해당 될 때, 그 때의 실행문이 실행된다. 모든value가 맞지 않는다면default문이 수행된다.- 해당
case가 실행된 후switch문을 멈춰주기 위해 반드시break를 사용해야 한다.
- AND
if (true && false) {
  System.out.println("can't d1.print");
} else if (true && true) {
  System.out.println("hi");
}
true && true
// true
false && true
// false
true && false
// false
false && false
// false- OR
if (false || false) {
  System.out.println("can't d1.print");
} else if (false || true) {
  System.out.println("hi");
}
true || true
// true
false || true
// true
true || false
// true
false || false
// false- NOT
if (!false) {
  System.out.println("hi");
}!false
// true
!true
// falseclass className {
/*
public : 다른 class가 접근 가능
void : 특정한 output이 없음
*/
public void methodName(String s) {
String x = "name" // x 는 `main` 에서 사용할 수 없다
System.out.println("hi!");
}
public static void main(String[] args){
className cn = new className();
cn.methodName("mm"); // 이렇게 함수를 실행시킬 수 있다.
}
}return
class Name {

    String s;

    public Name(String ss) {
        s - ss;
    }

    /*
    public __ method() {} 에서 __ 부분에 Datatype 을 넣어줌으로써
    해당하는 Datatype variable 을 return 할 수 있다.
    */
    public int method() {
        int x = 1;
        return x;
    }

    public static void main(String[] args) {
        Name cn = new Name("abc");
        int xy = cn.method();
    }
}
toString()
class Name {

    String x;

    public Name(String ss){
        x = ss;
    }
    public static void main(String[] args){
        Name cn = new Name();
        System.out.println(cn);
    }

    public String toString(){
        return "This is a " + x + " s";
    }
}toString()이 없을 때, object 를 출력하면 object 의 메모리 주소가 출력된다.toString()을 사용한다면, object 의 출력 결과가 메소드의 return 값이 나온다.
int[] number = {1, 2, 3, 4, 5};

System.out.println(number);
// 메모리 주소가 출력된다.
import java.util.Arrays;
int[] number = {1, 2, 3, 4, 5};
System.out.println(number);
// [1, 2, 3, 4, 5]index
int[] number = {1, 2, 3, 4, 5};

System.out.println(number[1]);
// 2
// index는 0부터 시작한다- Empty Array
// 빈 리스트 생성
String[] menu = new String[5];

// 초기화
menu[0] = "ab";
menu[1] = "cd";
menu[2] = "ef";
menu[3] = "gh";
menu[4] = "ij";

// value 변경
menu[3] = "xy";
// menu = ["ab", "cd", "ef", "xy", "ij"]
length
int[] number = {1, 2, 3, 4, 5};

System.out.println(number.length);
// 5
sort()
import java.util.Collections;
Arrays.sort(str); // 오름차순
Arrays.sort(str, Collections.reverseOrder()); // 내림차순

// comparator 사용 (import java.util.Comparator;)
Arrays.sort(ns, Comparator.naturalOrder());
Arrays.sort(ns, Comparator.reverseOrder());

// int 의 경우에는 Integer 로 바꿔주어야 가능
// Collections.sort(arraylist) 로 ArrayList 정렬도 가능
String[] args
public class Hello {
    public static void main(String[] args){
        System.out.println("hi " + args[0]);
    }
}
// java Hello hh를 통해서 'Hello hh' 의 결과를 얻을 수 있다.import java.util.ArrayList;
ArrayList<String> name = new ArrayList<String>();
// int 타입의 ArrayList 는 아래와 같이 써야 컴파일이 가능하다.
ArrayList<Integer> ages;add
ArrayList<Integer> nums = new ArrayList<Integer>();

nums.add(1);
// nums = [1]
nums.add(2);
// nums = [1, 2]
nums.add(3);
// nums = [1, 2, 3]size: Array 에서의length
ArrayList<Integer> nums = new ArrayList<Integer>();

nums.add(1);
System.out.println(nums.size());
// 1
nums.add(2);
System.out.println(nums.size());
// 2 (length)get: index 로 접근 (Array 에서는nums[1]로 접근)
ArrayList<Integer> nums = new ArrayList<Integer>();

nums.add(1);
nums.add(2);
nums.add(3);

System.out.println(nums.get(2));
// 3 (index 는 0부터 시작)set: 값을 변경
ArrayList<Integer> nums = new ArrayList<Integer>();

nums.add(1);
nums.add(2);
nums.add(3);

nums.set(0, 5);

// nums = [5, 2, 3]
remove
ArrayList<Integer> nums = new ArrayList<Integer>();

nums.add(1);
nums.add(2);
nums.add(3);

nums.remove(3);
// nums = [1, 2]indexOf: 값의 인덱스에 접근
ArrayList<Integer> nums = new ArrayList<Integer>();

nums.add(1);
nums.add(2);
nums.add(3);

// nums =  [1, 2, 3]
System.out.println(nums.indexOf(2));
// 1
sort()
import java.util.Comparator;
ArrayList<Integer> n = new ArrayList<>();
n.add(3);
n.add(2);
n.add(7);
n.add(6);
n.sort(Comparator.naturalOrder()); // n.sort(null) 과 같음
n.sort(Comparator.reverseOrder());while
// condition 이 true 일 때, code 가 실행된다.

while (condition) {
	// code
}
// 조건을 제대로 생성해주지 않으면 무한 루프에 빠질 수 있다.
int num = 0;
while (num < 5){
System.out.println("d1.print");
num++;
}- 참고
// 랜덤 util
import java.util.Random;
// 랜덤 숫자 생성
Random randomGenerator = new Random();
// 숫자 생성
int num = randomGenerator.nextInt(6) + 1;
for
// i 가 4가 될때까지 반복
for (int i = 0; i < 5; i++) {
    //code
}
// Array
for (int i = 0; i < nums.length; i++) {
// code
}
//ArrayList
for (int i = 0; i < nums.size(); i++) {
// code
}for - each
// String 문자 하나씩 돌아가면서(각각의 item)
for (String x : xs) {
    System.out.println(x);
}length
String str = "Hello World";

System.out.println(str.length());
// 11
concat()
String name = "kim hyeon ";

name = name.concat("hwa");

System.out.println(name);
// kim hyeon hwa

// concat() 은 두 string 을 합쳐주지만, string 을 바꿔주지는 않는다.
String name = "kim";

name.concat("hyeon hwa");

System.out.println(name);
// kim
equals()
String x = "nn";
String y = "mm";

System.out.println(x.equals("nn"));
// true
System.out.println(x.equals(y));
// false
indexOf()
String str = "Hello World";

System.out.println(str.indexOf("e"));
// 1
System.out.println(str.indexOf("llo"));
// 2 (시작지점이 l 이기 때문)
replaceAll
String str = "Hello World";
System.out.println(str.replaceAll("World", "Java"));
// Hello Java
charAt()
String str = "Hello";

System.out.println(str.charAt(3));
// l
substring()
String str = "Hello World";

System.out.println(str.substring(3));
// lo World

System.out.println(str.substring(3, 7));
// lo WtoUpperCase()/toLowerCase()
String str = "Hello";

String upper = str.toUpperCase();
// upper = "HELLO"
String lower = str.toLowerCase();
// lower = "hello"
trim()
// 공백 제거(양 옆)
String str = " abc def ";
str = str.trim();
System.out.println(str);
// abc def
toCharArray()
// 문자열의 각 문자를 분해
str = "char";
for (char c : str.toCharArray()) {
    System.out.println(c);
}
// c (\n) h (\n) a (\n) r- Java 에서는 다른 클래스의 fields 와 methods 를 상속받을 수 있다.
class Phone {

  // Phone class members

}

class Iphone extends Phone {

  // additional Triangle class members

}-
자바 클래스는 각각 파일을 가지고 있어야 하며, 하나의 자바 클래스만이
main()method 를 가질 수 있다. -
자식 클래스는 부모 클래스의 constructor 가 default 값으로 지정되지만,
super()또는@override를 통해서 값의 수정이 가능하다.
class Phone{
    String x;
    Phone(String y){
        x = y;
    }
}

class Iphone extends Phone {
    Iphone() {
        super("iphone11"); // 부모 클래스의 생성자를 불러 초기화
    }
}
class Iphone extends Phone {
Iphone() {
this.x = 3; // 현재 클래스의 변수를 지정할 때 사용
}
}/*
this : 현재 클래스의 인스턴스
this() : 현재 클래스에 정의된 생성자를 부를때 사용
super : 자식 클래스에서 상속받은 부모 클래스의 멤버변수를 참조
super() : 자식 클래스가 생성될 때 부모 클래스의 생성자를 불러 초기화
*/protected또는final을 통해서 부모 클래스로의 자식 클래스 접근을 조정할 수 있다.
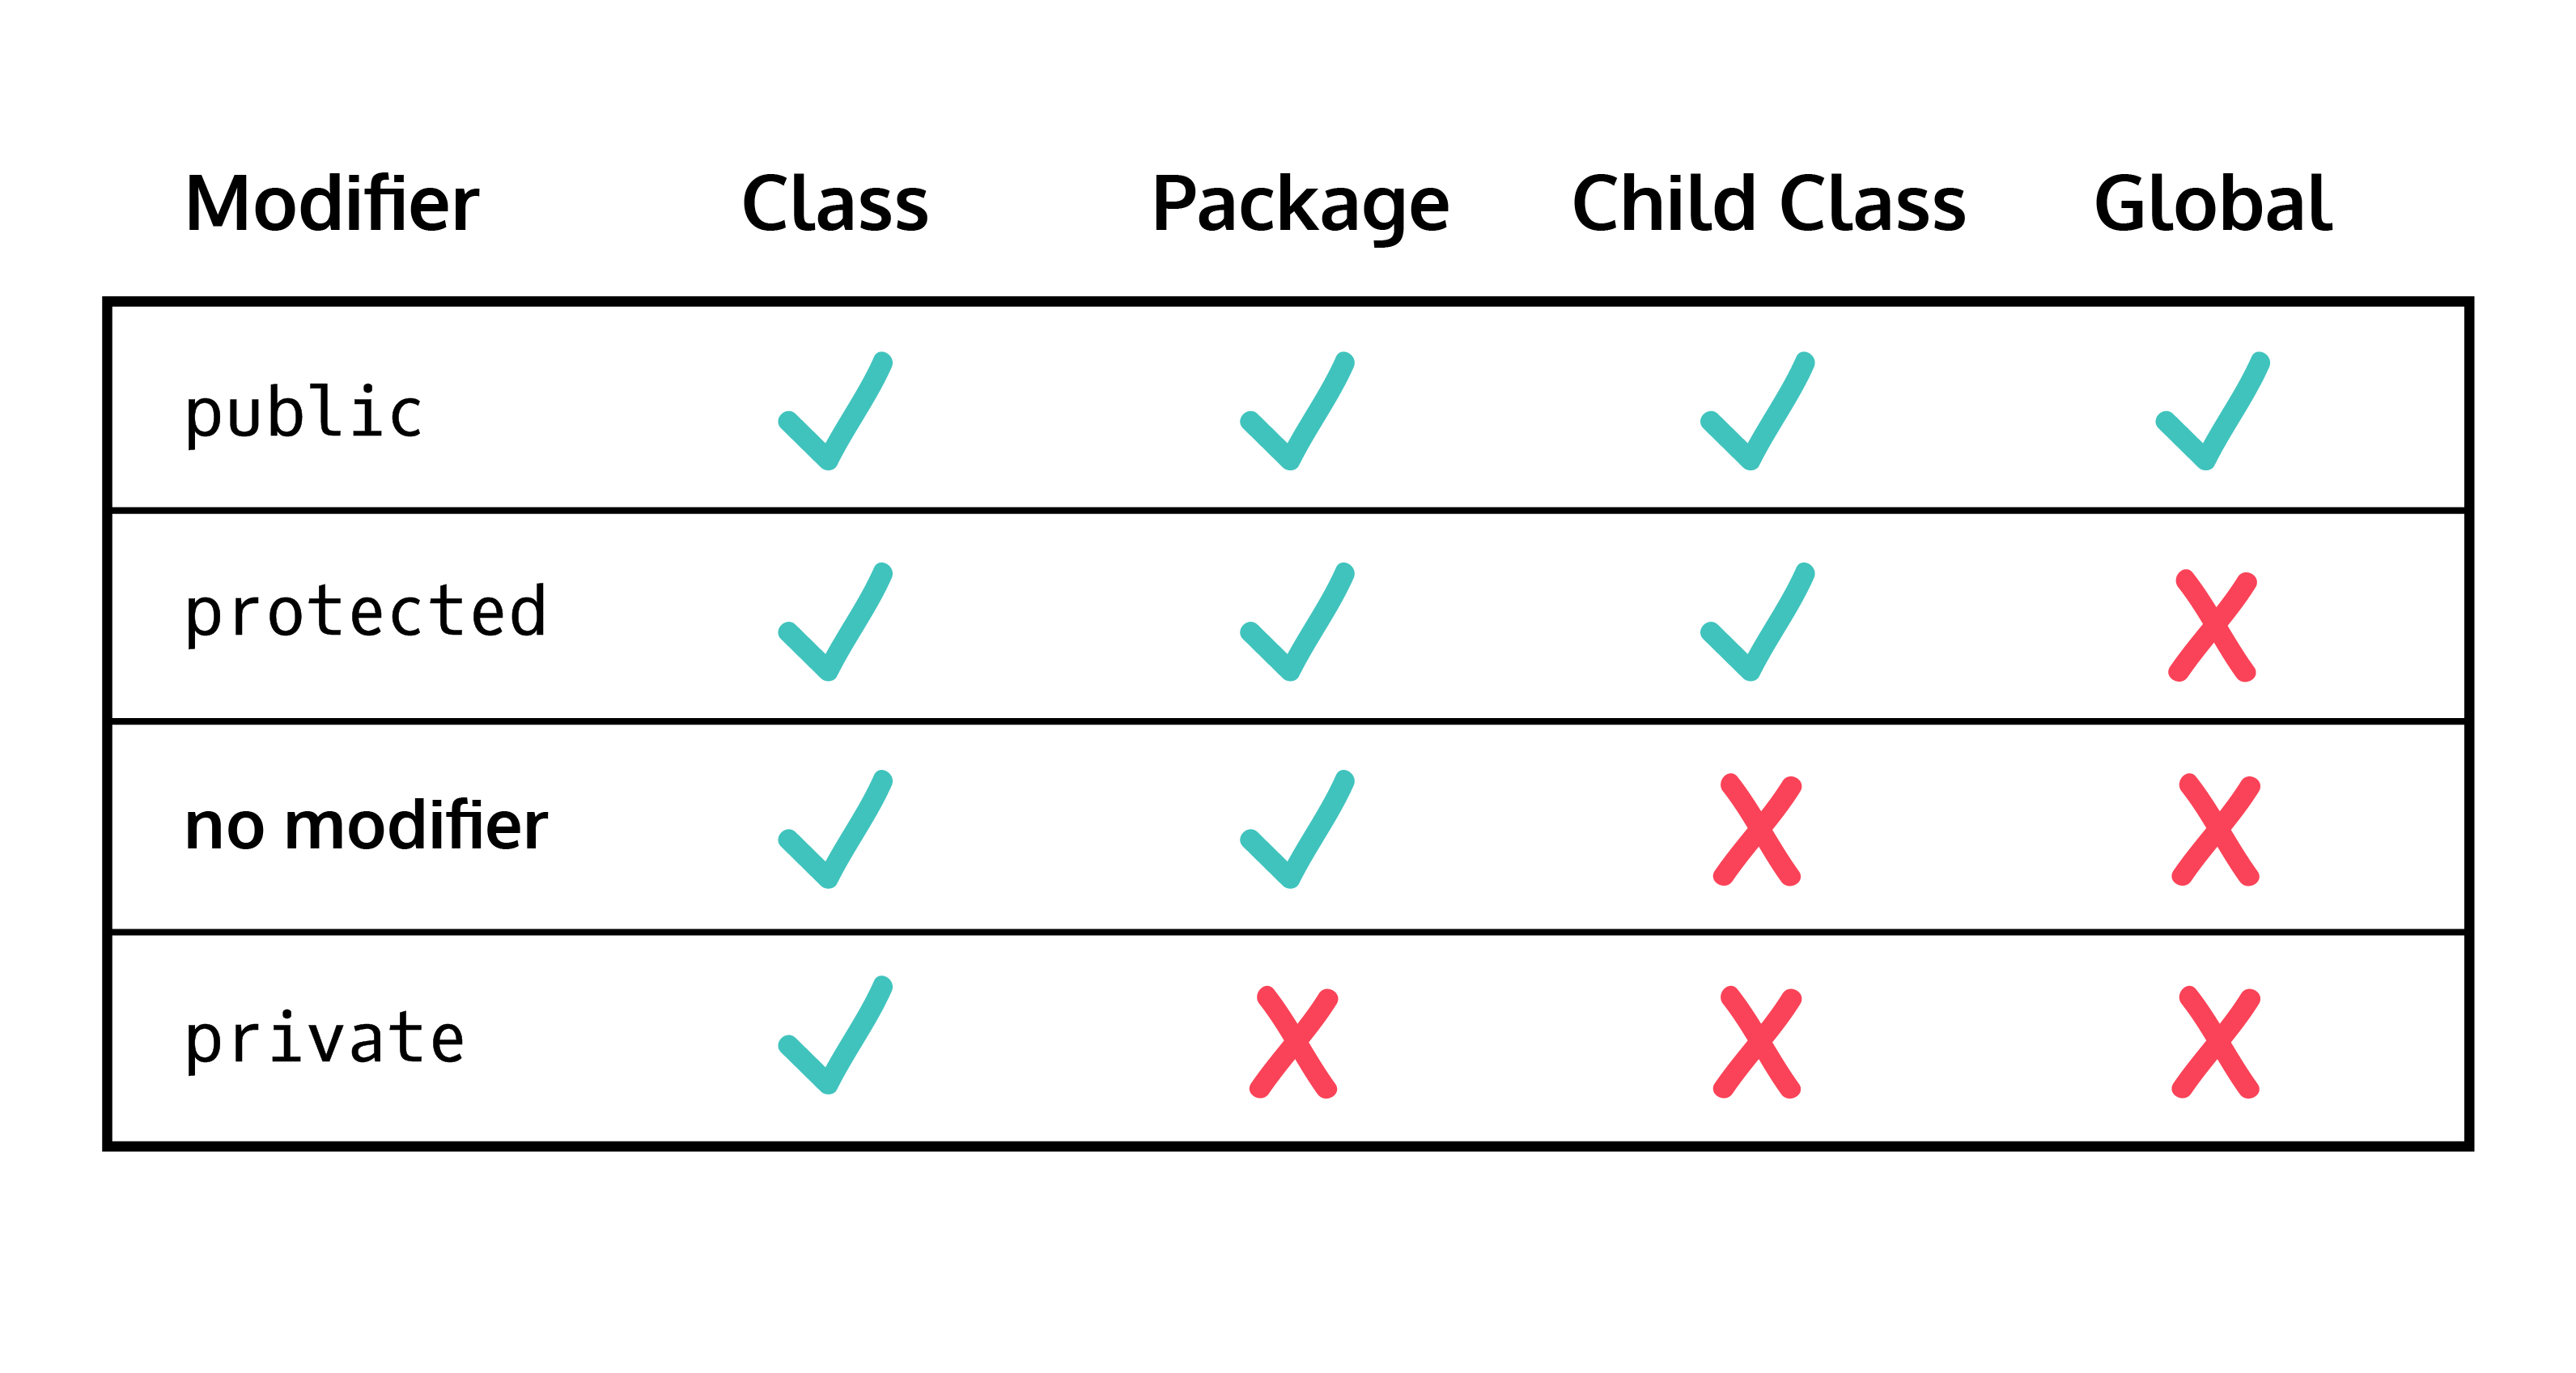
class Phone {
    protected int size; // 자식 클래스에서 변경 가능
}

final public boolean isokay(){
    return true; // 자식 클래스에서 변경 불가능
}-
Java의 다형성은 자식 클래스의 objects 를 부모 클래스처럼 사용할 수 있지만, 자식 클래스는 자식 클래스만의 특성을 가지고 있다는 것을 의미한다.
-
@override를 통해서 자식 클래스에서 부모 클래스의 methods 를 다르게 사용할 수 있다.
// 메소드 이름, return 타입, parameter 는 동일
class Scores {

  protected double score;

  public void printscore() {
    System.out.println(score);
  }

}

class Math extends Scores {

  @Override
  public void printscore() {
    System.out.println("Your math score is " + score);
  }
}

// x 가 Scores 의 인스턴스인 것처럼 사용 가능, 하지만 메소드를 사용할 경우, 자식클래스에서 오버라이딩한 메소가 사용된다.
Scores x = new Math(85.00);- array 또는 arraylist 에서 다른 클래스의 objects 가 같은 부모 클래스를 공유할 수 있다.
Location x, y, z;

x = new Column();
y = new Row();
z = new Height();

Location[] locations = {x, y, z};- variable 또는 method 의 이름을 잘못 입력했을 경우
;을 적지 않았을 경우(),{},[]의 괄호를 닫지 않은 경우
-
0 으로 나눴을 경우
-
존재하지 않은 파일을 열었을 경우
-
Exception
ArithmeticException: 0 으로 나눈 것과 같이 계산이 잘못된 경우NullPointerException:null인 인스턴스나 메소드를 사용하려고 하는 경우ArrayIndexOutOfBoundsException: index 가 범위를 벗어난 경우FileNotFoundException: 파일이 존재하지 않는 경우
-
try - catchtry { // code } catch (ArithmeticException e) { // d1.print error message System.err.println("ArithmeticException: " + e.getMessage()); // code }
- 출력이 원하는 답이 아닐 경우
import java.util.Scanner;

public class d1.reverse {

	public static void main(String[] args) {
		// TODO Auto-generated method stub
		Scanner scan = new Scanner(System.in);
         int num = scan.nextInt();
         double nums = scan.nextDouble();
         String str = scan.nextLine();
	}

}-
System.out.println("Hello"): 자동 개행(ENTER) 기능 O -
System.out.d1.print("Hello"): 자동 개행 기능 X ,\n을 사용해 수동적으로 바꿔줘야함 -
서식을 이용해 출력, 자동 개행 기능 X
String s = "Hello";
System.out.printf("%s", s);
/*
자릿수 정하기 : "%5s" : 문자열의 길이가 5 아래라면 남은 공간 공백 표시
대체 문자 넣기 : "%07d" : 정수형 서식 출력 -> 길이가 7 아래라면 "0"으로 공백 채워줌
*/
// Scanner 로 받을 경우 Space Enter 를 모두 경계로 인식해 데이터 가공 편리
// BufferedReader : Enter 만 경계로 인식, 받은 데이터 String -> 가공 작업 필요 / 많은 양의 데이터 입력에 편리
import java.io.*

public class main {

	public static void main(String[] args) {
		//BufferedReader
		// 콘솔 입력
		BufferedReader br = new BufferedReader(new InputStreamReader(System.in));
		// 파일 입력
		FileReader fr = new FileReader("test.txt")
		BufferedReader bfr = new BufferedReader(fr);

		// readLine : return 이 String 이므로 형변환 필요
		int num = Integer.parseInt(br.readLine());
		br.close()

		//BufferedWriter
		BufferedWriter bw = new BufferedWriter(new OutputStreamWriter(System.out));
		//파일
		BufferedWriter bwf = new BufferedWriter(new FileWriter("test.txt"));

		bw.write("Hello\n") // 출력
		// 개행(Enter)
		bw.newLine()
		// 남은 데이터 모두 출력
		bw.flush()
		// close
		bw.close()
	}
}- BufferedReader
| Modifier and Type | Method and Description |
|---|---|
| void | Close() : Closes the stream and releases any system resources associated with it. |
| void | mark(int, readAheadLimit) : Marks the present position in the system. |
| boolean | markSupported() : Tells whether this stream supports the mark() operation, which it does. |
| int | read() : Reads a single character. (정수형 반환) |
| int | read(char[] cbuf, int offset, int length) : Reads characters into a portion of an array. |
| String | readLine() : Reads a line of text. |
| boolean | ready() : Tells whether this stream is ready to be read. |
| void | reset() : Resets the stream to the most recent mark. |
| long | skip(long n) : Skips characters. |
- BufferedWriter
| Modifier and Type | Method and Description |
|---|---|
| void | close() : Closes the stream, flushing it first. |
| void | flush() : Flushes the stream. |
| void | newLine() : Writes a line separator. |
| void | write(char[] cbuf, int offset, int length) |
| void | write(int c) : Writes a single character |
| void | write(String s, int offset, int length) : Writes a portion of a String |
// 입출력 예외처리
import java.io.IOException

public class Solution{
	public static void main(String[] args) throws IOException {

	}
}- 문자 변환 보조 스트림
InputStreamReaerOutpurStreamReader
- String 을 token 단위로 끊어주는 클래스
- 생성자
StringTokenizer(String str): 디폴트 구획문자(\t, \n, \r, \f) 를 받아 나눠준다StringTokenizer(String str, String delim): delimiter(구획문자) 를 받는다. 길이가 2이상인 구획문자를 받으면 여러 개의 구획문자를 받는 것으로 한다. 단, 같은 구획문자가 여러 개 있을 경우 하나로 취급한다.StringTokenizer(String str, String delim, boolean returnDelims): returnDelims 가 true 일 경우 구획문자도 토큰으로 받는다. 이 때는 같은 구획문자가 여러 개 있을 경우, 모든 구획문자를 받는다.
- 매소드
countTokens(): 토큰이 몇 개인지 리턴nextToken(): 이전 토큰을 제거하고 다음 토큰을 리턴nextToken(String delim): 생성자에서 정의한 구획문자를 delim으로 바꾼 후 다음 토큰을 리턴hasMoreTokens(): 토큰이 남아 있으면 true, 없으면 false
// 긴 문자열을 더할 경우 사용
StringBuilder sb = new StringBuilder();
sb.append("abc");
System.out.println(sb.toString());-
int to String
String str = Integer.toString(i);
-
String to int
int num = Integer.parseInt(str);
int num = Integer.valueOf(str).intValue();
-
double to String
String str = Double.toString(d);
-
long to String
String str = Long.toString(l);
-
float to String
String str = Float.toString(f);
-
String to double
double d = Double.valueOff(str).doubleValue();
-
String to long
long l = Long.valueOf(str).longValue();
long l = Long.parseLong(str);
-
String to Float
float f = Float.valueOf(str).floatValue();
-
decimal to binary
String binstr = Integer.toBinaryString(i);
-
decimal to hexadecimal
String hexstr = Integer.toString(i, 16);
String hexstr = Integer.toHexString(i);
(Integer.toHexString( 0x10000 | i).substring(1).toUpperCase());
-
hexadecimal(String) to int
int i = Integer.valueOf("B8DA3", 16).intValue();
int i = Integer.parseInt("B8DA3", 16);
-
ASCII Code to String
String asc = new Character((char) i).toString();
-
Integer to ASCII Code
int i = (int) c; // char c;
-
Integer to boolean
boolean b = (i != 0);
-
boolean to Integer
int i = (b)? 1 : 0;
-
parseInt(): int 값을 반환
-
valueOf(): Integer 값을 반환
-
Primitive type vs Reference type
-
Primitive type : 메모리에 직접 데이터를 담음 / 기본자료형
: int, long, short, byte, float, double, char, boolean
-
Reference type : 참조 주소값을 담음
: 클래스, 인터페이스, 배열, 열거
-
-
래퍼 클래스(Wrapper)
- 기본 자료형을 매개변수로 가짐(기본형을 객체로)
- Integer, Long, Short, Byte, Float, Double, Character, Boolean
-
AutoBoxing
: 기본형을 참조형으로
-
Unboxing
: 참조형을 기본형으로
-
Loop
-
Collections.max(),Colletions.min()-
리스트가 비어있을 경우
NoSuchElementException에러가 발생 -> 기본값 처리 필요 -
리스트 타입의 인자만 받는다.
int i = num.isEmpty() ? -1 : Collections.min(num);
-
-
Stream().max(),Stream().min()-
Optional객체 리턴 :orElse(-1)을 통해서 쉽게 기본값 처리 가능int i = num.stream().max(Integer::compare).orElse(-1);
-
- 생성
java.util.Optional<T>

/*
Optional : 'null' 이 될 수도 있는 객체 ex) Collection, Stream
null을 직접 다룰 필요 X -> 불필요한 로직 생략
*/
// null (비어있는 Optional 객체)
Optional<class> maybeclass = Optional.empty();
// 객체를 담고 있는 Optional : null 이 넘어오면 NPE(NullPointerException) 가 나옴
Optional<class> maybeclass = Optional.of(value);
// null인지 아닌지 확신 x
Optional<class> maybeclass = Optional.ofNullable(value);
Optional<class> maybeclass = Optional.ofNullable(null); // == Optional.empty()- 객체 접근
- 해당 객체가 있을 경우 해당 값 반환!
get(): 비어있을 경우,NoSuchElementExceptionorElse(T other): 비어있을 경우, 넘어온 인자 반환orElseGet(Supplier<? extends T> other): 비어있을 경우, 넘어온 함수형 인자를 통해 생성된 객체 반환 -> 비어있는 경우에만 함수 호출orElseThrow(Supplier<? extends X> exceptionSupplier): 비어있을 경우, 넘어온 함수형 인자를 통해 생성된 예외
::- 메소드 참조 연산자
- 람다 식과 동일한 처리 방법