This script is used to switch off or switch on some data sources in FastStats Designer to allow a build with only a few tables (like customer data) and then later do a bigger build with customer and transactional data.
This example just changes the behaviour of the extract options and saves it in the same xml
SyncExtractOptions -DesignFile "C:\Apteco\Build\20220714\designs\20220714.xml" -Include "Bookings", "People"Do the same, but also execute DesignerConsole to load the data
SyncExtractOptions -DesignFile "C:\Apteco\Build\20220714\designs\20220714.xml" -Include "Bookings", "People" -StartDesignerTo execute from a scheduled task, do it like
Program/Script
powershell.exe
Add arguments
-Command "& 'SyncExtractOptions' -DesignFile 'C:\Apteco\Build\20220714\designs\20220714.xml' -Include 'Bookings', 'People'"
powershell.exe -Command "& 'SyncExtractOptions' -DesignFile 'C:\Apteco\Build\20221107\designs\20221107.xml' -Exclude 'Bookings', 'People' -StartDesigner"

powershell.exe -Command "& 'SyncExtractOptions' -DesignFile 'C:\Apteco\Build\20221107\designs\20221107.xml' -Exclude 'People' -Include 'Bookings' -StartDesigner -Verbose"
It also works with incremental extracts with discards. When you put the table into the exclude list, the table won't be extracted and no records will be discarded. It will just output something like
07.11.2022 10:42:57 INFO Bookings will not be extracted. 44.998 record(s) were previously extracted.
You do not need to put all tables in the include or exclude list. Only those tables will be changed to extract or not to extract.
Use the -Verbose flag if you want to get more details
Don't forget that if you turn off some tables with -Exclude than they are turned off until you actively turn them on again.
You can just download the whole repository here and pick this script or your can use PSGallery through PowerShell commands directly.
For installation execute this for all users scope
Find-Script -Repository "PSGallery" -Name "SyncExtractOptions" -IncludeDependencies | Install-Script -VerboseYou can then find the script via Set-Location "$( $env:USERPROFILE )\Documents\WindowsPowerShell\Scripts"
or this for the current users scope (this includes all dependencies as addition to Install-Script SyncExtractOptions)
Find-Script -Repository "PSGallery" -Name "SyncExtractOptions" -IncludeDependencies | Install-Script -Scope CurrentUser -VerboseThe last option installs the script in a folder like Set-Location "$( $env:USERPROFILE )\Documents\WindowsPowerShell\Scripts" but you can also have a look via
Get-InstalledScript SyncExtractOptionsor
Get-Command SyncExtractOptionsIf you want to find more Apteco scripts in PSGallery, please search with
Find-Script -Repository "PSGallery" -Tag "Apteco"
Find-Module -Repository "PSGallery" -Tag "Apteco"If your machine does not have an online connection you can use another machine to save the script from PSGallery website as a local file via your browser. You should have download a file with an .nupkg extension. Please don't forget to download all dependencies, too. You could simply unzip the file(s) and put the script somewhere you need it OR do it in an updatable manner and create a local repository if you don't have it already with
Set-Location "$( $env:USERPROFILE )\Downloads"
New-Item -Name "PSRepo" -ItemType Directory
Register-PSRepository -Name "LocalRepo" -SourceLocation "$( $env:USERPROFILE )\Downloads\PSRepo"
Get-PSRepository
Then put your downloaded .nupkg file into the new created PSRepo folder and you should see the script via
Find-Script -Repository LocalRepoThen install the script like
Find-Script -Repository LocalRepo -Name SyncExtractOptions -IncludeDependencies | Install-Script -Scope CurrentUser -VerboseThat way you can exchange the .nupkg files and update them manually from time to time.
WARNING: Unable to download from URI...
If you are confronted with this message (because of missing internet connection)
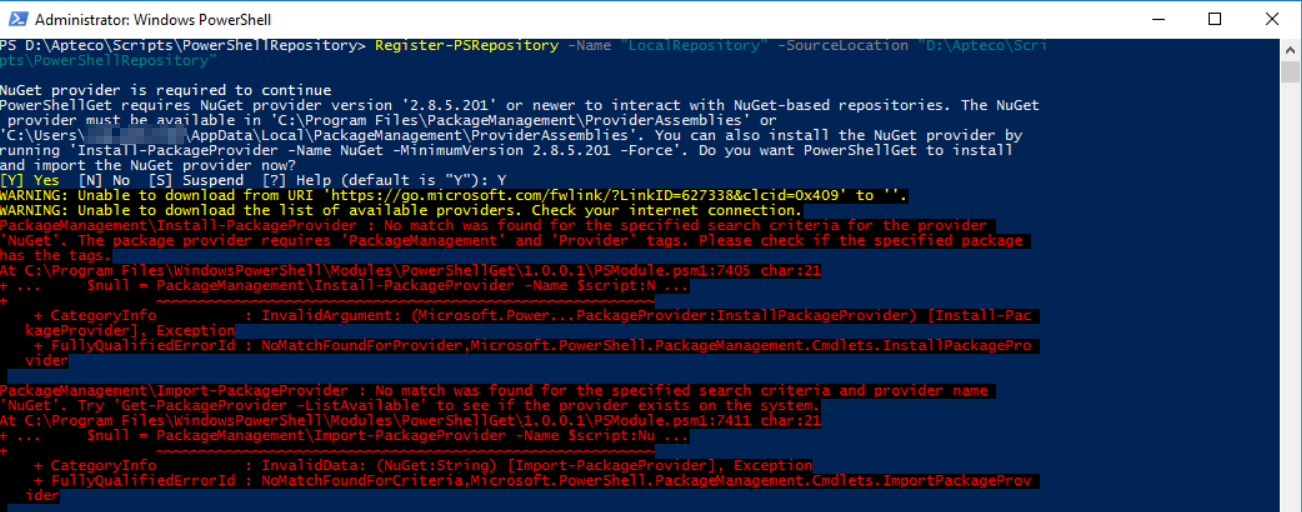
Make sure to install the nuget provider in order to create a local repository for nuget packages.
So have a look at the url that is embedded in that message, in our case https://go.microsoft.com/fwlink/?LinkID=627338&clcid=0x409 and copy that to a browser with internet access. This should forward you automatically to another url https://onegetcdn.azureedge.net/providers/providers.masterList.feed.swidtag where you can copy

the url https://onegetcdn.azureedge.net/providers/nuget-2.8.5.208.package.swidtag from it and then you are redirected this file

where you get the final link https://onegetcdn.azureedge.net/providers/Microsoft.PackageManagement.NuGetProvider-2.8.5.208.dll for the dll file to download.
Make sure you unblock the dll file

and then load it to your machine without internet connection and put it into one of your folders mentioned in the first screenshot like C:\Program Files\PackageManagement\ProviderAssemblies or %LOCALAPPDATA%\PackageManagement\ProviderAssemblies
Then proceed with the other steps...
Good reference here: https://copdips.com/2018/05/setting-up-powershell-gallery-and-nuget-gallery-for-powershell.html
Execute this command first to use the local IE proxy settings
(New-Object -TypeName System.Net.WebClient).Proxy.Credentials = [System.Net.CredentialCache]::DefaultNetworkCredentialsand maybe add these command to your profile to execute it with every new PowerShell process. You can find your profiles here:
$PROFILE | gm | ? membertype -eq notepropertyIf you don't want to use the script anymore, just remove it with
Uninstall-Script -Name WriteLogfileDownload the whole repository and pick the SyncExtractOptions.ps1 file and put it wherever you want in your project.
To execute the script just do it like in the examples
.\SyncExtractOptions.ps1 -DesignFile "C:\Apteco\Build\20220714\designs\20220714.xml" -Include "Bookings", "People"or wherever you organise your scripts. If you put it in a folder that is automatically loaded through the PATH Environment variable you can find the script in a list via
Get-Command -CommandType ExternalScriptSee Usage for more information about loading this script.
See https://www.powershellgallery.com/packages/SyncExtractOptions for more examples.
The script can be used as a separate scheduled task (or used manually on demand). Or can be used in combination with a FastStats Build.