This quickstart describes a C2D flow.
Here are the steps:
- Setup
- Alice publishes data asset
- Alice publishes algorithm
- Alice allows the algorithm for C2D for that data asset
- Bob acquires datatokens for data and algorithm
- Bob starts a compute job
- Bob monitors logs / algorithm output
- Tips and tricks
Let's go through each step.
To get started with this guide, please refer to data-nfts-and-datatokens-flow and complete the following steps :
- Setup : Prerequisites
- Setup : Download barge and run services
- Setup : Install the library from v4 sources
This example uses c2d to create a regression model. In order to visualise it or manipulate it, you also need some dependencies.
In your project folder, in this case my_project from Setup : Install the library in First Steps, run the following command:
pip install numpy matplotlibSet the required enviroment variables as described in data-nfts-and-datatokens-flow:
- Setup : Set envvars
In your project folder (i.e. my_project from Install the library step) and in the work console where you set envvars, run the following:
Please refer to data-nfts-and-datatokens-flow and complete the following steps :
- 2.1 Create a data NFT
In the same python console:
# Publish the datatoken
DATA_datatoken = data_nft.create_datatoken("DATA 1", "D1", from_wallet=alice_wallet)
print(f"DATA_datatoken address = '{DATA_datatoken.address}'")

# Specify metadata and services, using the Branin test dataset
DATA_date_created = "2021-12-28T10:55:11Z"
DATA_metadata = {
    "created": DATA_date_created,
    "updated": DATA_date_created,
    "description": "Branin dataset",
    "name": "Branin dataset",
    "type": "dataset",
    "author": "Trent",
    "license": "CC0: PublicDomain",
}

# ocean.py offers multiple file types, but a simple url file should be enough for this example
from ocean_lib.structures.file_objects import UrlFile
DATA_url_file = UrlFile(
    url="https://raw.githubusercontent.com/oceanprotocol/c2d-examples/main/branin_and_gpr/branin.arff"
)

# Encrypt file(s) using provider
DATA_encrypted_files = ocean.assets.encrypt_files([DATA_url_file])

# Set the compute values for compute service
DATA_compute_values = {
    "allowRawAlgorithm": False,
    "allowNetworkAccess": True,
    "publisherTrustedAlgorithms": [],
    "publisherTrustedAlgorithmPublishers": [],
}

# Create the Service
from ocean_lib.services.service import Service
DATA_compute_service = Service(
    service_id="2",
    service_type="compute",
    service_endpoint=ocean.config.provider_url,
    datatoken=DATA_datatoken.address,
    files=DATA_encrypted_files,
    timeout=3600,
    compute_values=DATA_compute_values,
)

# Publish asset with compute service on-chain.
DATA_asset = ocean.assets.create(
    metadata=DATA_metadata,
    publisher_wallet=alice_wallet,
    encrypted_files=DATA_encrypted_files,
    services=[DATA_compute_service],
    data_nft_address=data_nft.address,
    deployed_datatokens=[DATA_datatoken],
)

print(f"DATA_asset did = '{DATA_asset.did}'")In the same Python console:
# Publish the algorithm NFT token
ALGO_nft_token = ocean.create_data_nft("NFTToken1", "NFT1", alice_wallet)
print(f"ALGO_nft_token address = '{ALGO_nft_token.address}'")

# Publish the datatoken
ALGO_datatoken = ALGO_nft_token.create_datatoken("ALGO 1", "A1", from_wallet=alice_wallet)
print(f"ALGO_datatoken address = '{ALGO_datatoken.address}'")

# Specify metadata and services, using the Branin test dataset
ALGO_date_created = "2021-12-28T10:55:11Z"

ALGO_metadata = {
    "created": ALGO_date_created,
    "updated": ALGO_date_created,
    "description": "gpr",
    "name": "gpr",
    "type": "algorithm",
    "author": "Trent",
    "license": "CC0: PublicDomain",
    "algorithm": {
        "language": "python",
        "format": "docker-image",
        "version": "0.1",
        "container": {
            "entrypoint": "python $ALGO",
            "image": "oceanprotocol/algo_dockers",
            "tag": "python-branin",
            "checksum": "44e10daa6637893f4276bb8d7301eb35306ece50f61ca34dcab550",
        },
    }
}

# ocean.py offers multiple file types, but a simple url file should be enough for this example
from ocean_lib.structures.file_objects import UrlFile
ALGO_url_file = UrlFile(
    url="https://raw.githubusercontent.com/oceanprotocol/c2d-examples/main/branin_and_gpr/gpr.py"
)

# Encrypt file(s) using provider
ALGO_encrypted_files = ocean.assets.encrypt_files([ALGO_url_file])

# Publish asset with compute service on-chain.
# The download (access service) is automatically created, but you can explore other options as well
ALGO_asset = ocean.assets.create(
    metadata=ALGO_metadata,
    publisher_wallet=alice_wallet,
    encrypted_files=ALGO_encrypted_files,
    data_nft_address=ALGO_nft_token.address,
    deployed_datatokens=[ALGO_datatoken],
)

print(f"ALGO_asset did = '{ALGO_asset.did}'")In the same Python console:
compute_service = DATA_asset.services[0]
compute_service.add_publisher_trusted_algorithm(ALGO_asset)
DATA_asset = ocean.assets.update(DATA_asset, alice_wallet)In the same Python console:
bob_wallet = Wallet(
    ocean.web3,
    os.getenv("TEST_PRIVATE_KEY2"),
    config.block_confirmations,
    config.transaction_timeout,
)
print(f"bob_wallet.address = '{bob_wallet.address}'")

# Alice mints DATA datatokens and ALGO datatokens to Bob.
# Alternatively, Bob might have bought these in a market.
DATA_datatoken.mint(bob_wallet.address, ocean.to_wei(5), alice_wallet)
ALGO_datatoken.mint(bob_wallet.address, ocean.to_wei(5), alice_wallet)Only inputs needed: DATA_did, ALGO_did. Everything else can get computed as needed.
In the same Python console:
# Convenience variables
DATA_did = DATA_asset.did
ALGO_did = ALGO_asset.did

# Operate on updated and indexed assets
DATA_asset = ocean.assets.resolve(DATA_did)
ALGO_asset = ocean.assets.resolve(ALGO_did)

compute_service = DATA_asset.services[0]
algo_service = ALGO_asset.services[0]
environments = ocean.compute.get_c2d_environments(compute_service.service_endpoint)

from datetime import datetime, timedelta
from ocean_lib.models.compute_input import ComputeInput

DATA_compute_input = ComputeInput(DATA_asset, compute_service)
ALGO_compute_input = ComputeInput(ALGO_asset, algo_service)

# Pay for dataset and algo for 1 day
datasets, algorithm = ocean.assets.pay_for_compute_service(
    datasets=[DATA_compute_input],
    algorithm_data=ALGO_compute_input,
    consume_market_order_fee_address=bob_wallet.address,
    wallet=bob_wallet,
    compute_environment=environments[0]["id"],
    valid_until=int((datetime.utcnow() + timedelta(days=1)).timestamp()),
    consumer_address=environments[0]["consumerAddress"],
)
assert datasets, "pay for dataset unsuccessful"
assert algorithm, "pay for algorithm unsuccessful"

# Start compute job
job_id = ocean.compute.start(
    consumer_wallet=bob_wallet,
    dataset=datasets[0],
    compute_environment=environments[0]["id"],
    algorithm=algorithm,
)
print(f"Started compute job with id: {job_id}")In the same Python console, you can check the job status as many times as needed:
# Wait until job is done
import time
from decimal import Decimal
succeeded = False
for _ in range(0, 200):
    status = ocean.compute.status(DATA_asset, compute_service, job_id, bob_wallet)
    if status.get("dateFinished") and Decimal(status["dateFinished"]) > 0:
        succeeded = True
        break
    time.sleep(5)
This will output the status of the current job. Here is a list of possible results: Operator Service Status description.
Once the returned status dictionary contains the dateFinished key, Bob can retrieve the job results using ocean.compute.result or, more specifically, just the output if the job was successful.
For the purpose of this tutorial, let us choose the second option.
# Retrieve algorithm output and log files
output = ocean.compute.compute_job_result_logs(
DATA_asset, compute_service, job_id, bob_wallet
)[0]
import pickle
model = pickle.loads(output) # the gaussian model result
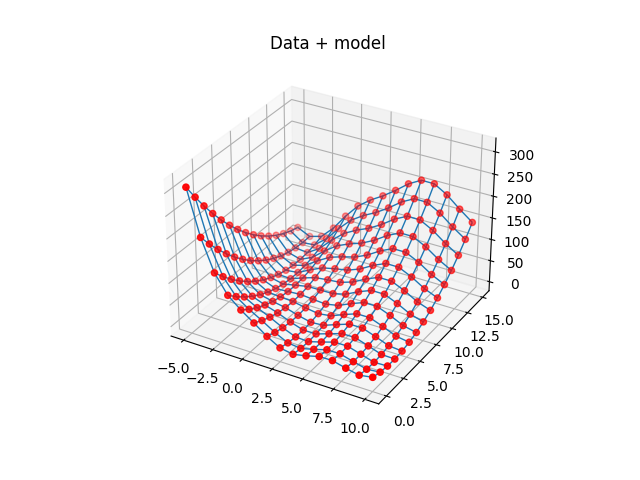
assert len(model) > 0, "unpickle result unsuccessful"You can use the result however you like. For the purpose of this example, let's plot it.
import numpy
from matplotlib import pyplot

X0_vec = numpy.linspace(-5., 10., 15)
X1_vec = numpy.linspace(0., 15., 15)
X0, X1 = numpy.meshgrid(X0_vec, X1_vec)
b, c, t = 0.12918450914398066, 1.5915494309189535, 0.039788735772973836
u = X1 - b * X0 ** 2 + c * X0 - 6
r = 10. * (1. - t) * numpy.cos(X0) + 10
Z = u ** 2 + r

fig, ax = pyplot.subplots(subplot_kw={"projection": "3d"})
ax.scatter(X0, X1, model, c="r", label="model")
pyplot.title("Data + model")
pyplot.show()  # or pyplot.savefig("test.png") to save the plot as a .png file instead
You should see something like this:
This c2d flow example features a simple algorithm from the field of ML. Ocean c2d is not limited to ML datasets and algorithms, but it is one of the most common use cases. For examples using different datasets and algorithms, please see c2d-flow-more-examples.md
In the "publish algorithm" step, to replace the sample algorithm with another one:
- Use one of the standard Ocean algo_dockers images or publish a custom docker image.
- Use the image name and tag in the
containerpart of the algorithm metadata. - The image must have basic support for installing dependencies. E.g. "pip" for the case of Python. You can use other languages, of course.
- More info: https://docs.oceanprotocol.com/tutorials/compute-to-data-algorithms/)
The function to pay_for_compute_service automates order starting, order reusing and performs all the necessary Provider and on-chain requests.
It modifies the contents of the given ComputeInput as follows:
- If the dataset/algorithm contains a
transfer_tx_idproperty, it will try to reuse that previous transfer id. If provider fees have expired but the order is still valid, then the order is reused on-chain. - If the dataset/algorithm does not contain a
transfer_tx_idor the order has expired (based on the Provider's response), then one new order will be created.
This means you can reuse the same ComputeInput and you don't need to regenerate it everytime it is sent to pay_for_compute_service. This step makes sure you are not paying unnecessary or duplicated fees.